Author
The Author tab of QPP enables a user with an Author license to work with different content types, and create and edit documents from within the platform. The Author tab also contains a smart content editor to edit documents. The smart editor comprises various operational and view-type functionalities.
Author Home
The Author home page or landing page provides the options to:
-
Create new assets
-
Access the assets already available on the repository
These options are placed across the page and appear in the following order:
-
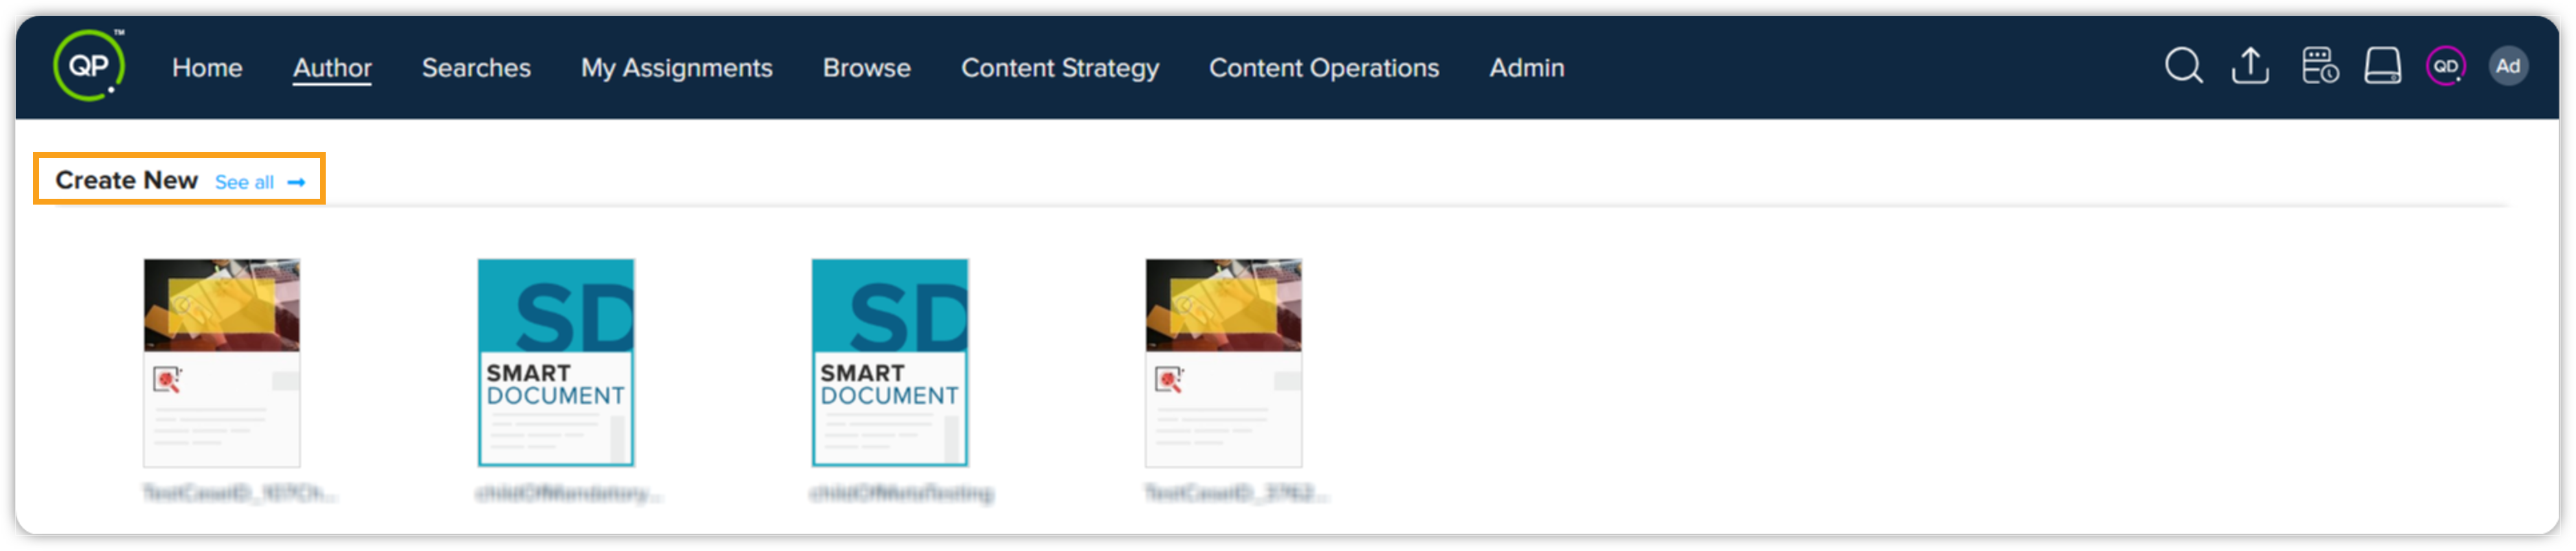
Create New: Allows you to create a new asset by clicking one of the most frequently used content types. You can see all the content types on the Create New page by clicking See All.
-
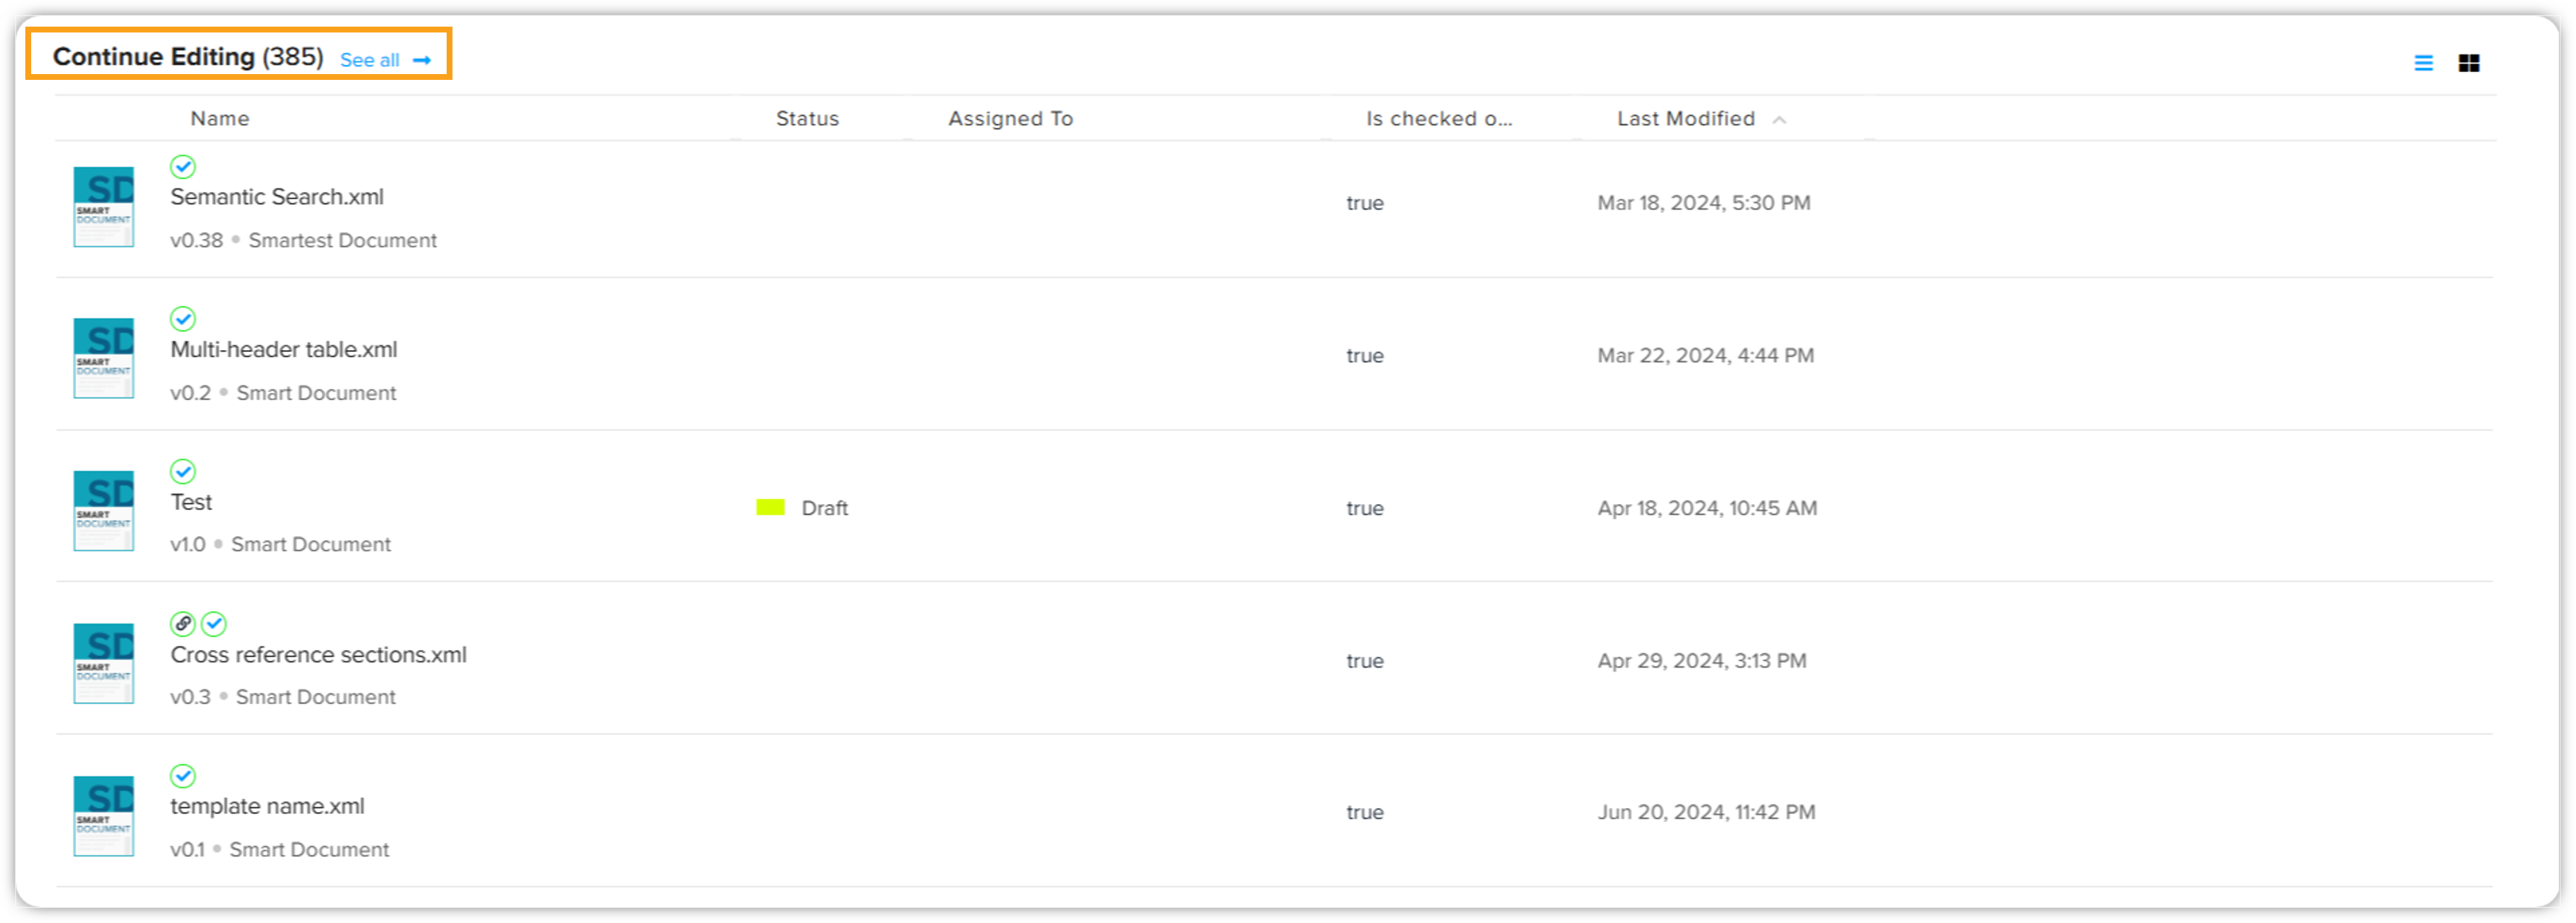
Continue Editing: Lists the assets that you have checked out with the option to see all the assets that you have checked out on the Continue Editing page through the link See All.
-
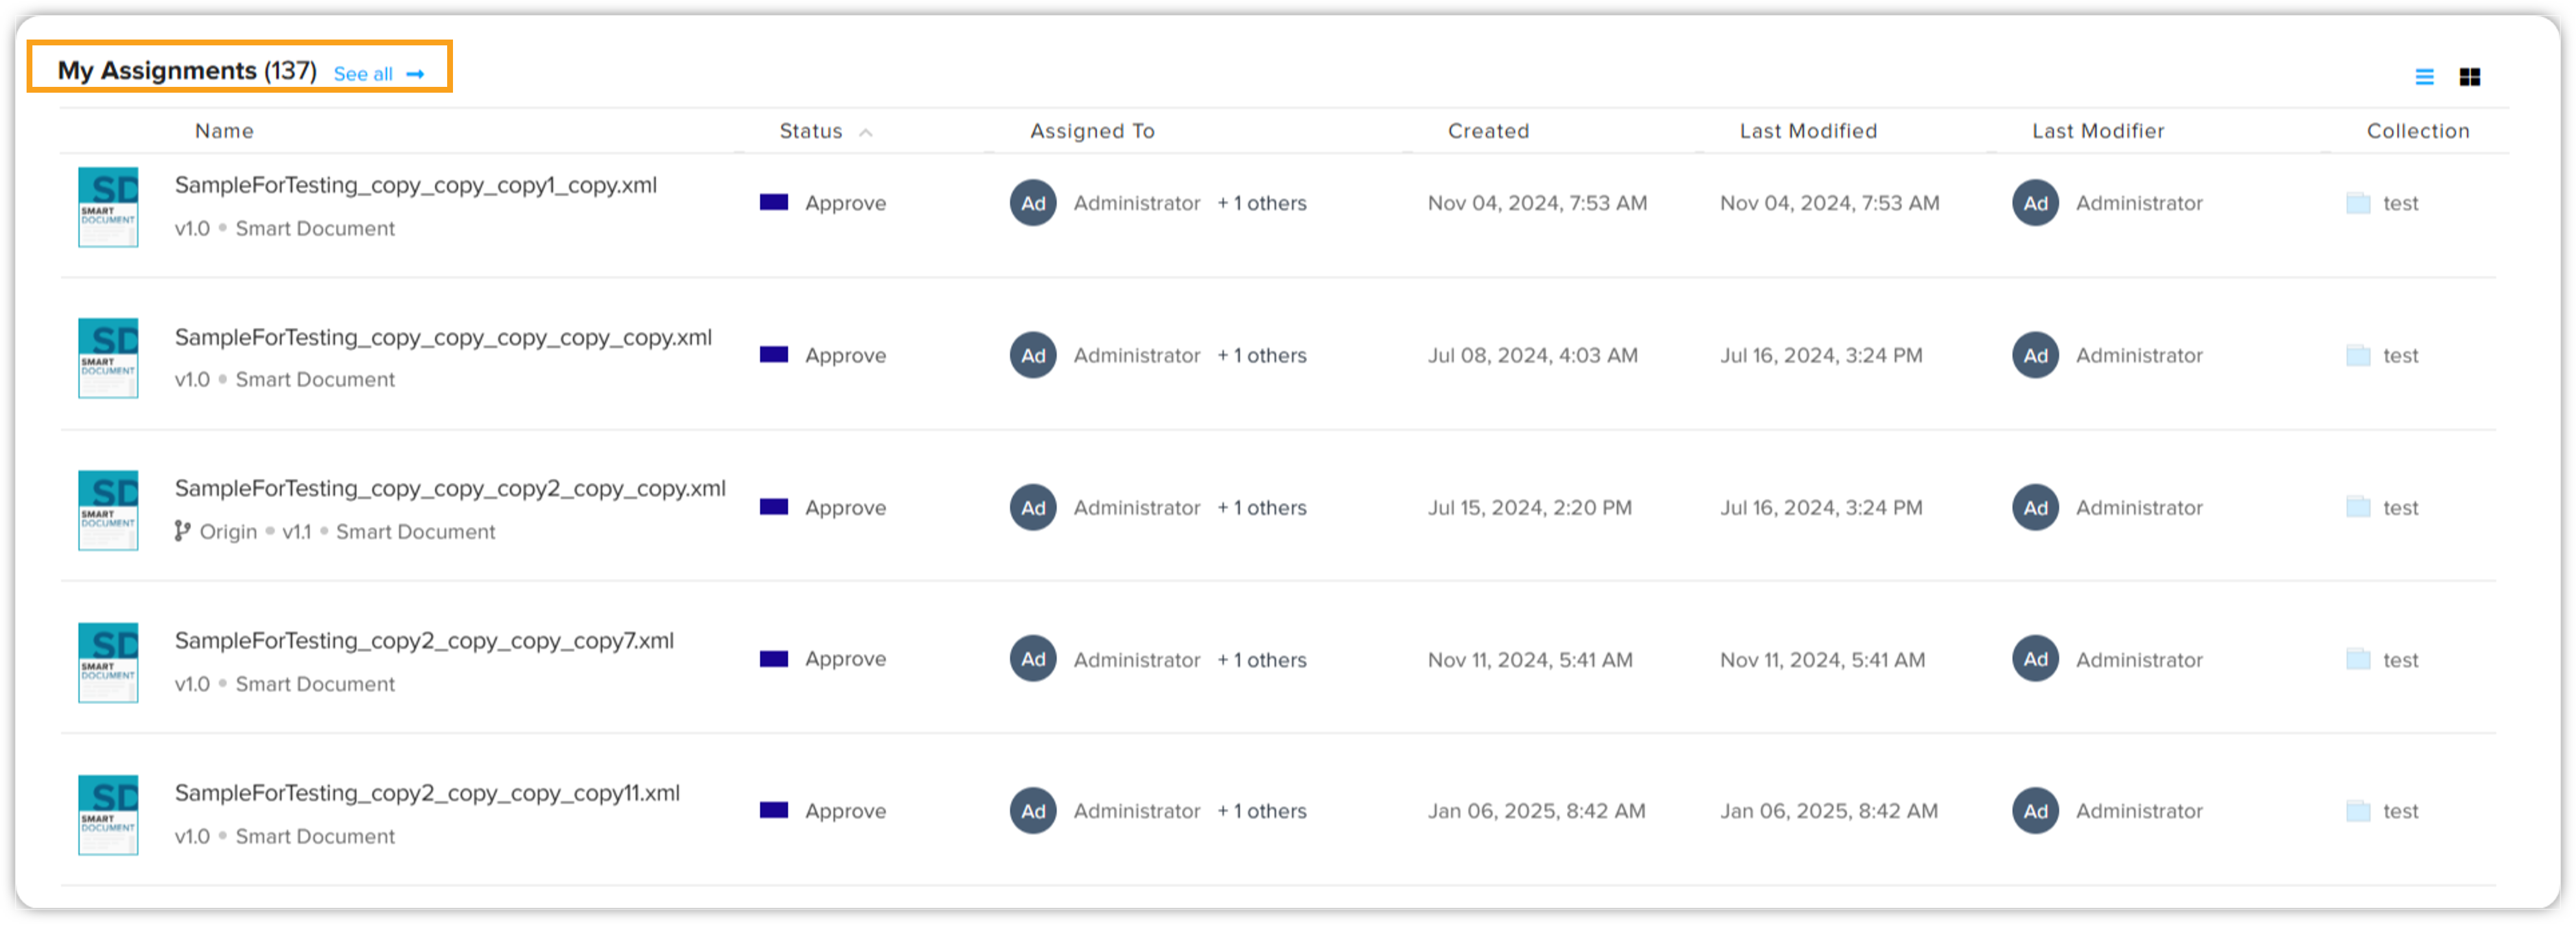
My Assignments: Lists the assets that are assigned to you with the option to see all the assets assigned to you on the My Assignments page through the link See All.
-
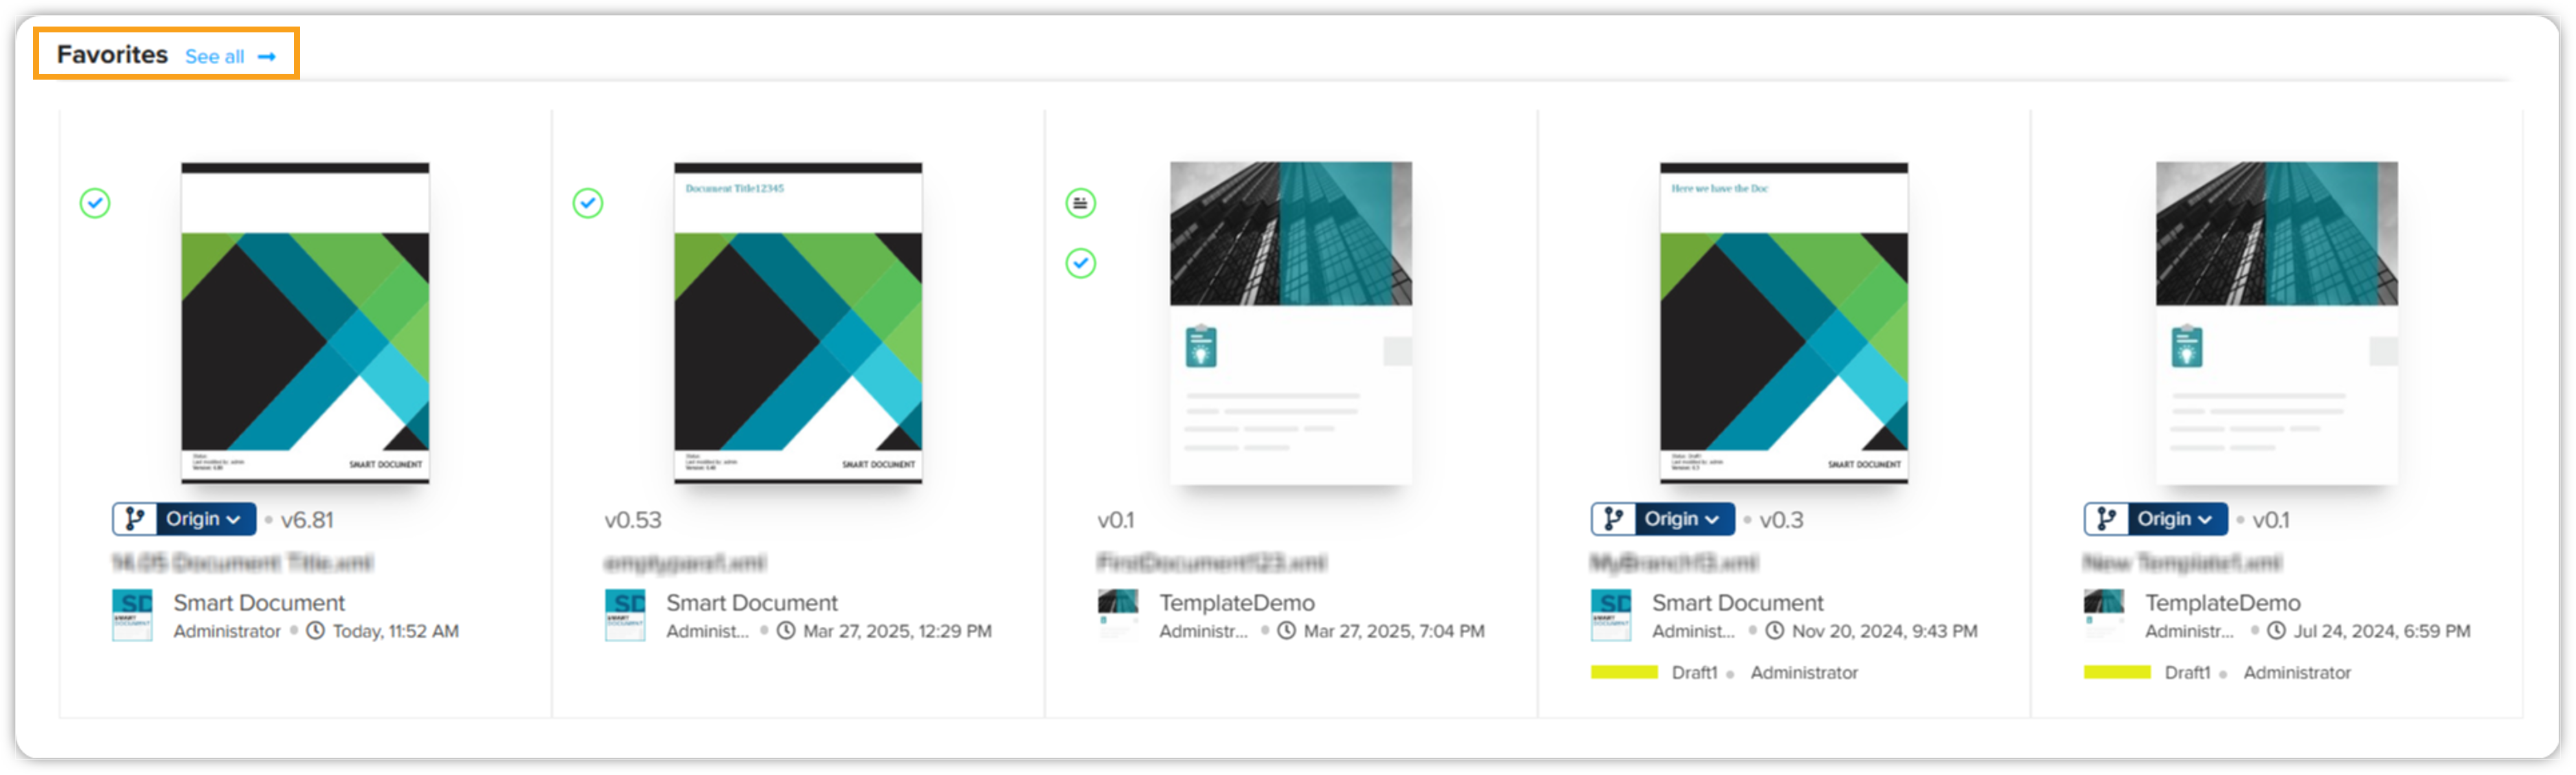
Favorites: Lists the assets that you have marked favorite with the option to see all the assets that you have marked as favorite on the Favorites page through the link See All.
Create New
QPP allows you to create a new document based on available content models from the following places on the user interface:
-
Create New button on the Home screen
-
Create New section under the Author tab
To create a new asset:
-
Click Create New option to open the New Document page.
-
On the New Document page, select the content type based on which you want to create a new document. You can search for the desired document type by simply entering the name in the search bar.
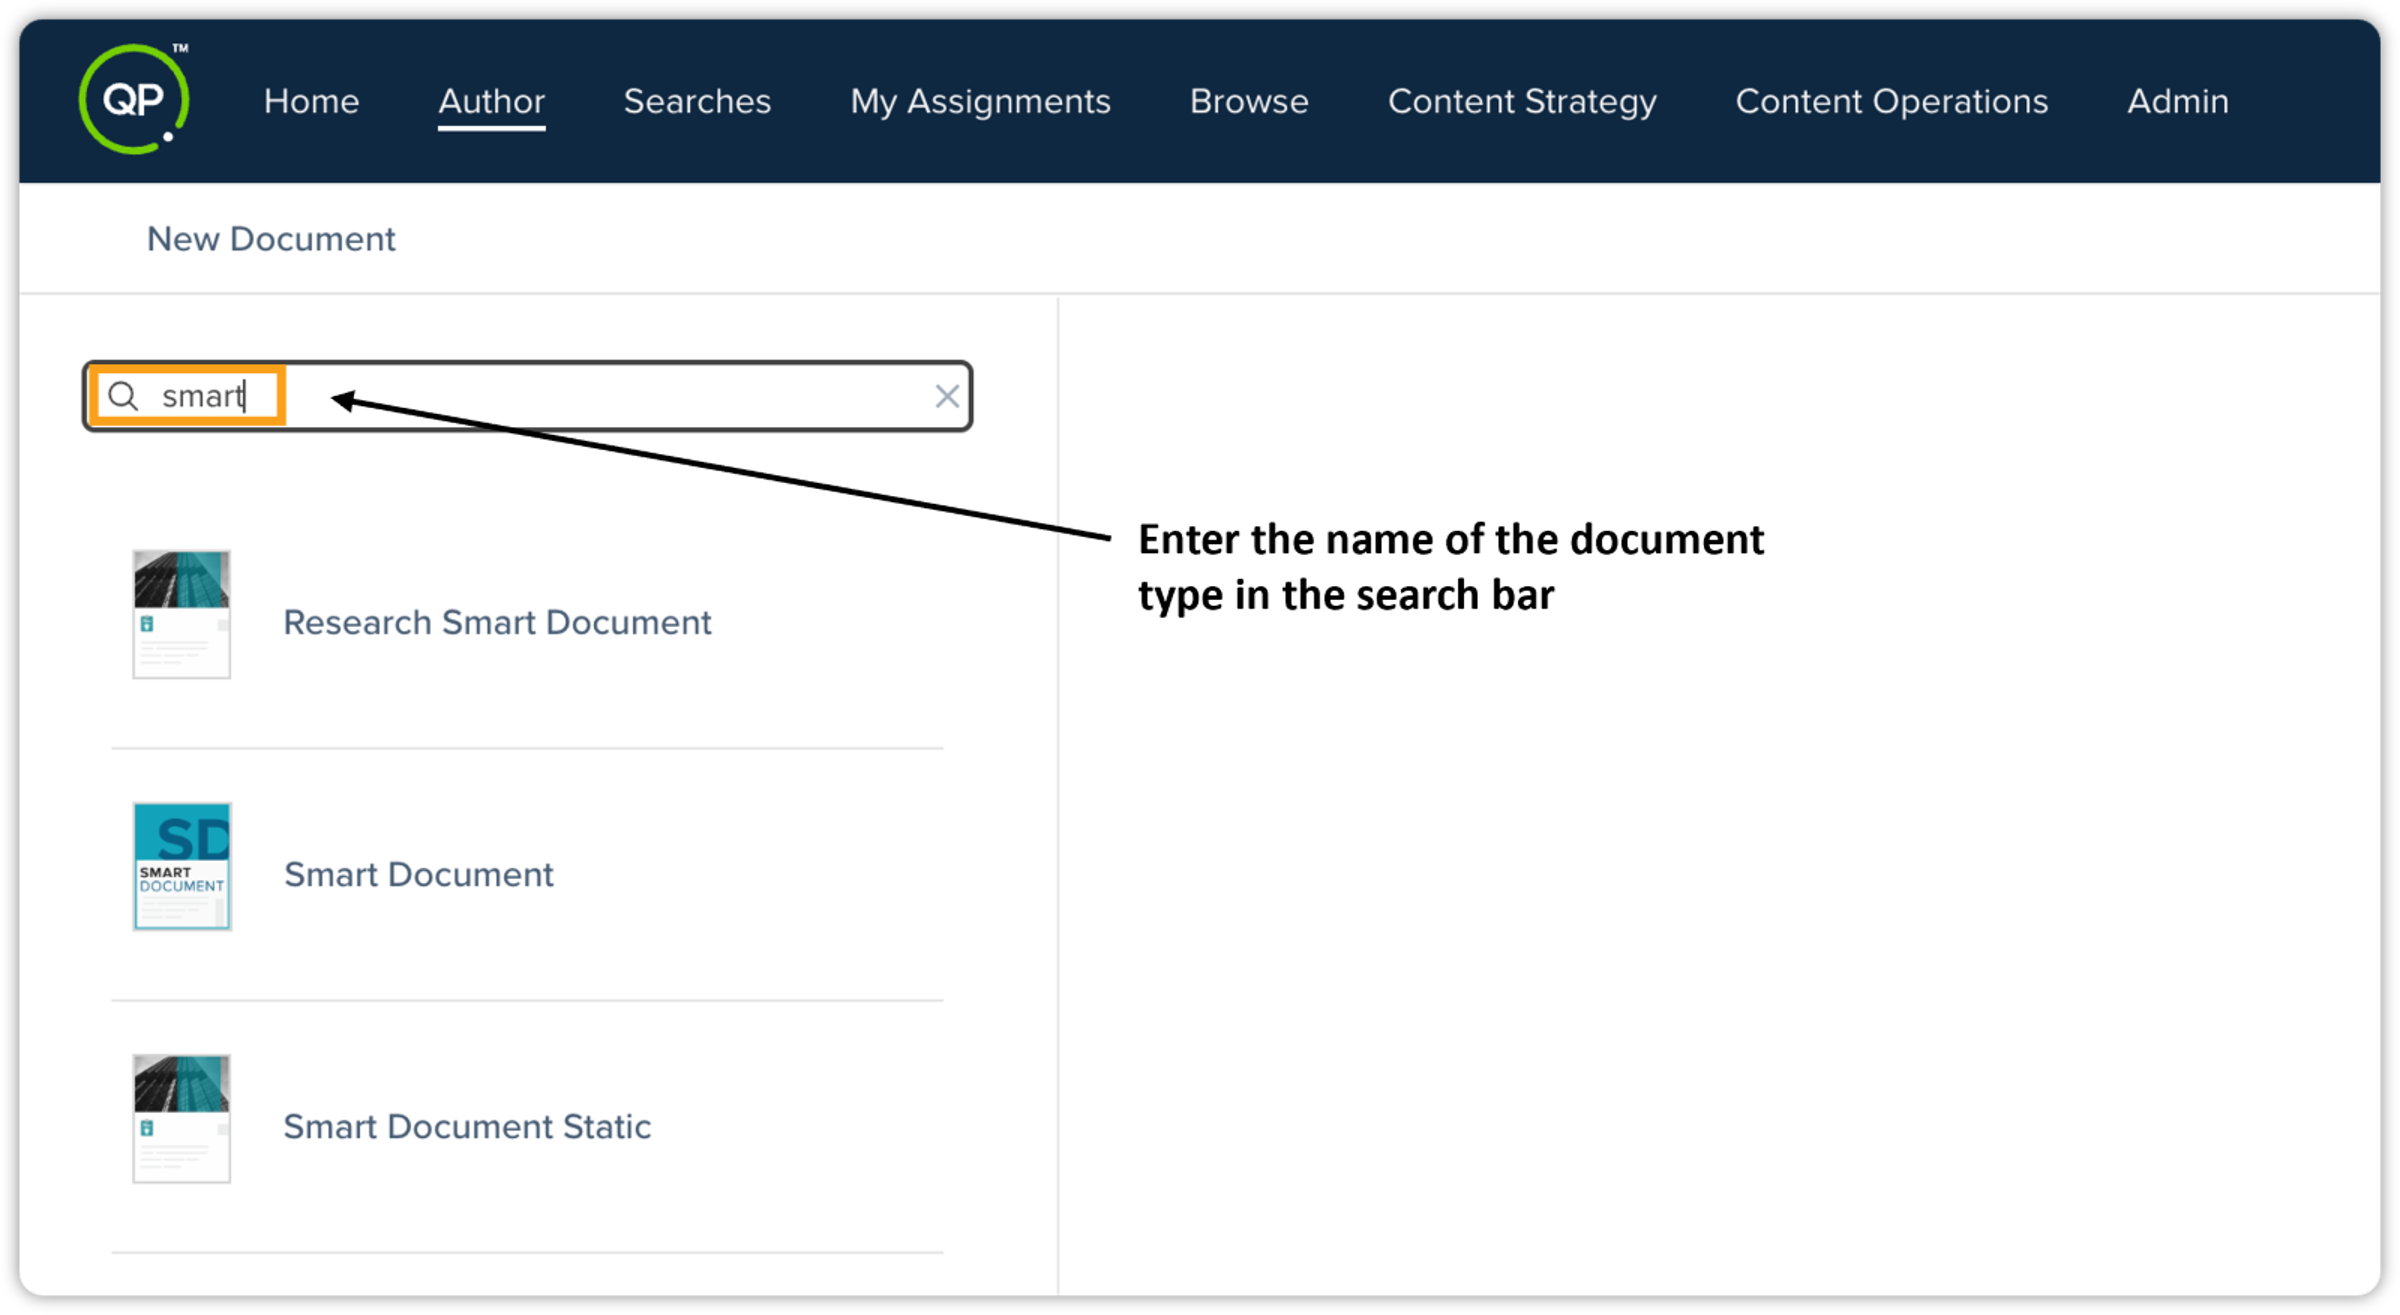 The list is organized with models at the top, citations at the bottom, and all document types sorted alphabetically. An error message, "No matching document types found", will appear if your search yields no results. Besides, you'll only see the specific content types for which you've been granted "Check In New" privileges. This ensures a clutter-free experience by showing only the templates relevant to your role.
-
Either double-click on the enlarged icon of the selected content type or click the text link Blank <content type> below the enlarged content type icon.
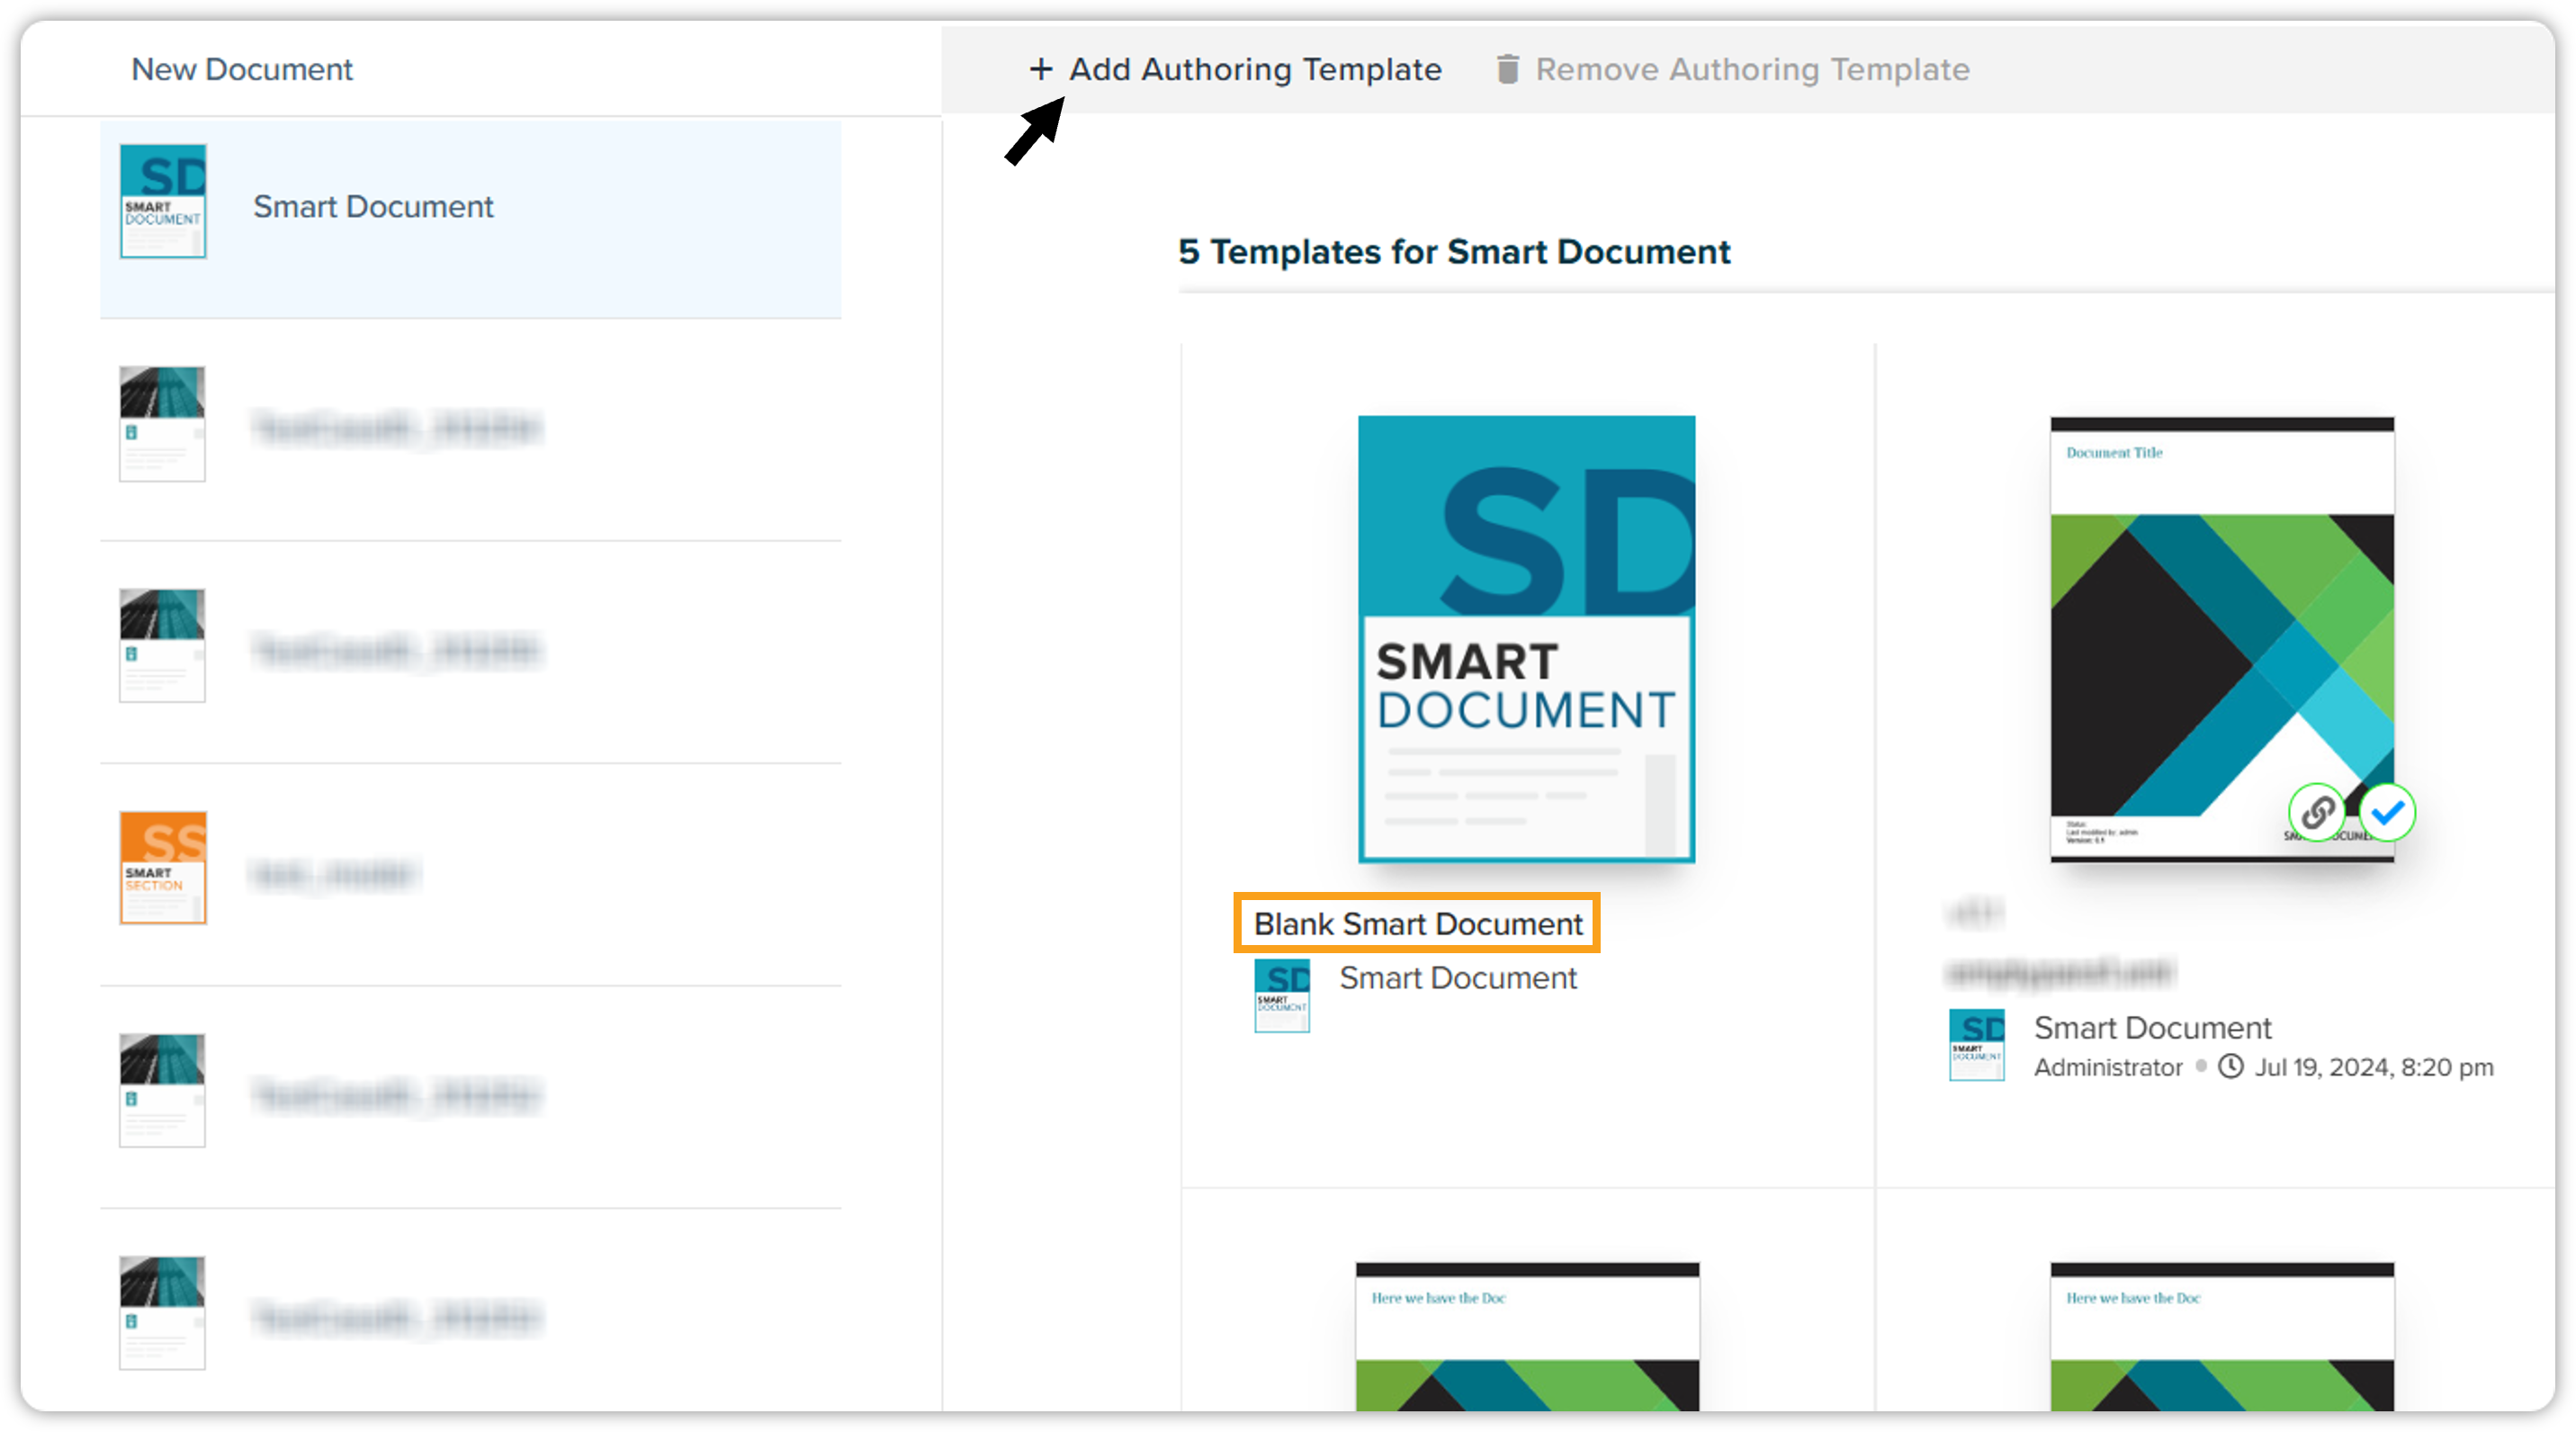 You can set documents as authoring templates in the Quark Publishing Platform. This will enhance your content creation process by enabling you to reuse documents as foundations for future work, enhancing efficiency and flexibility within the authoring workflows. Simply click the Add Authoring Template option and select the authoring template(s) you want to add. To know how to save a document as an authoring template, refer to Save Document as Authoring Template.
-
On the next screen, which displays a list of default properties related to the selected content type, modify properties based on your requirements (optional) and then click Create.
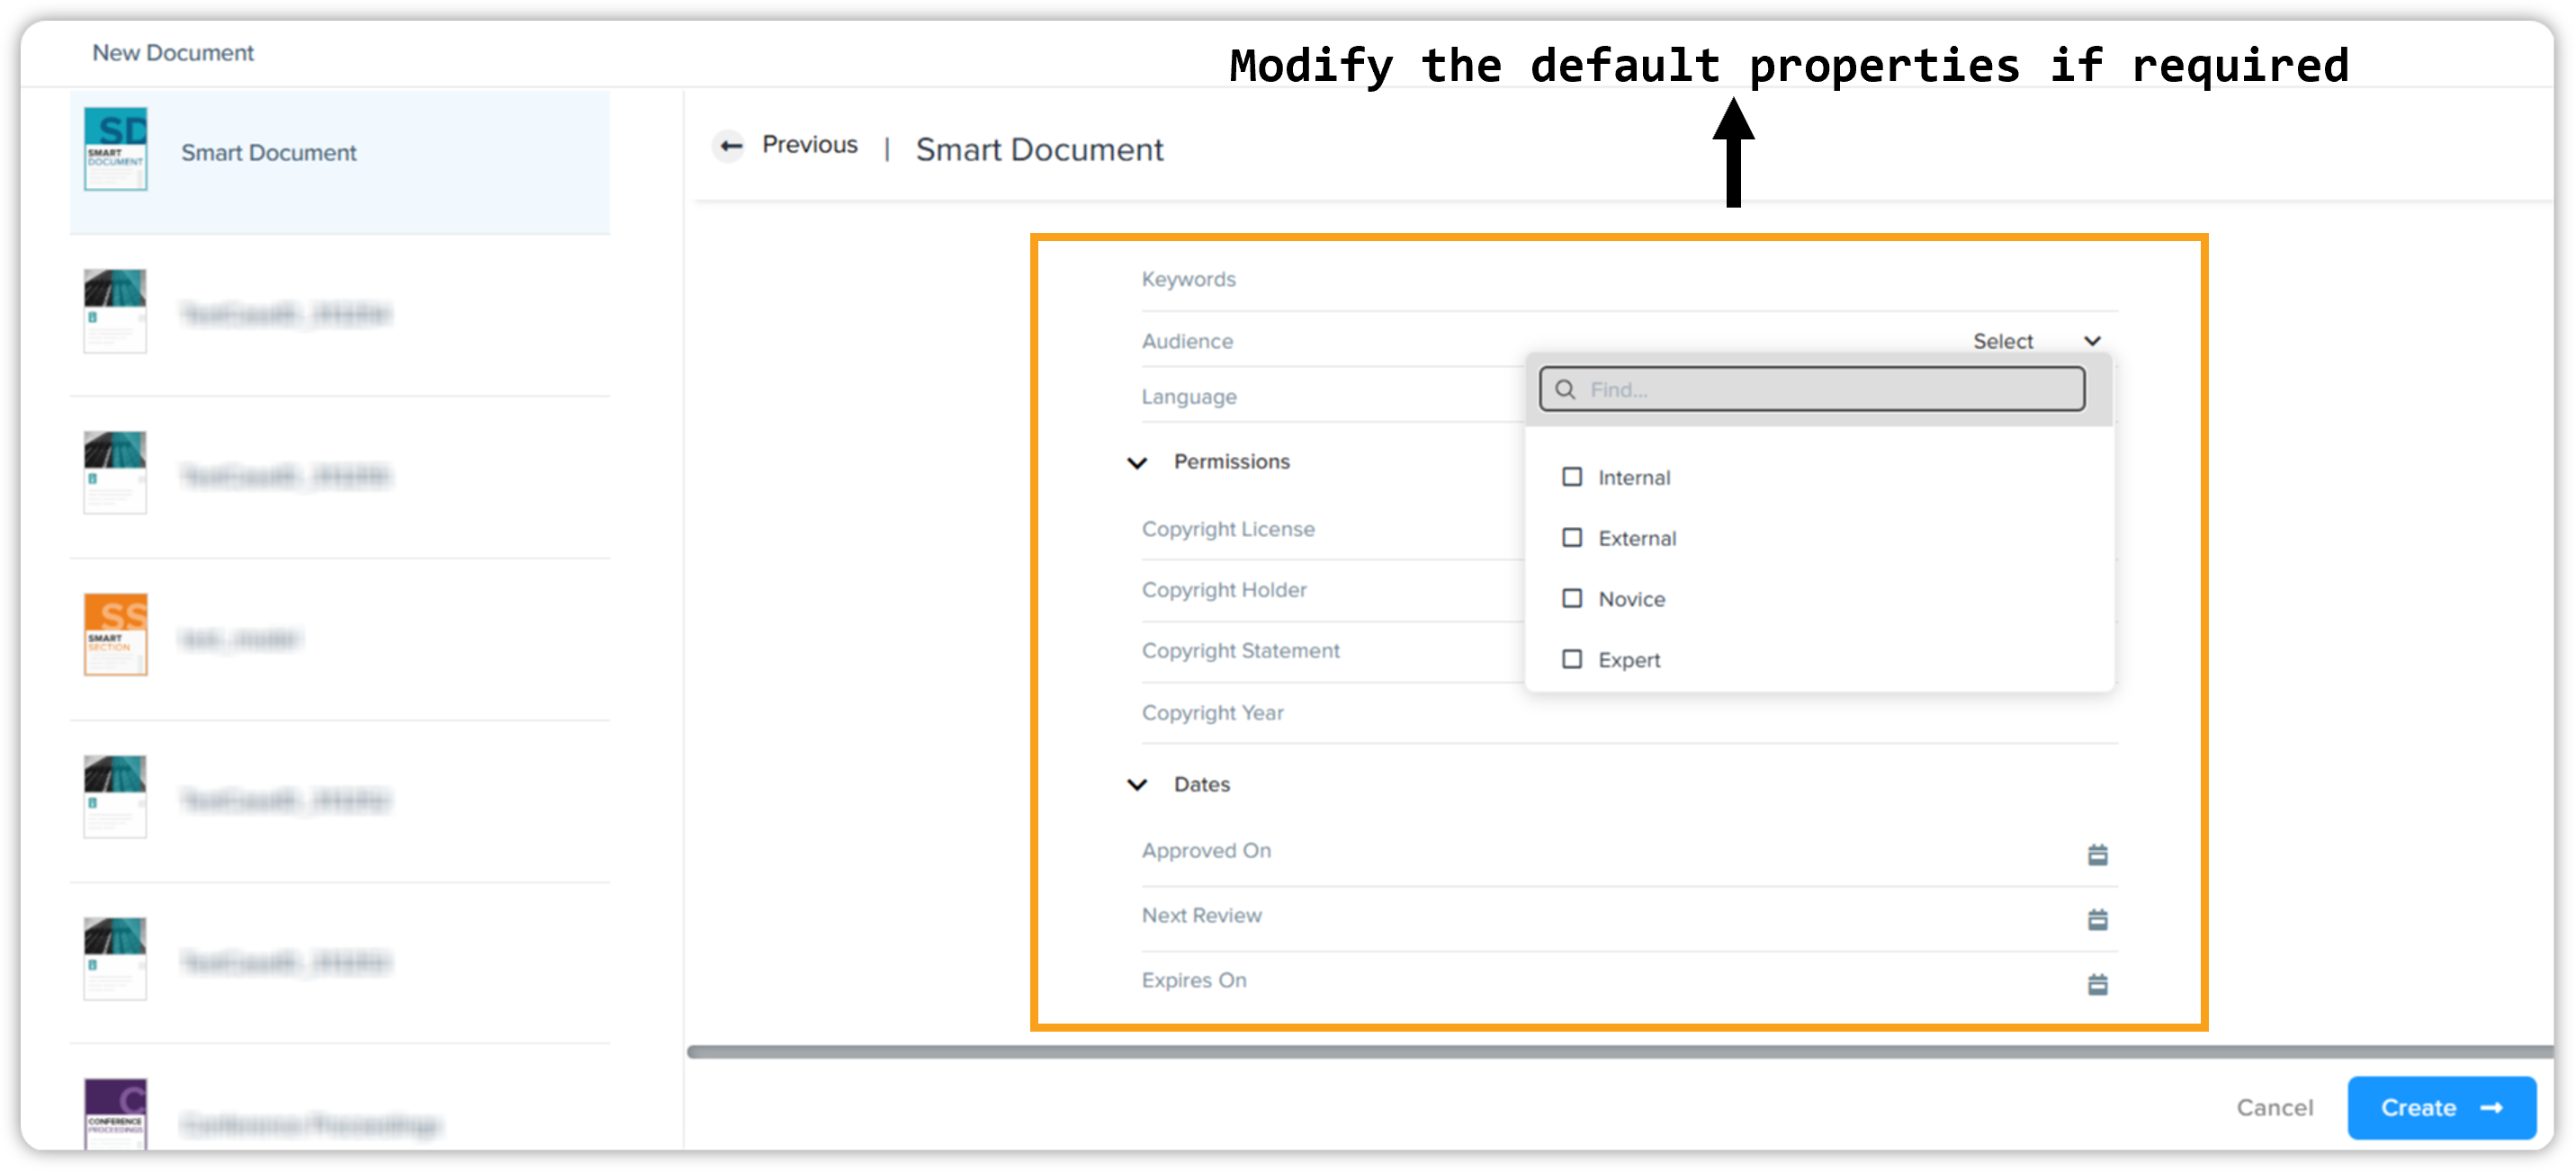 This list of properties (metadata) contains both types of properties: inherent and admin-defined. Some properties are automatically generated and updated by the platform; for example, Created On, Last Modified, and so on.
-
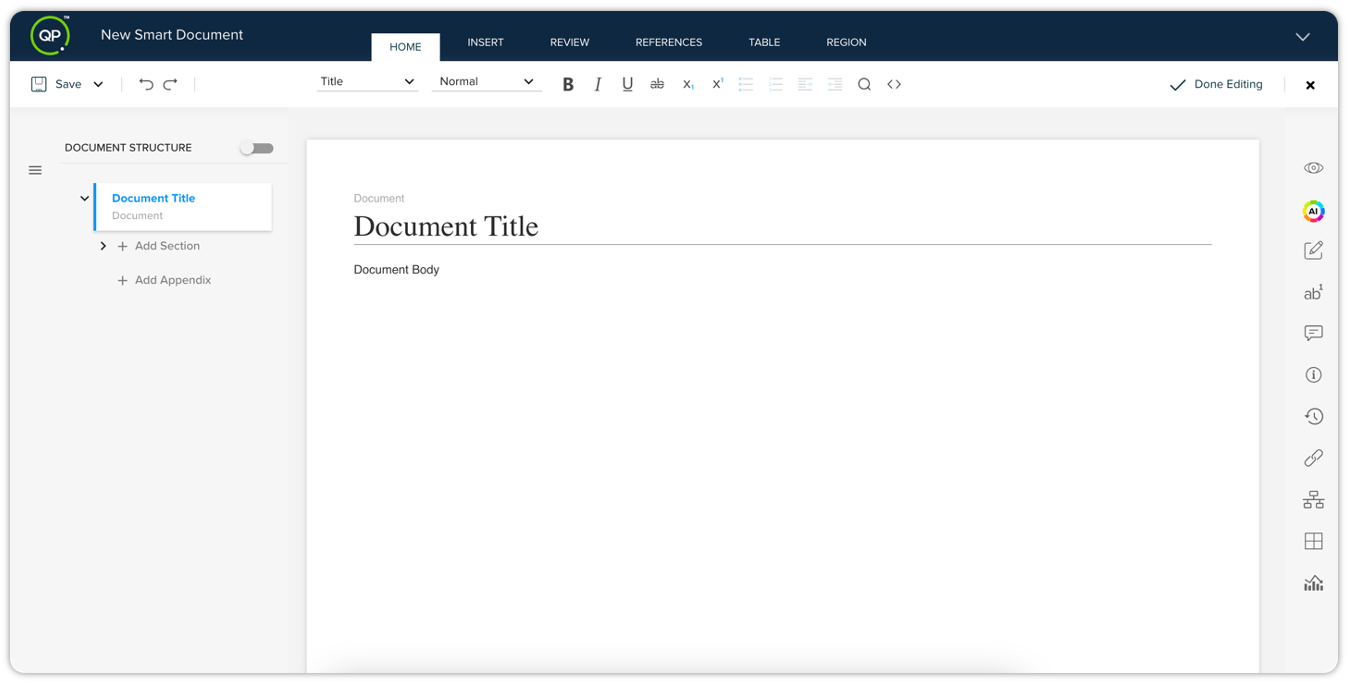
QPP creates and opens a blank document based on the content type you selected in the content editor.
Content Editor
When you create a new document or when you open a document to edit, QPP opens the document in Content Editor. Content Editor is a web authoring tool built-in in QPP, which resembles other popular authoring tools such as Microsoft Word and Google Docs.
Content Editor contains several options to allow you to work with both inline and server-side components of QPP.
Toolbars
Content Editor contains several toolbars and each of these toolbars has a specific set of functional options.
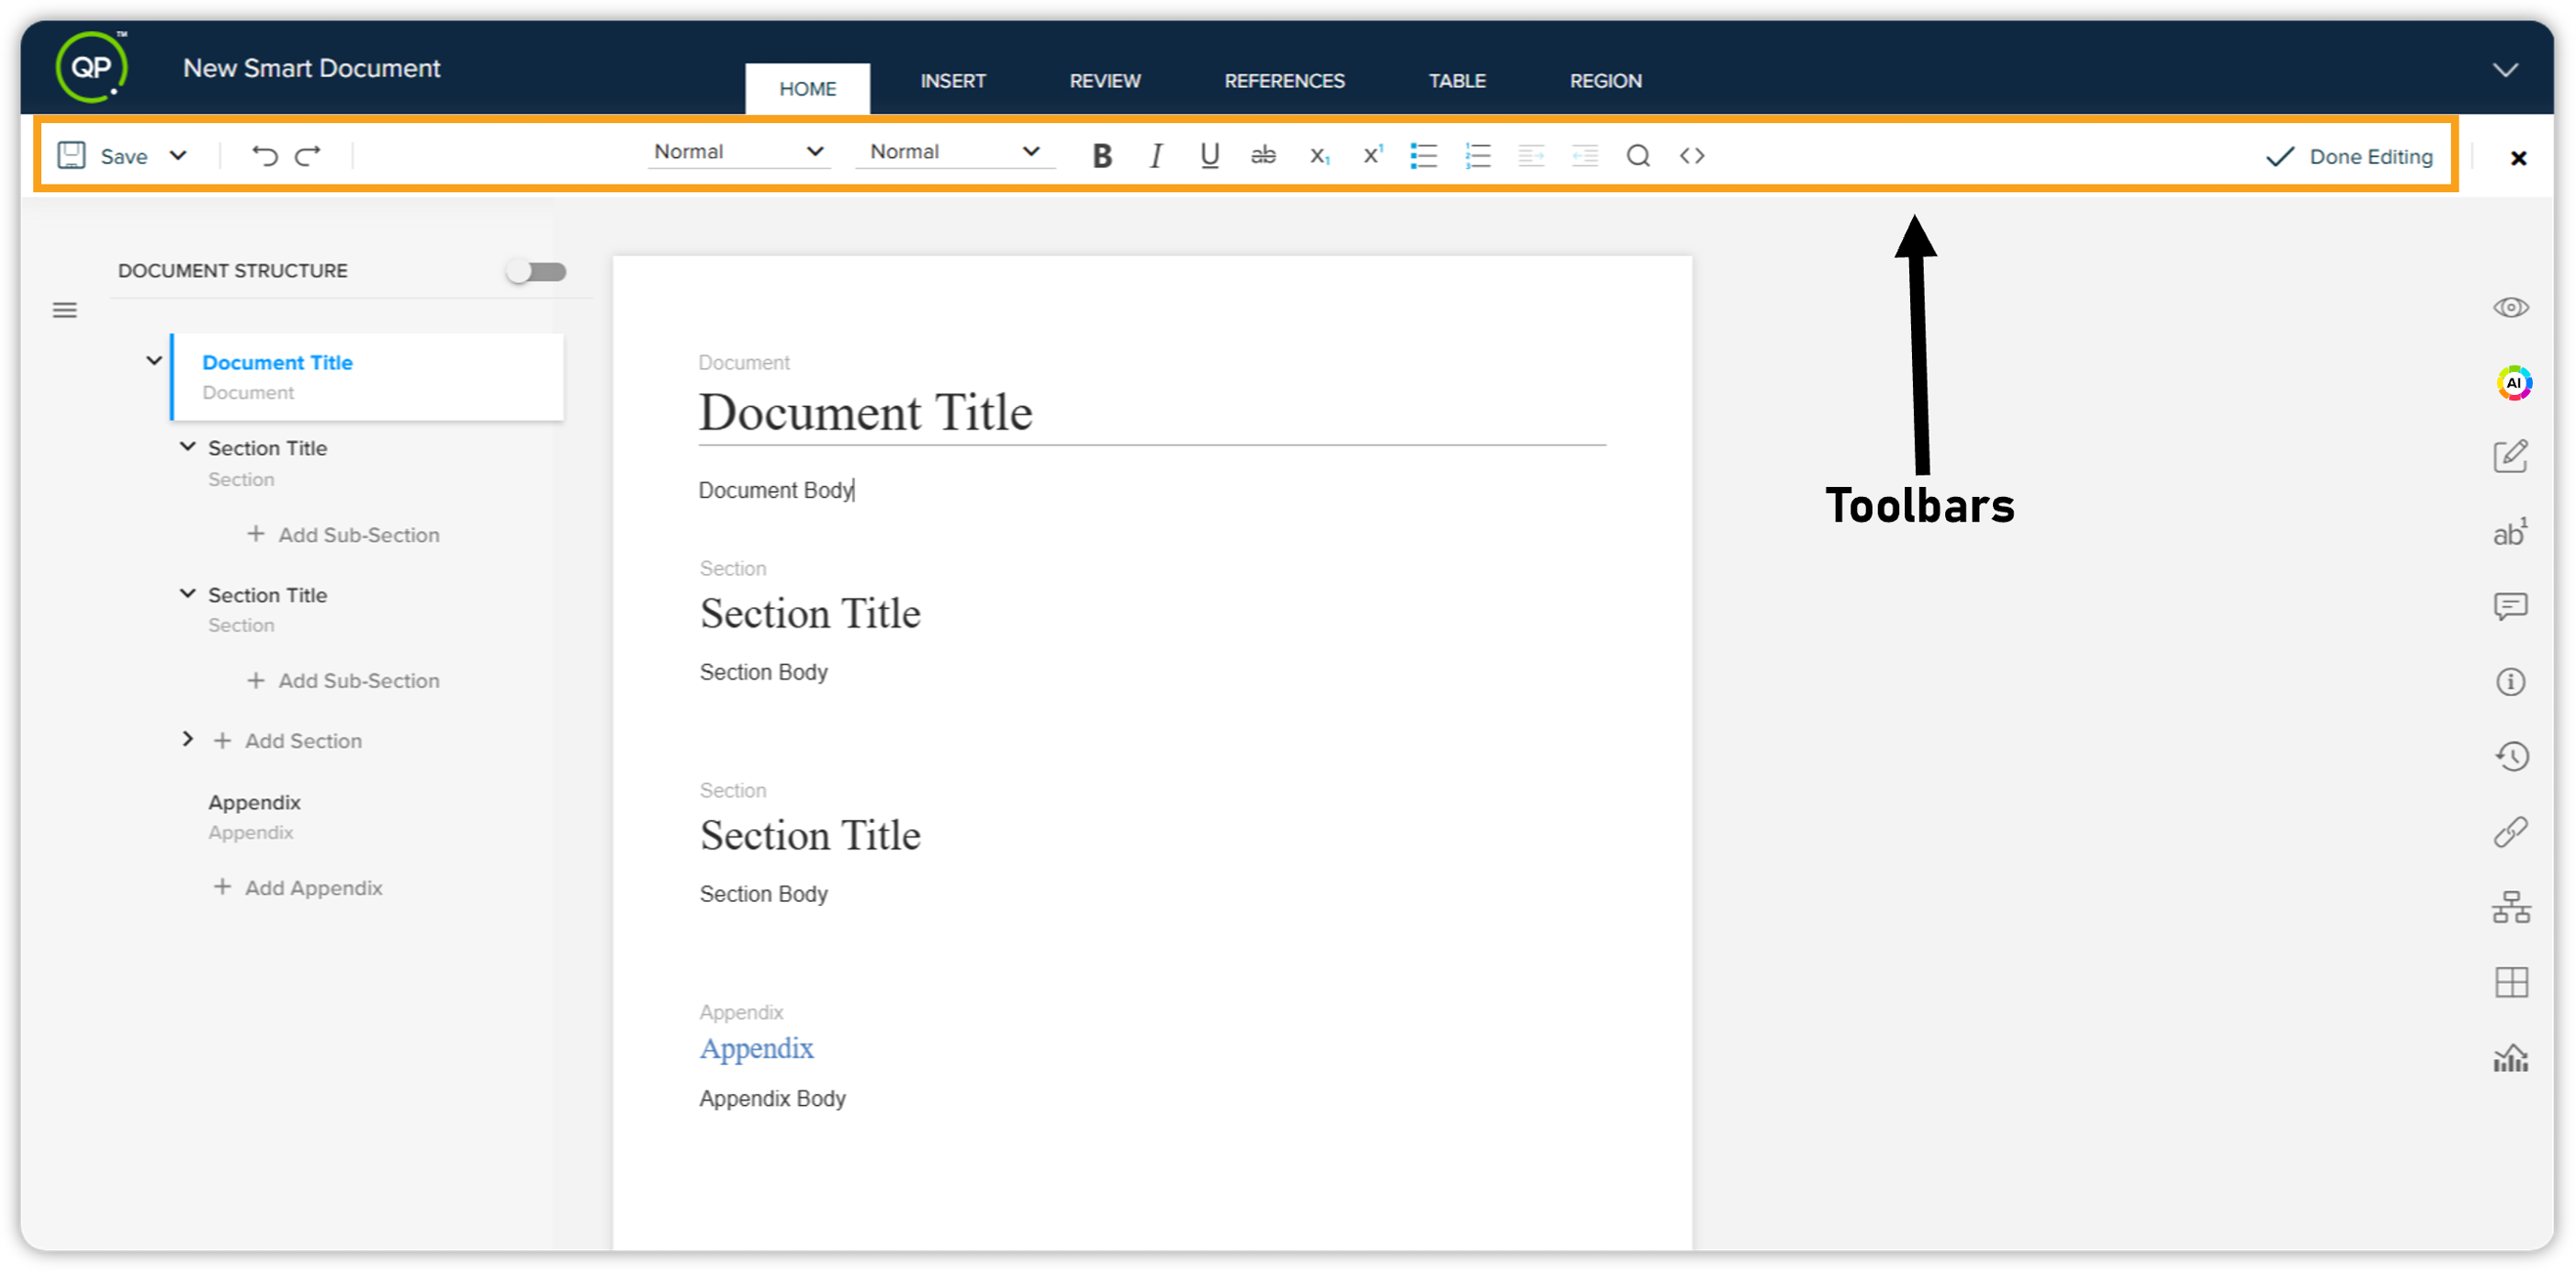
These toolbars are as follows:
File Operations
Some file operations always remain visible when you edit a document. These operations are as follows:

|
Name |
Icon |
Function |
|
Save |
|
Opens the Save dialog to allow you to save a document on the server.
|
|
Discard |
|
Discards all the changes you have made in the current copy of the document and restores the document to the version stored on the server. |
|
Undo |
|
Reverses the most recent change you have made in a document. |
|
Redo |
|
Reverses the most recent Undo operation you have made in a document. |
|
Done Editing |
|
Saves the changes you have made to the current copy of the document as a new version on the server and closes the document. |
|
Branching |
|
Allows you to create a branch or switch to a different branch of the document. When a document already has branches, QPP displays the icon
 instead of the default Create Branch icon. |
|
Workflow |
|
Open a mini Workflow right pane to allow you to change the workflow state of a document. |
|
Close |
|
Closes a document. |







Home
The tab Home contains the basic functions related to text formatting, which are as follows:
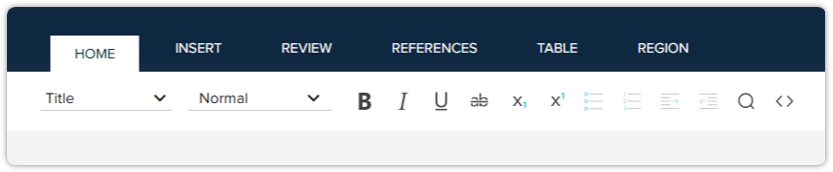
|
Name |
Icon |
Function |
|
Para Types |
|
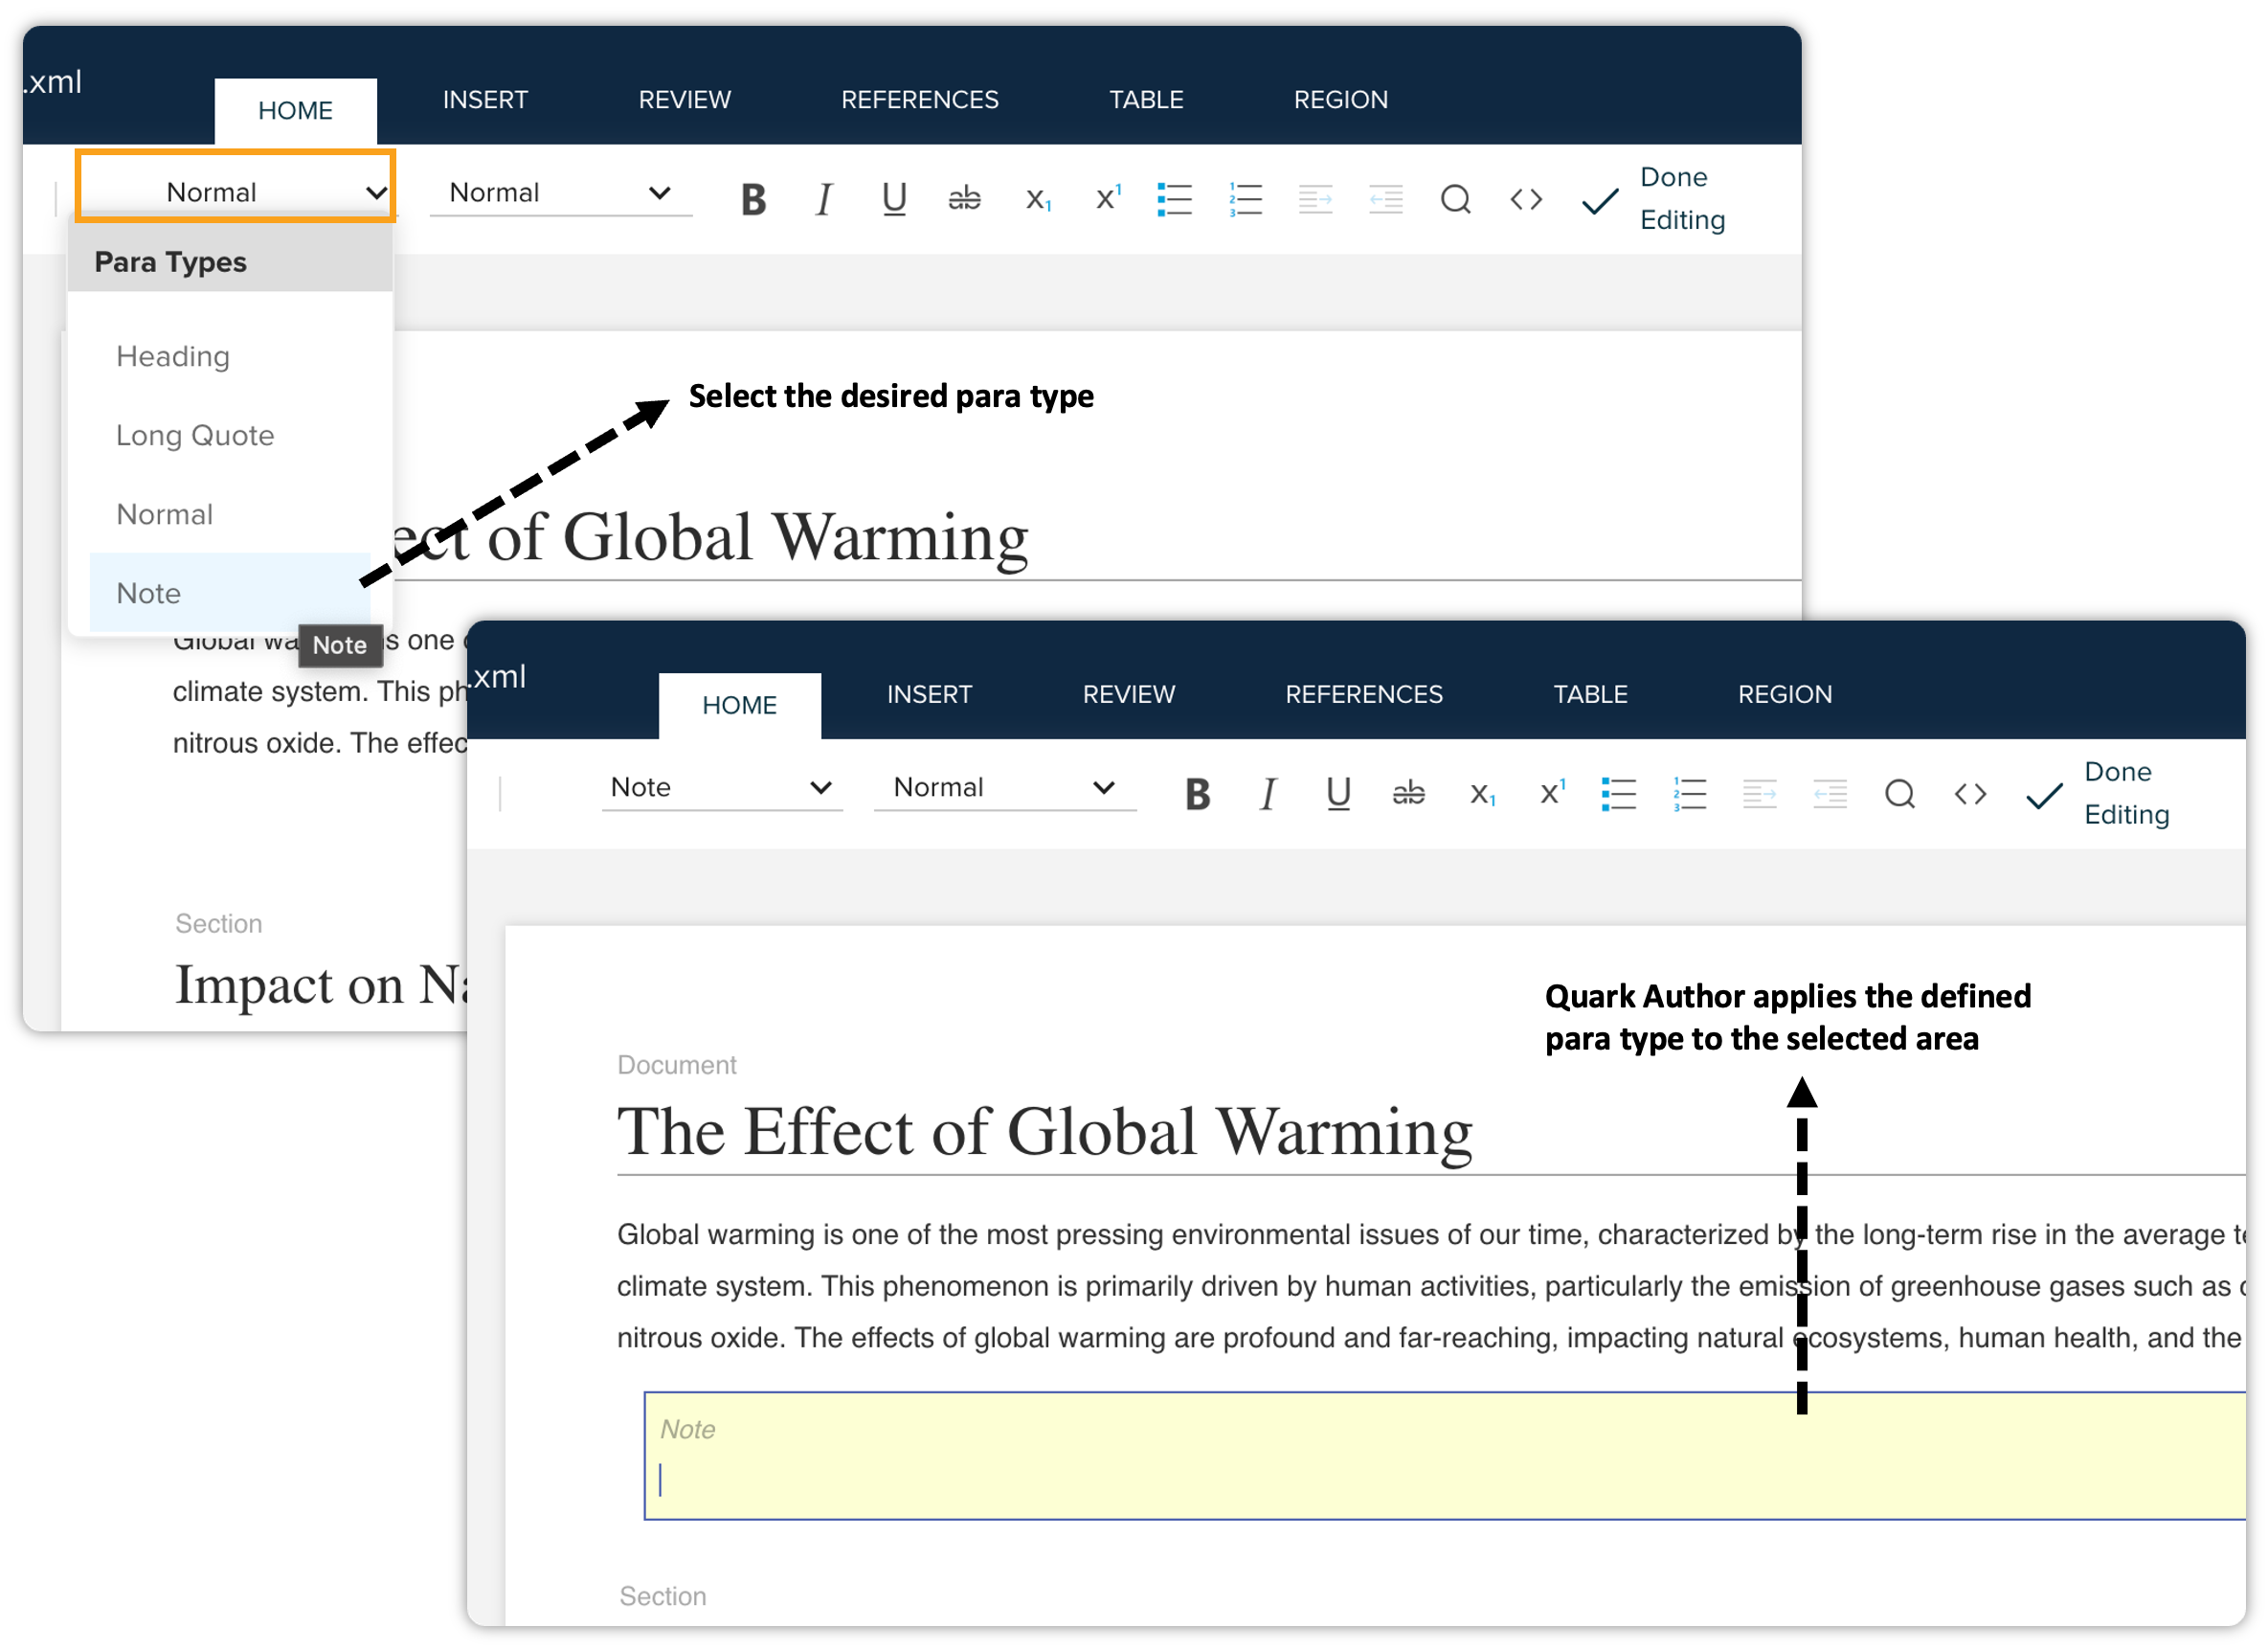
Applies a paragraph type on the text. The available paragraph types are Normal, Heading, Note, and Long Quote. |
|
Tags |
|
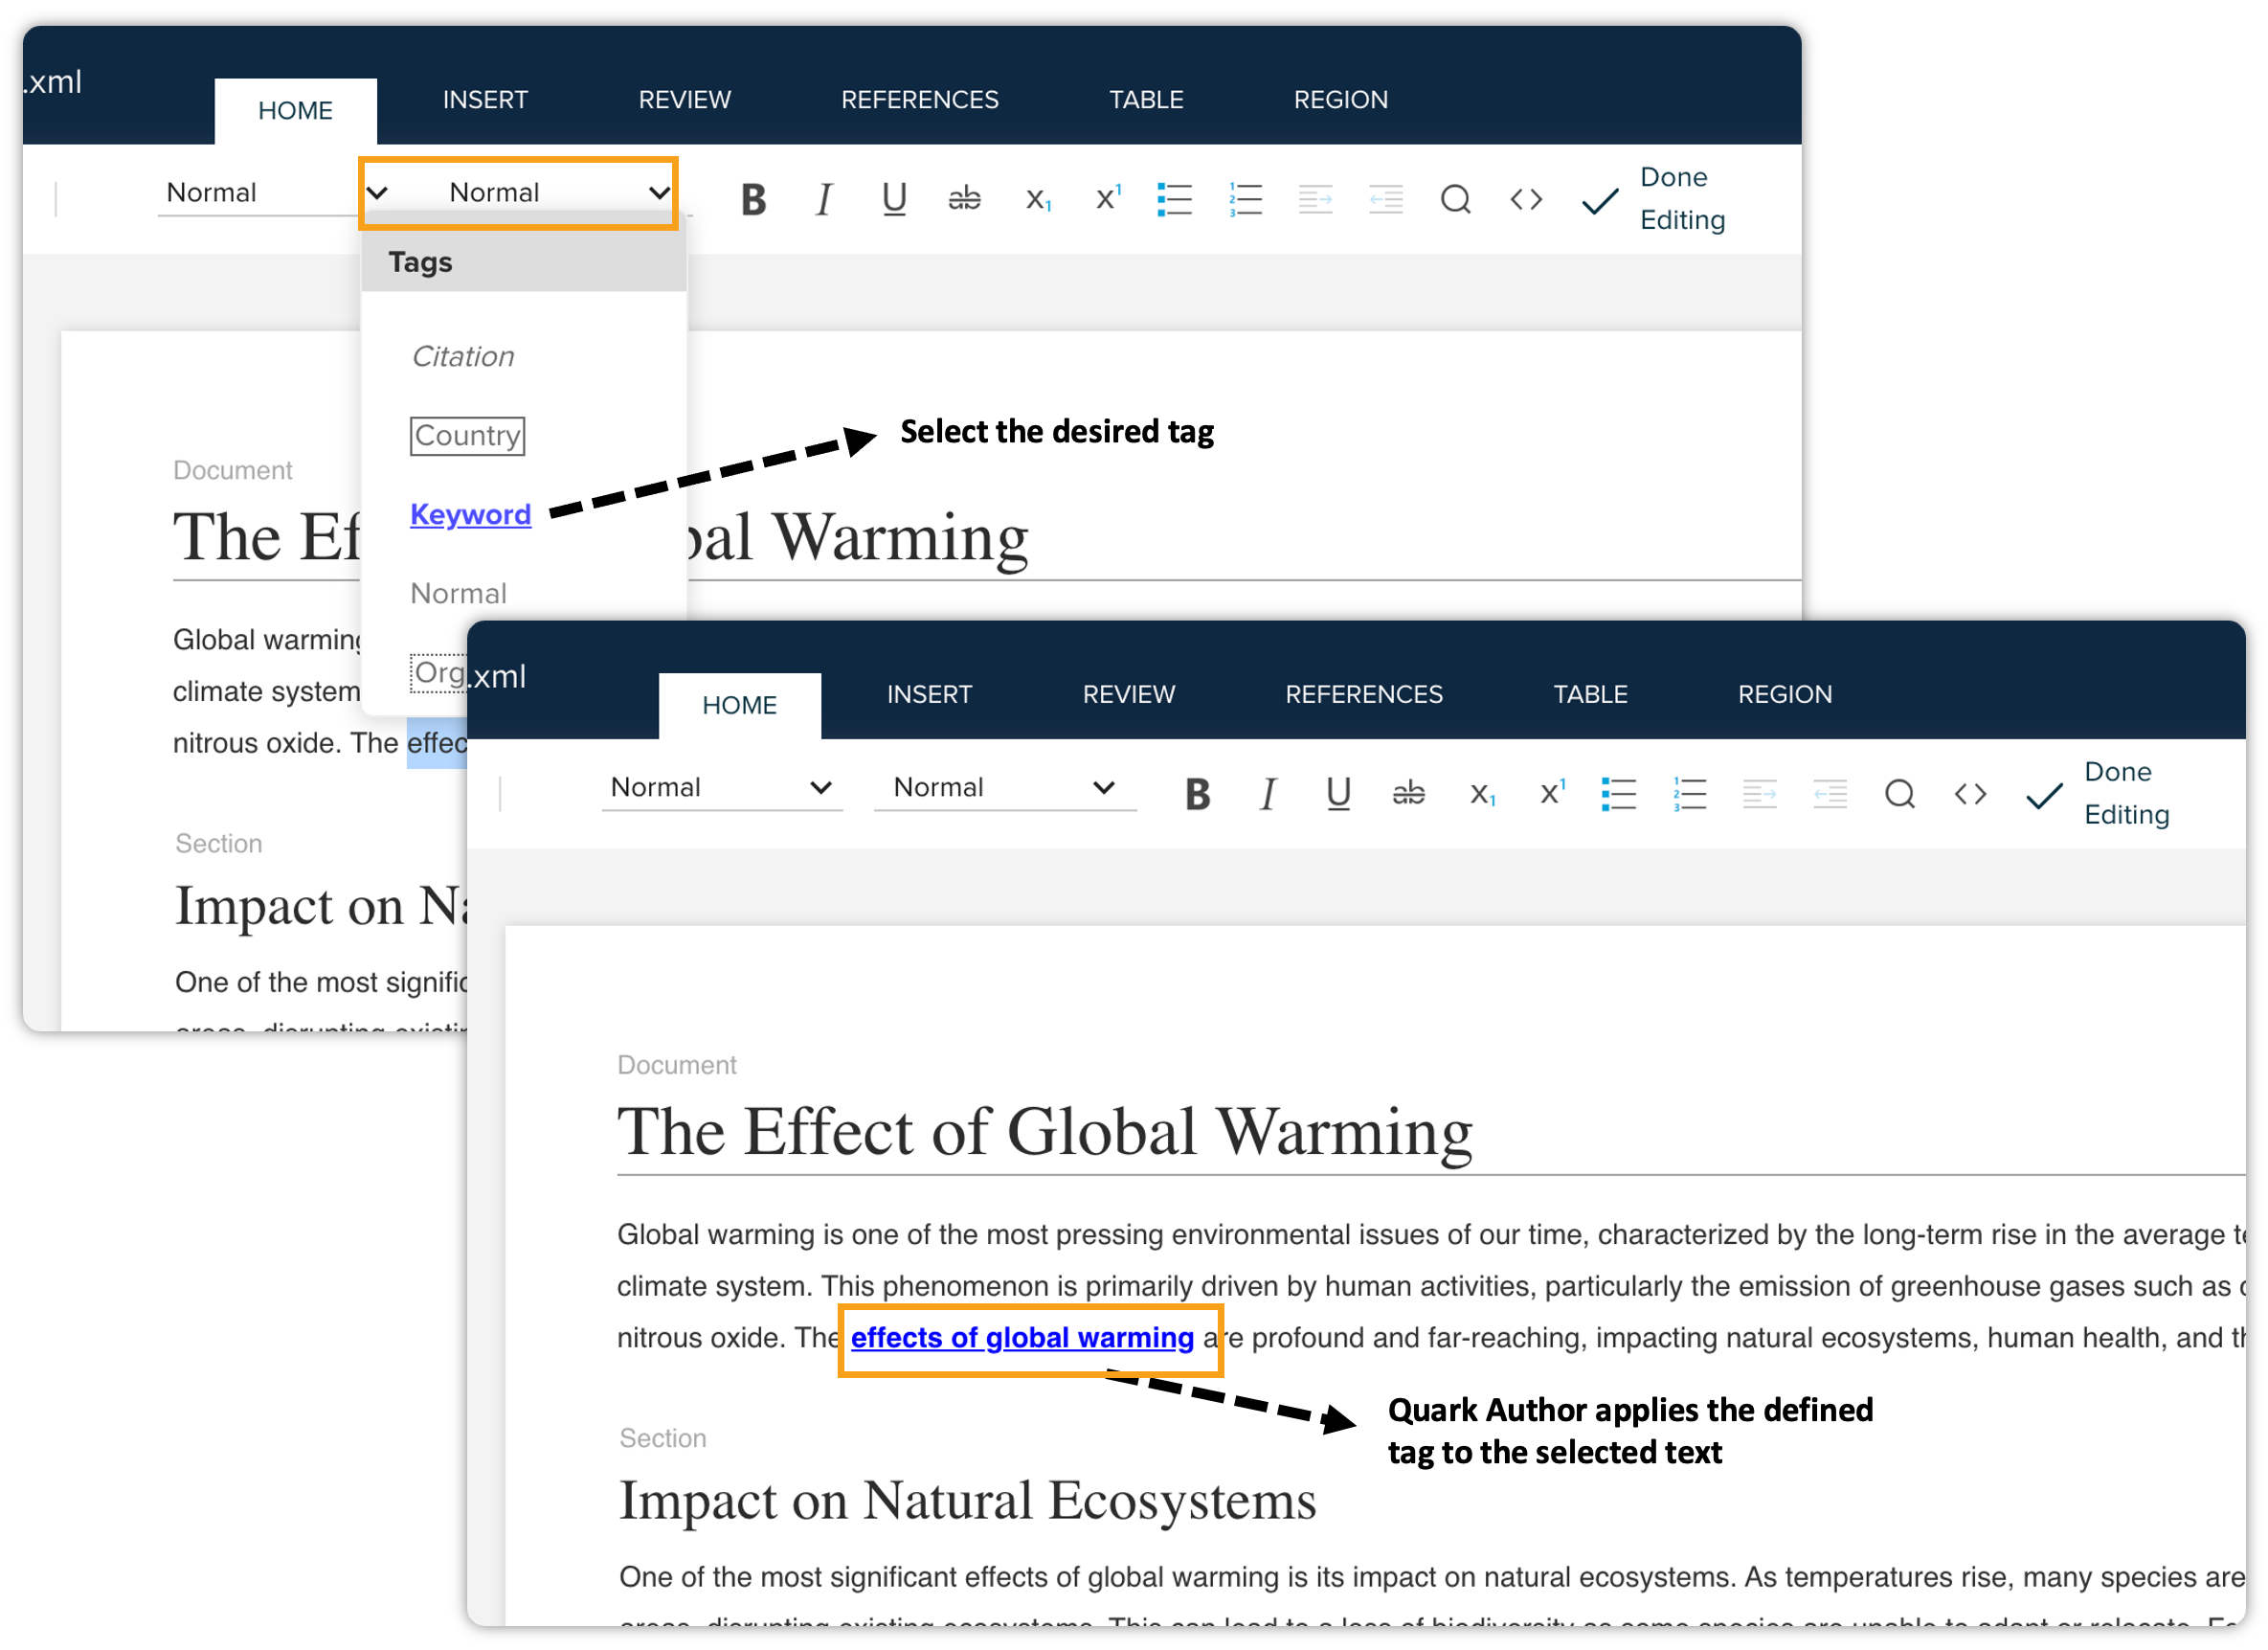
Applies a tag/emphasis on the selected text. The available tags are Normal, Phrase, Citation, Country, Keyword, Organization, Person, Quote, Term, and Trademark. |
|
Bold |
|
Applies/removes the bold formatting to/from the selected text. |
|
Italics |
|
Applies/removes the italic formatting to/from the selected text. |
|
Underline |
|
Applies/removes the underline to/from the selected text. |
|
Strikethrough |
|
Applies/removes the strikethrough to/from the selected text. |
|
Subscript |
|
Applies subscript on the text. |
|
Superscript |
|
Applies superscript on the text. |
|
Bulleted List |
|
Creates a bulleted list. |
|
Numbered List |
|
Creates a numbered list. |
|
Increase Indent |
|
Increases the indent (moves to the right) of a list item. |
|
Decrease Indent |
|
Decreases the indent (moves to the left) of a list item. |
|
Find |
|
Allows you to search for a word or phrase within document content. Also, let's replace a word or phrase with another. |
|
View XML |
|
Allows you to see the XML of a document. |




Insert
The tab Insert gives you several options to insert various assets types, such as tables, images, charts, and so on from your local machine and server. These options are as follows:
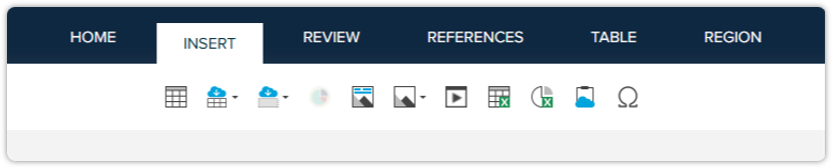
|
Name |
Icon |
Function |
|
Insert Table |
|
Inserts a table. |
|
Insert Table Component |
|
Inserts a table from the server. You can save a table as a component on the server.
|
|
Insert Region from Server |
|
Inserts a region from the server. You can save a body text region within a document as a component on the server.
|
|
Show Table As Chart |
|
Converts a data table into a chart. |
|
Insert Figure |
|
Creates a figure box with a placeholder for an image, space, and figure description. |
|
Insert Image |
|
Inserts an image. To insert an image from your local machine, click From Local File System. To insert an image from the server, click From Platform.
|
|
Insert Excel Table |
|
Inserts a table from an Excel file stored on the server. |
|
Insert Excel Chart |
|
Inserts a chart from an Excel file stored on the server. |
|
Paste from Server |
|
Pastes an Excel asset (table, chart, or table range) in the document. |
|
Insert Special Character |
|
Inserts special characters from a list of available special characters. |
|
Math Editor |
|
Allows you to edit math equations through Wiris MathType editor. |


Review
The tab Review contains functions related to reviewing a document, which are as follows:

|
Name |
Icon |
Function |
|
Add Comment |
|
Adds a comment on a specific section of a document. |
|
Delete Comment |
|
Deletes a comment already available in a document. |
|
Hide All Comments |
|
Hides all the comments in a document. |
|
Show Previous Comment |
|
Moves the selection highlight to the previous comment. |
|
Show Next Comment |
|
Moves the selection highlight to the next comment. |
|
Track Changes |
|
Tracks all the changes that you are currently making to a previously saved version of a document. |
|
Highlight Changes |
|
Highlights all the changes that you have made to a previously saved version of a document. |
|
Show Previous Change |
|
Moves the selection highlight to the previous change in a document. |
|
Show Next Change |
|
Moves the selection highlight to the next change in a document. |
|
Accept and Move to Next |
|
Accepts the currently selected change and moves the cursor to the next change. |
|
Reject and Move to Next |
|
Rejects the currently selected change and moves the cursor to the next change. |
|
Accept Change |
|
Accepts the currently selected change. |
|
Reject Change |
|
Rejects the currently selected change. |
|
Accept All Changes |
|
Accepts all the changes made in a document. |
|
Reject All Changes |
|
Rejects all the changes made in a document. |
|
Spelling and Grammar |
|
Checks for spelling and grammatical mistakes in a document. |


Reference
The tab Reference allows you to add references, links, and notes in a document. These options are as follows:
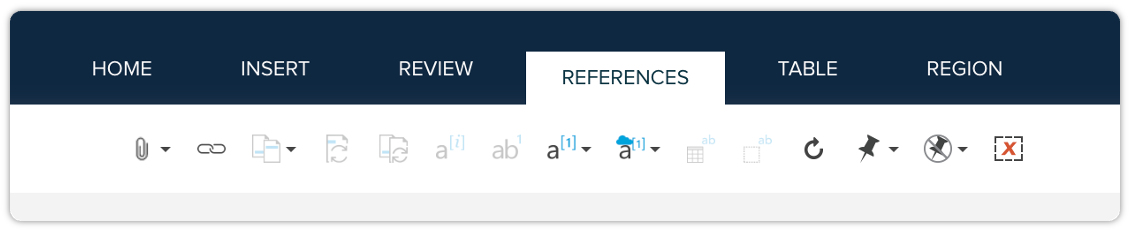
|
Name |
Icon |
Function |
|
File Attachment |
|
Allows you to attach various file types directly to your documents. For detailed information, refer to the File Attachment section. |
|
Insert Link |
|
Adds a hyperlink to the selected text. |
|
Insert Cross Reference |
|
Cross-references a section in a document with a word or phrase within the same document. |
|
Synchronize Cross Reference |
|
Synchronizes the currently selected cross-reference. By default, a cross-reference is not synchronized, meaning, when you change the title of a referenced content, QPP doesn't automatically update the title wherever the content is referenced. |
|
Synchronize All Cross References |
|
Synchronizes all the cross-references in the document. |
|
Insert Footnote |
|
Inserts a footnote for the selected text. |
|
Insert Endnote |
|
Inserts an endnote for the selected text. |
|
Insert Citation |
|
Inserts a citation for the selected text. |
|
Insert Citation from Server |
|
Inserts a citation saved on the server for the selected text. |
|
Insert Table Note |
|
Inserts a table note for the selected table. |
|
Insert Section Note |
|
Inserts a section note for the selected section. |
|
Refresh |
|
Refreshes the page to reflect all the recent changes. |
|
Pin Component Reference |
|
Pins a component reference, which means other users can't change the referenced component. |
|
Unpin Component Reference |
|
Unpins a component reference to allow other users to make changes to the referenced component. |
|
Convert to Inline |
|
Converts a component that is referenced from the server to an inline cross-reference. |


Table
The tab Table contains all the functions related to the tables, which are as follows:

|
Name |
Icon |
Function |
|
Table Type |
|
Changes the type of table from the available table types. |
|
Create Table Component |
|
Creates a component of the selected table and saves it on the server, which any user with author privileges can reuse in a document. |
|
Replace Table from Server |
|
Replaces the selected table from a table stored on the server. |
|
Caption |
|
Creates a title placeholder right above the table. |
|
Description |
|
Creates a description placeholder right after the table. |
|
Insert Paragraph After |
|
Inserts a paragraph after the table. |
|
Insert Row Above |
|
Inserts a row above the current (selected or where the cursor is placed) row. |
|
Insert Row Below |
|
Inserts a row below the current row. |
|
Insert Column to left |
|
Inserts a column left to the current column. |
|
Insert Column to Right |
|
Inserts a column right to the current column. |
|
Split Cells Horizontally |
|
Splits the current table cell horizontally. |
|
Split Cells Vertically |
|
Splits the current table cell vertically. |
|
Merge Cells |
|
Merges the selected table cells. |
|
Delete Row(s) |
|
Deletes the current row. |
|
Delete Column(s) |
|
Deletes the current column. |
|
Delete Table |
|
Deletes the entire table. |
|
Text Color |
|
Sets the color of the text in the selected table cell(s). |
|
Background Color |
|
Sets the background color of the selected table cell(s). |
|
Create Data Doc Table |
|
Inserts a data-integrated table that supports dynamic content from external sources, enabling automatic population and synchronization of structured data within Smart Documents. |



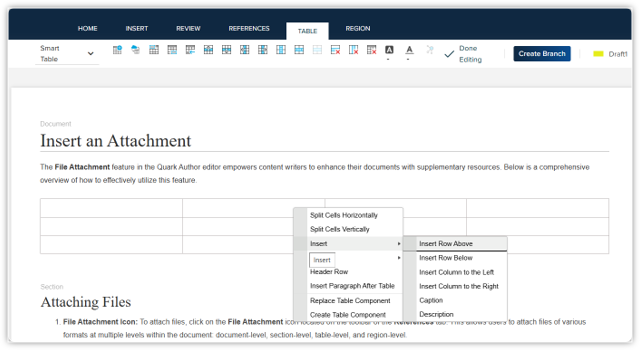
Region
The tab Region allows you to create a region within a document and offers related options, which are as follows:

|
Name |
Icon |
Function |
|
Regions (Region Type) |
|
Sets the region type. The available region types are Region, Box, and Callout. |
|
Create Region Component |
|
Creates a component of the selected region and saves it on the server, which any user with author privileges can reuse in a document. |
|
Region Title |
|
Creates a title placeholder right above the selected region. |
|
Insert Paragraph After |
|
Inserts a paragraph after the selected region. |
|
Replace Region from Server |
|
Replaces the selected region with another region stored on the server. |
|
Remove Region |
|
Removes the selected region. |



Work with a Document
The web authoring tool of QPP is intuitive for the most part because of its similarities with other popular authoring tools. However, when you work with a document, there are certain functions and processes that require a detailed description. These functions and processes are as follows:
Apply Paragraph Types and Tags
You can use Paragraph Types and Tags to make part of the text body visually distinguishable. Paragraph types are for entire sections like a paragraph, while tags are for single words or phrases.
To apply a paragraph type:
-
Position the cursor in the paragraph or any area in the canvas where you want to apply a paragraph type.
-
Go to the Home tab.
-
From the Para Types dropdown menu, click the desired paragraph type.
To apply a tag:
-
Select the word or phrase on which you want to apply a tag.
-
Go to the Home tab.
-
From the Tags dropdown menu, select the desired tag.
Insert Elements
QPP allows you to insert several types of elements in a document; such as tables, images, figures, charts, and so on. You can insert some types of elements from within the content editor, some from your local machine, some from the server, and some from two or more of these sources.
Insert a Table
In Quark Author, there are two ways to insert tables: directly from the content editor or from the server, which stored as a component.
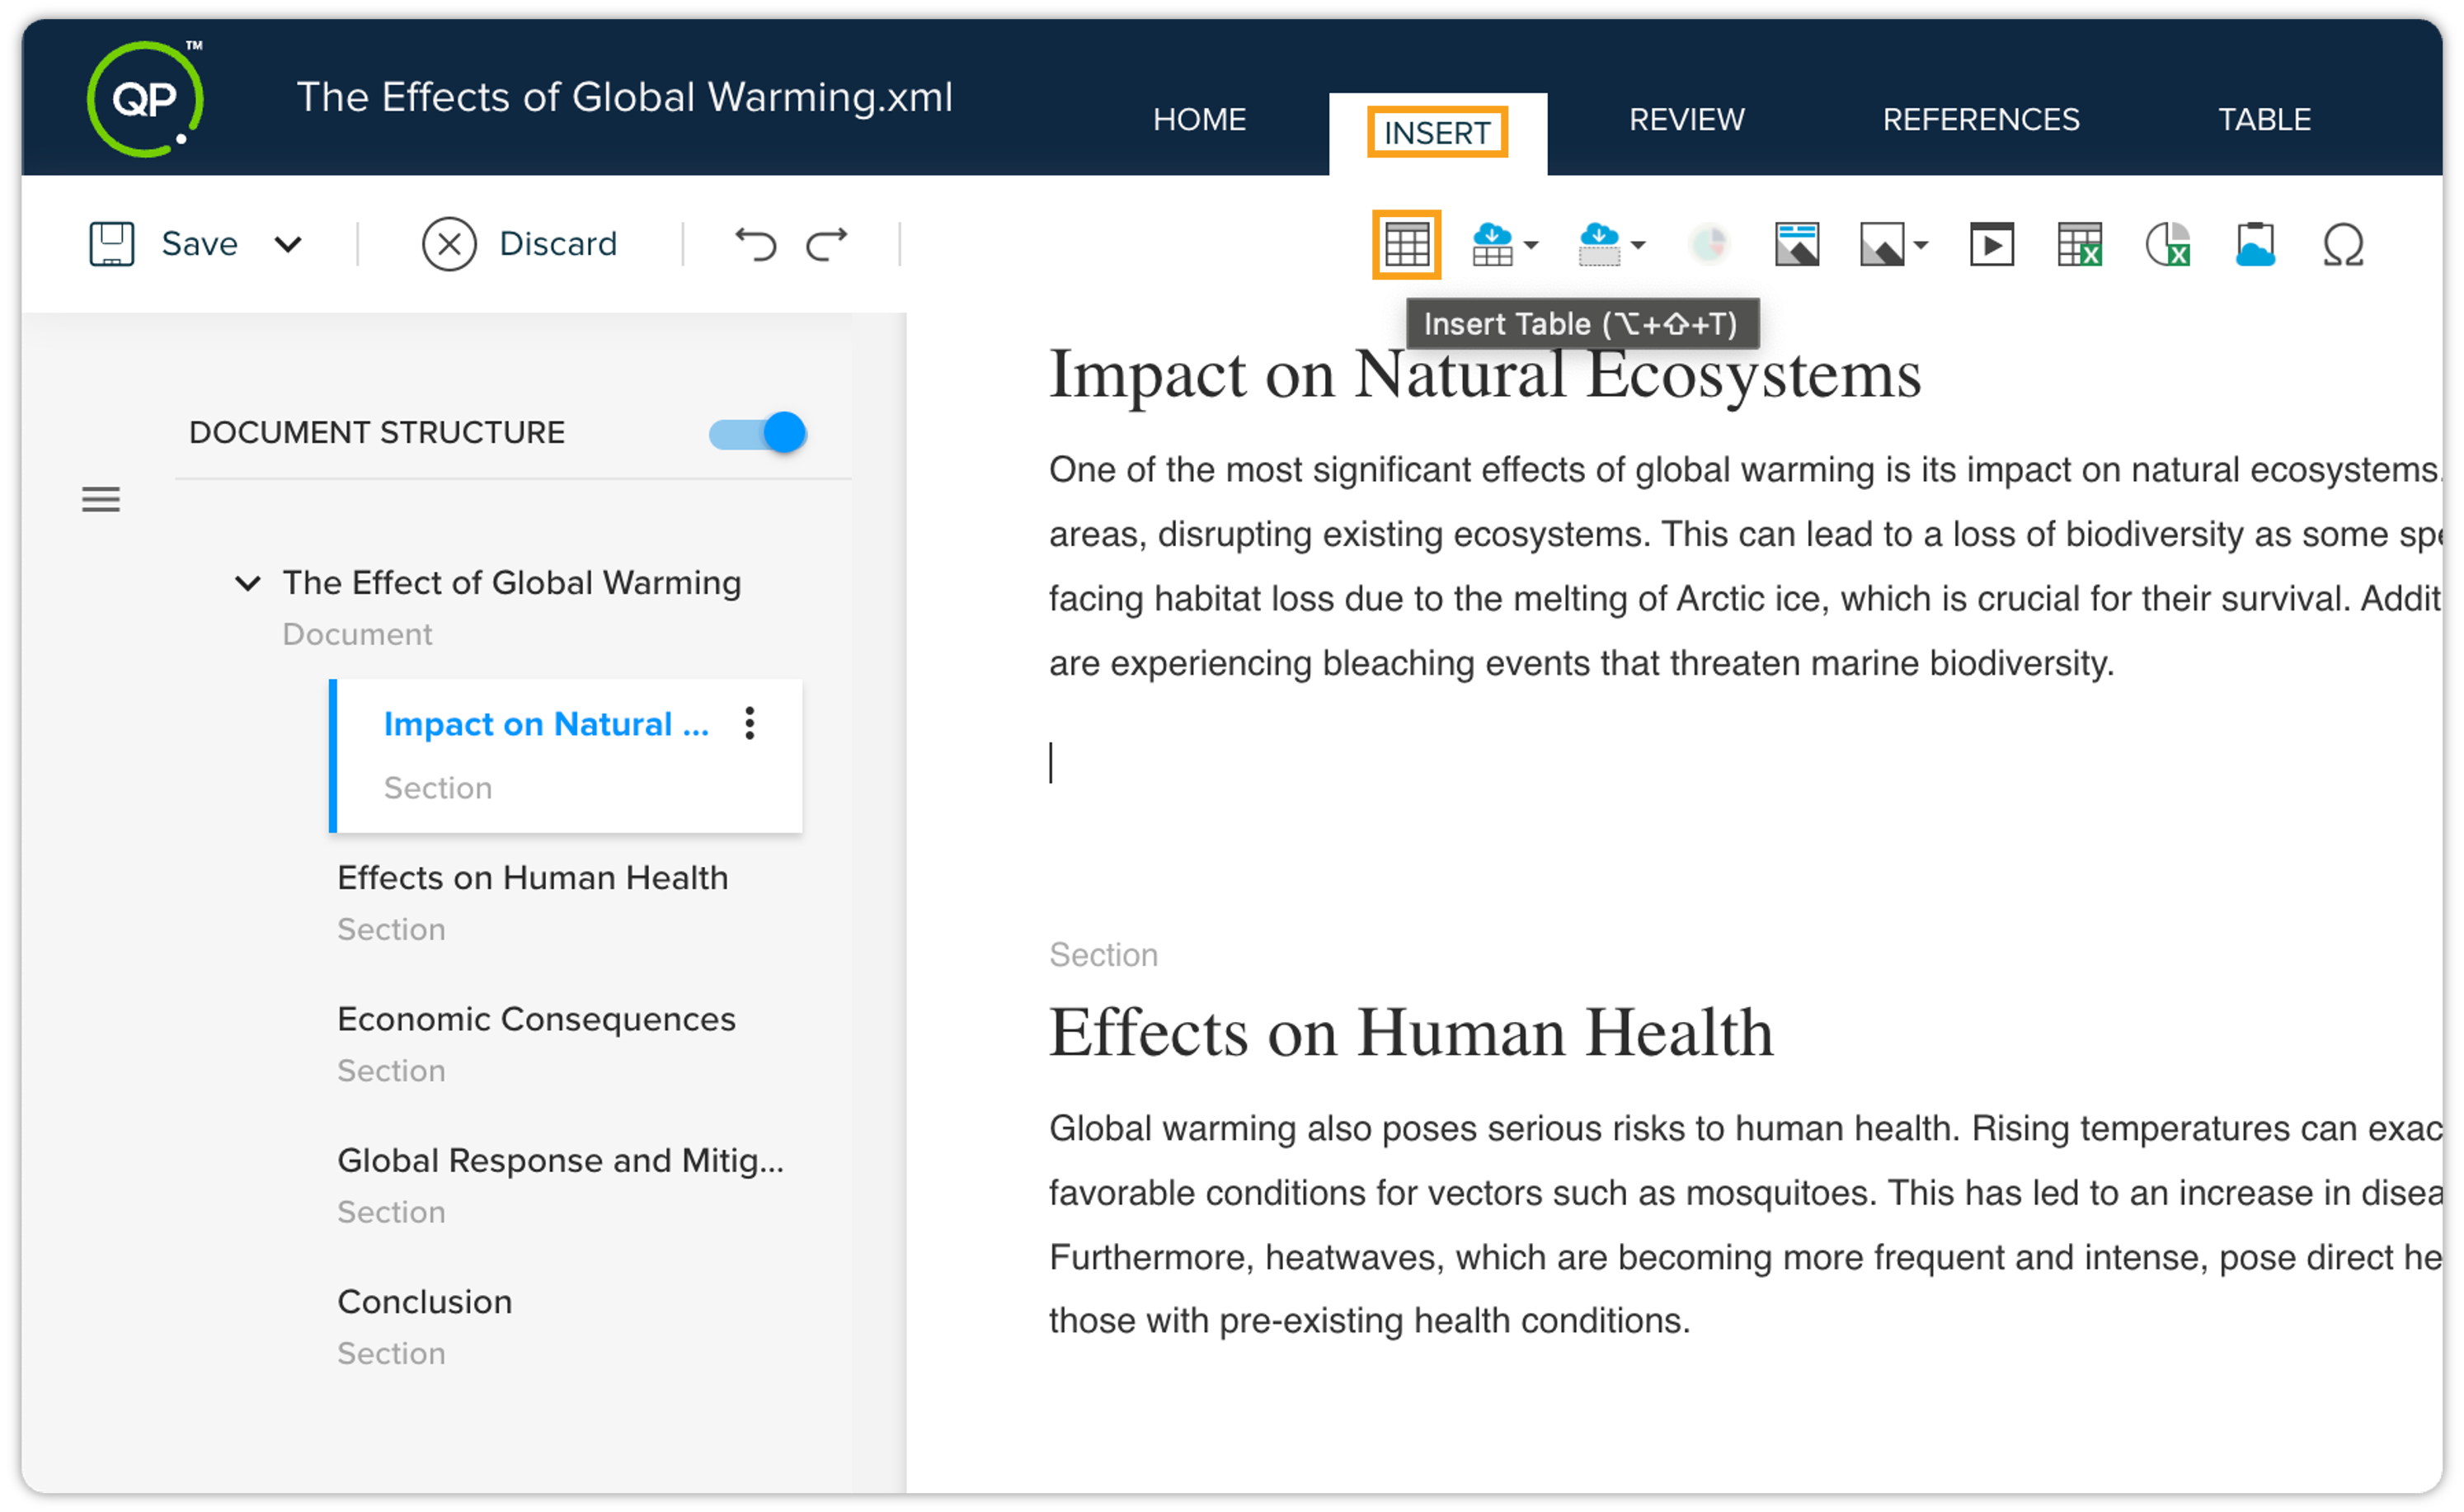
To insert a table directly into your content using the editor:
-
Click on the canvas where you want to place the table.
-
Navigate to the Insert tab. Click the Table
 icon.
-
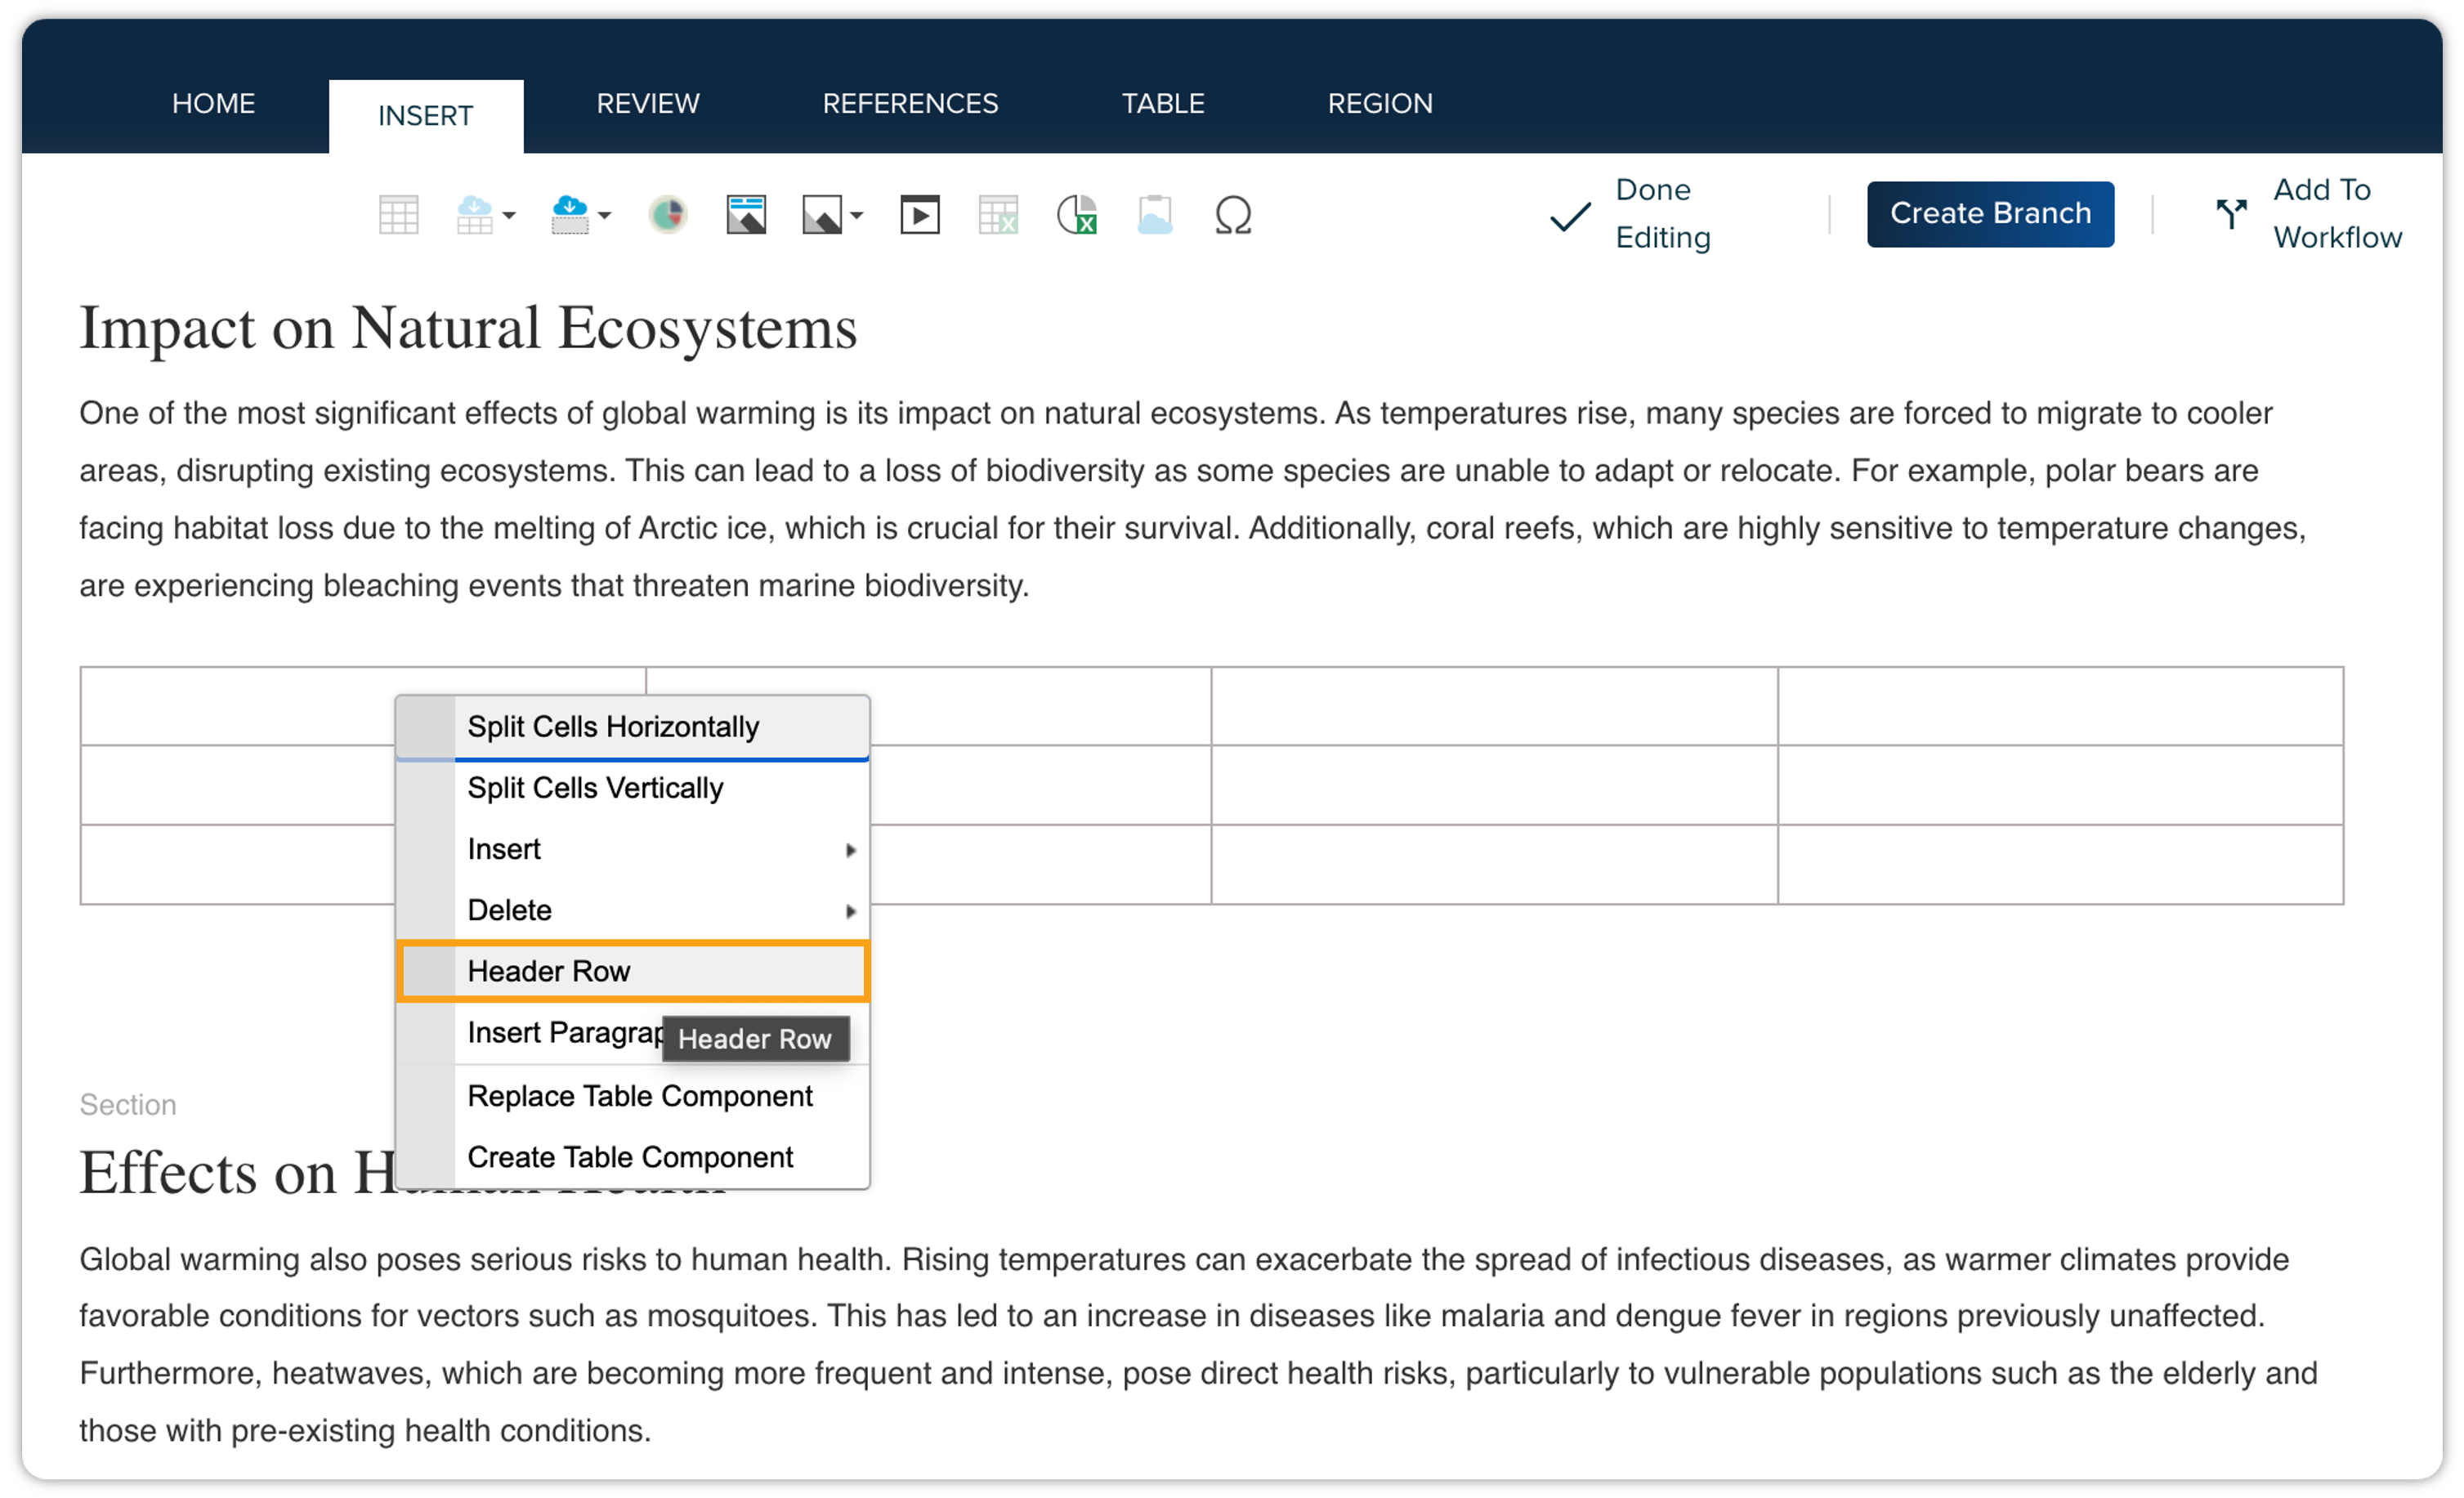
A new table will appear on your canvas with a default size of 4 columns and 3 rows.
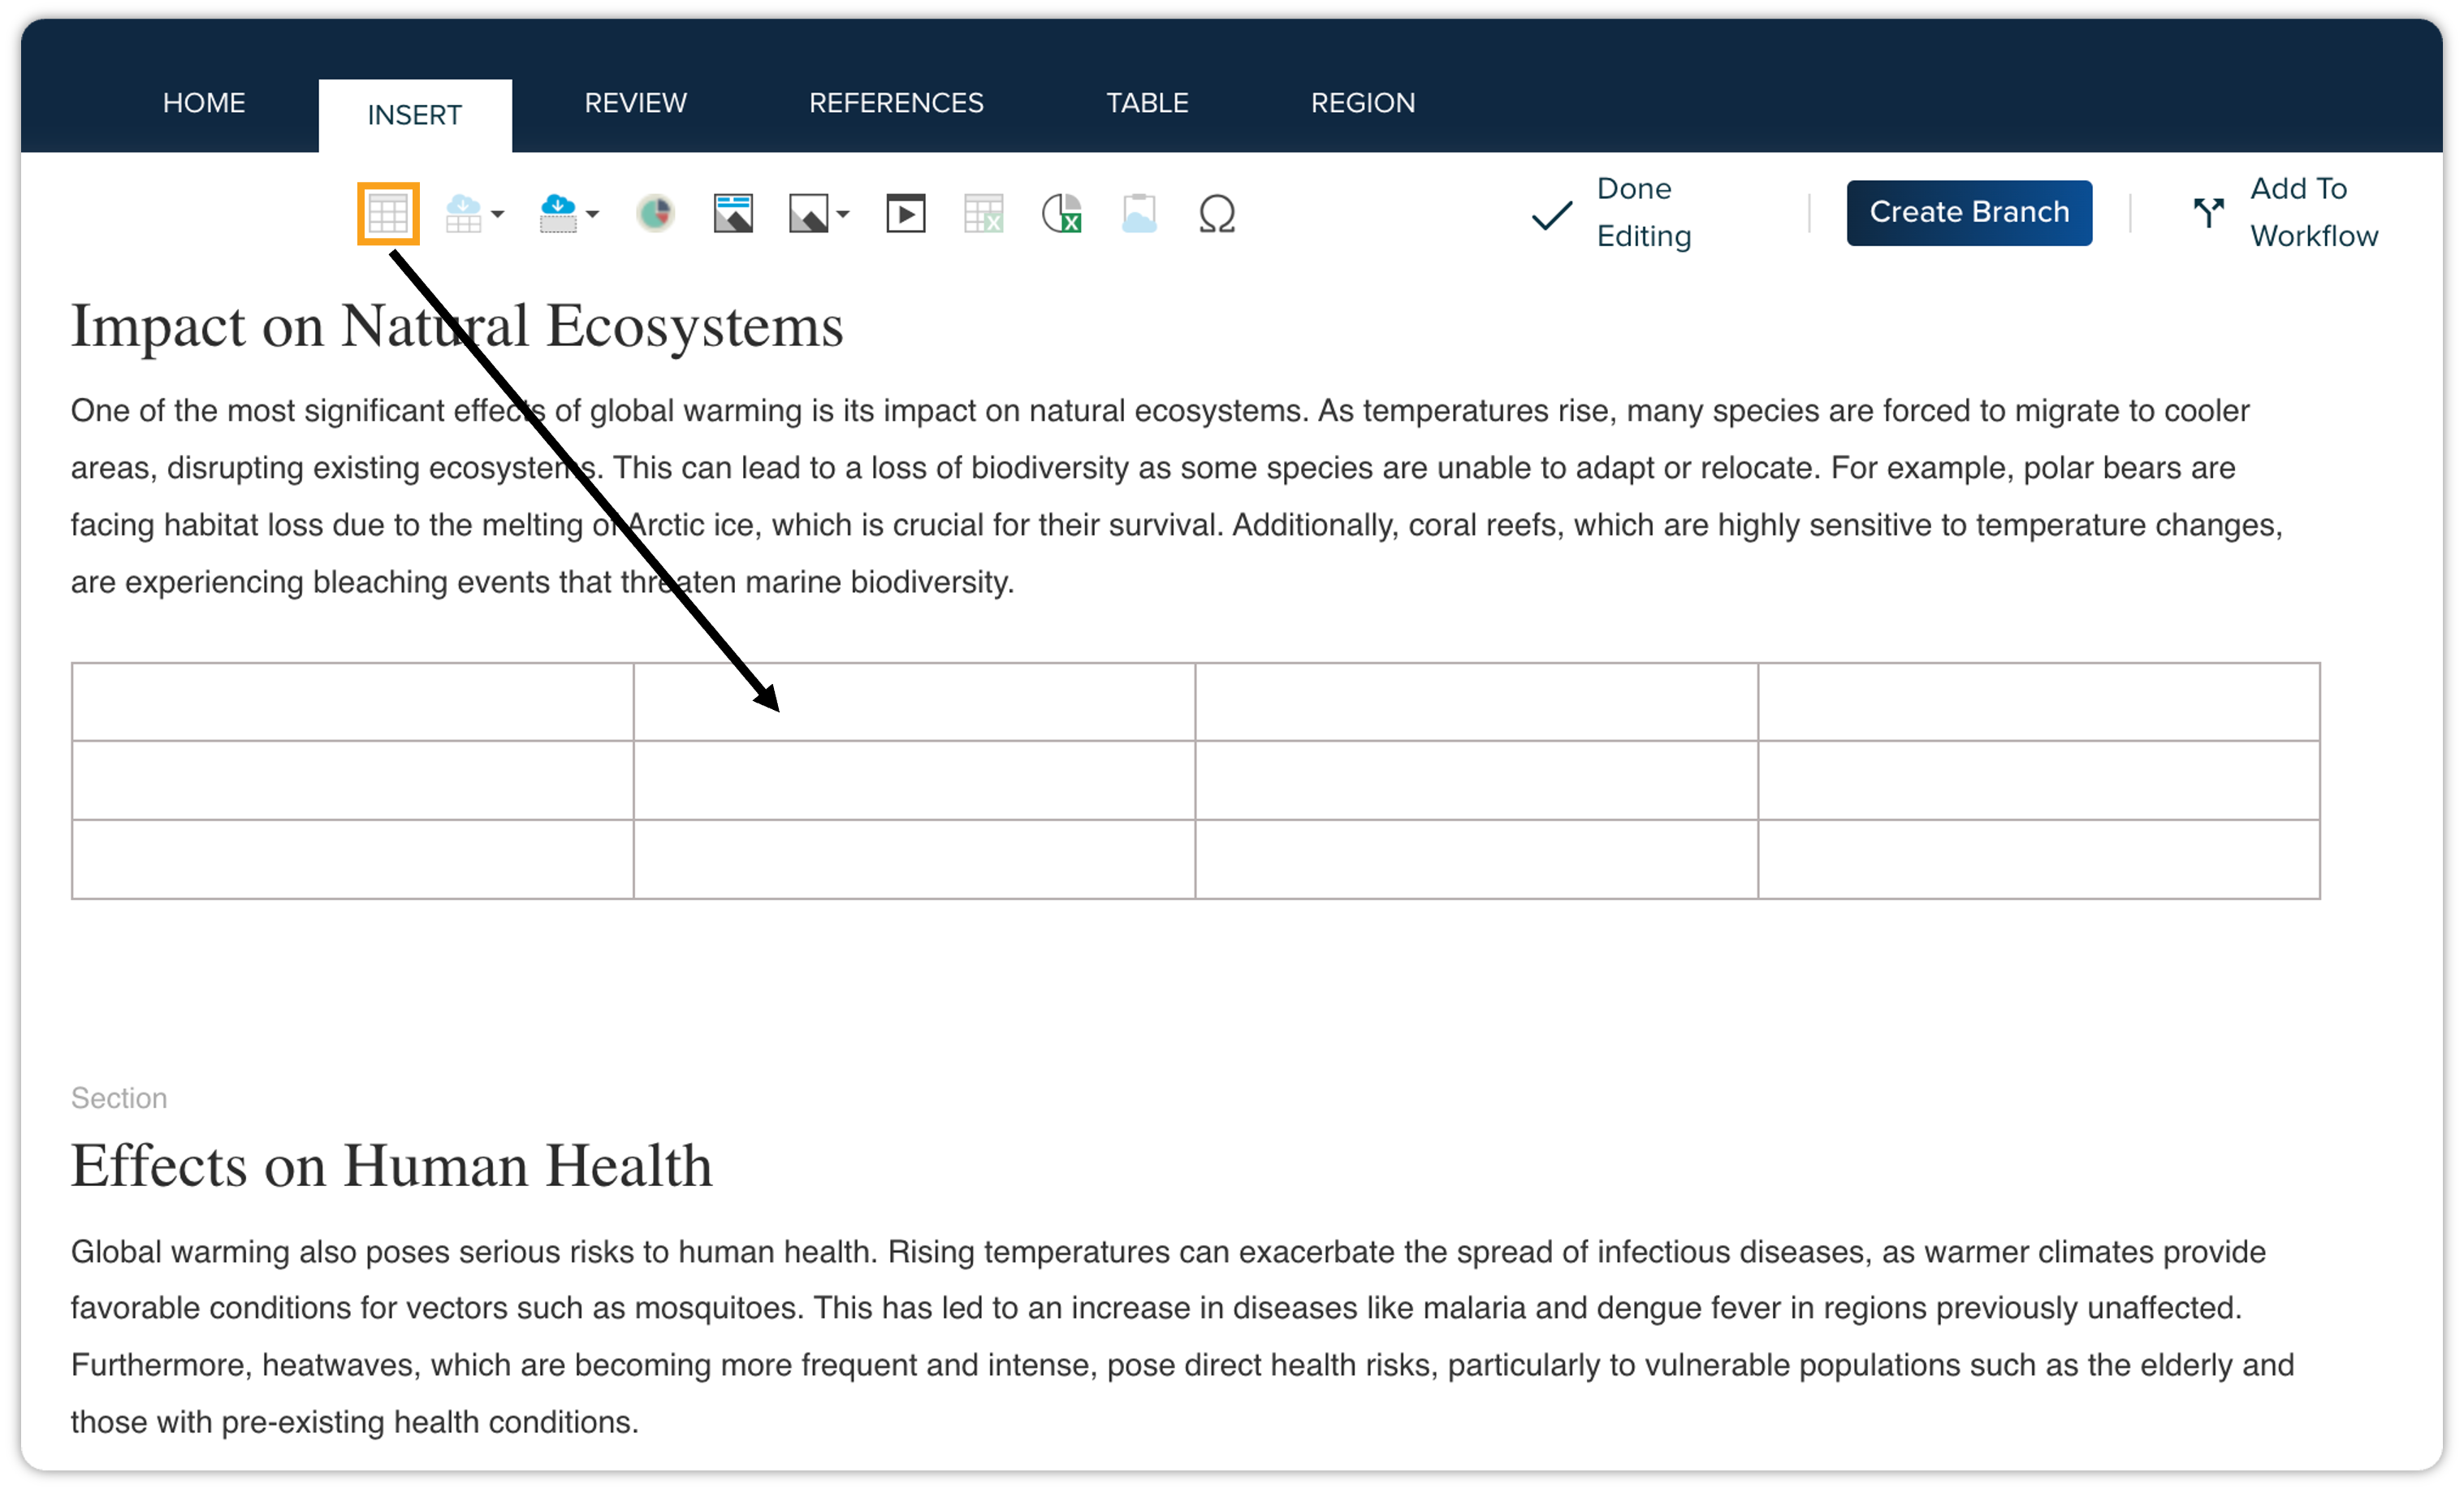
Please note that when you insert a table this way, Quark Author doesn't automatically include a header row. To add one, right-click on the table and select Header Row from the context menu.
To insert a table from the server:
-
Click on the canvas where you want to place the table.
-
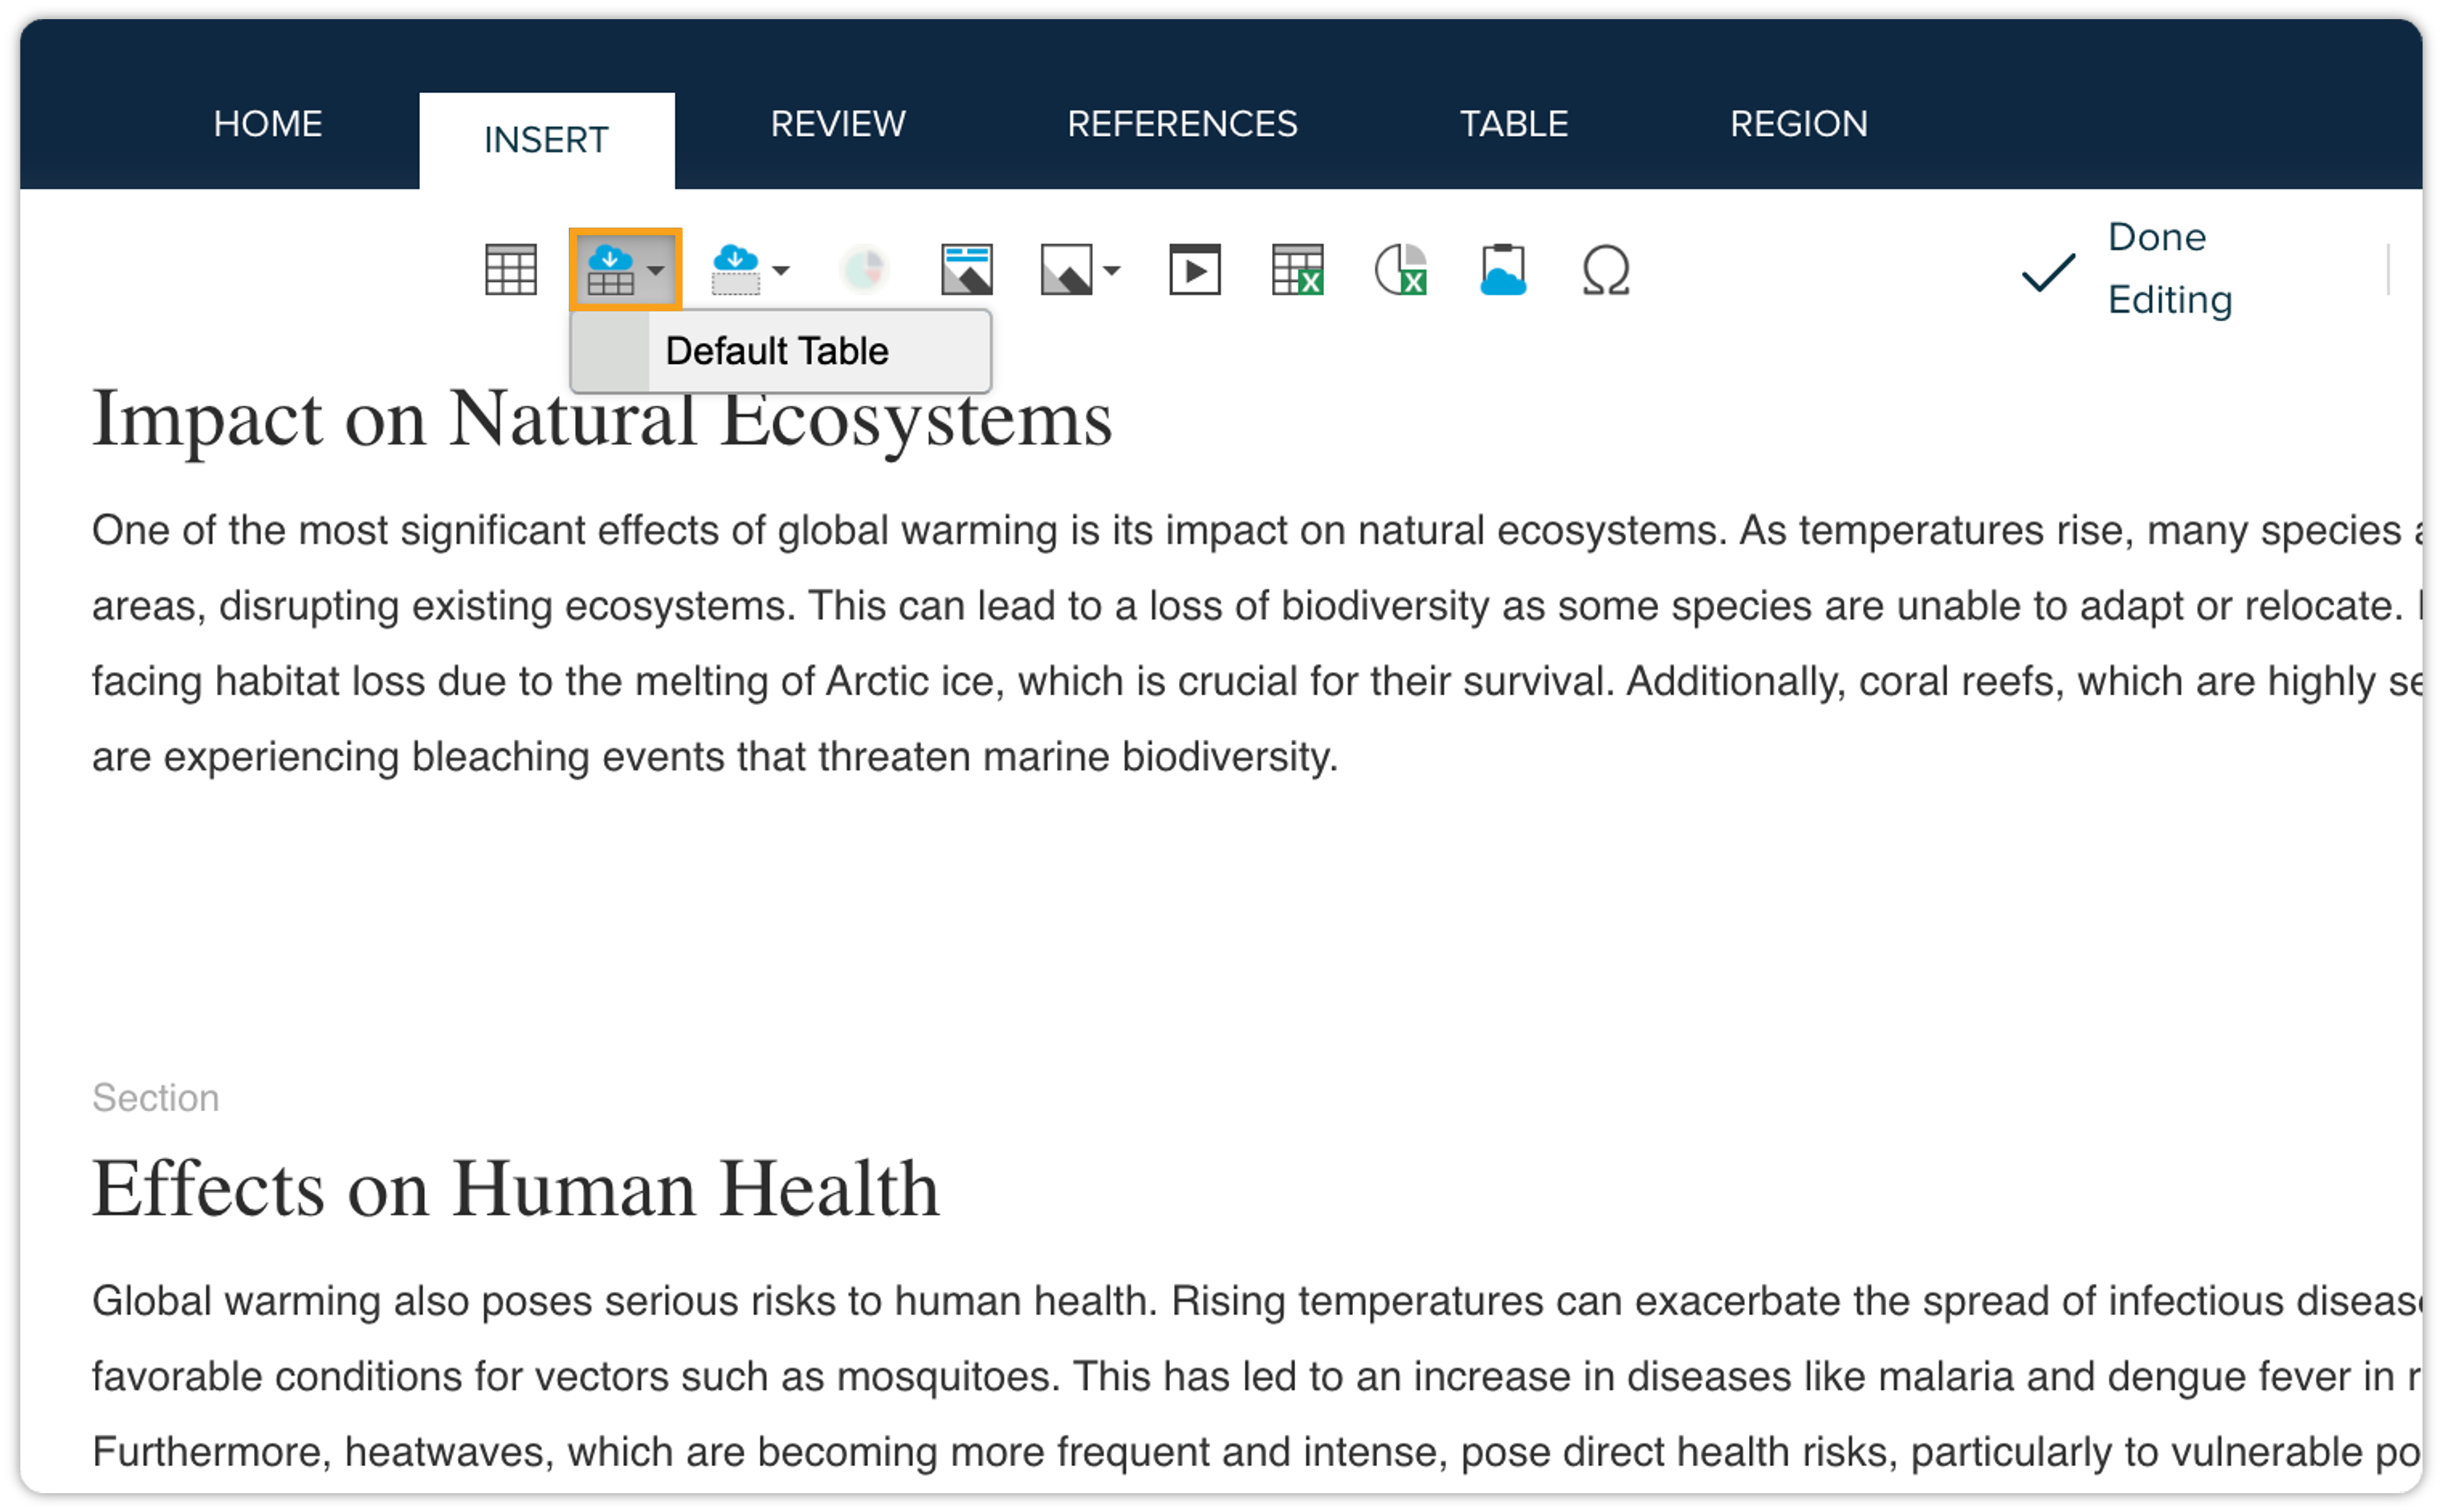
Navigate to the Insert tab. Click the Insert Table Component
 icon and then click Default Table.
-
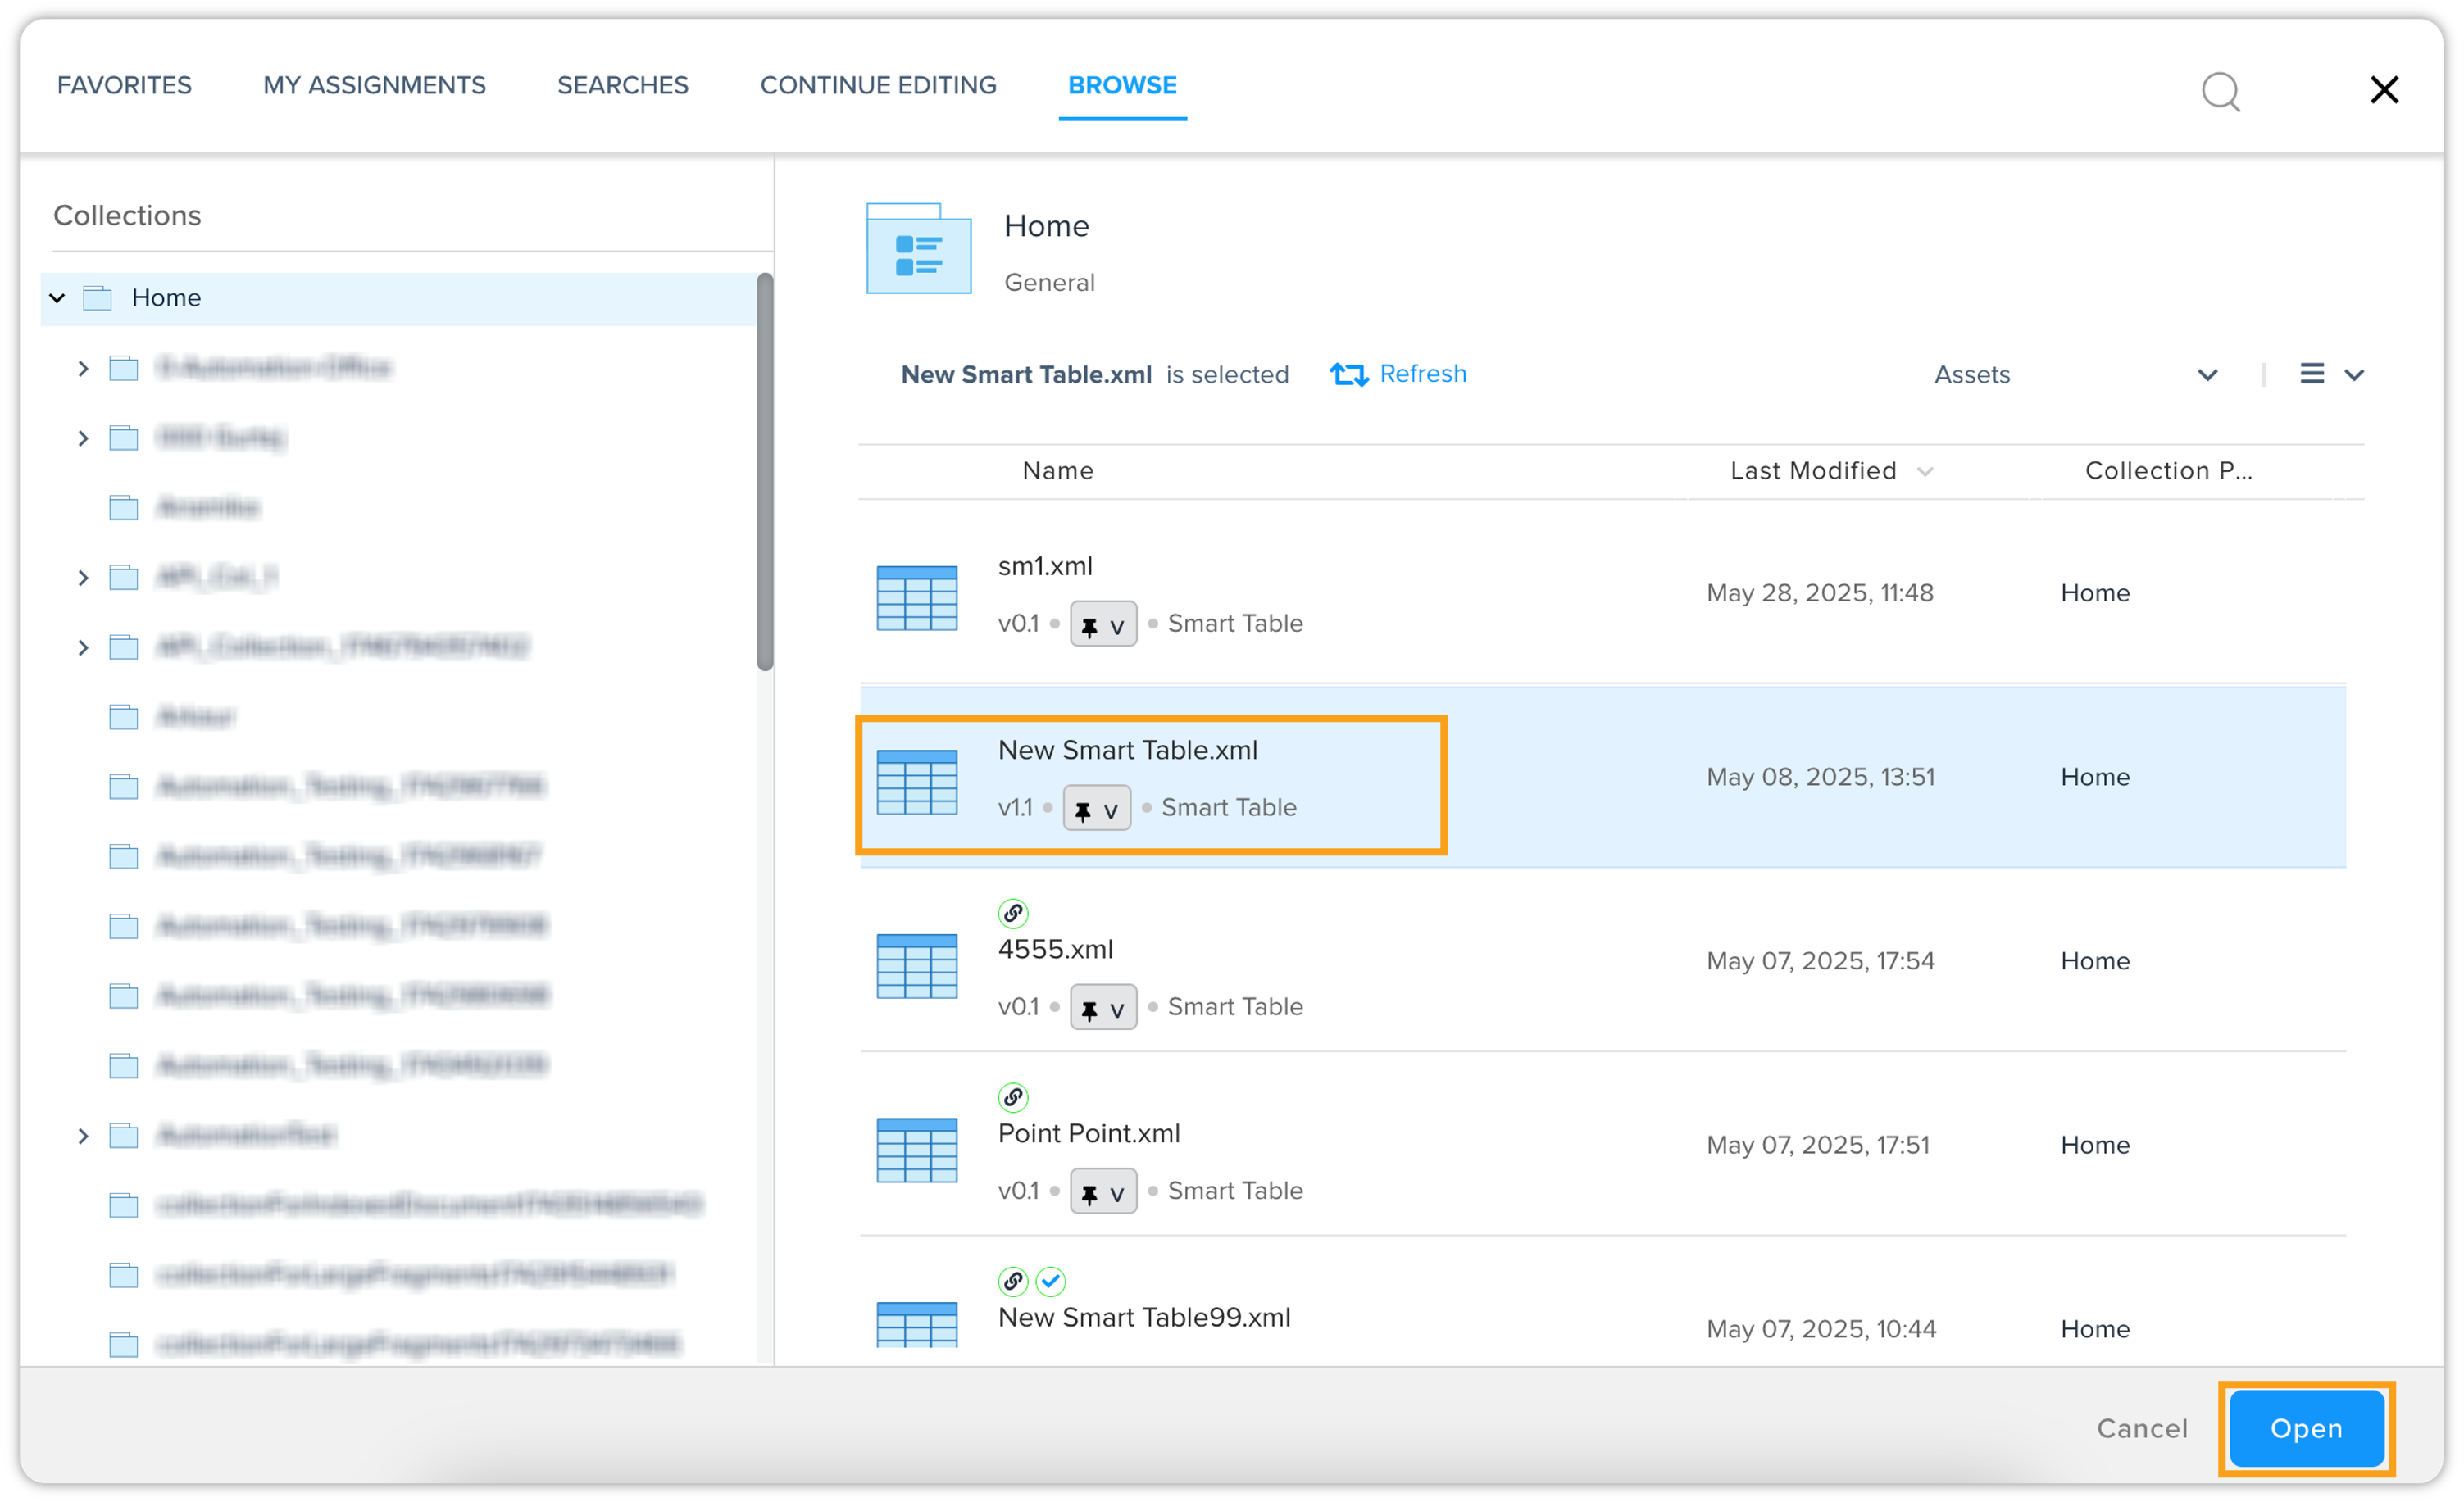
QPP opens the Asset Picker dialog.
-
In the Asset Picker dialog, navigate to the table you want to add. Select it and then click Open.
-
QPP inserts the table you have selected.
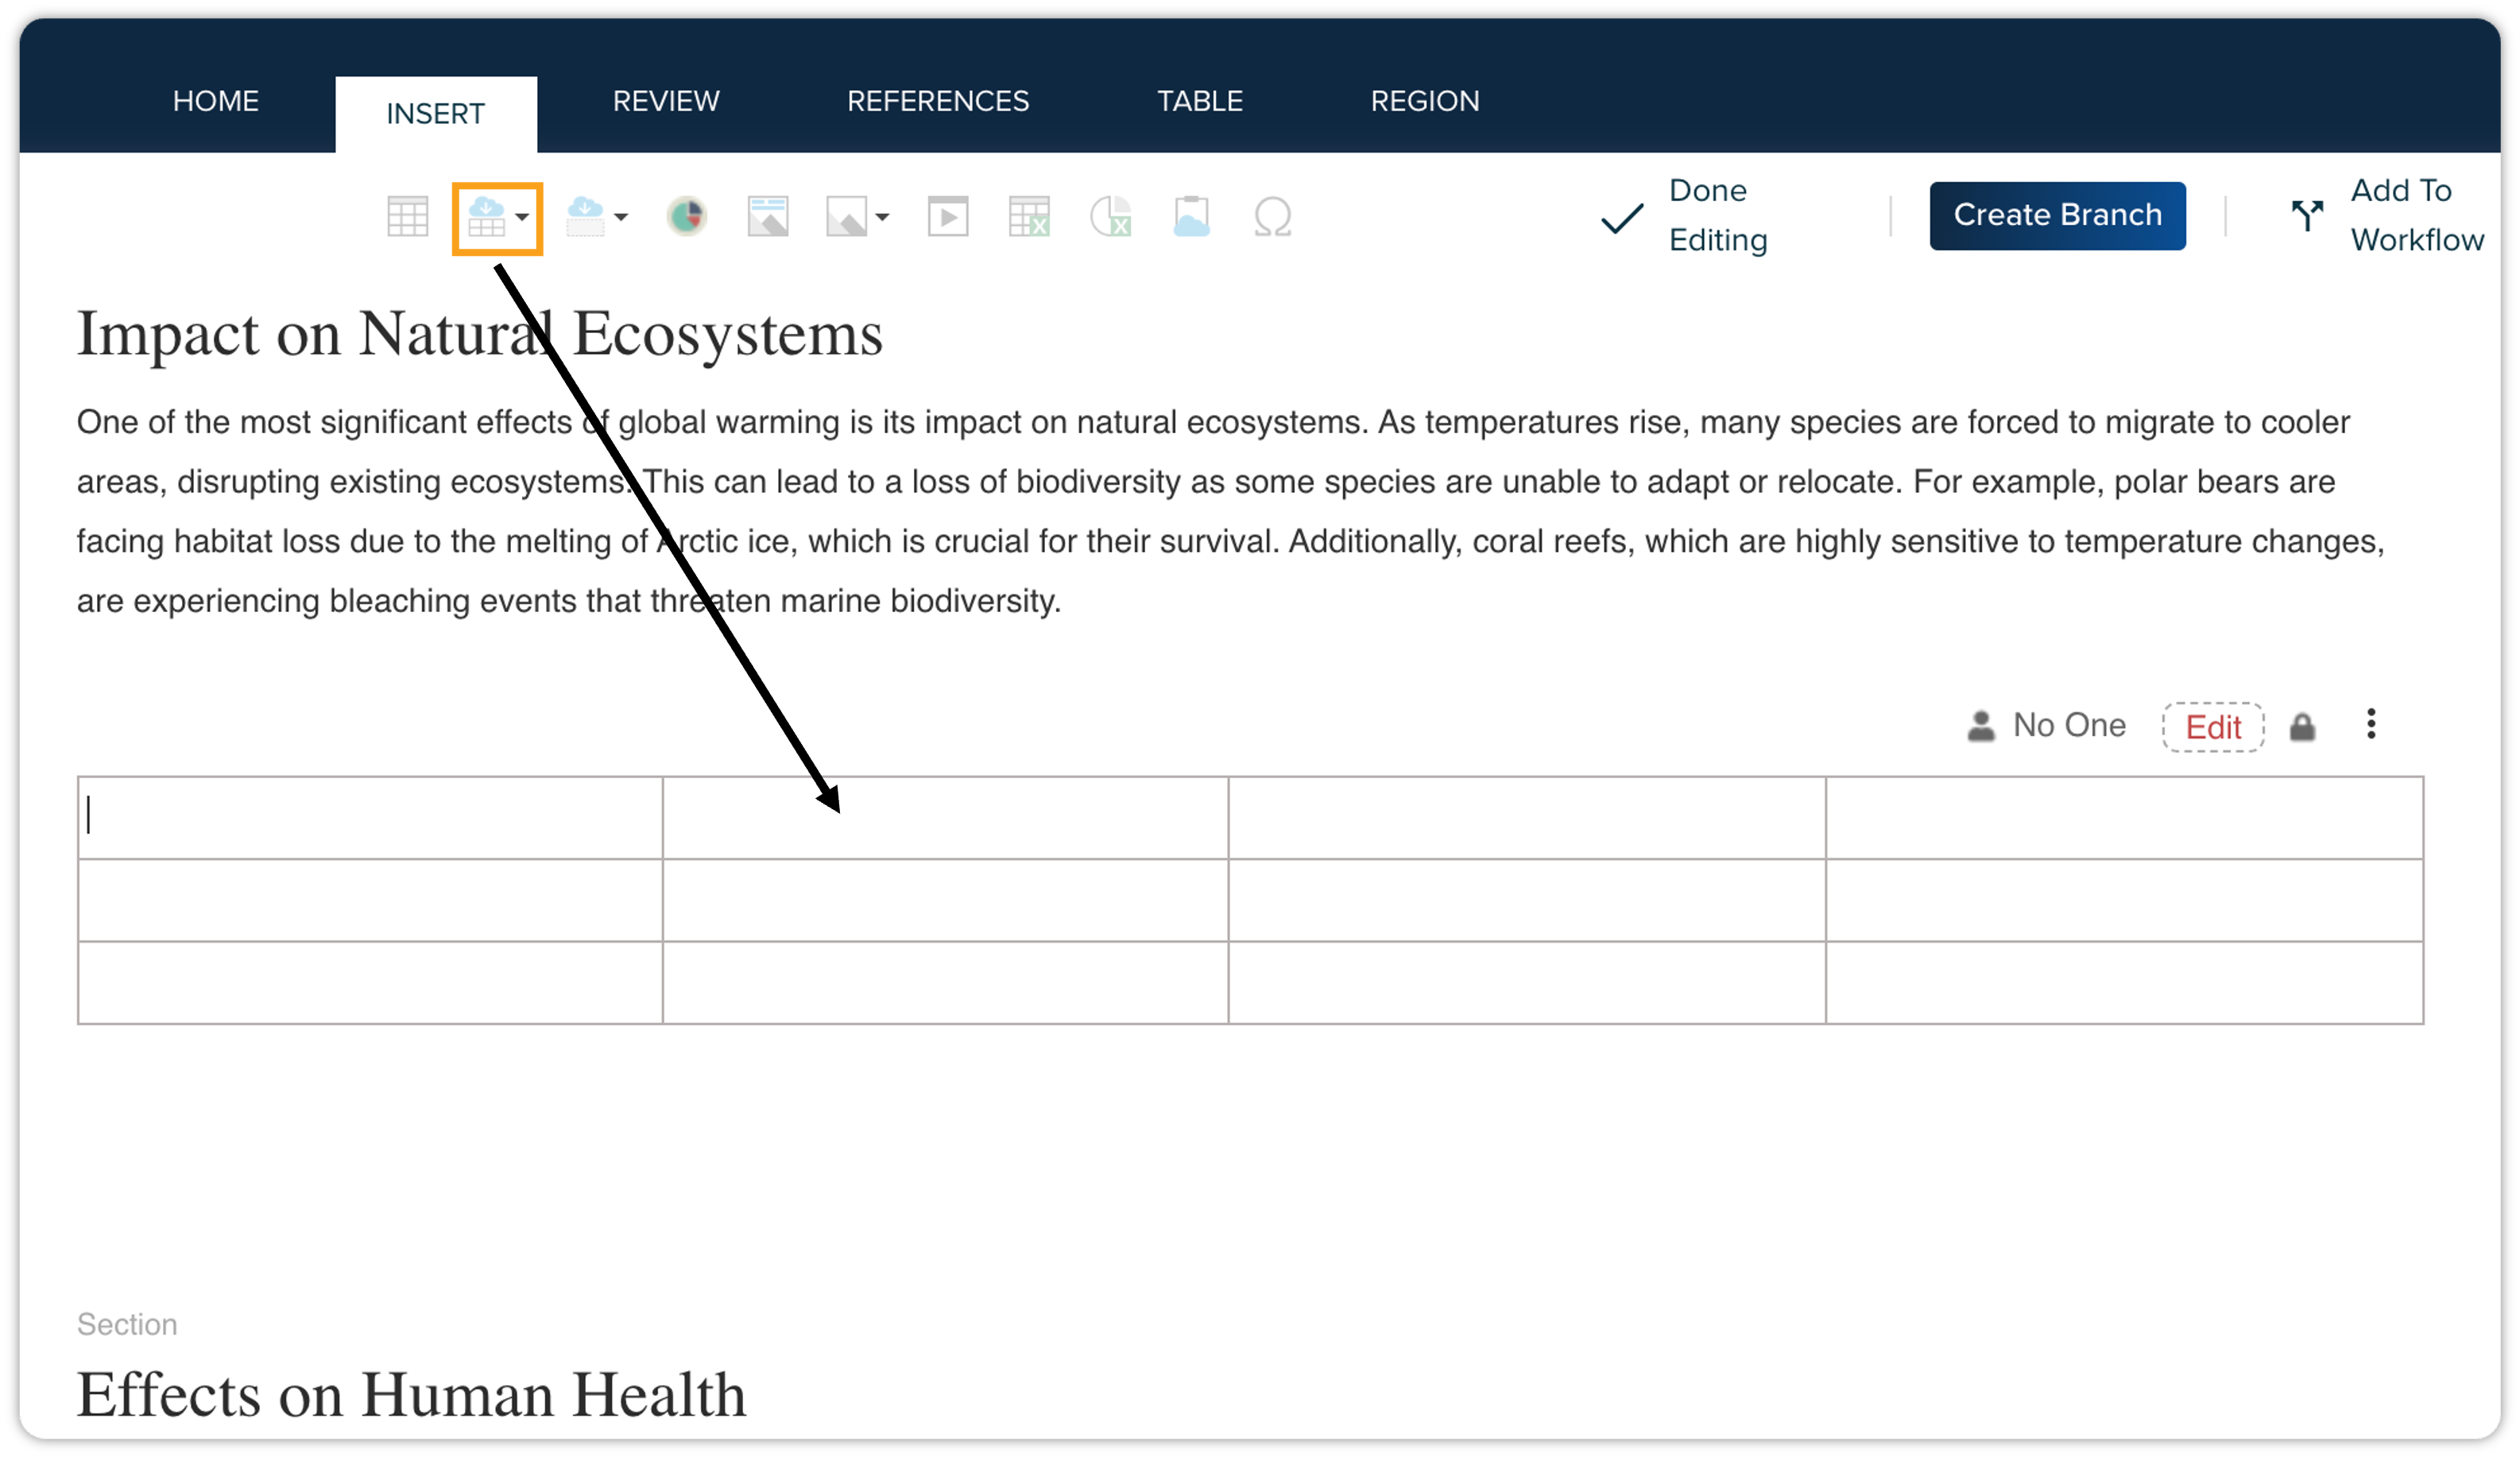
When you insert a section, table, or any other component from the server, QPP provides
a few options through the kebab menu  that allow you to use and edit the table based on your specific requirements through
a toolbar called the Component Reference Toolbar.
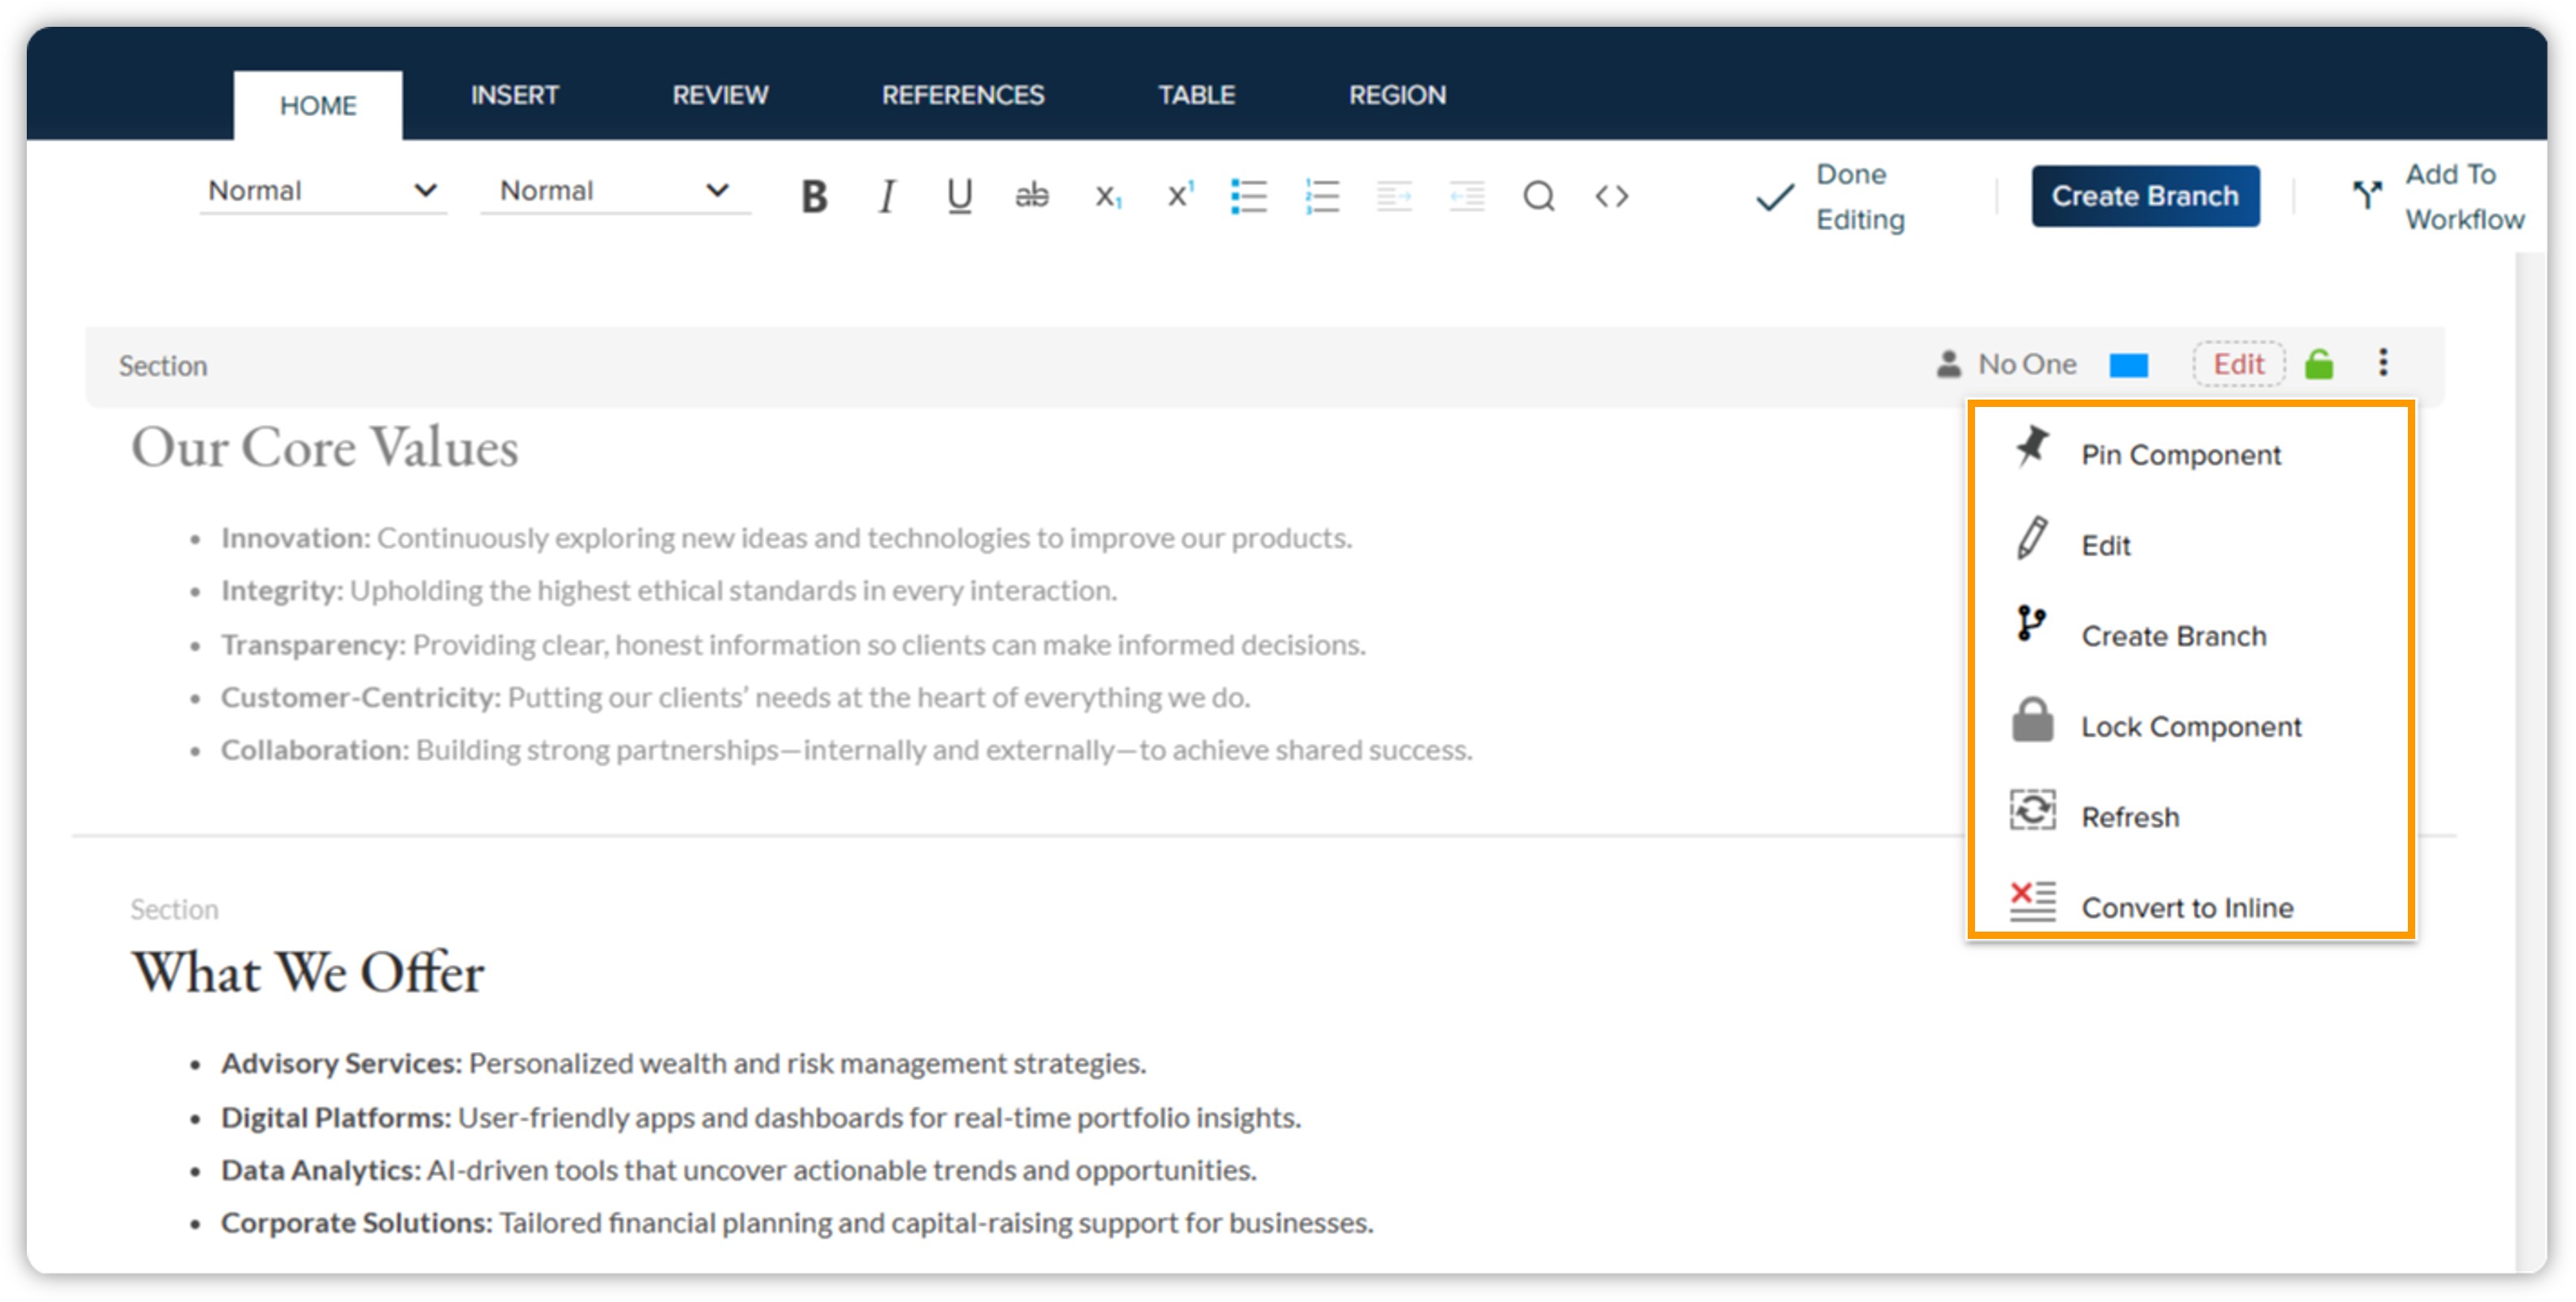
The options on the Component Reference Toolbar vary based on the content type of the component you have added from the server. For example, for a table from the server, the Component Reference Toolbar contains the following options:
-
Pin Component: This allows you to pin the current version of the table component in the current document, so that, when you or another author updates the table on the server, the current version remains intact in the current document.
-
Edit: This allows you to edit the table component on the server from within the document.
-
Create Branch: This allows you to create a new branch for the component. For detailed information, refer to the Branching section.
-
Lock Component: Locks or unlocks the components to prevent them from being deleted or converted into inline content once inserted. For detailed information, please refer to the Lock/Unlock Component section.
Only users with the appropriate role or permission can use this option. -
Add to Workflow: This allows you to assign or update a workflow status to the table.
-
Refresh: Refreshes the table to reflect any recent or ongoing changes in the table.
-
Convert to Inline: Converts the table component to a simple table to allow you to make updates that don't affect the table component stored on the server.
Insert a Region Component
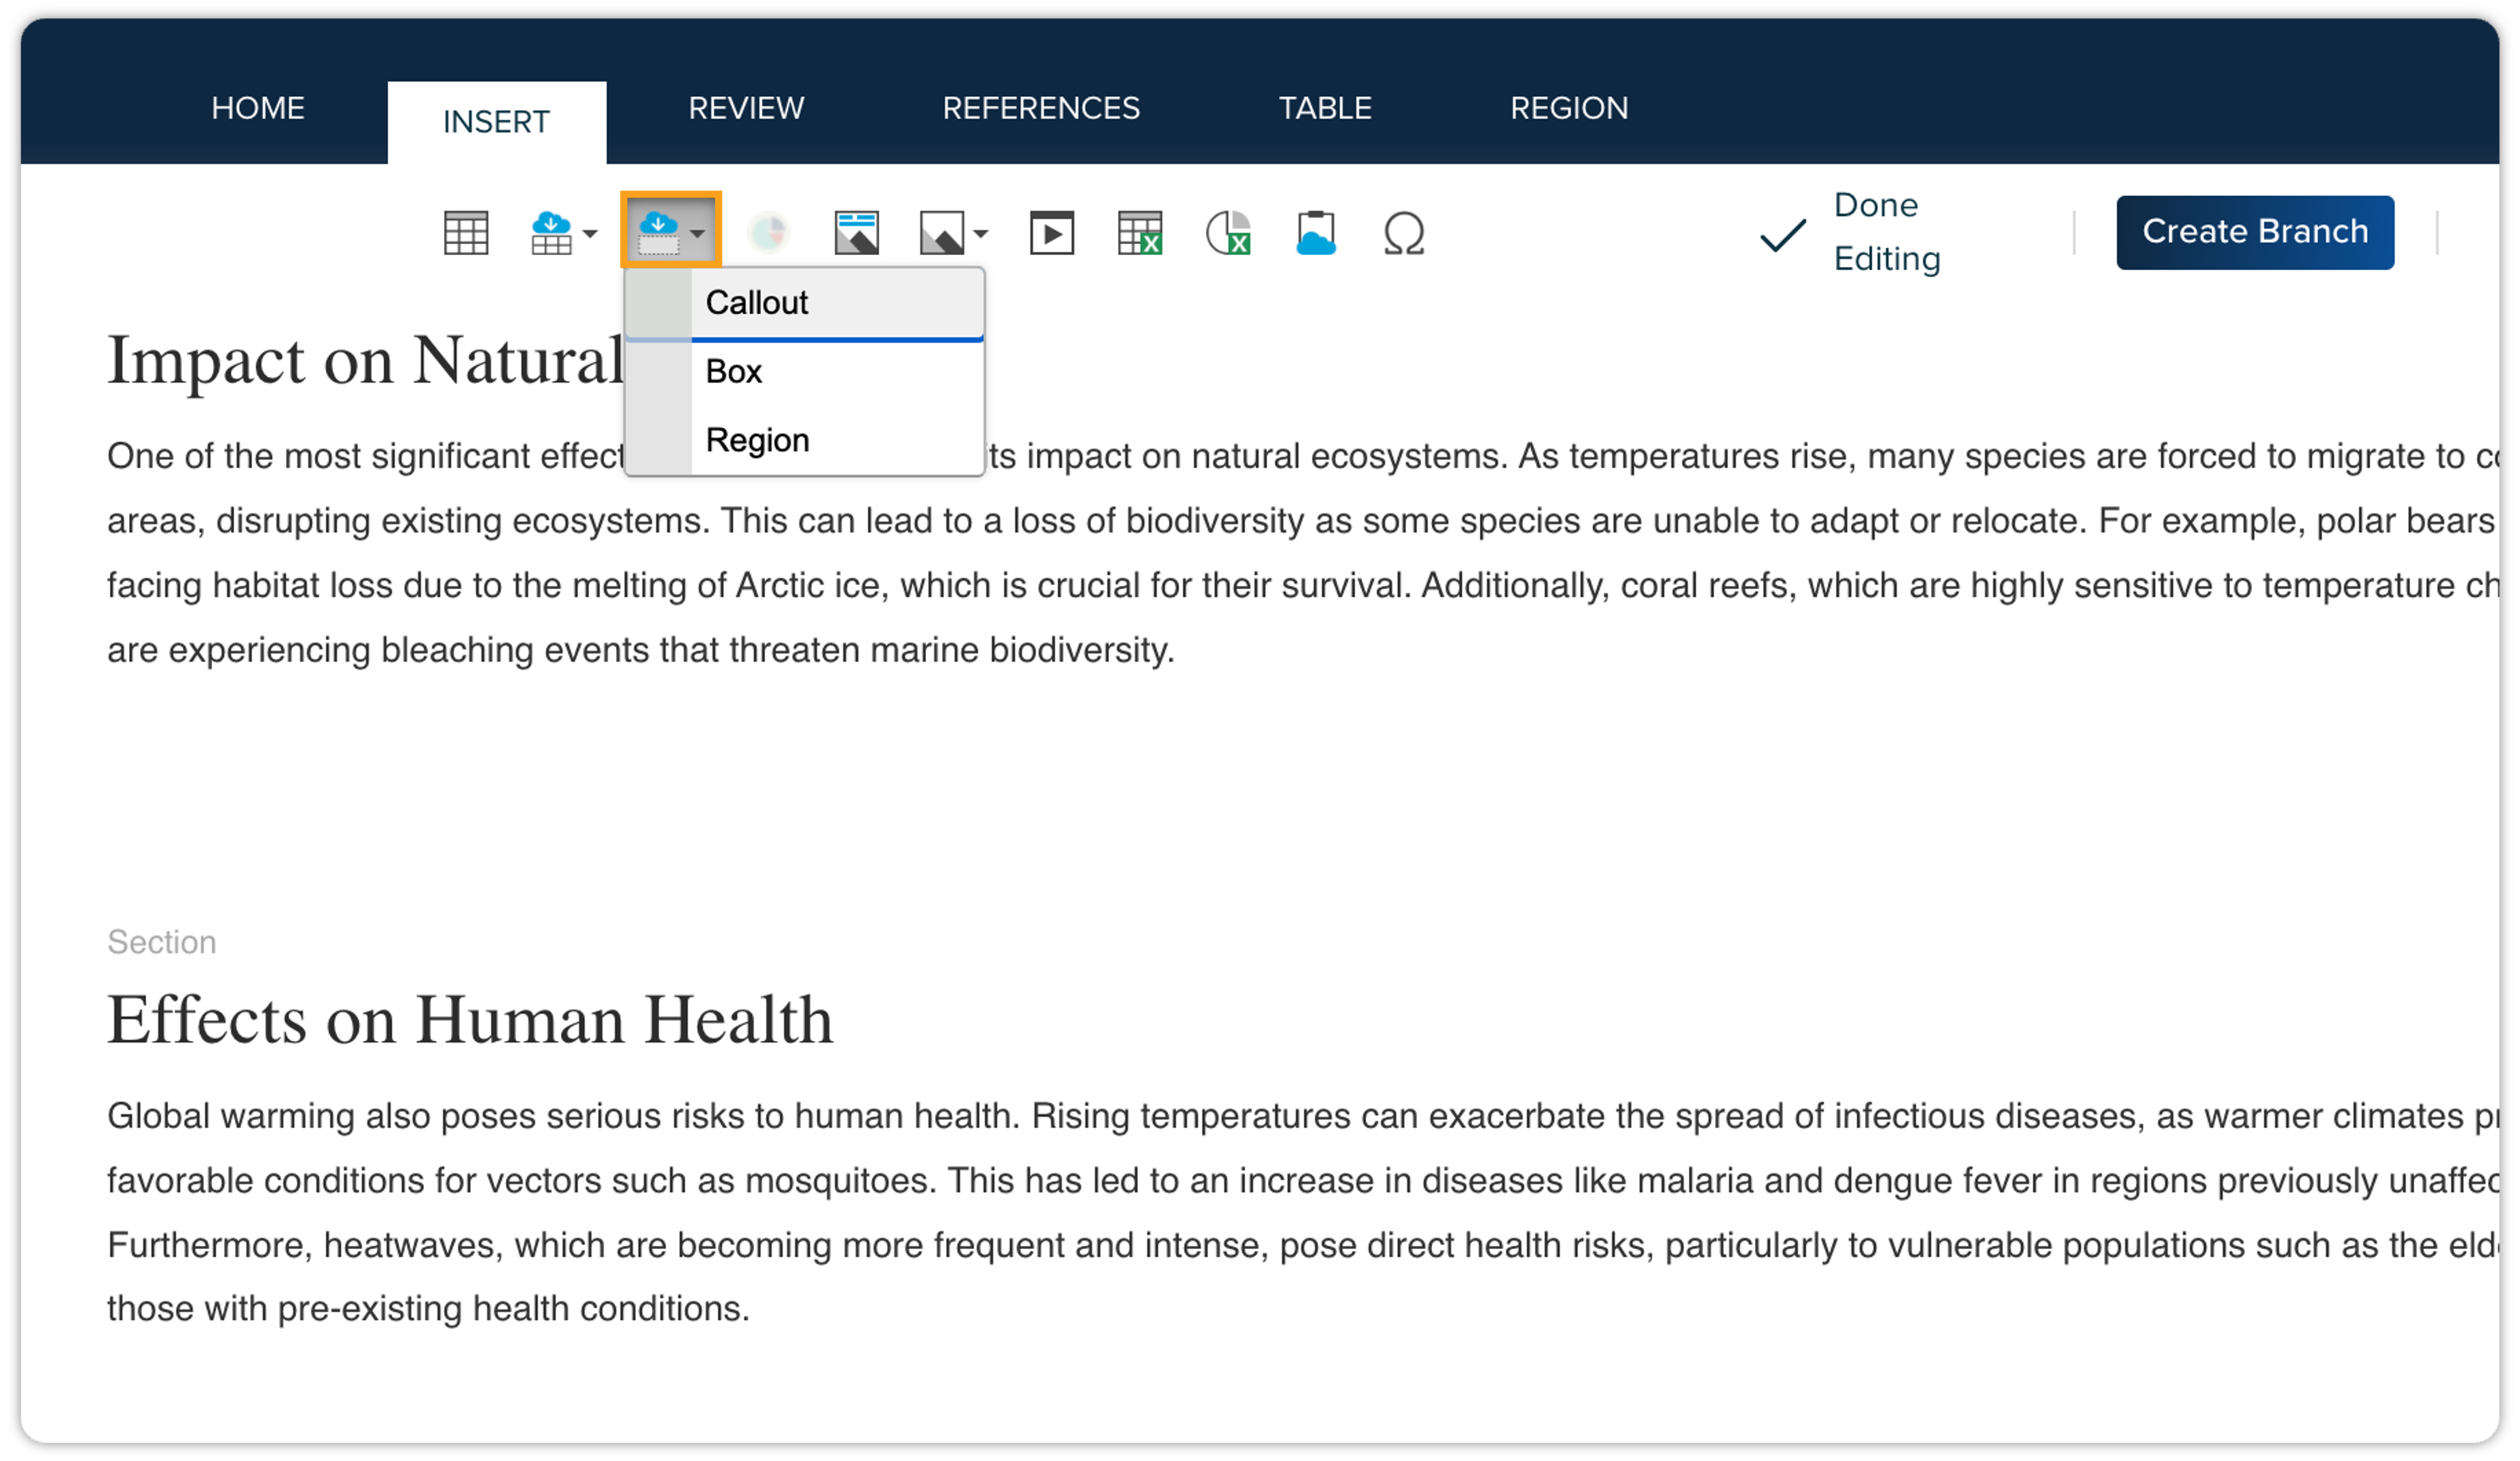
You can insert a callout/box/region from the server, in the same manner, you insert a table from the server.
Insert an Image
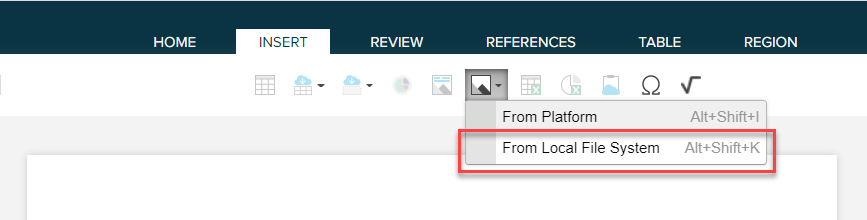
You can insert an image from your local machine and from the server. The steps to insert an image from the server are the same as inserting a table or region from the server. To insert an image from your local machine:
-
Under the tab Insert, click the Insert Image icon
 to expand the insert image options.
-
Click From Local File System to open the Open file explorer dialog.
-
Select the image you want to insert and then click Open.
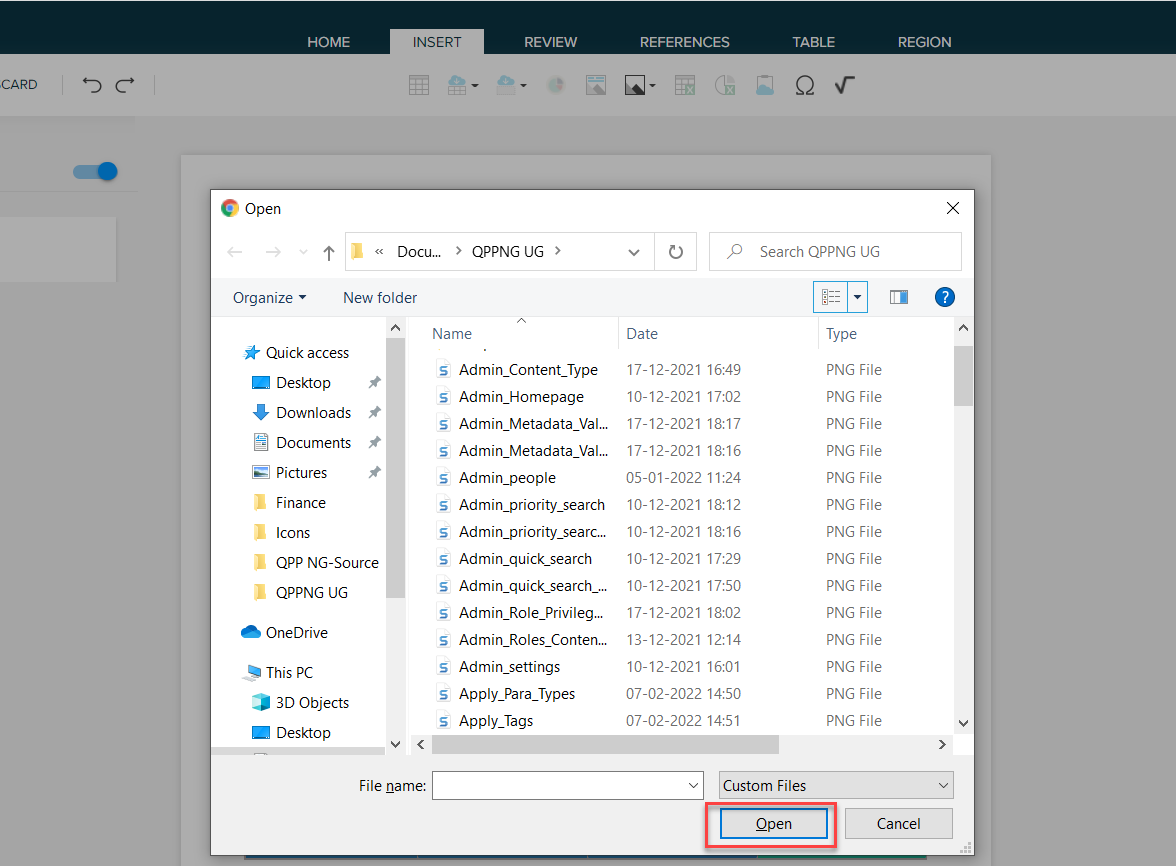
-
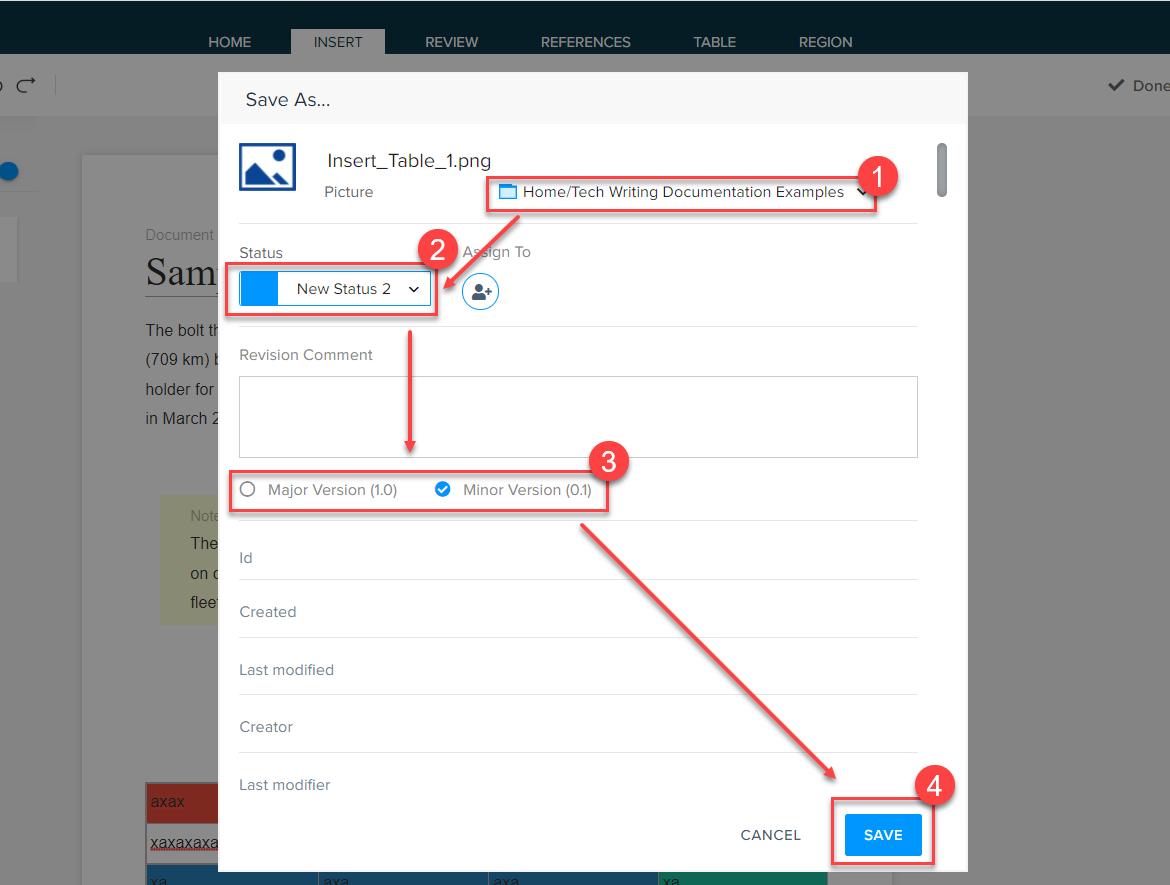
QPP opens a dialog to save the image from your local machine to the server.
-
Select a location on the server, a workflow status, and version (Major or Minor) for the image, and then click Save.
-
QPP inserts the image in the document.
Insert a Figure
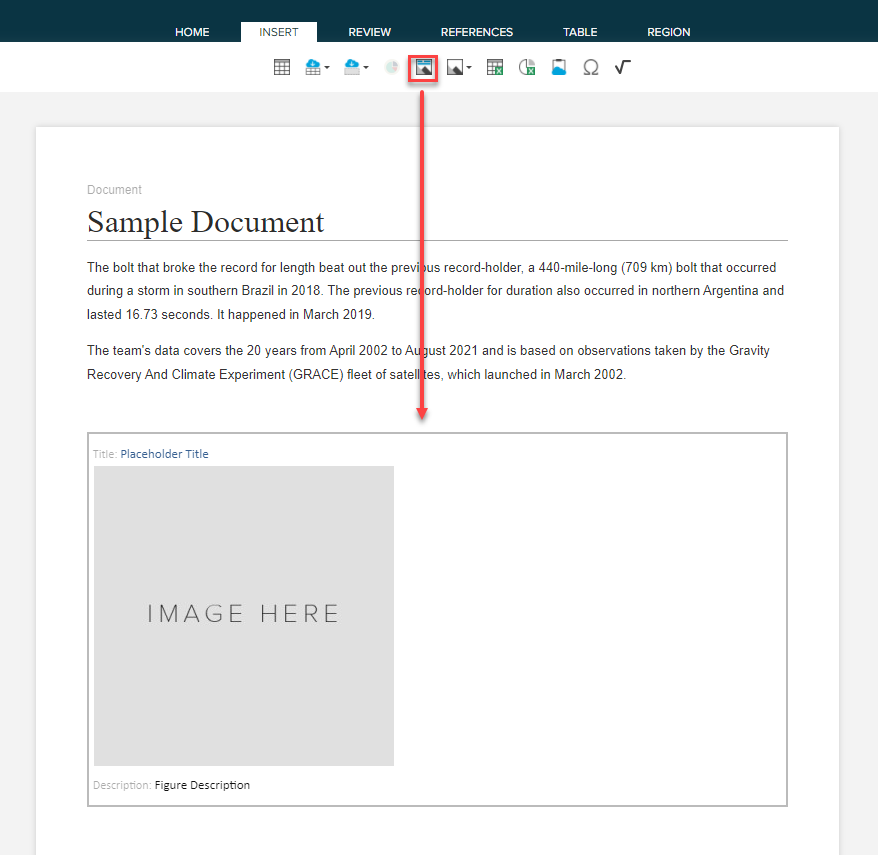
In QPP, a figure is a placeholder for an image that also contains a title and description of the image. To insert a figure:
-
Under the tab Insert, click Insert Figure icon
 .
-
QPP inserts a figure in the document, in which, you can insert an image from the server or from your local file system.
Insert an Excel Table/Chart
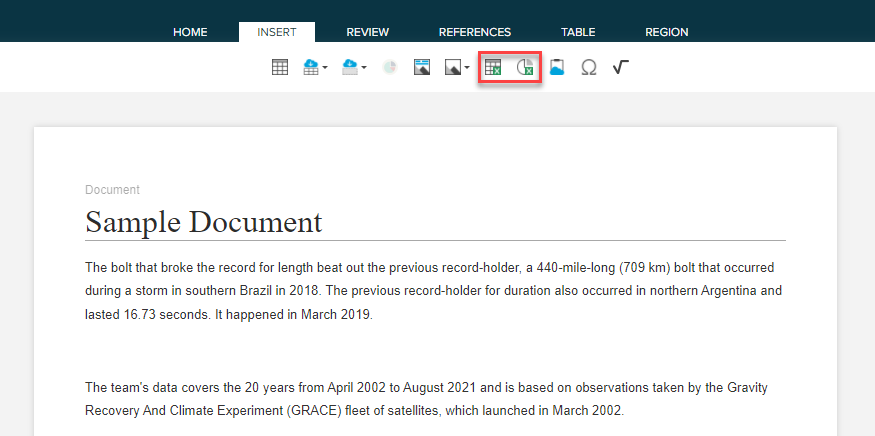
You can insert an Excel table/chart that is already stored on the server. To insert an Excel table/chart:
-
Under the tab Insert, click the Insert Excel Table icon
 or click the Insert Excel Chart icon
 to open the Asset Picker dialog.
-
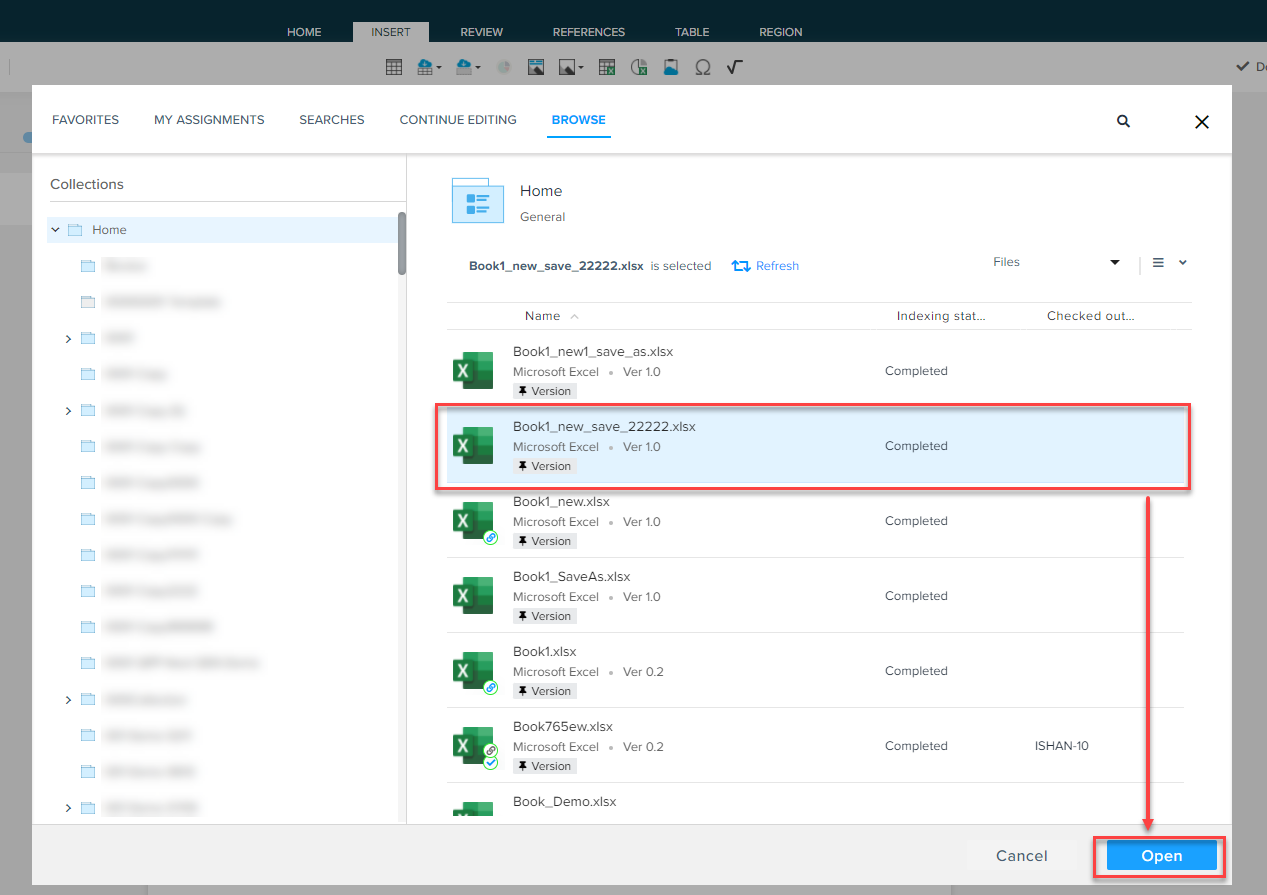
In the Asset Picker dialog, navigate to the Excel file you want to add a table/chart from.
-
Select the Excel file and then click Open to open the Insert Table/Insert Chart dialog.
-
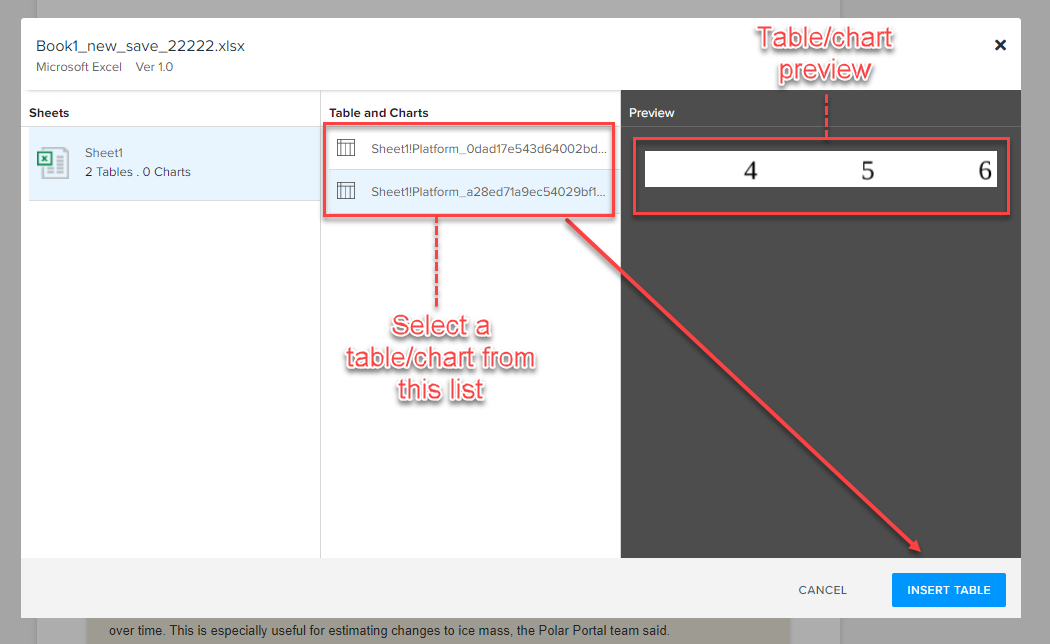
The Insert Table/Insert Chart dialog lists all the tables and charts in the Excel file, which you can select to preview.
-
Click the table/chart you want to add and then click Insert Table/Insert Chart.
-
QPP inserts the Excel table/chart in the document.
|
Icon |
Excel File Type |
|
|
An Excel file with more than one table/chart. |
|
|
An Excel file with a single table. |
|
|
An Excel file with a single chart. |


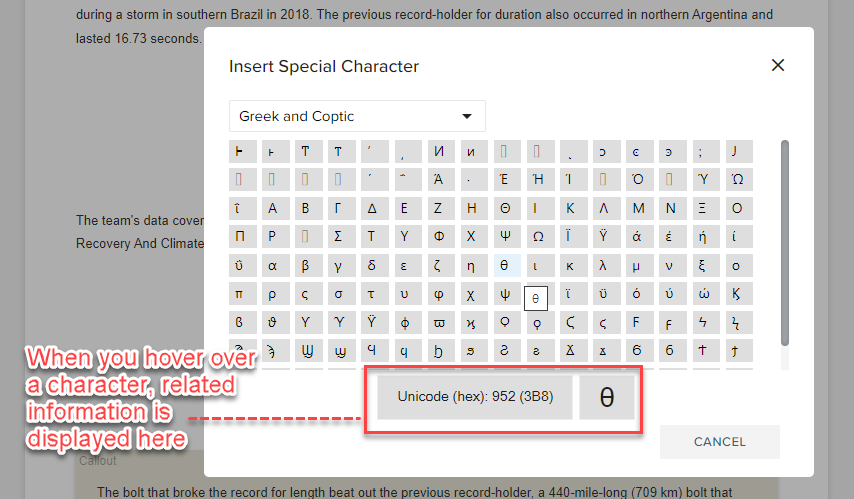
Insert a Special Character
To insert a special character:
-
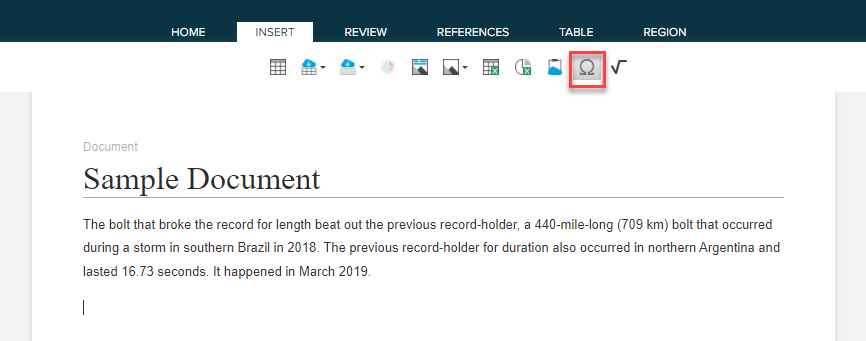
Under the tab Insert, click the Insert Special Character icon
 to open the Insert Special Character dialog.
-
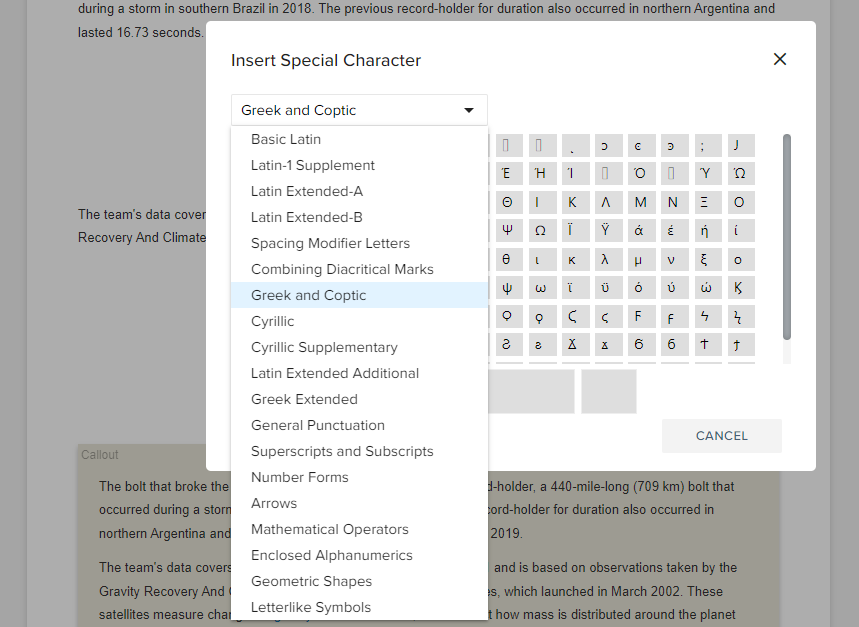
In the Insert Special Character dialog, click the category of special characters that you want to add.
-
Select the character that you want to add.
-
QPP inserts the character in the document.
Insert Math Equations
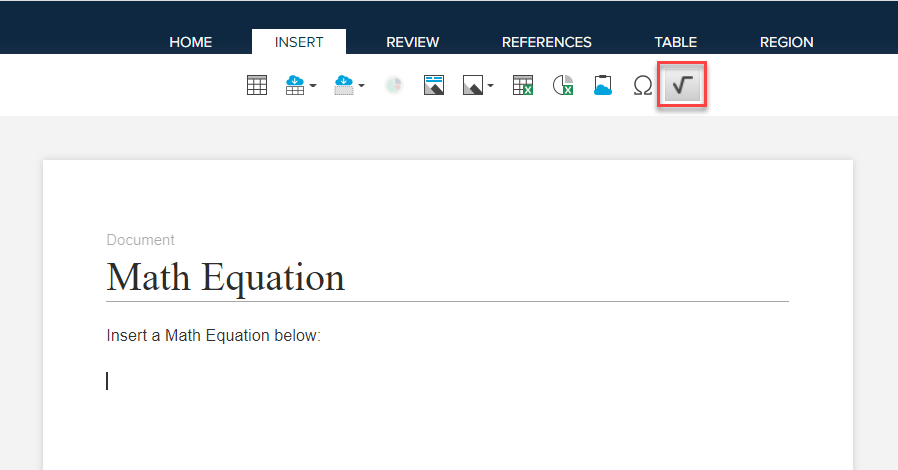
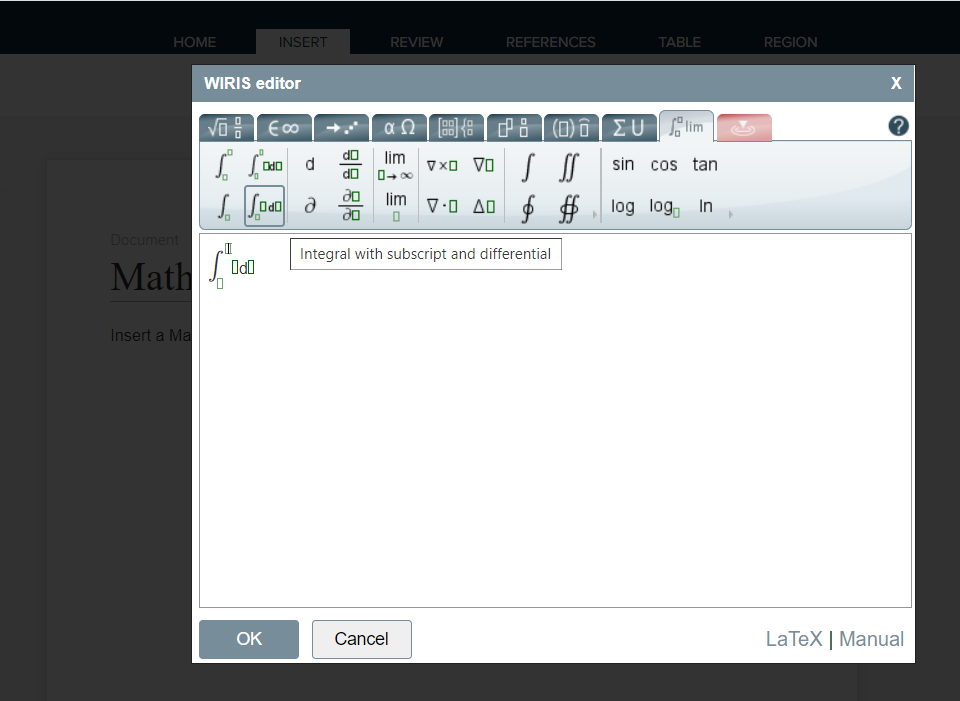
You can insert math equations into a document through a MathType add-in. The MathType editor by Wiris is inbuilt in QPP.
To insert a math equation:
-
Under the tab Insert, click the MathType icon
 to open the Wiris MathType Editor.
-
In the Wiris Editor, click the tab based on the type of equation or expression that you want to type.
-
Edit the values in the equation/expression you have selected within the Wiris Editor and then click OK.
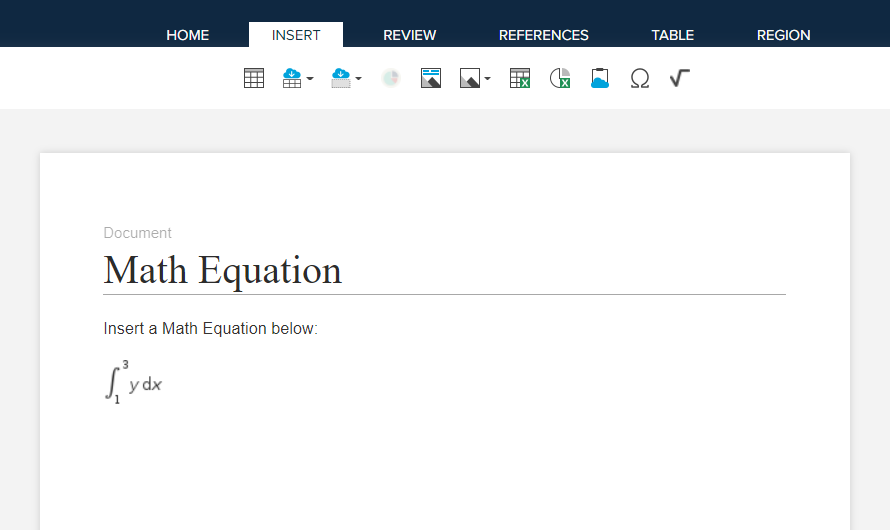
-
QPP inserts the equation/expression in the document body.
Insert Cross-reference
The Cross-Reference feature in Quark Author (QA) allows you to create dynamic links within a single document or across multiple documents stored on the QPP repository. These references ensure document integrity by automatically tracking the location and content of referenced elements such as sections, tables, figures, and regions.
The following options are available within the Links group of the Insert tab:
-
Insert Cross Reference: Creates a link to an element located within the currently opened document.
-
Insert Document Cross Reference: Creates a link to another document stored on the platform.
-
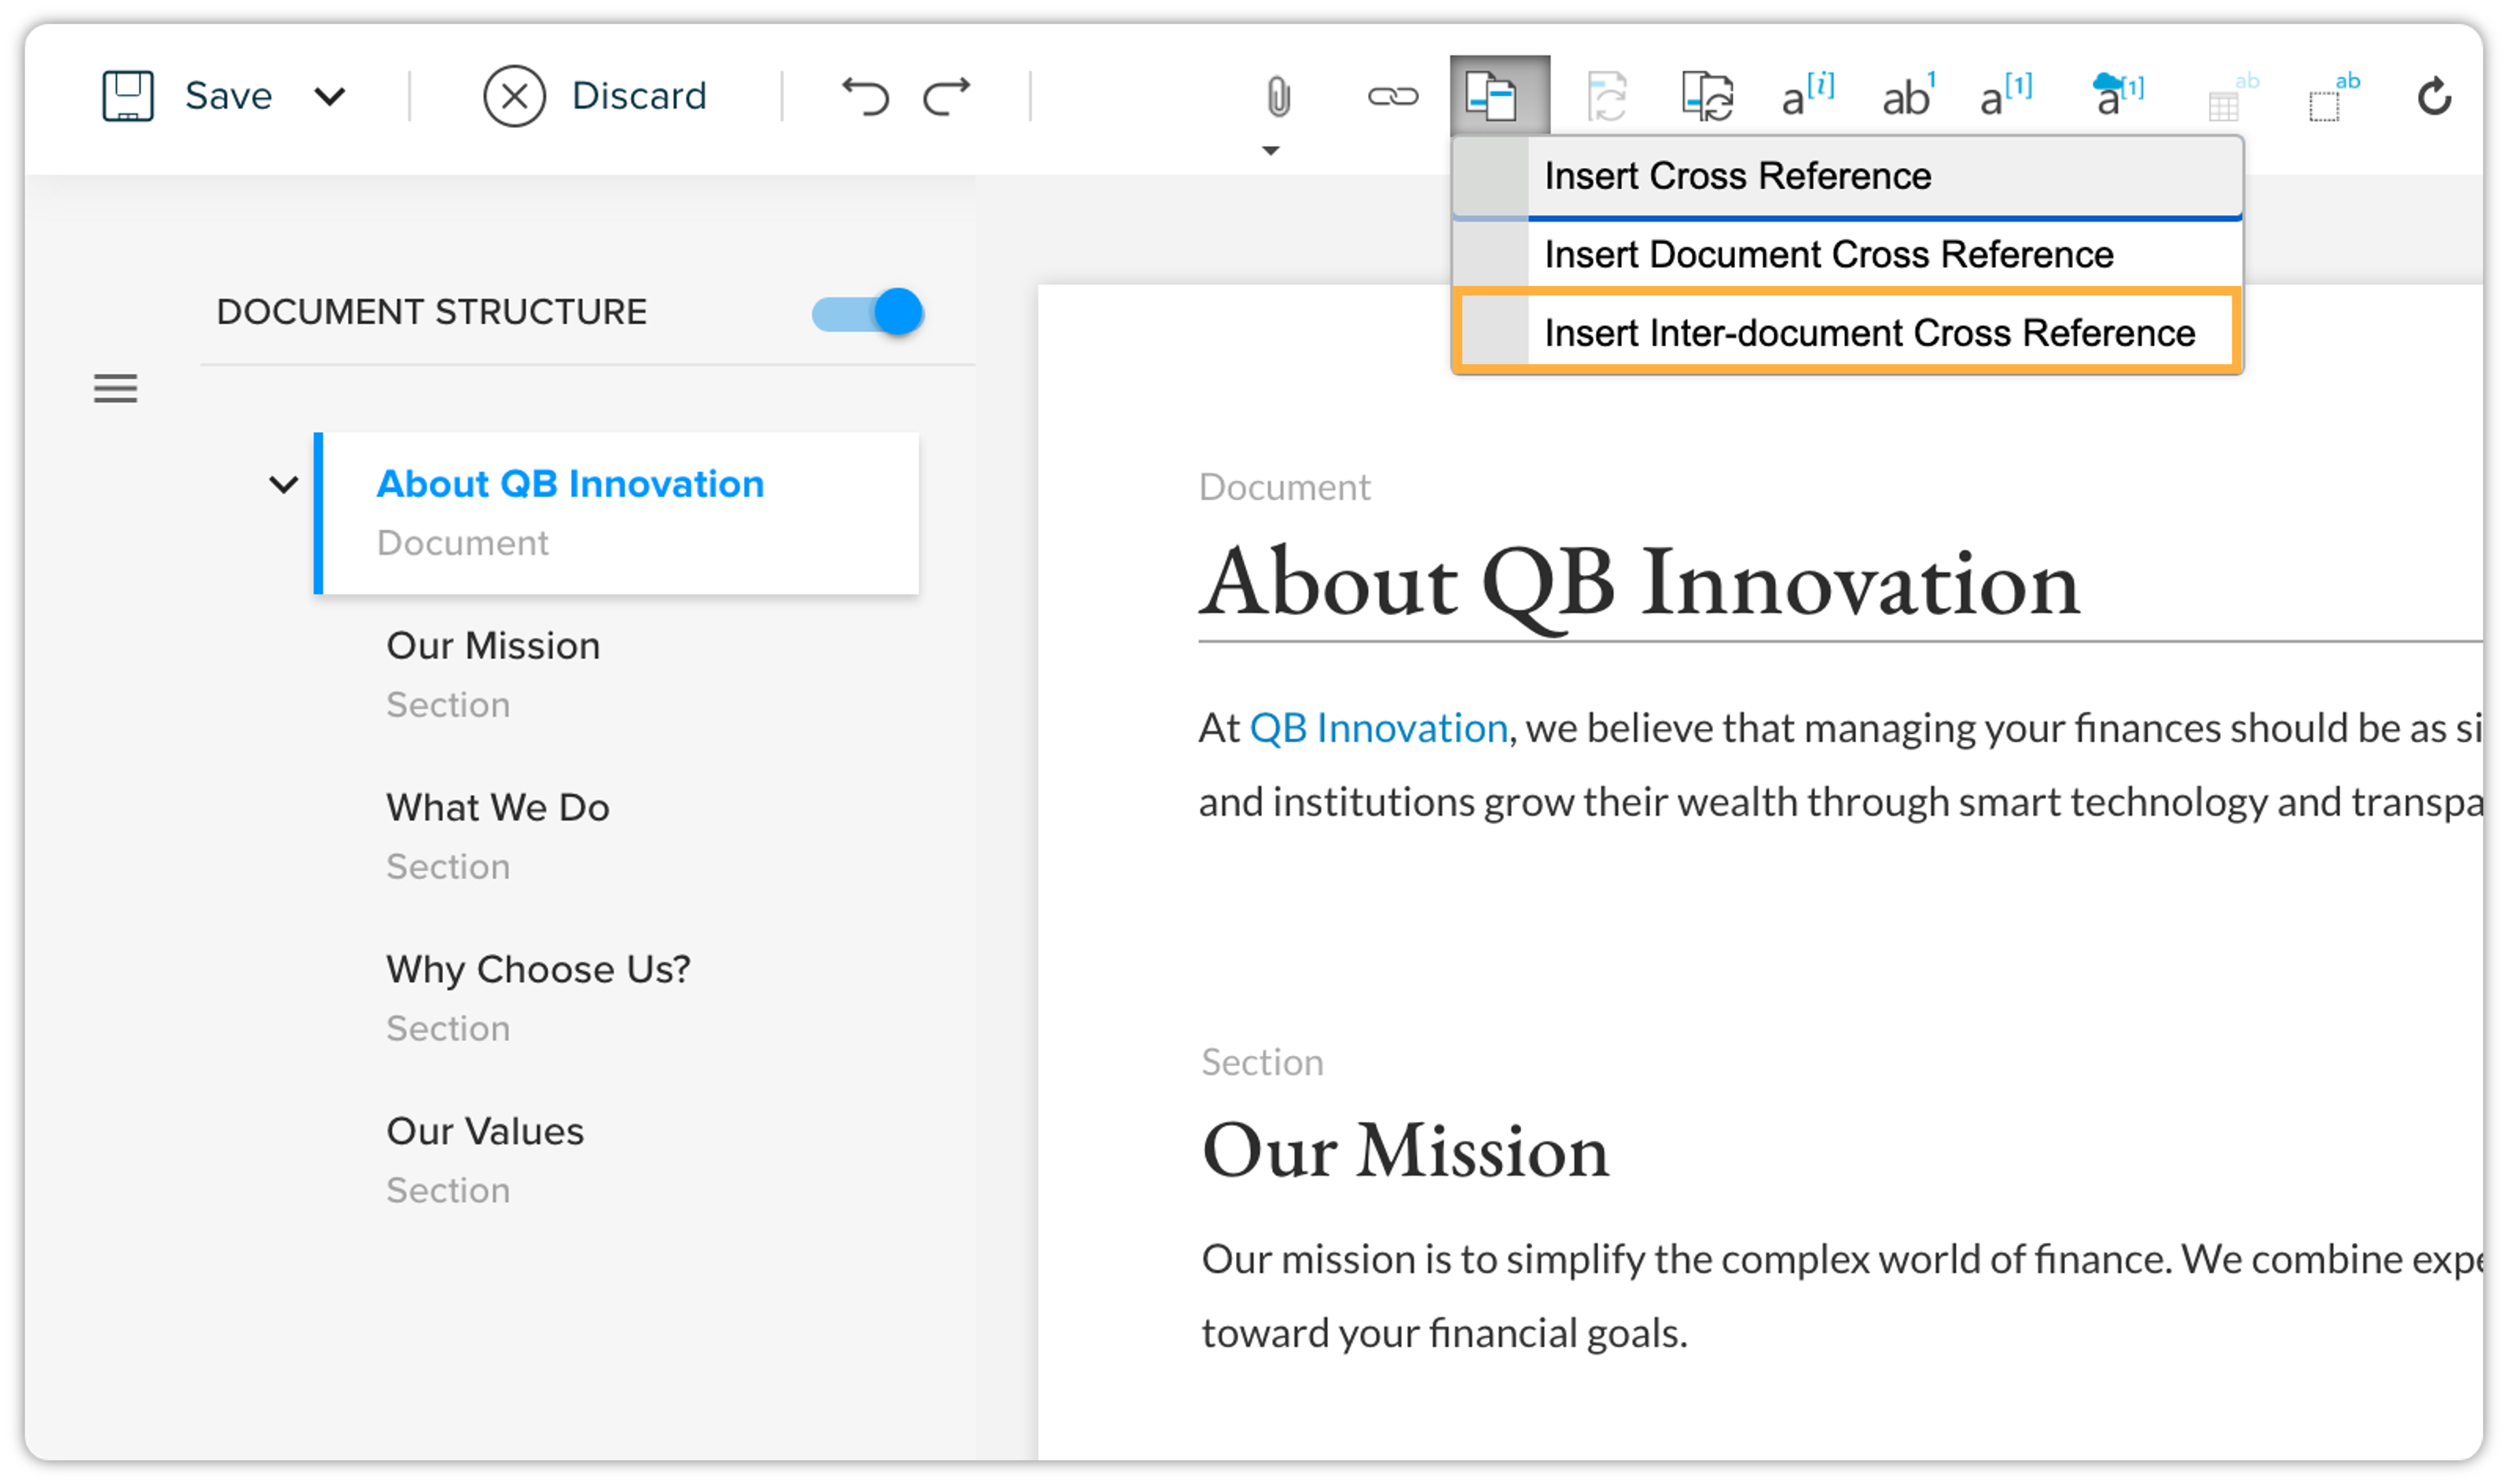
Insert Inter-document Cross Reference: Creates a link to a specific element (such as a section or table) located within a different document on the platform.
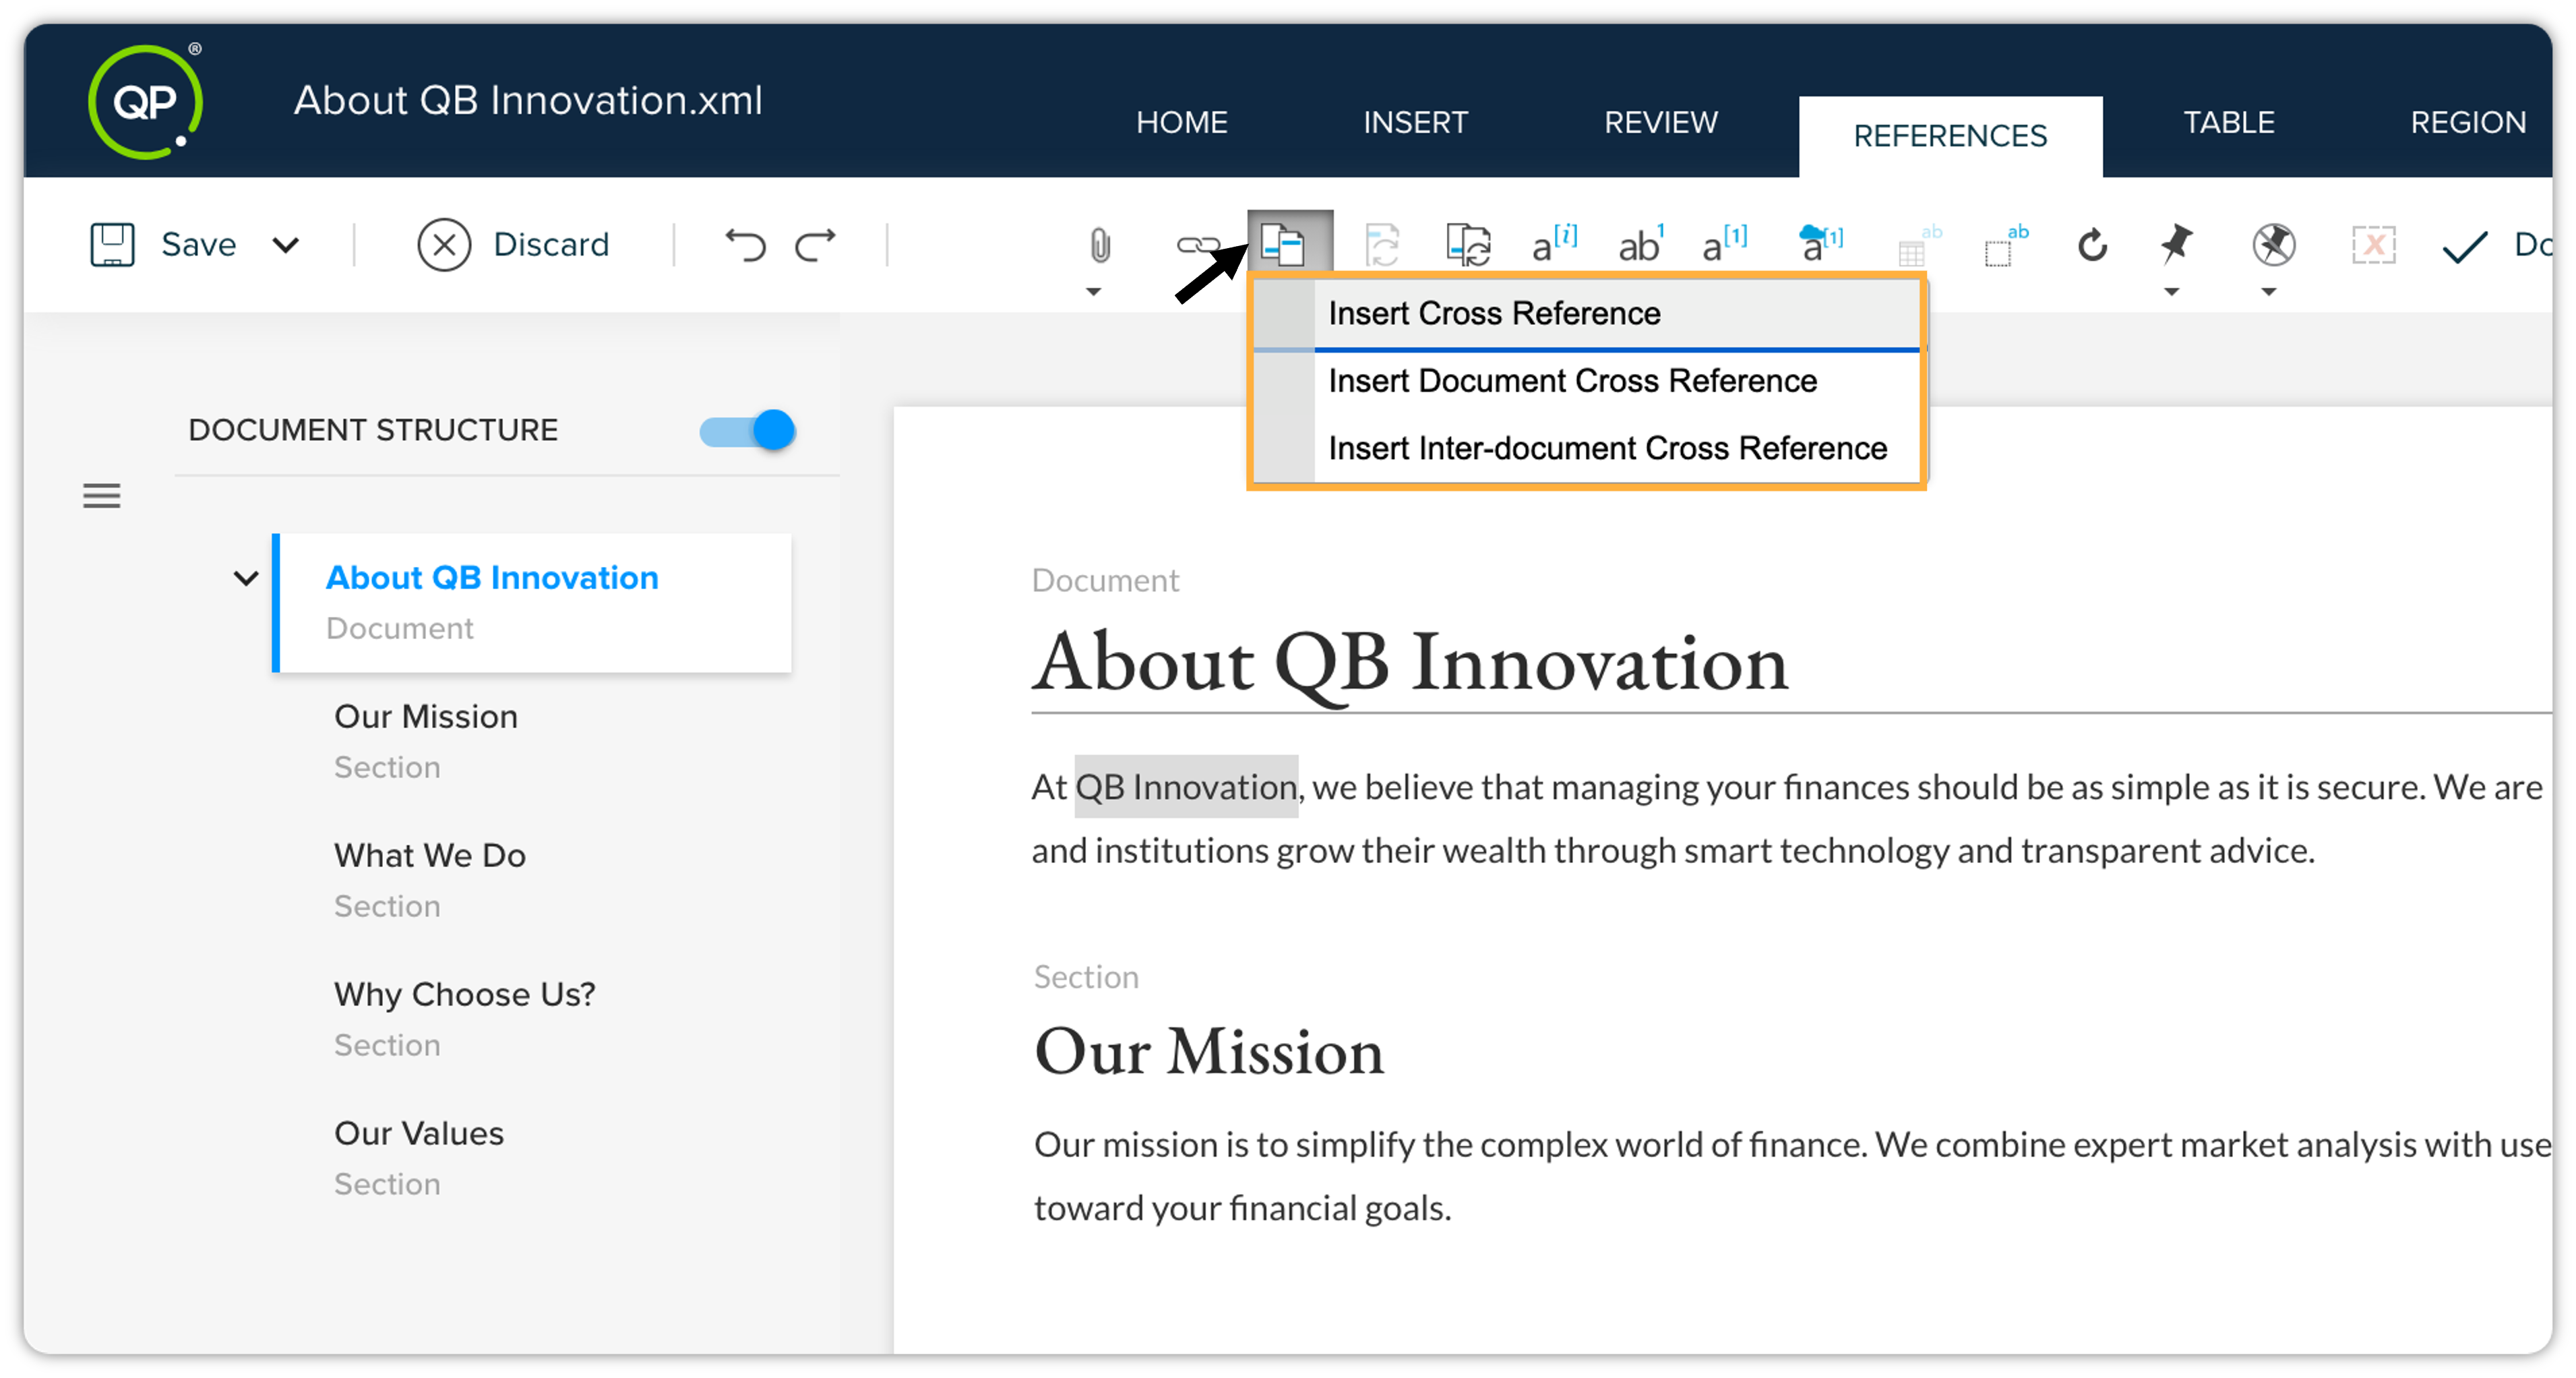
To insert a cross-reference:
-
Select the word/phrase where you want to add a cross-reference in the document.
-
Go to the References tab, and click the Cross Reference icon, and then click Insert Cross Reference.
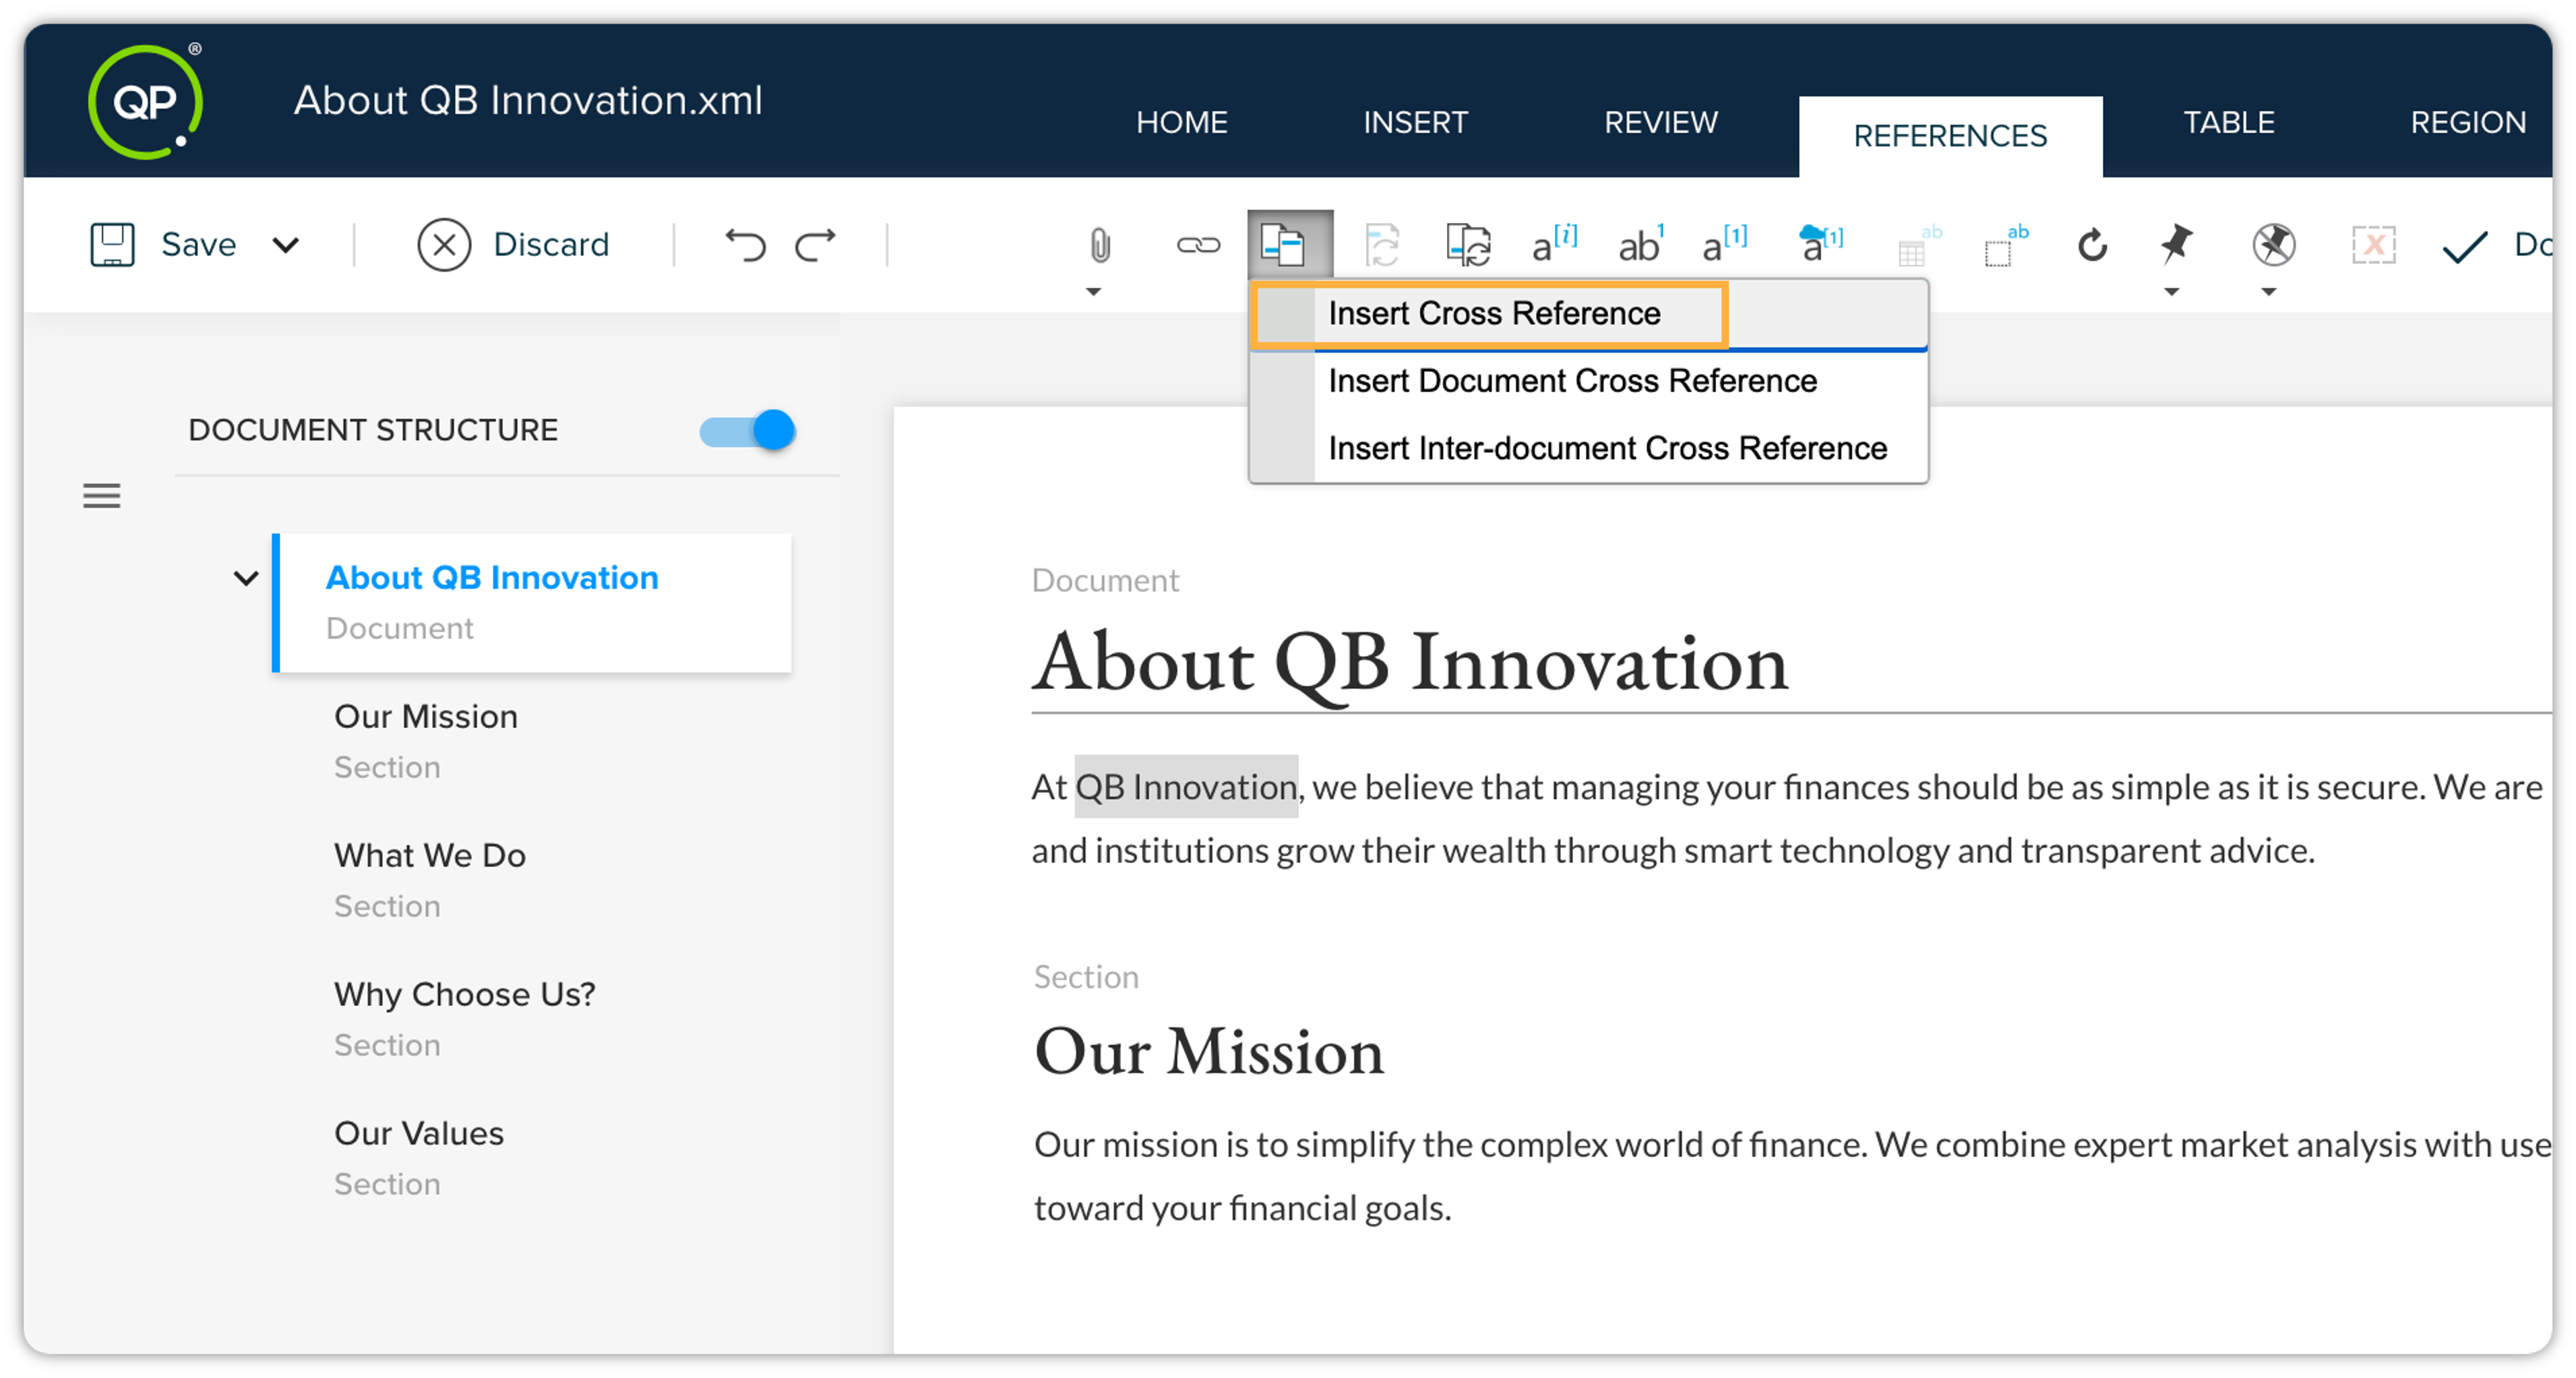
-
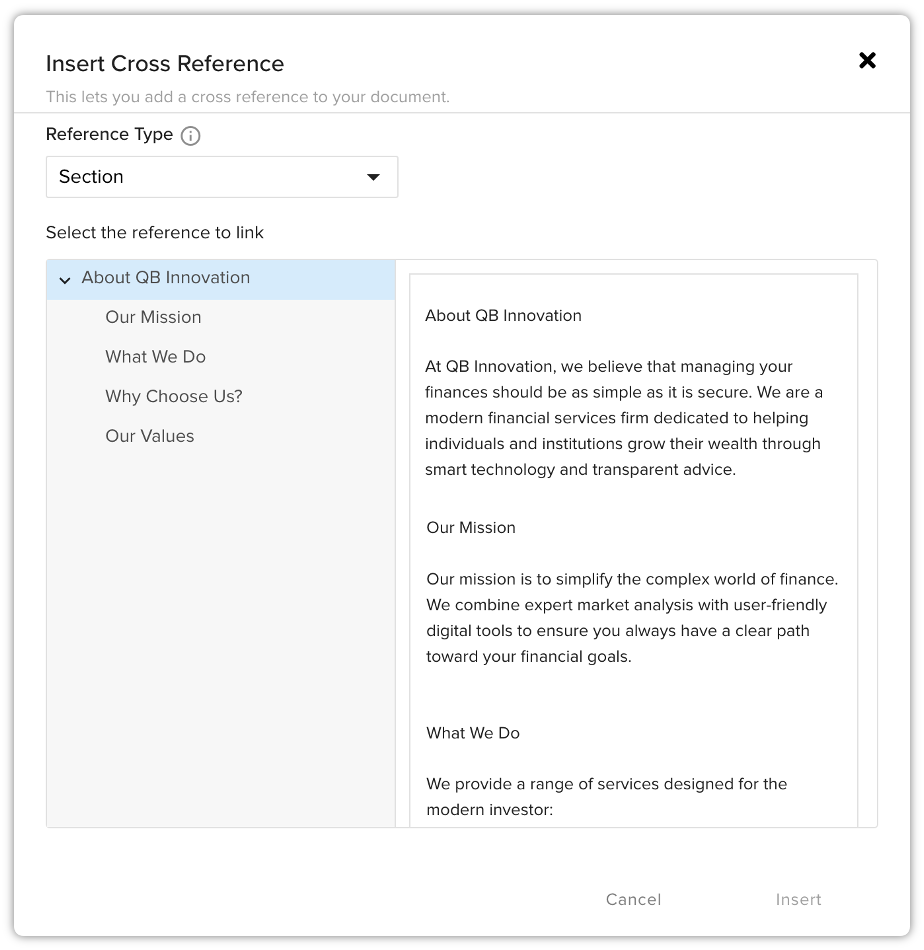
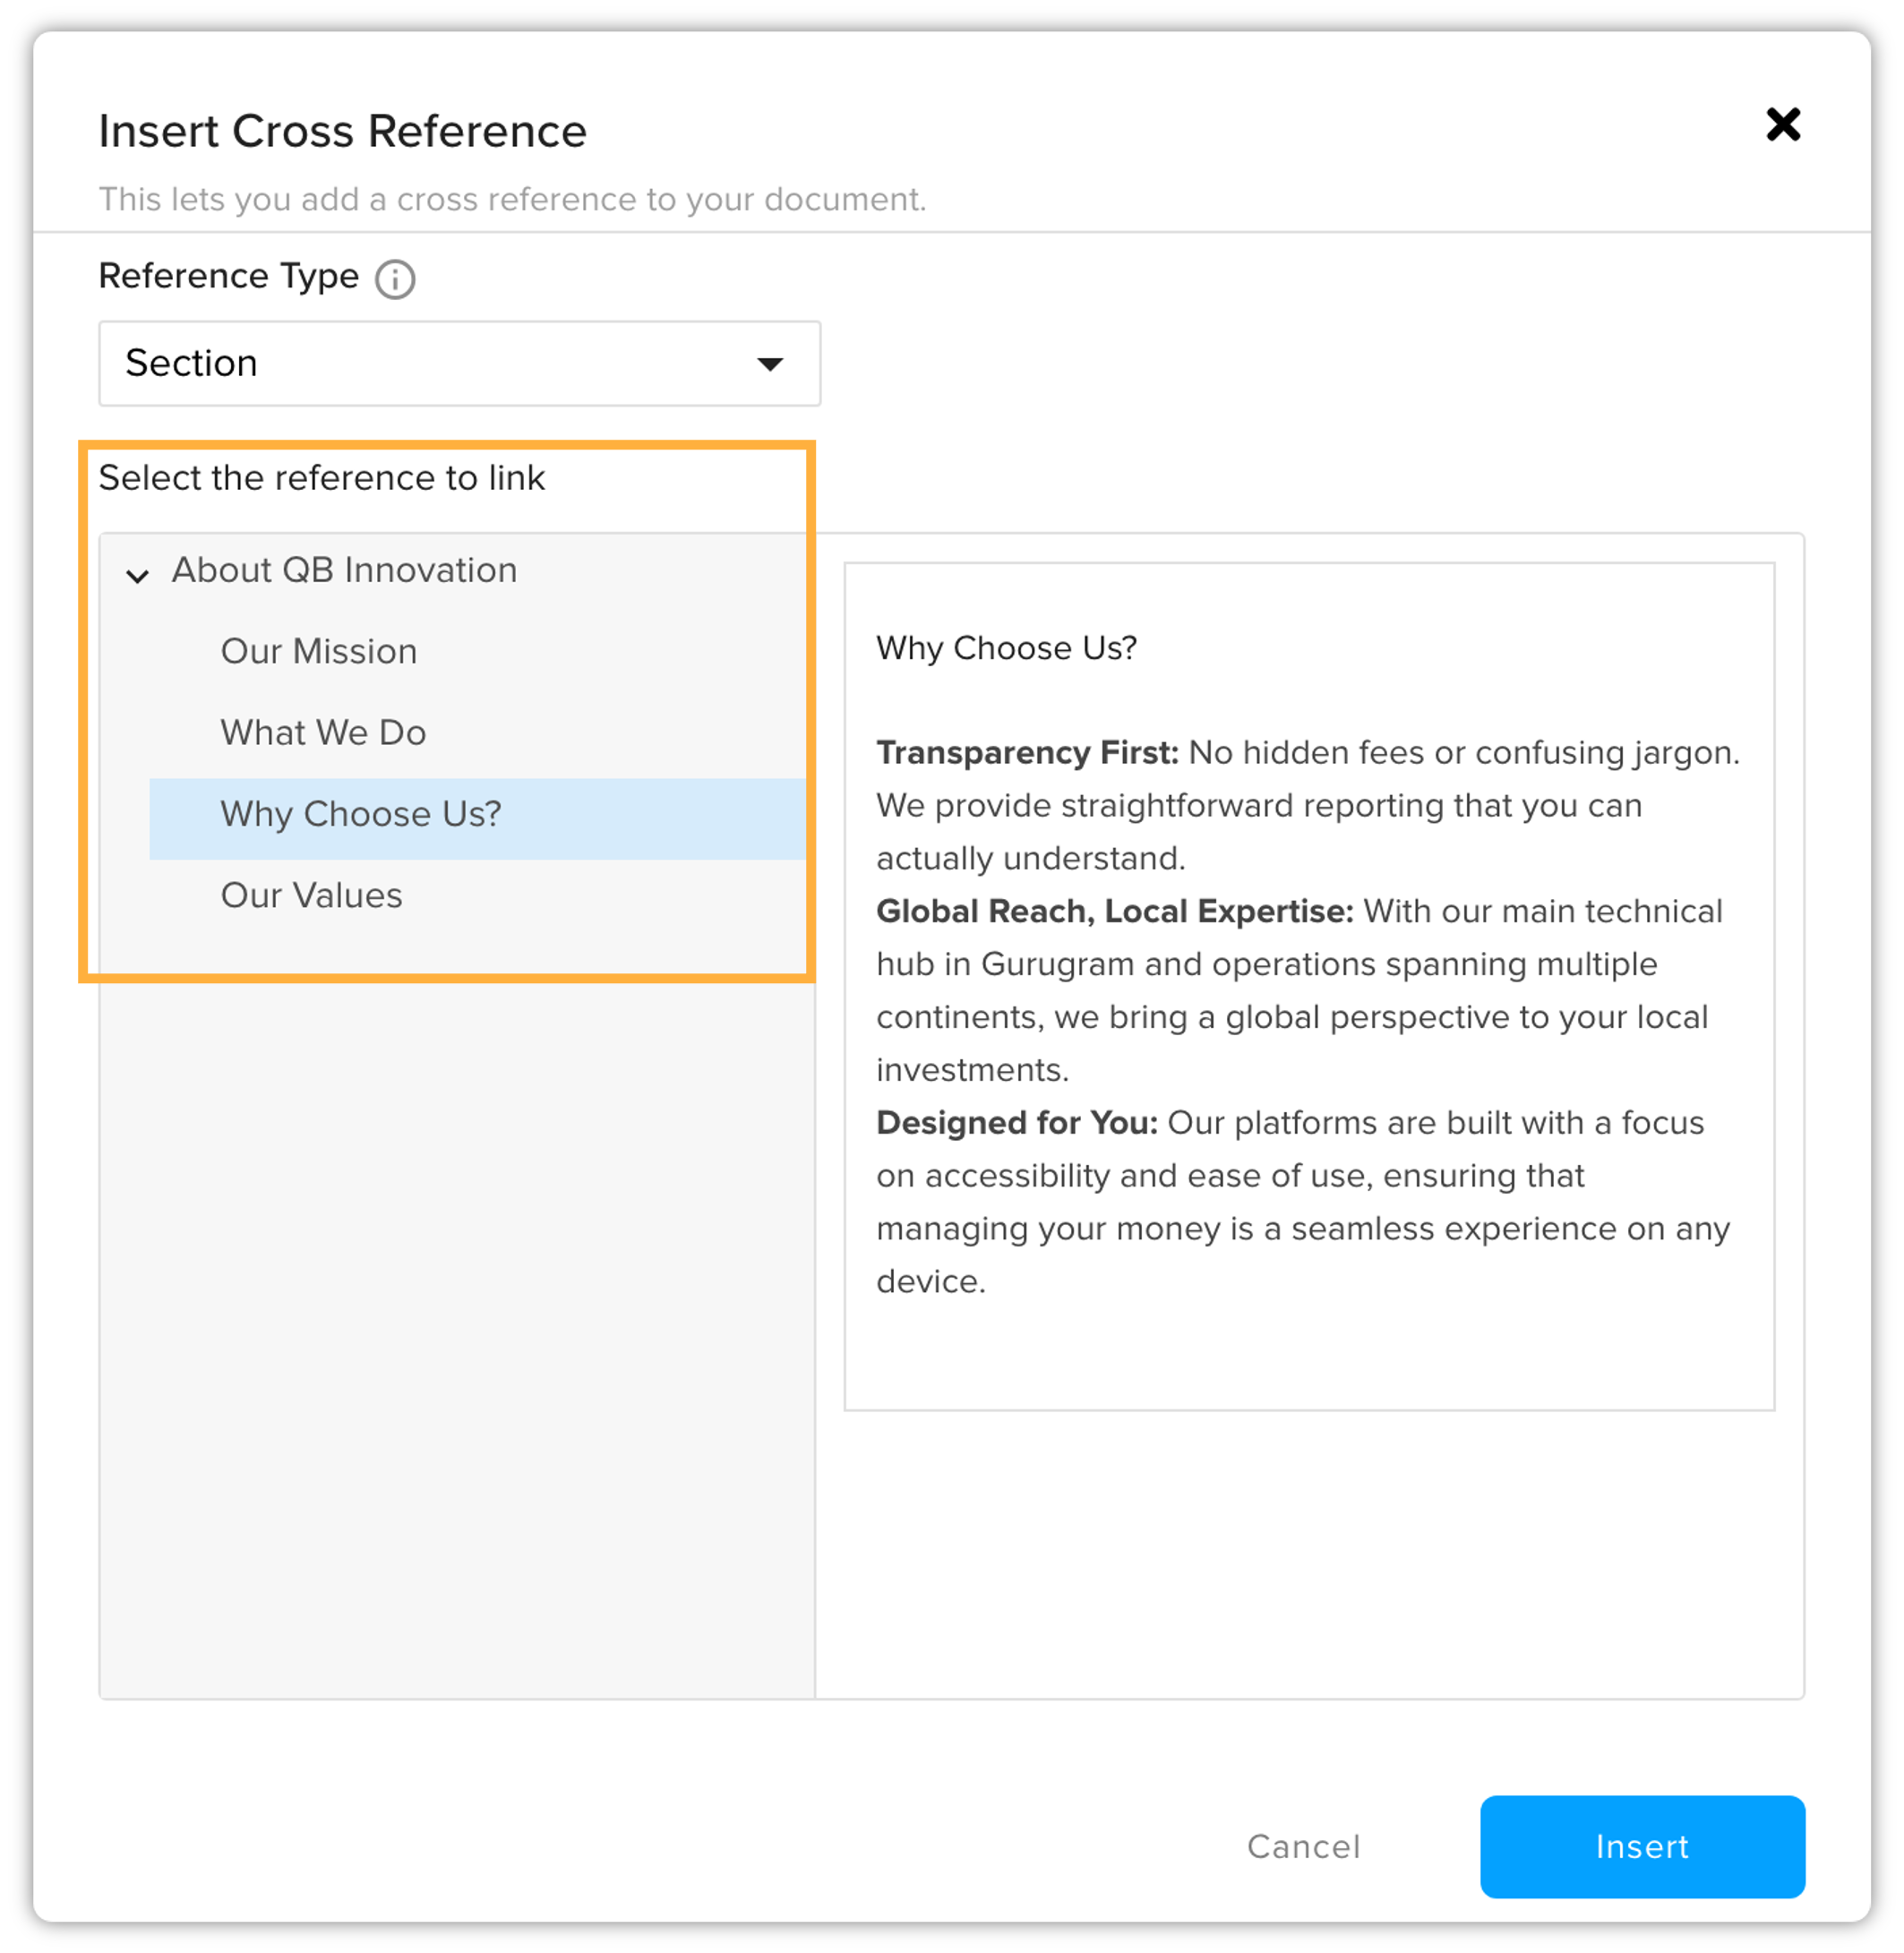
This will open the Insert Cross Reference dialog.
-
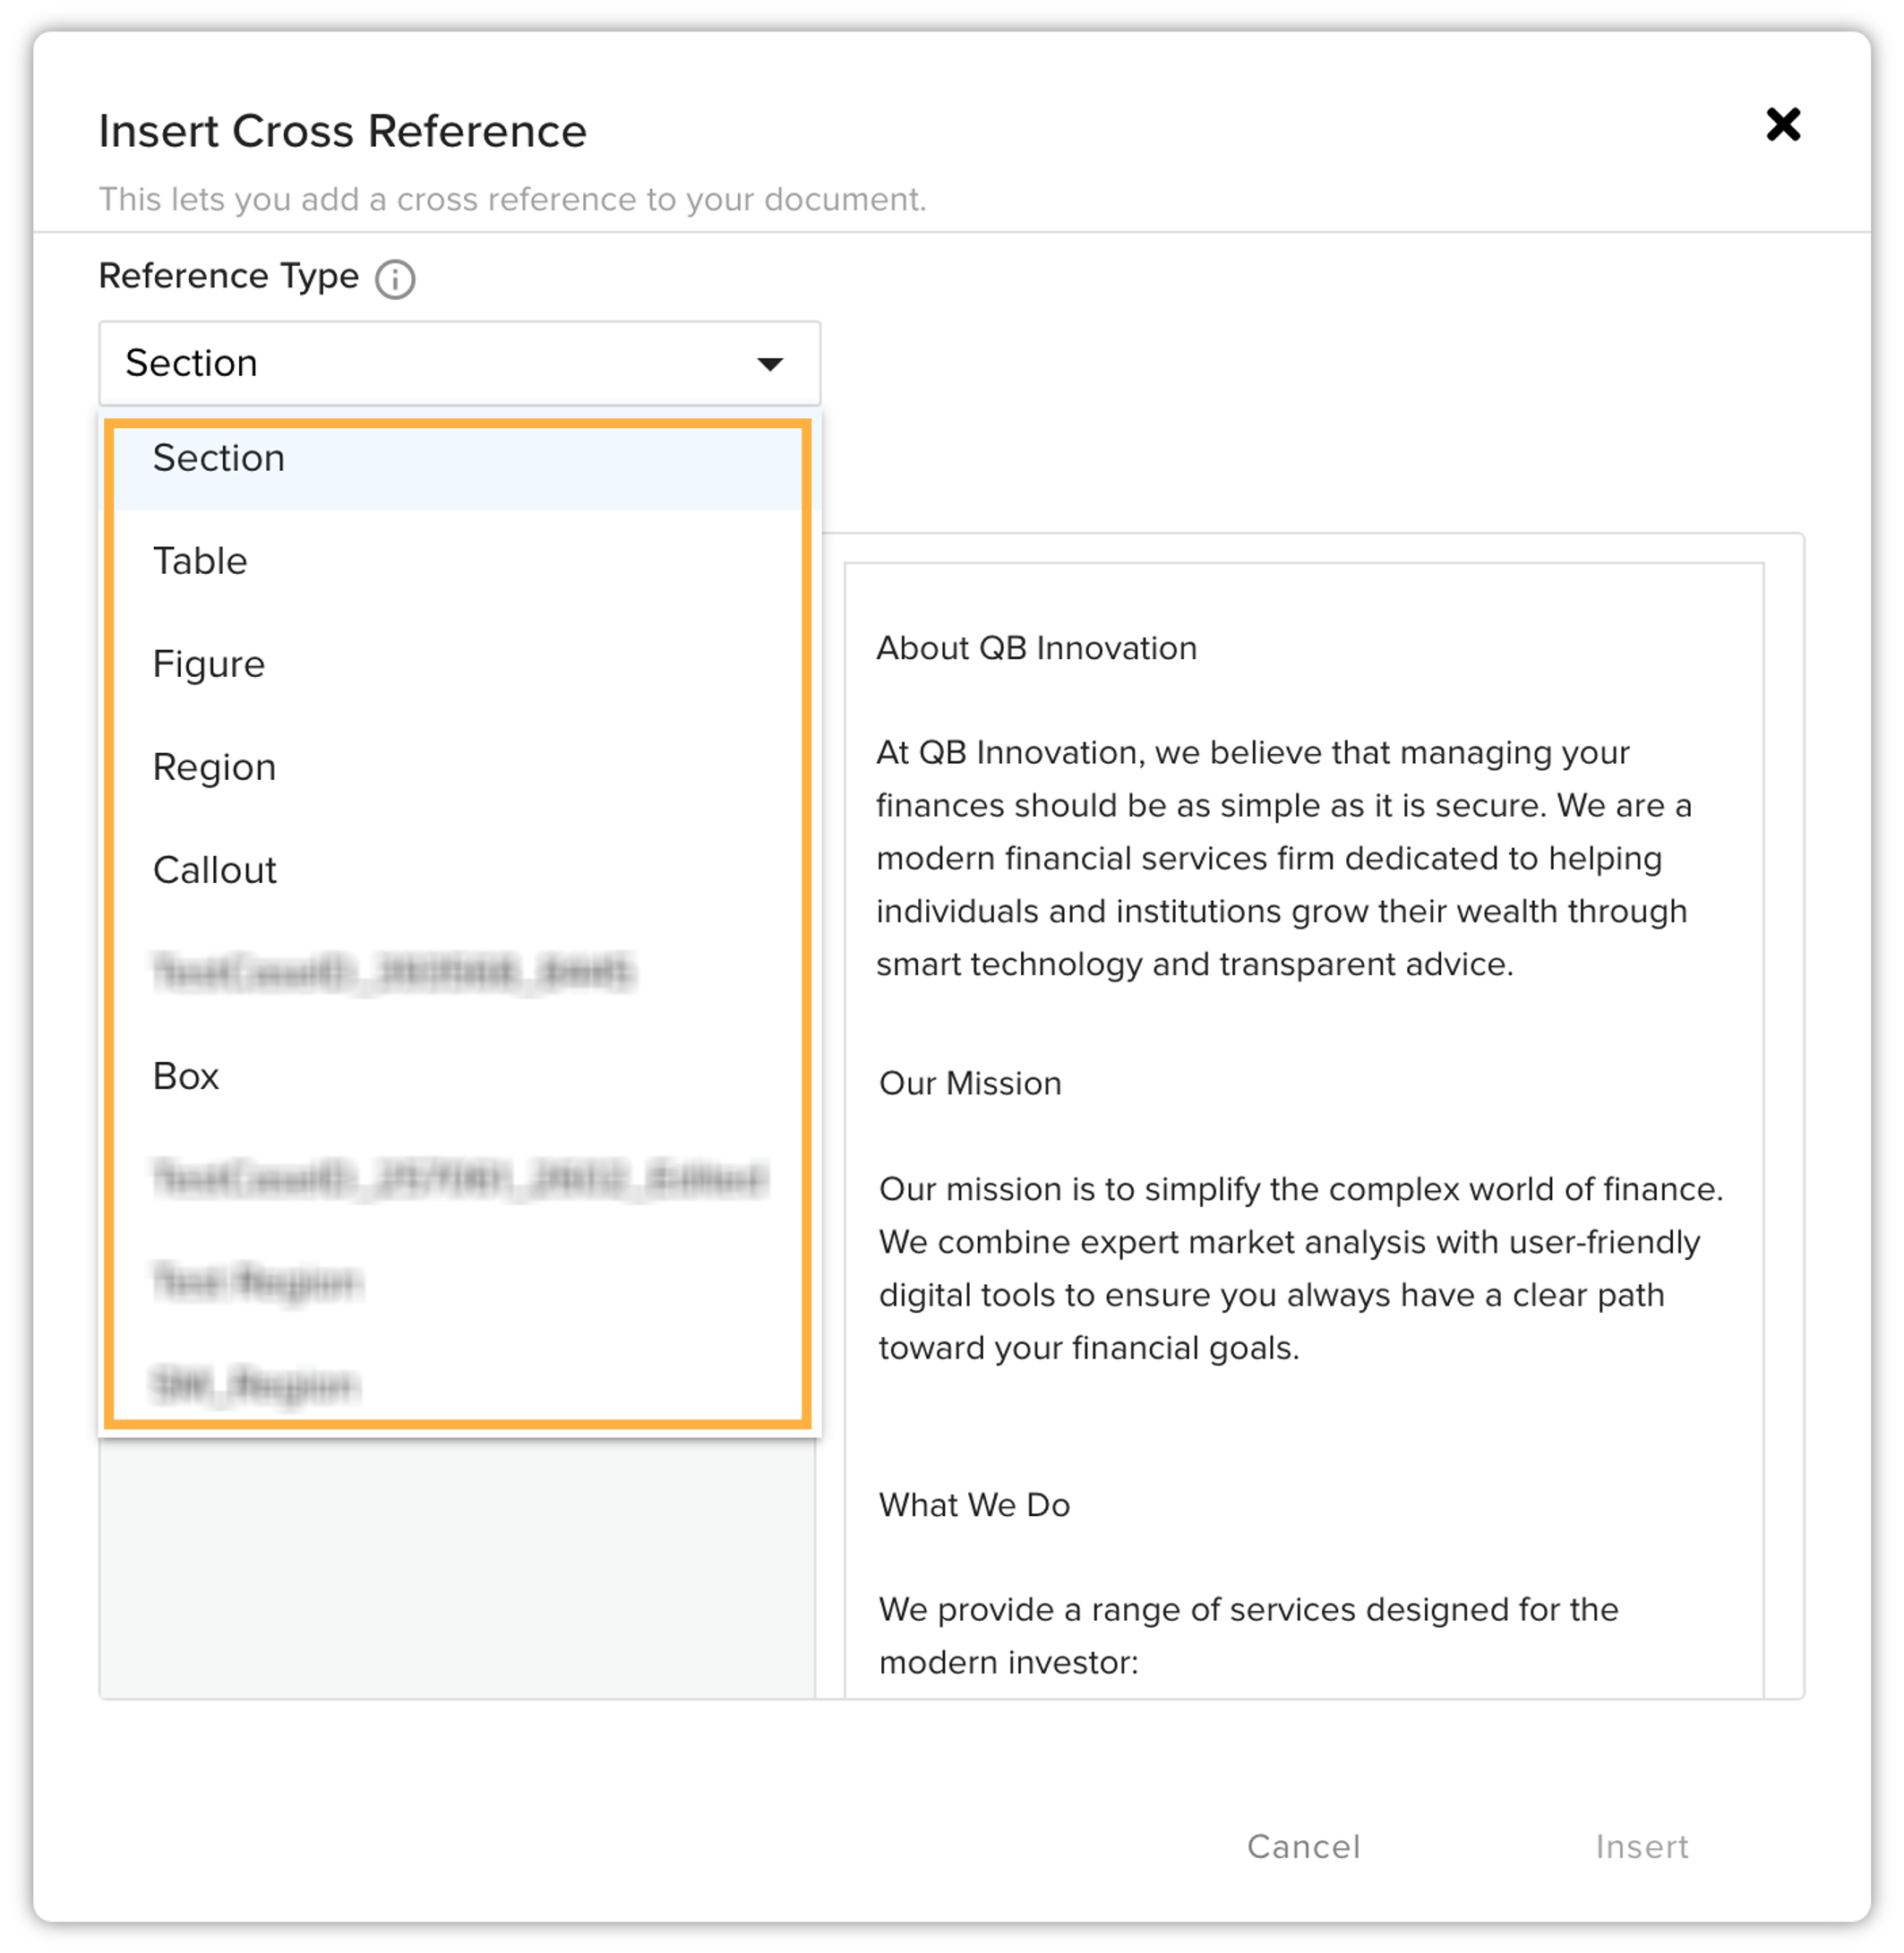
Select the reference type (e.g., Section, Table, Figure, or Region).
-
Then select the reference to link, and click Insert.
-
The link is successfully inserted.
To insert a document cross-reference:
-
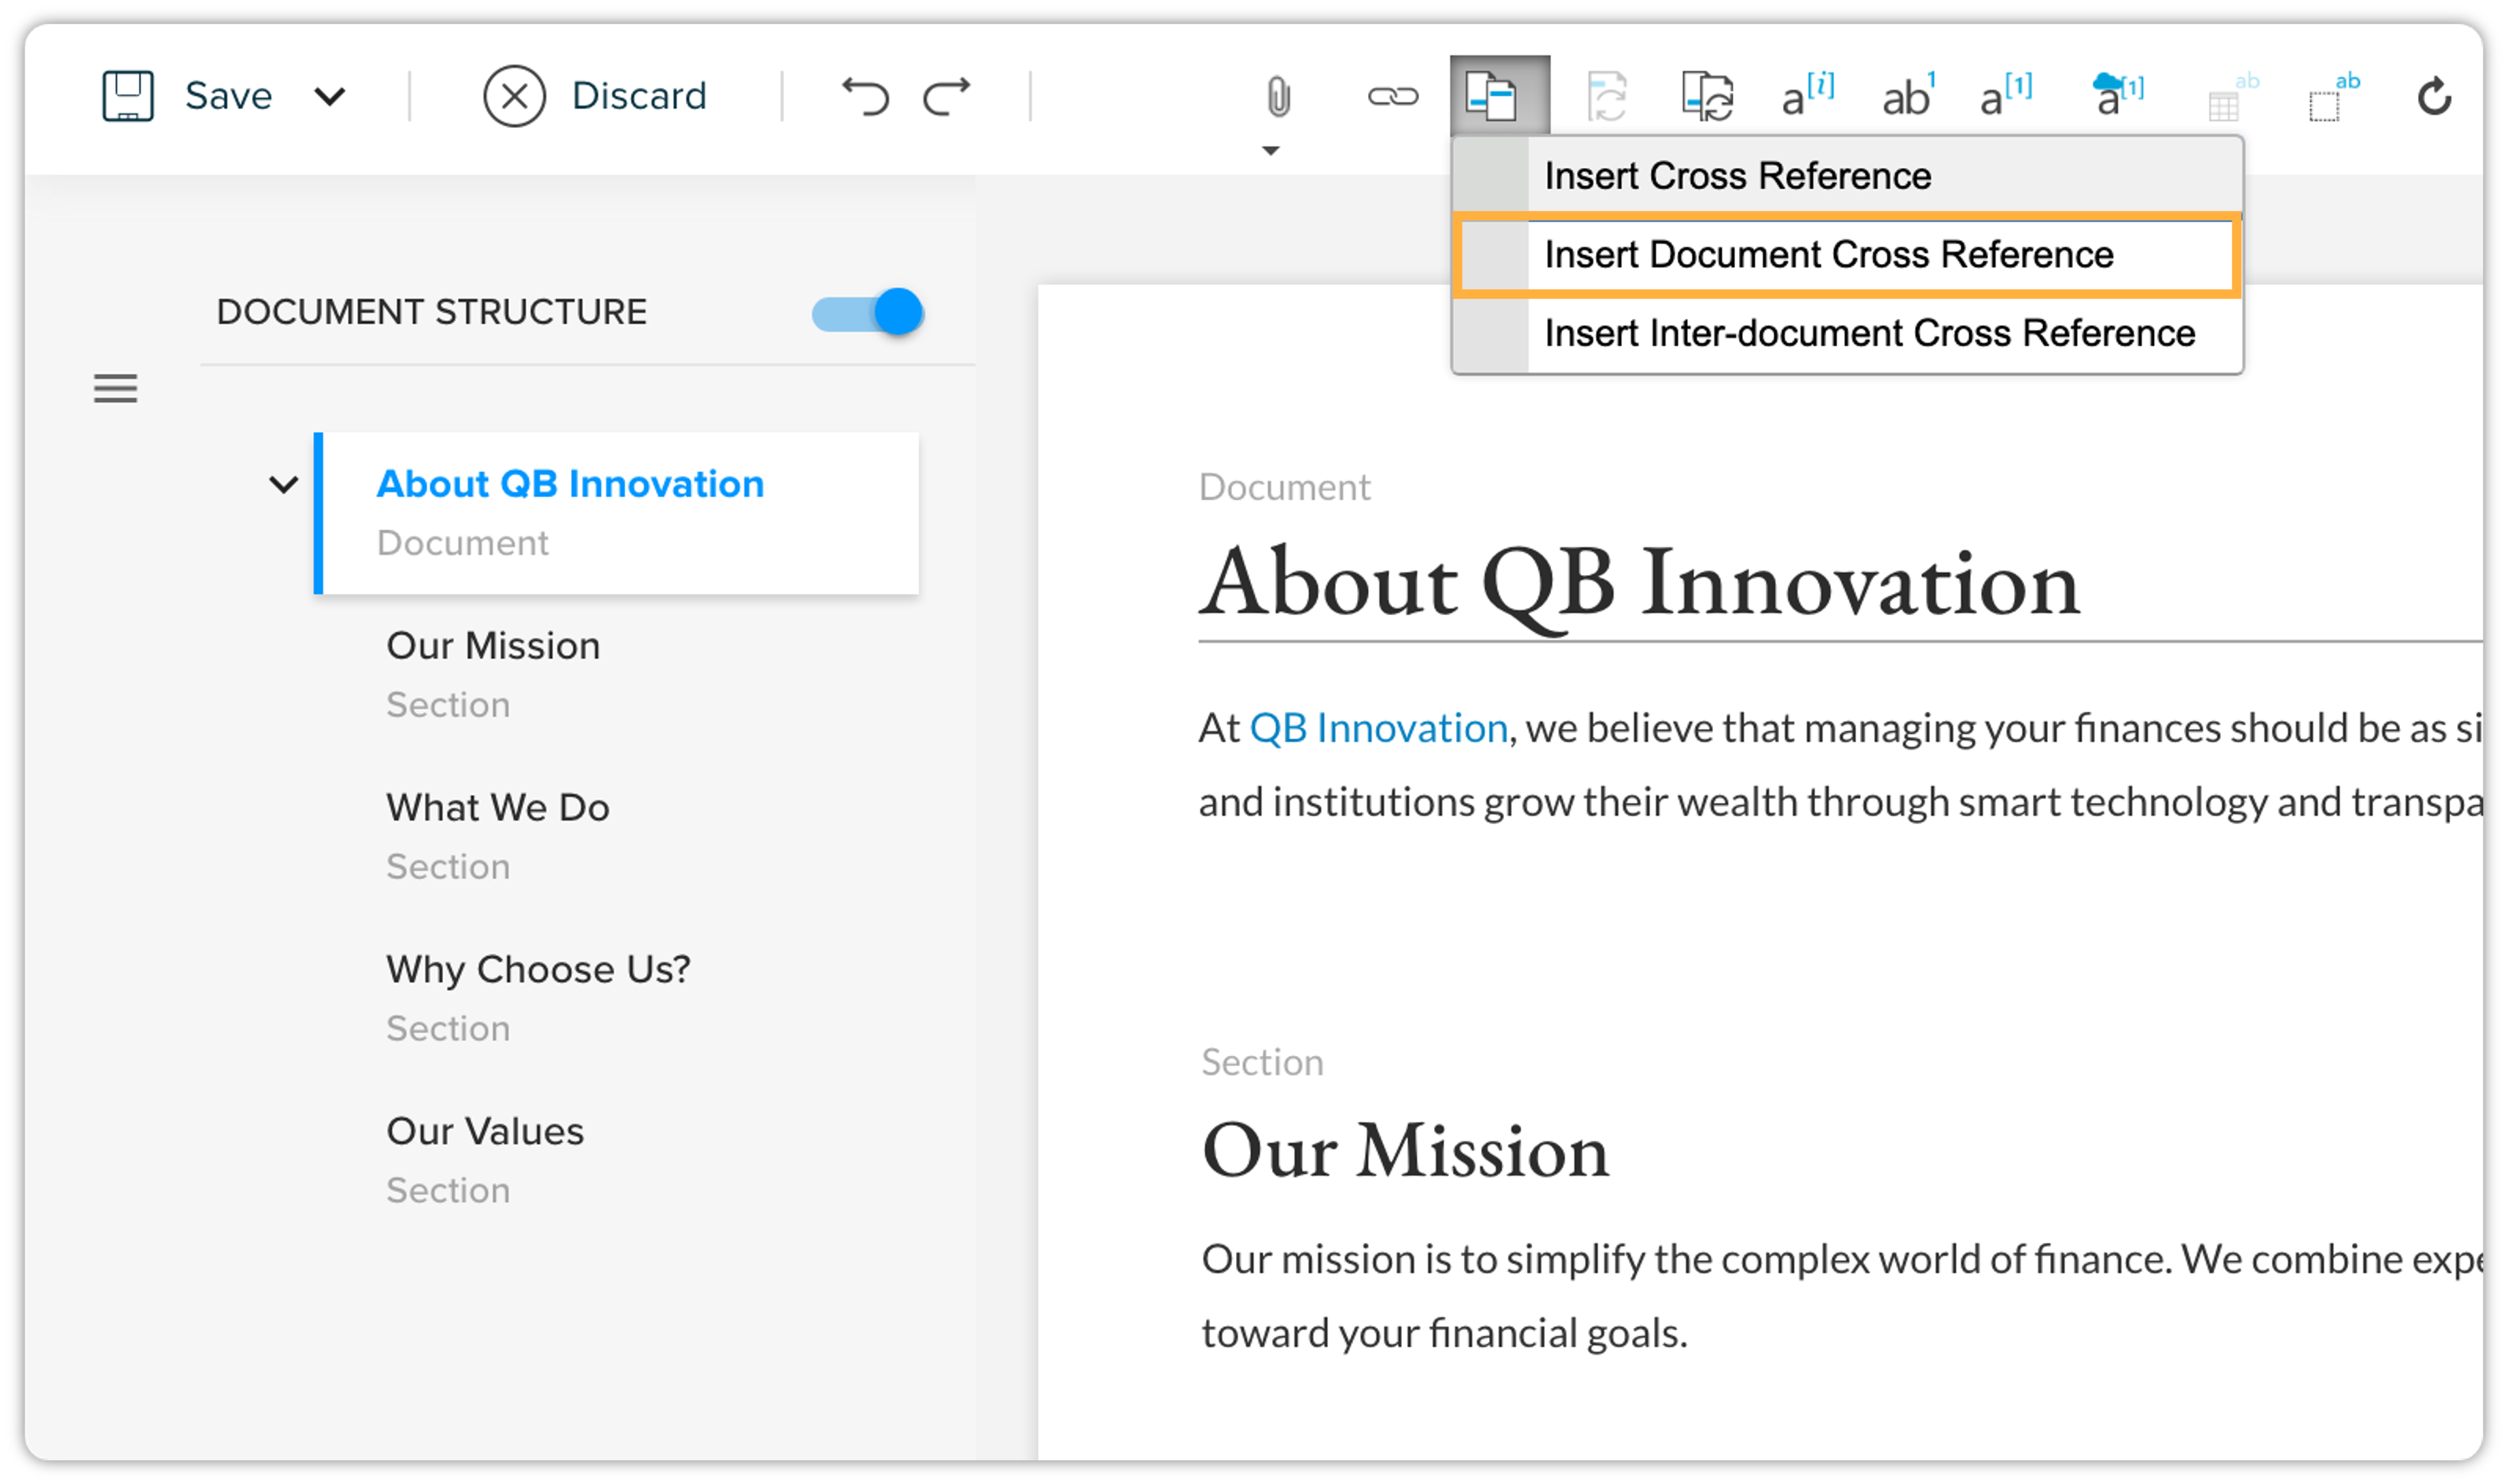
Place your cursor where you want the link to appear.
-
Go to the References tab, and click the Cross Reference icon, and then click Insert Document Cross Reference.
-
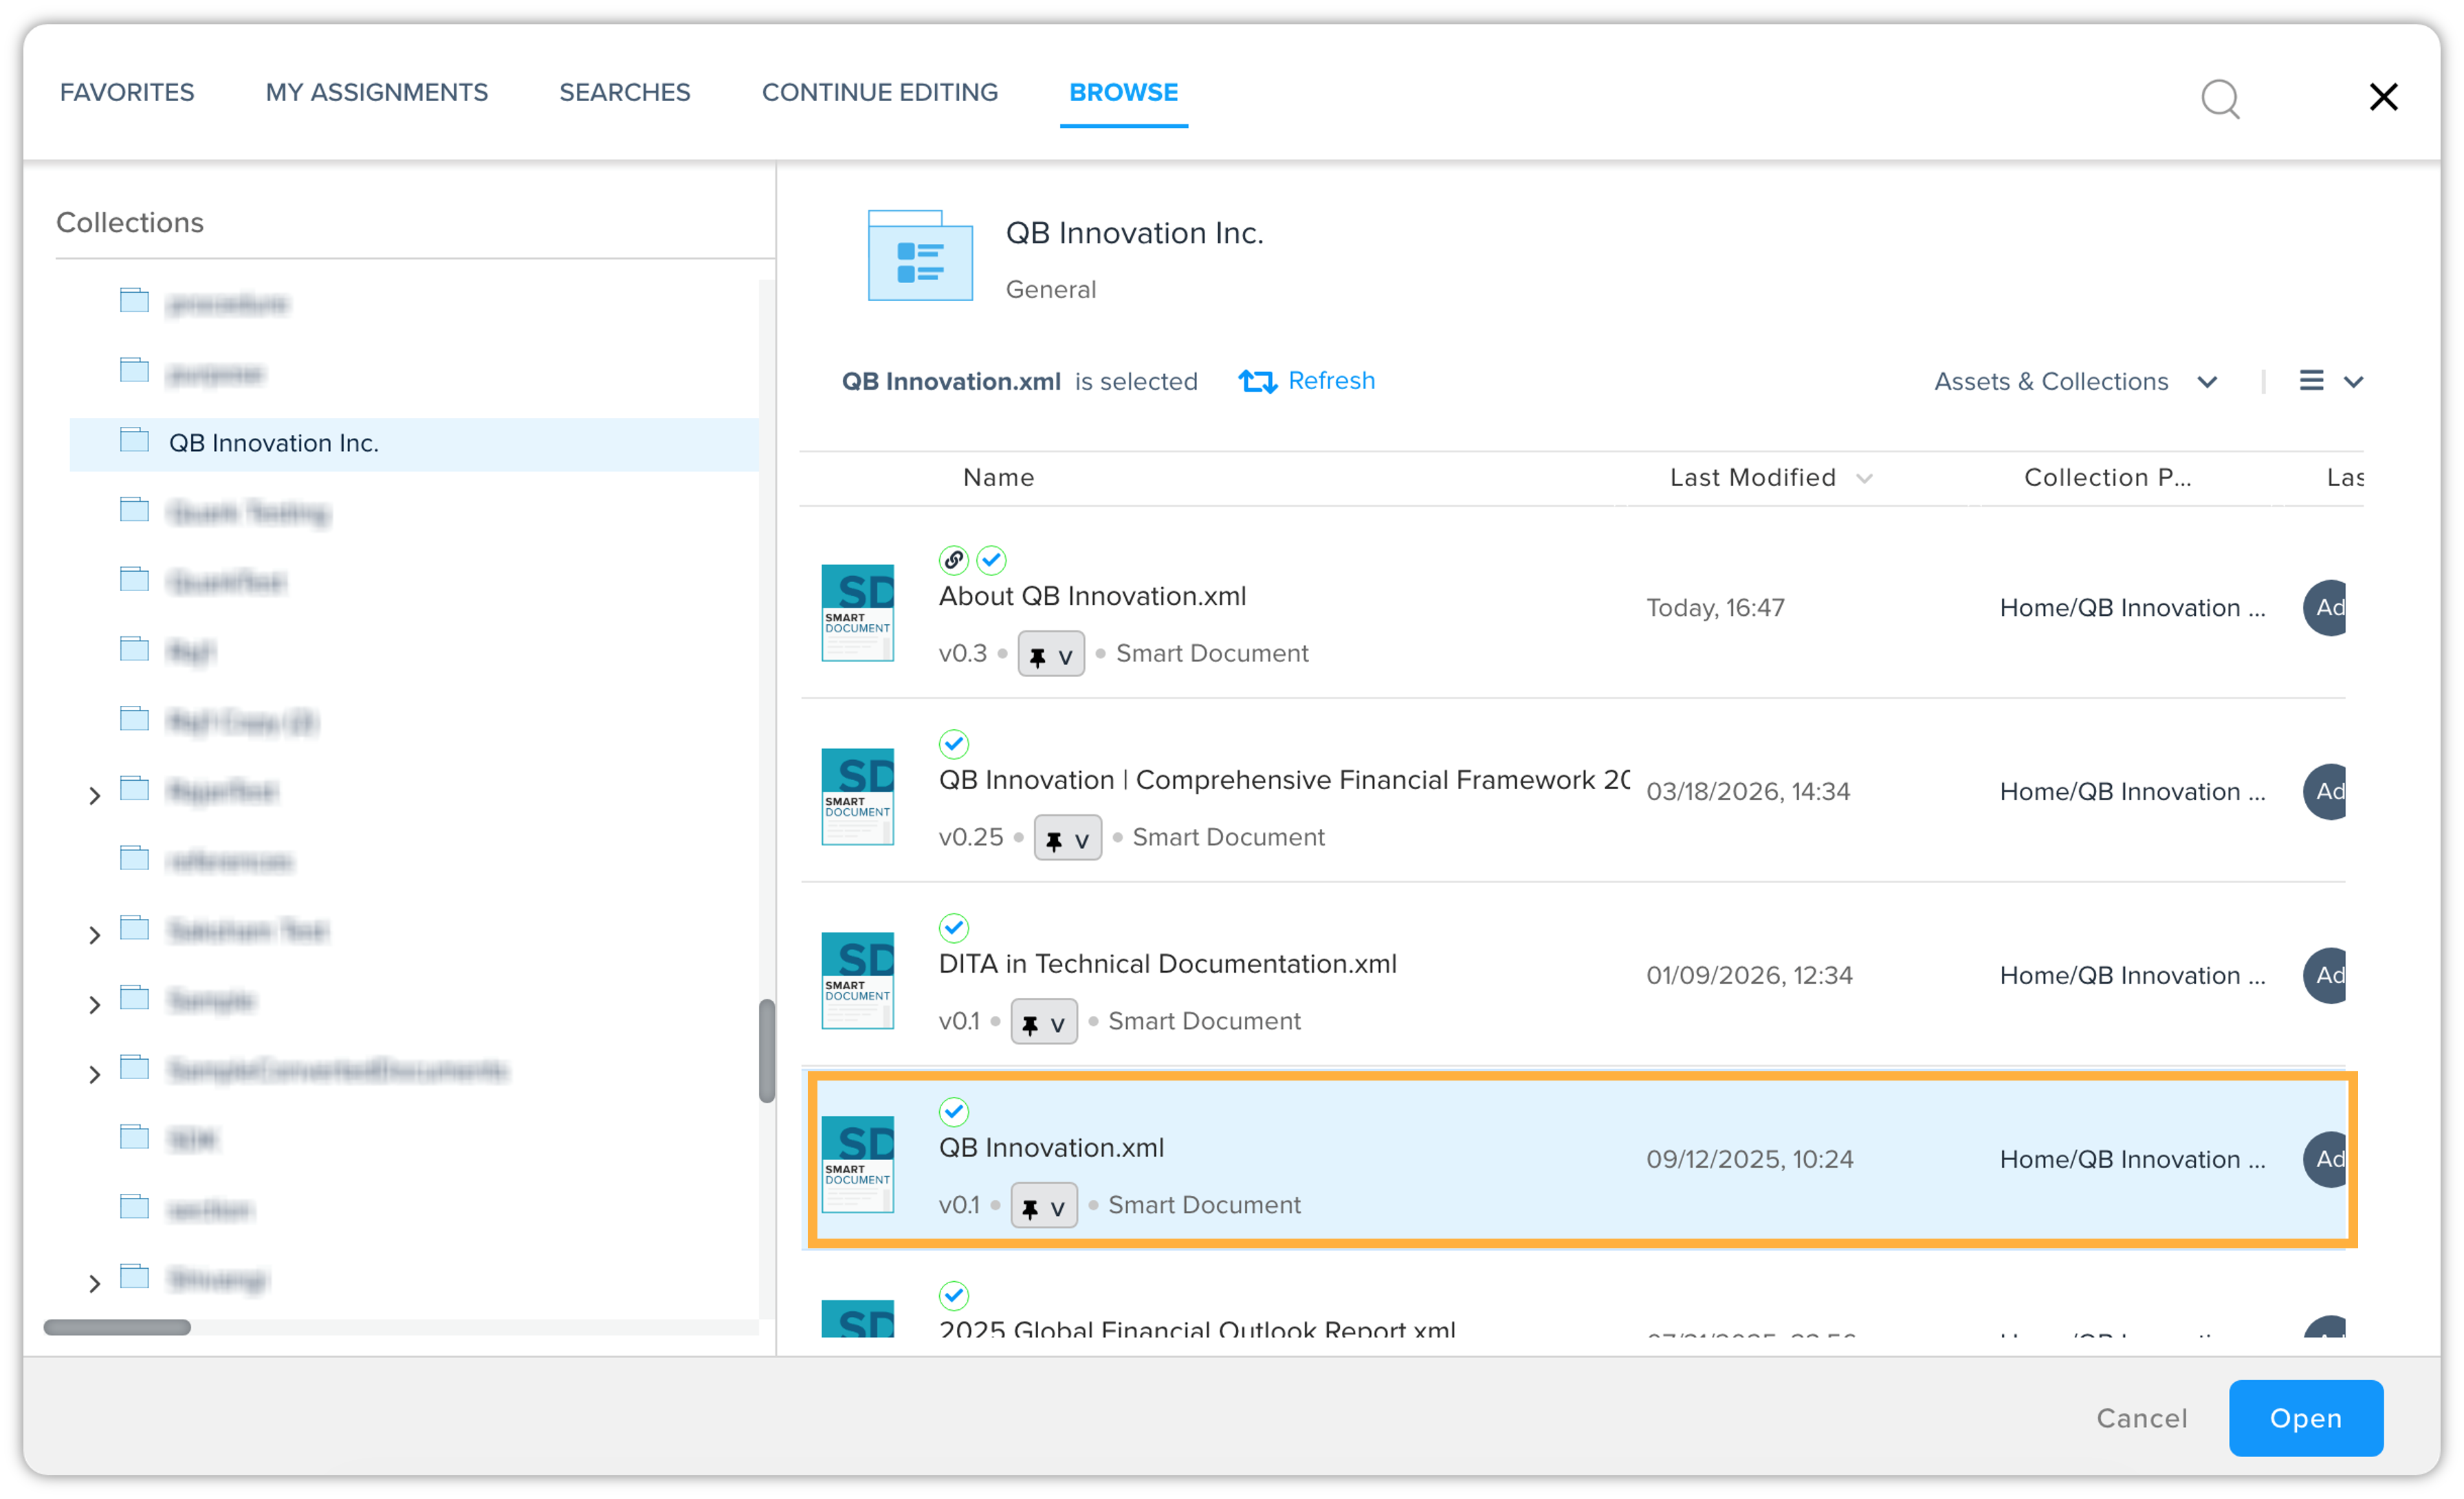
Use the search or browse functions to locate the desired document. Select the document and click Open.
-
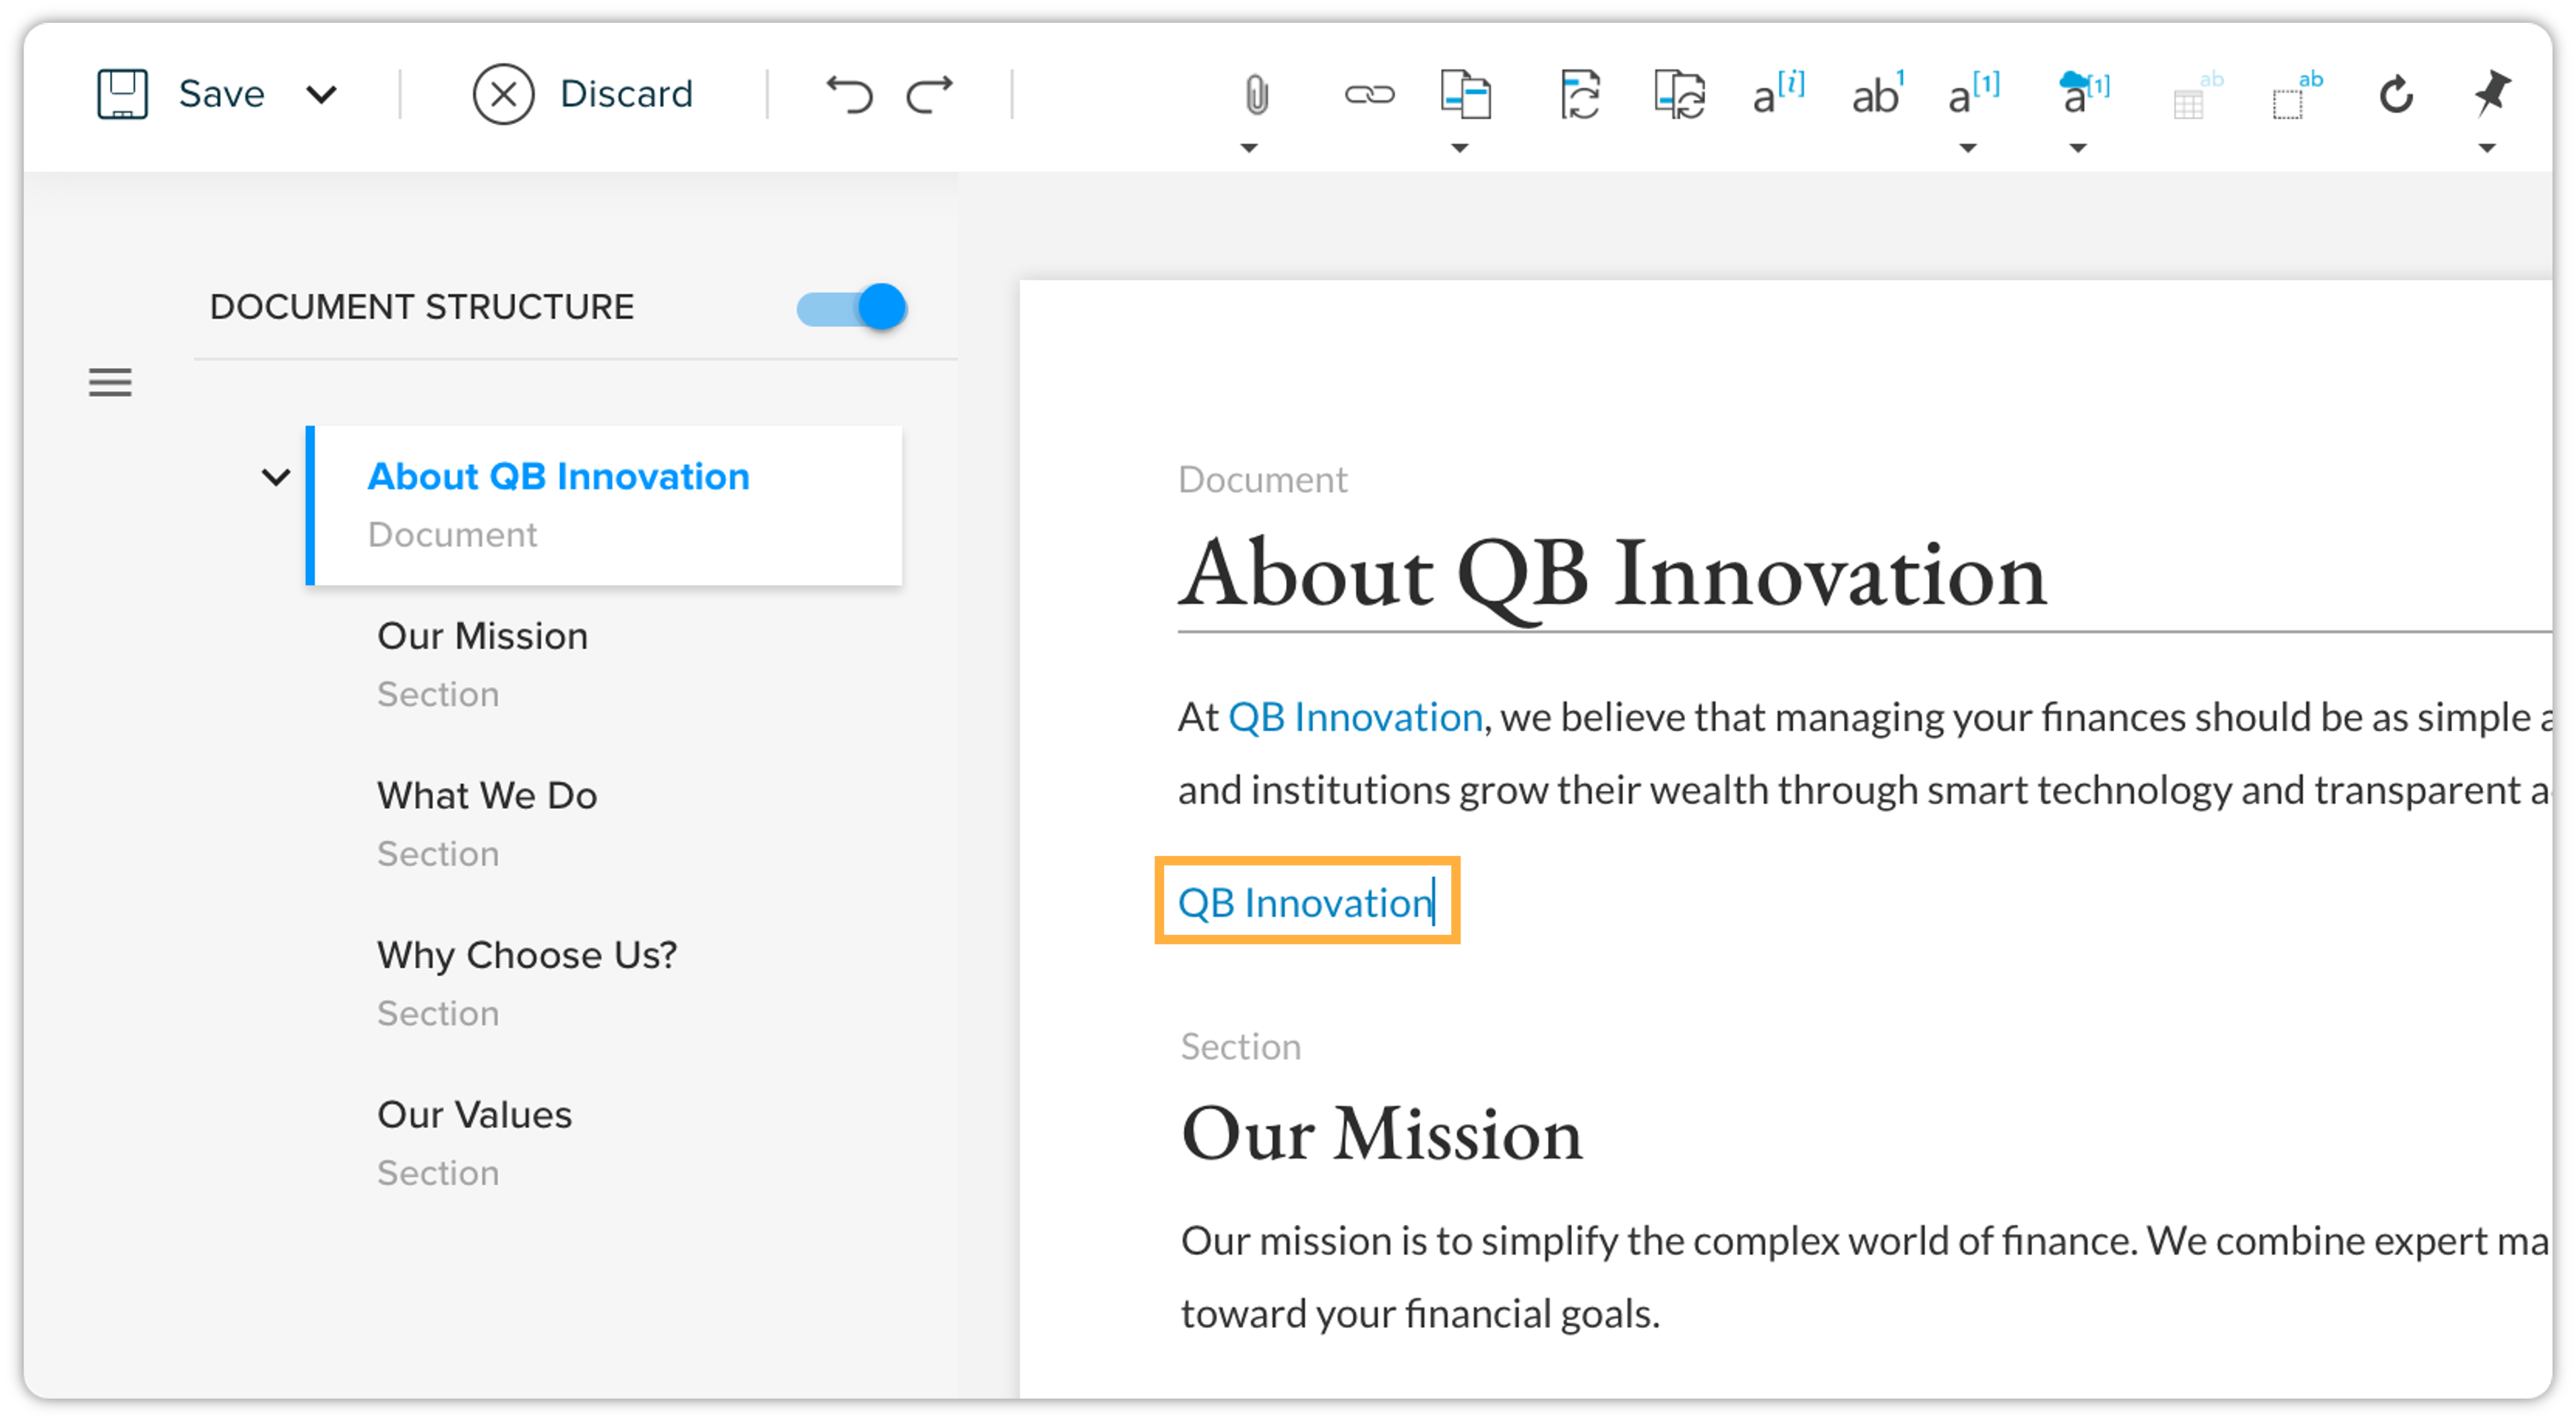
The link is successfully inserted.
To insert an inter-document cross-reference:
-
Place your cursor where you want the link to appear.
-
Go to the References tab, and click the Cross Reference icon, and then click Insert Inter Document Cross Reference.
-
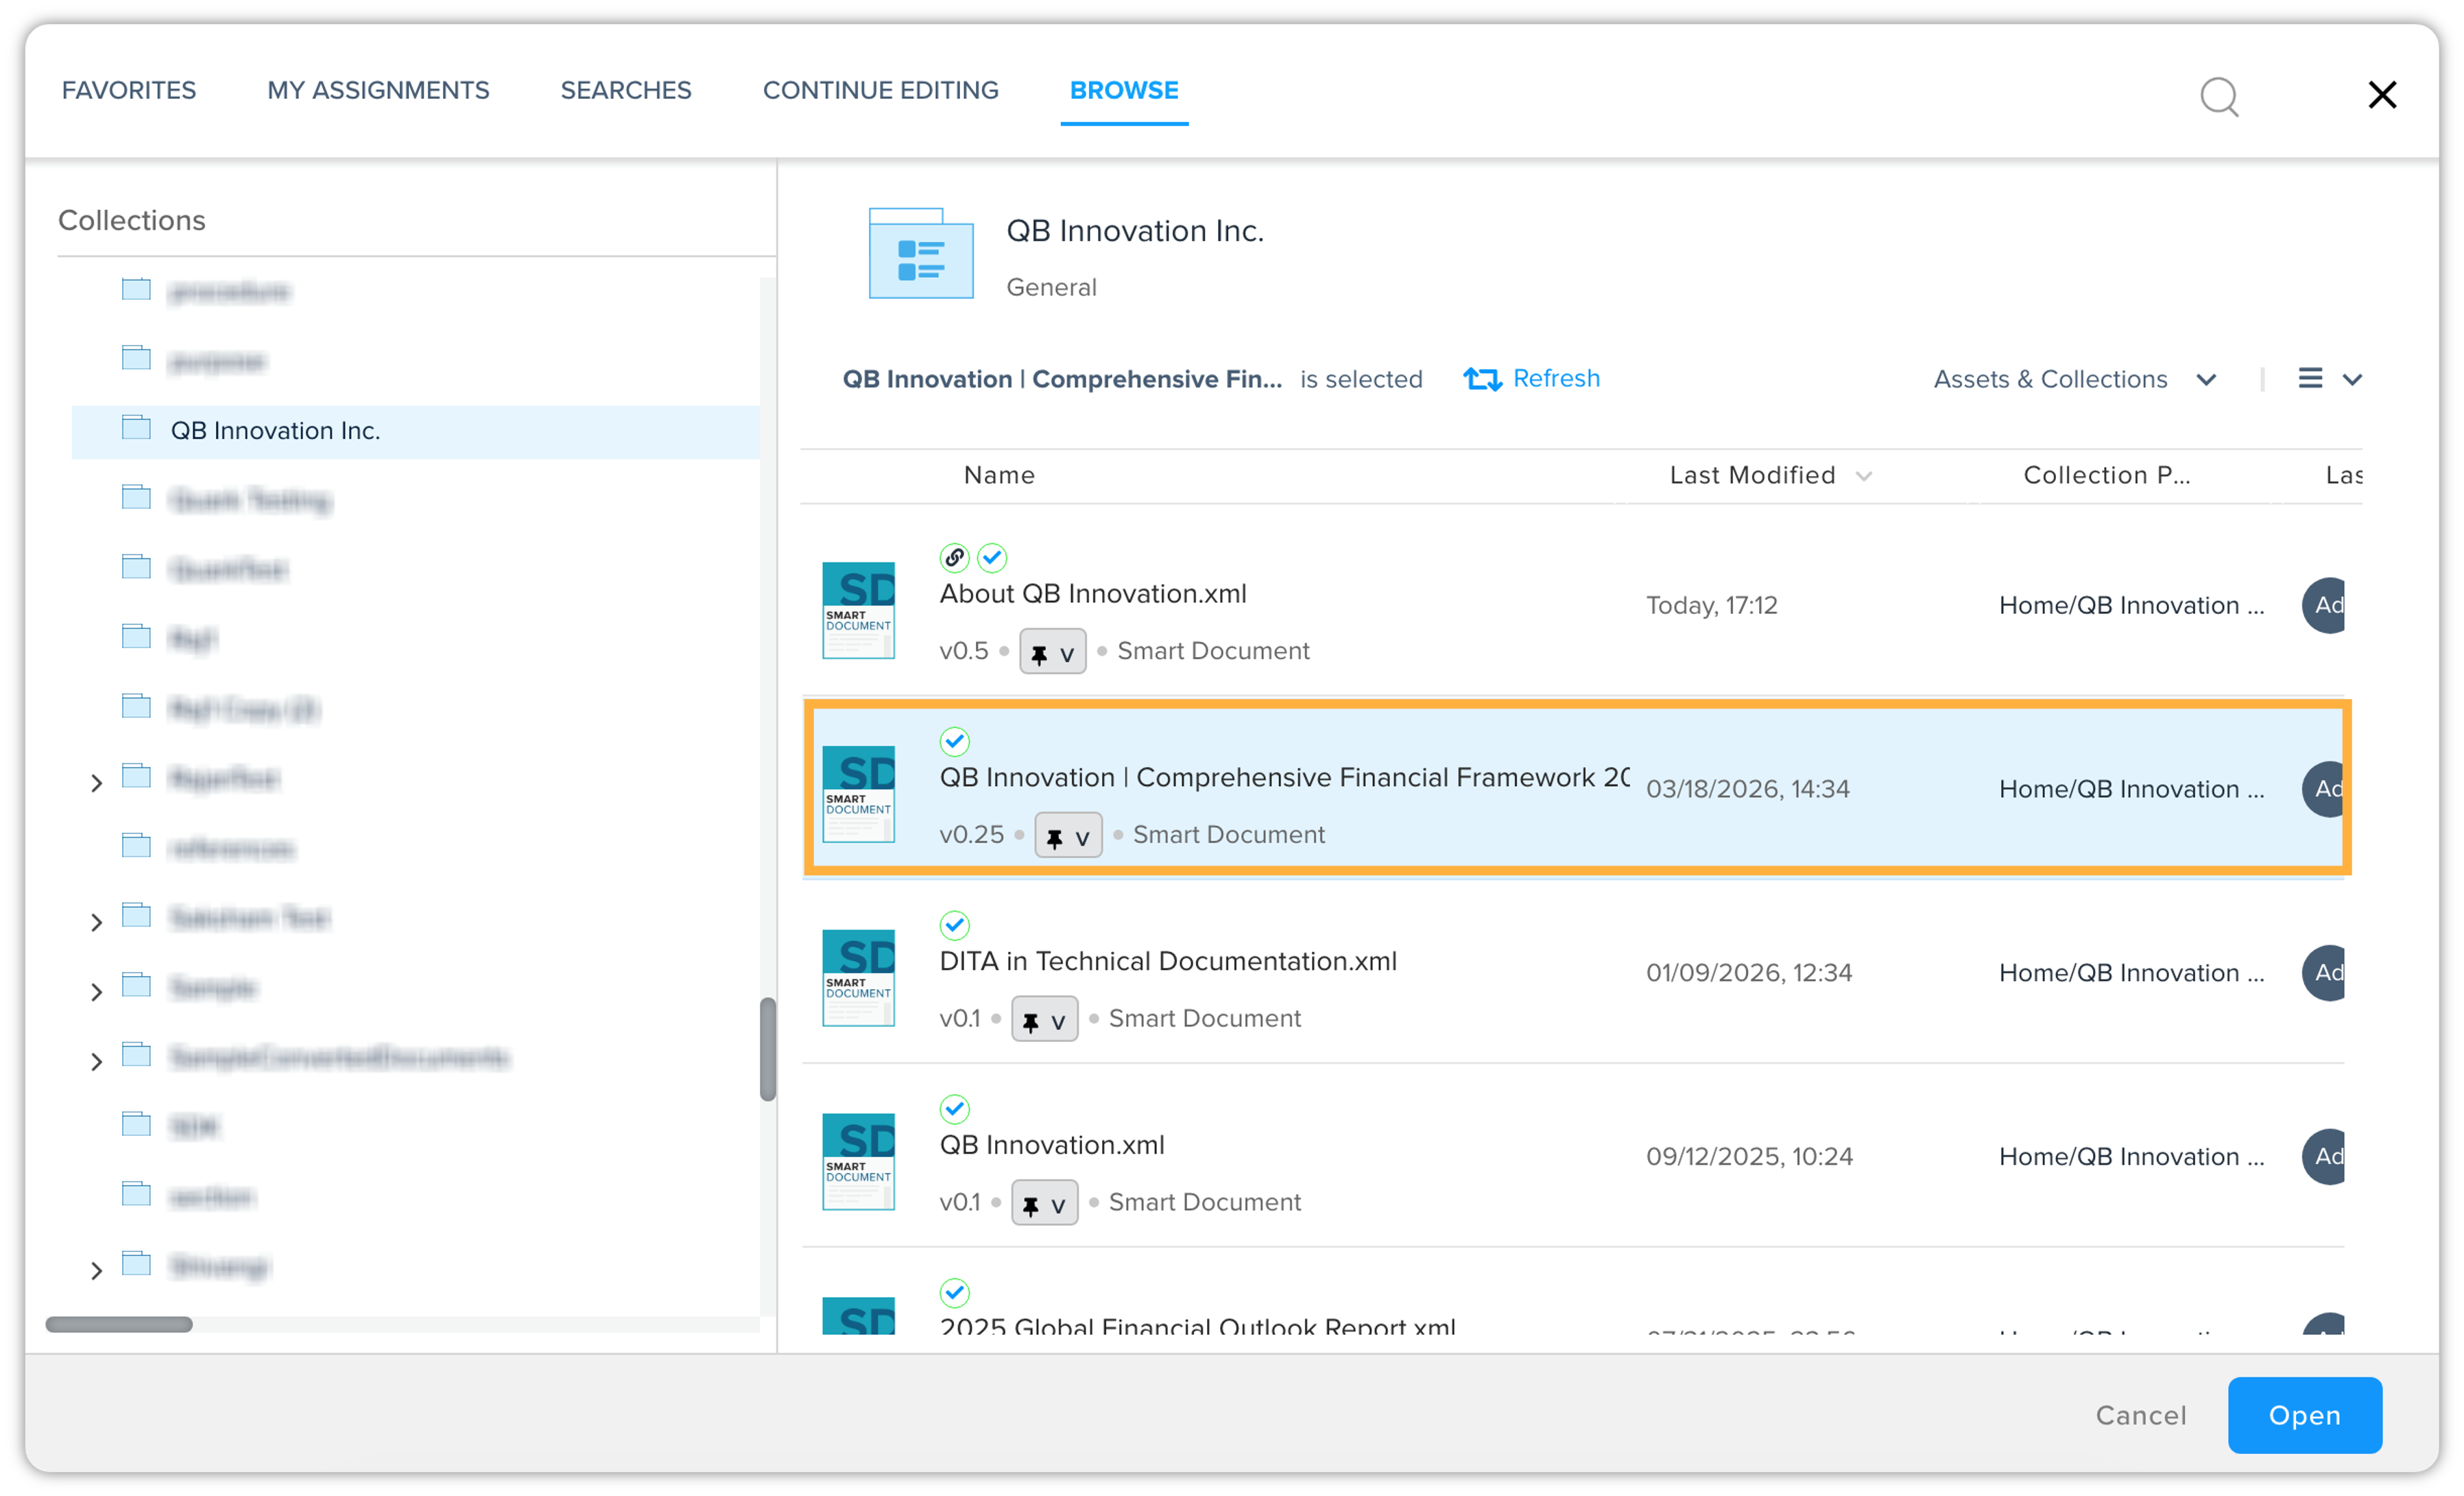
Use the search or browse functions to locate the desired document. Select the document and click Open.
-
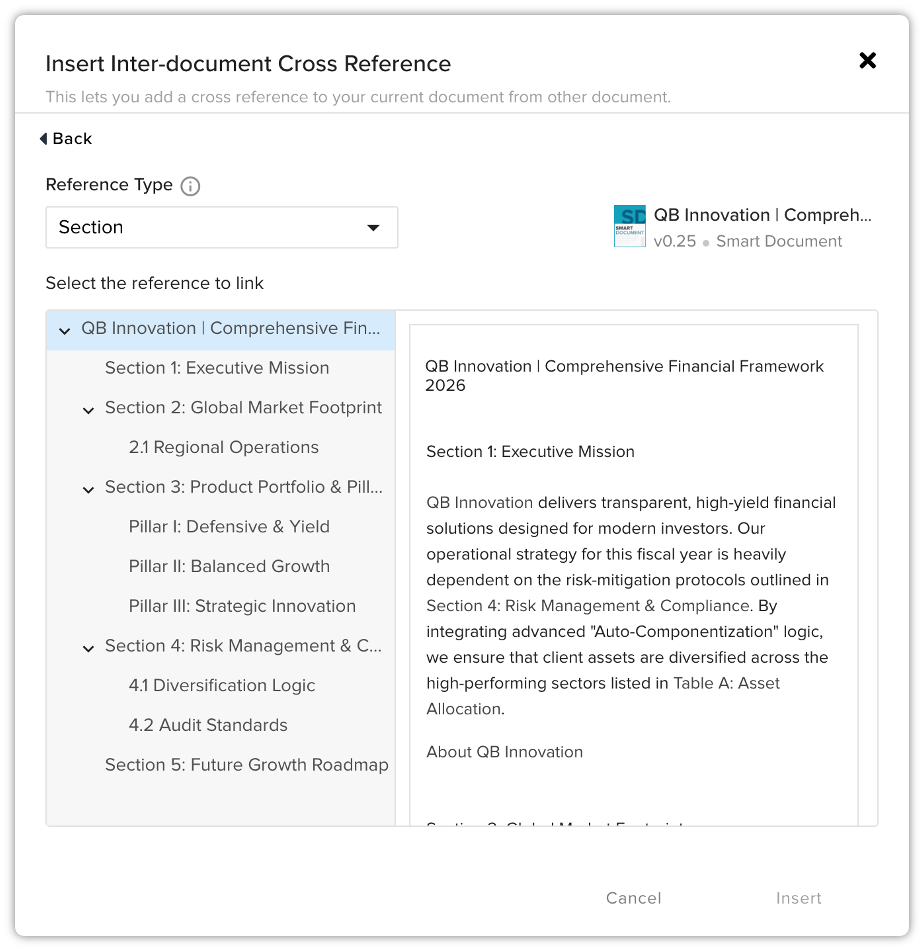
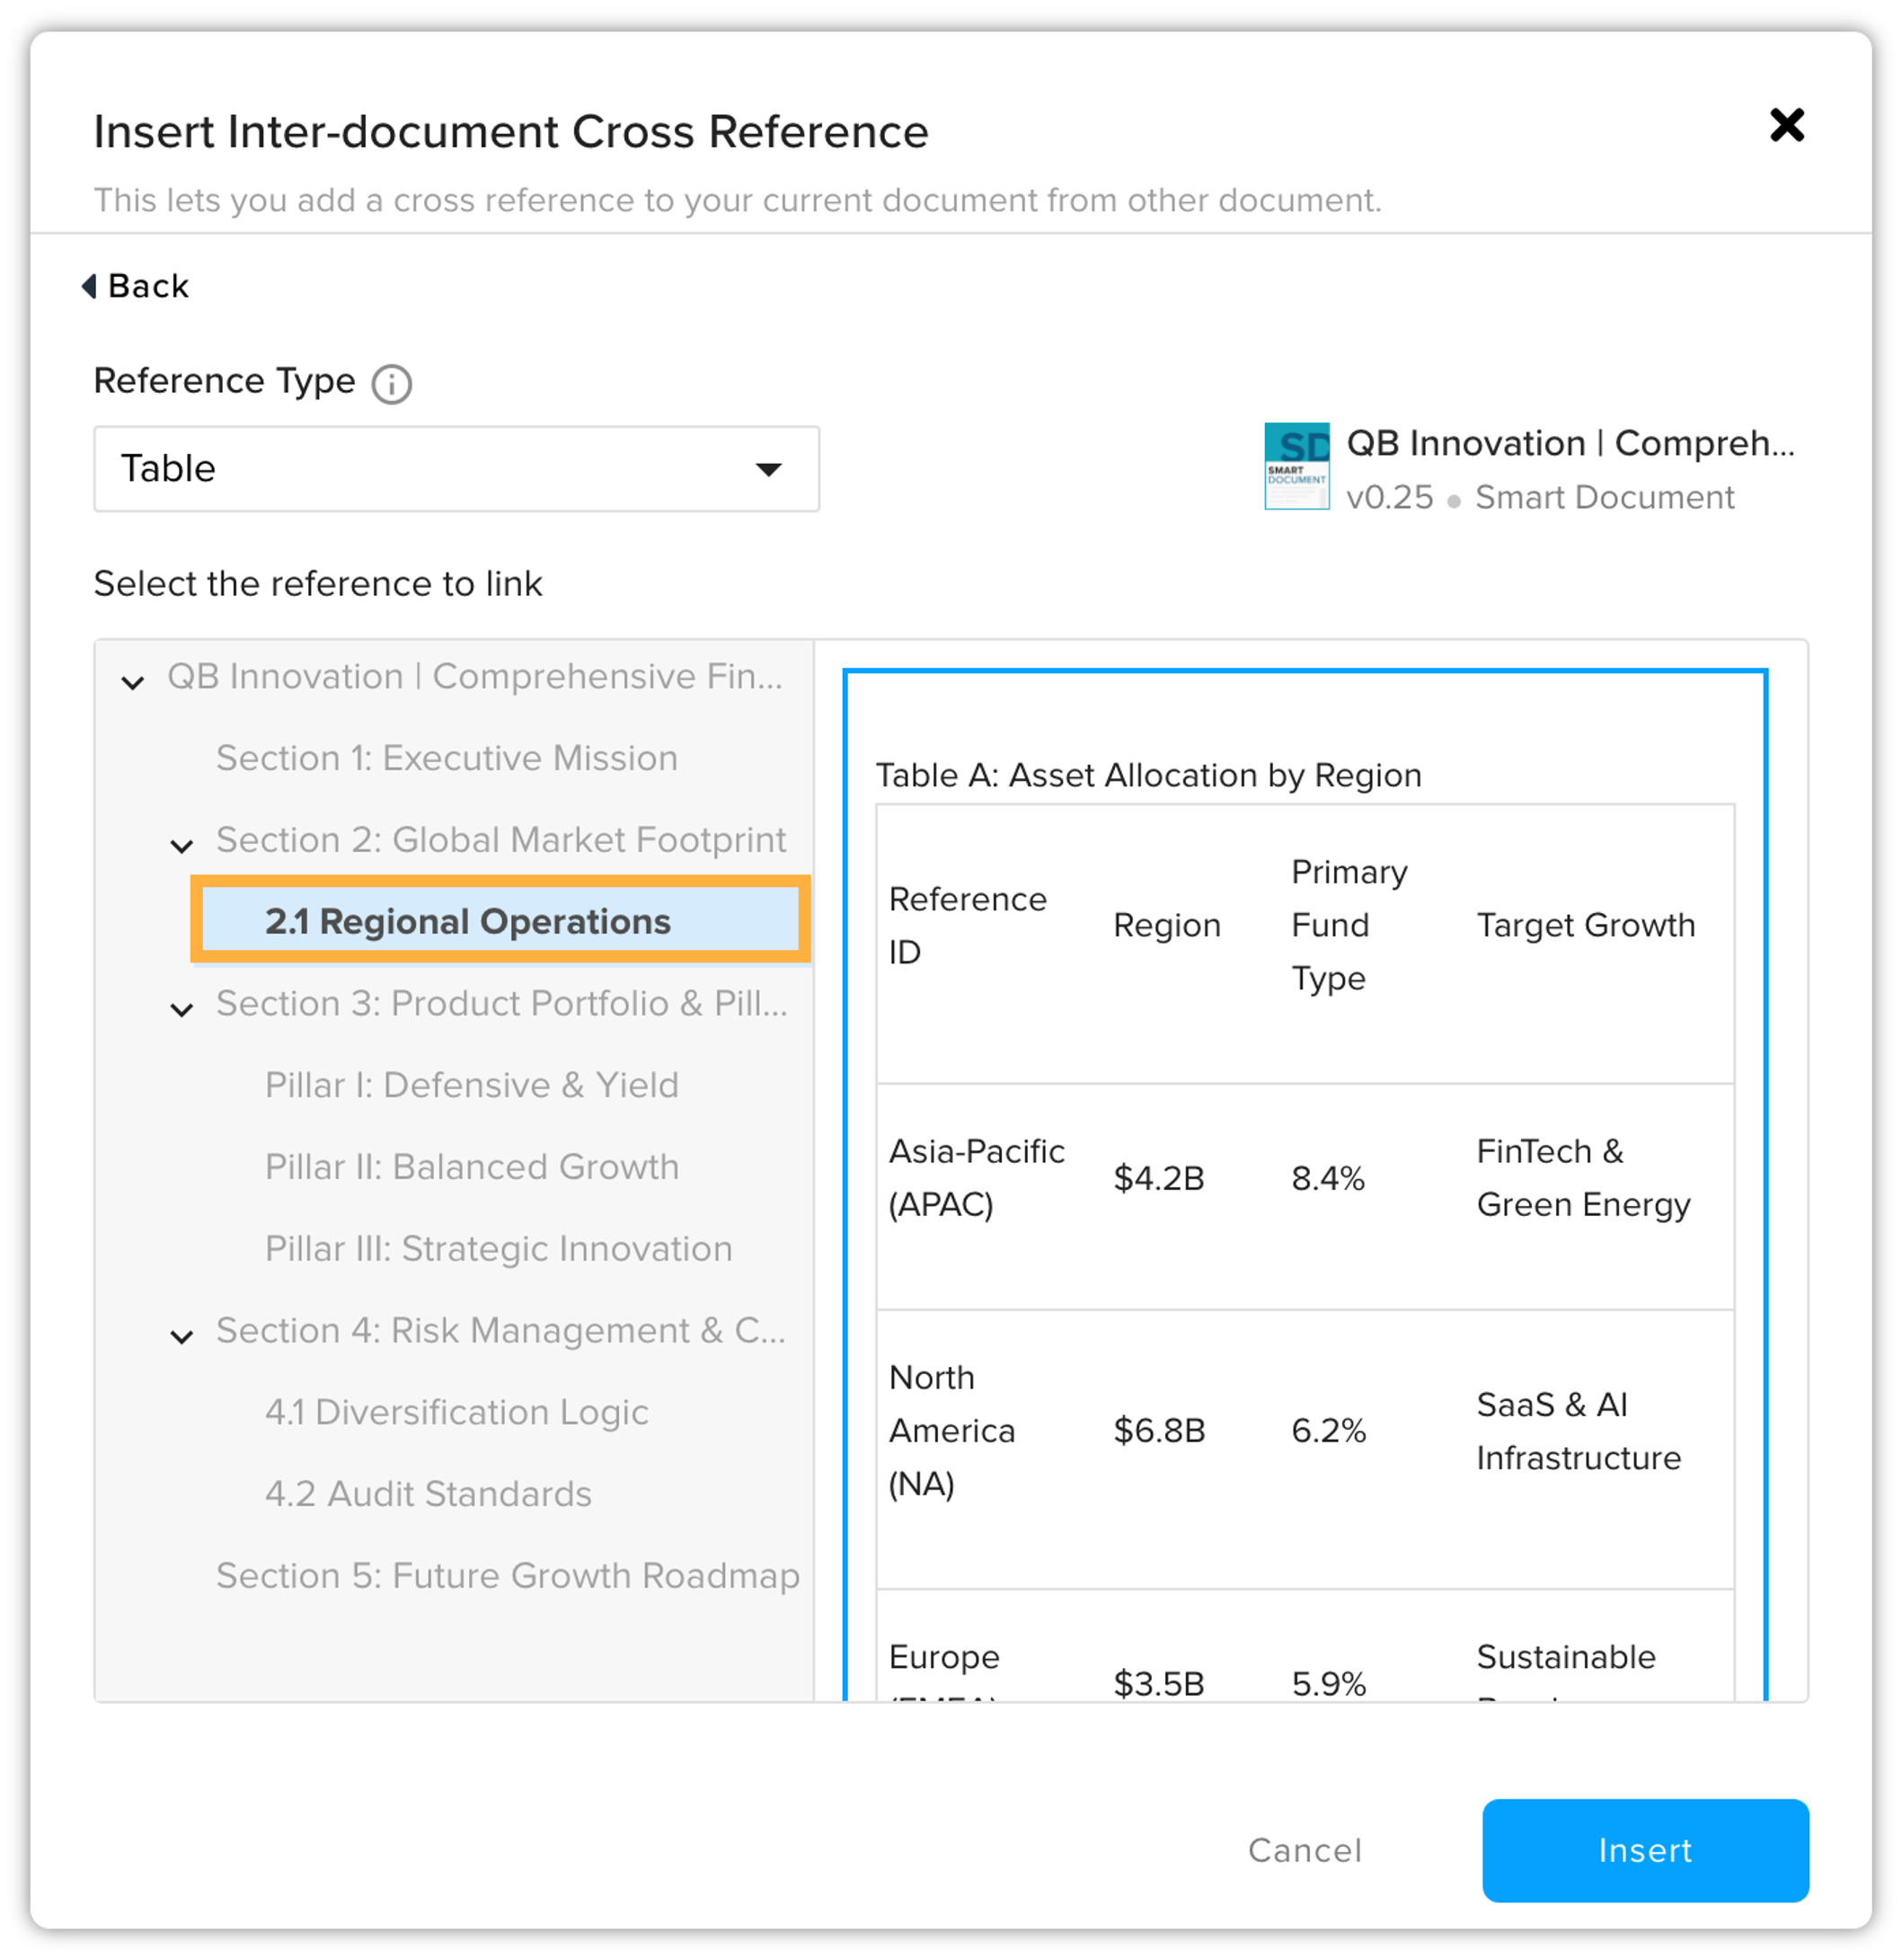
The Insert Inter-document Cross Reference dialog will open.
-
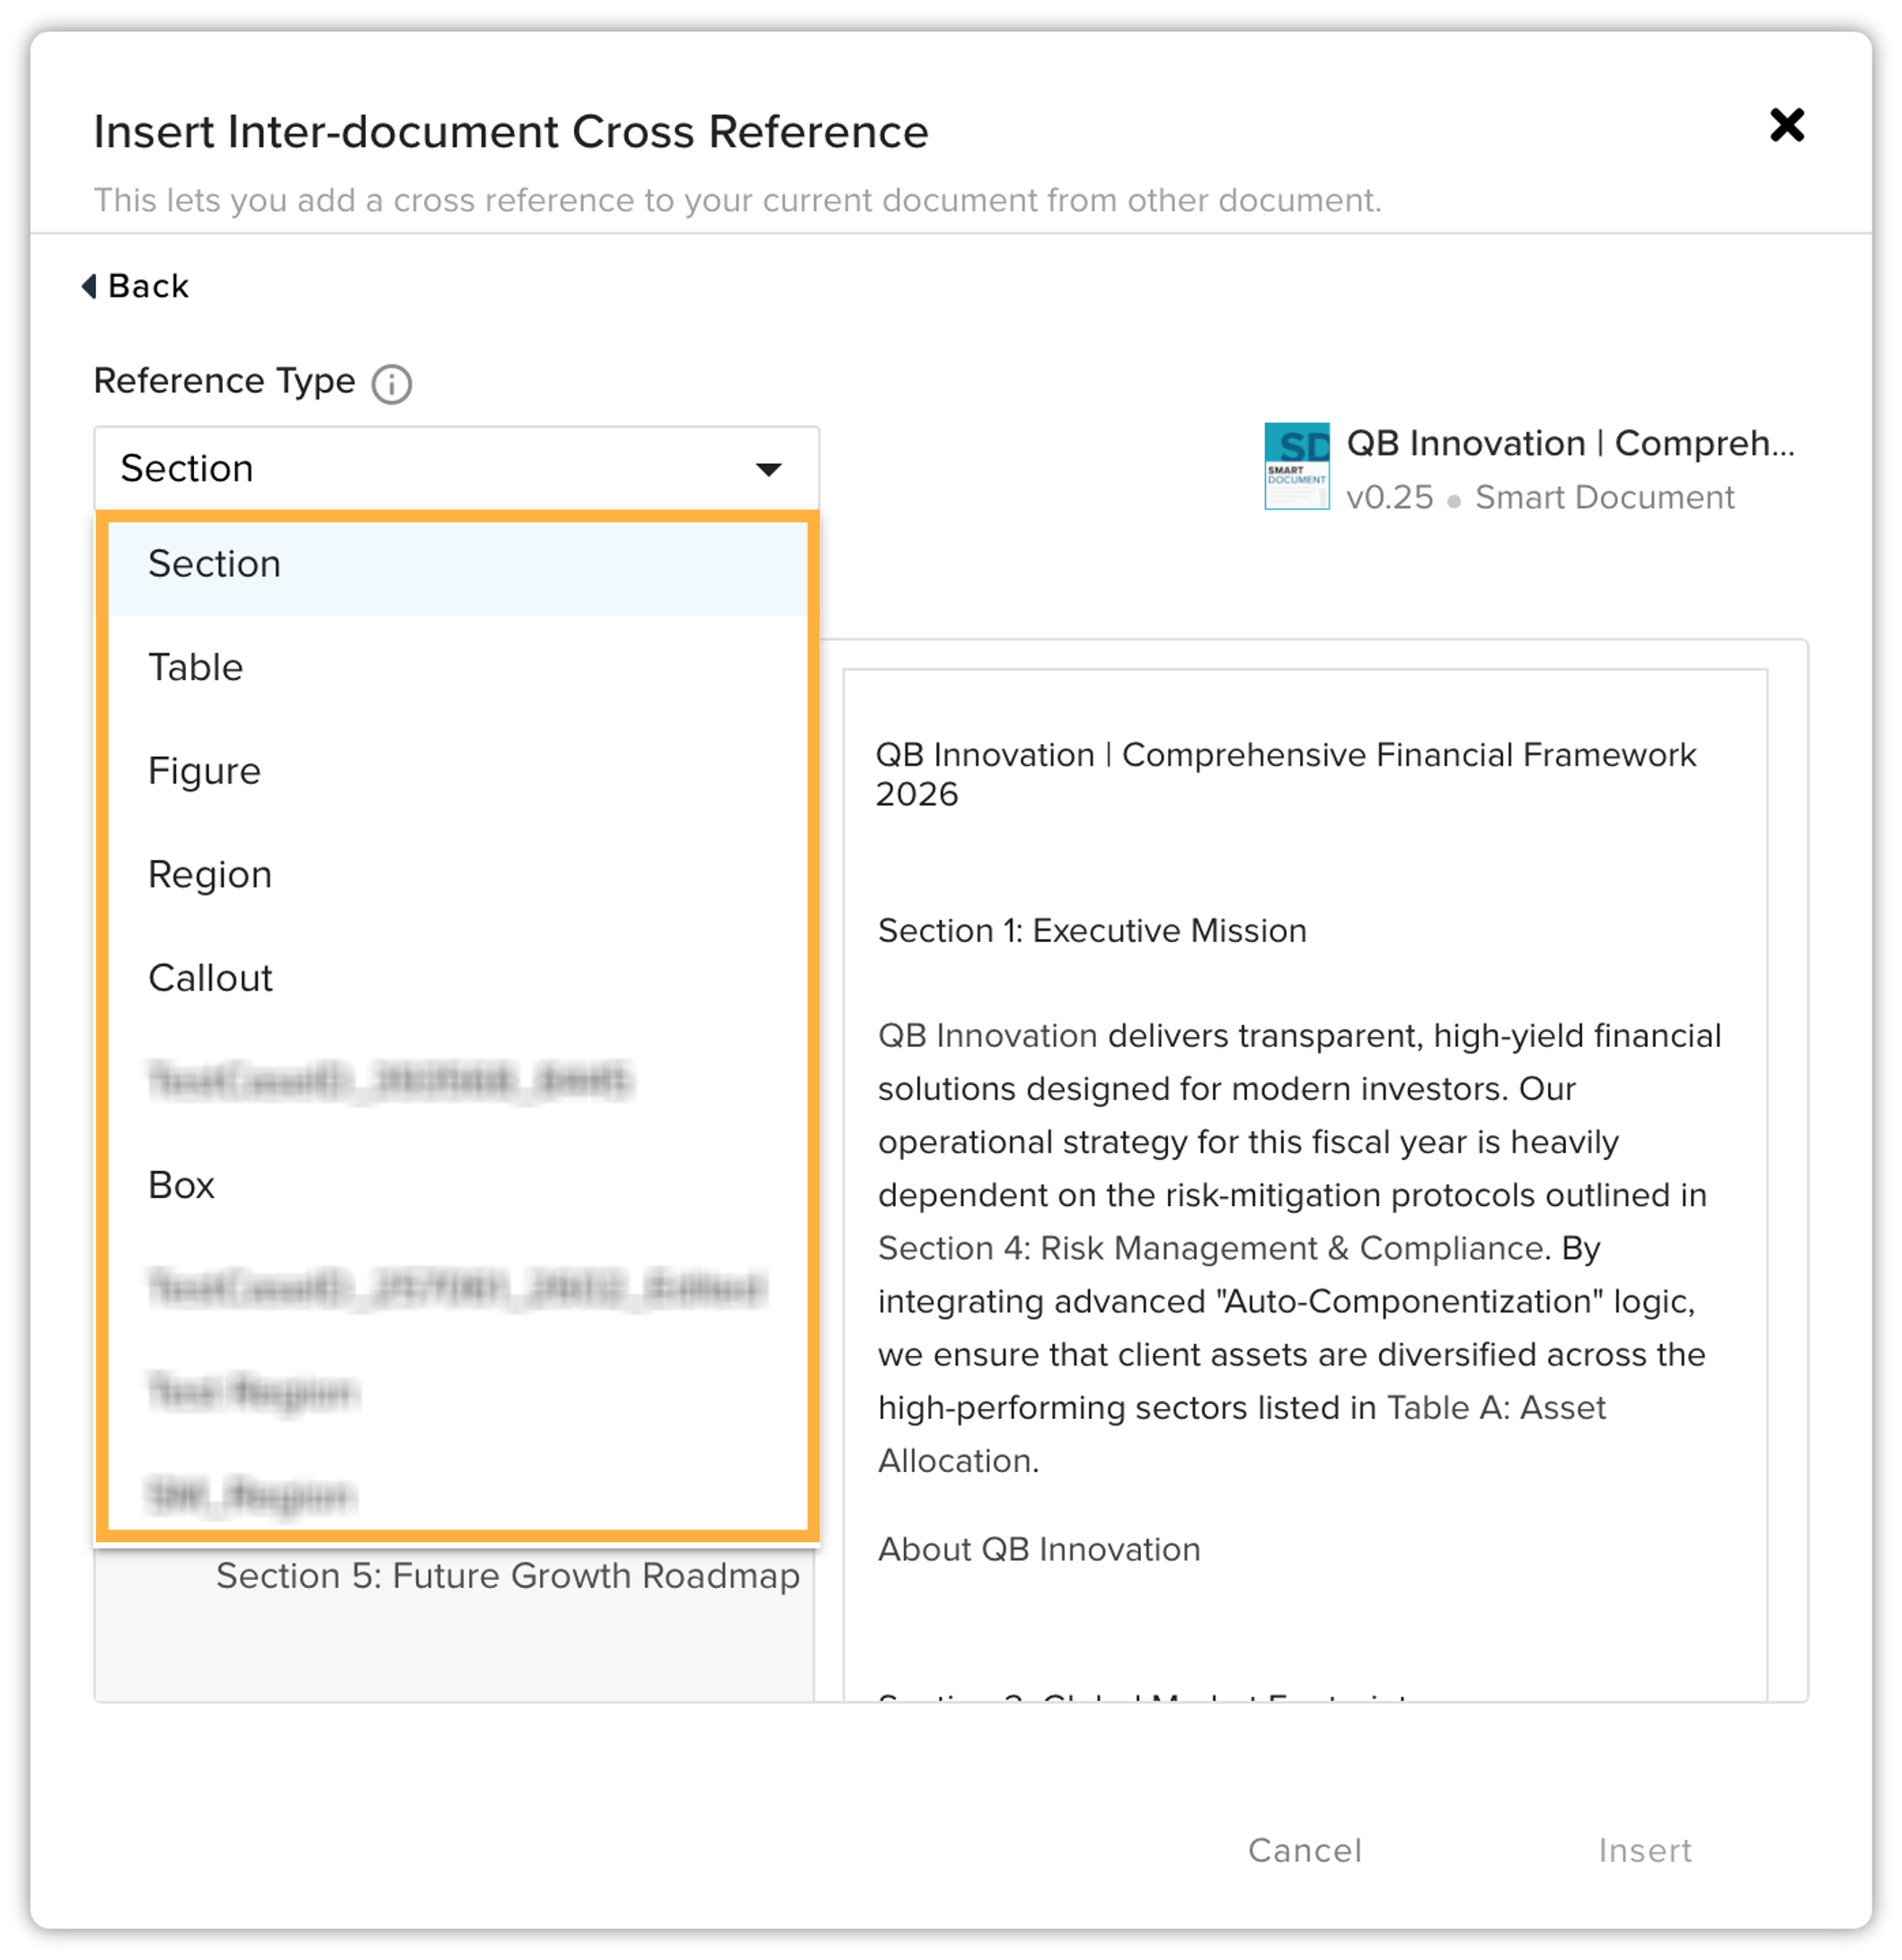
Select the reference type (e.g., Section, Table, Figure, or Region).
-
Then select the reference to link, and click Insert.
-
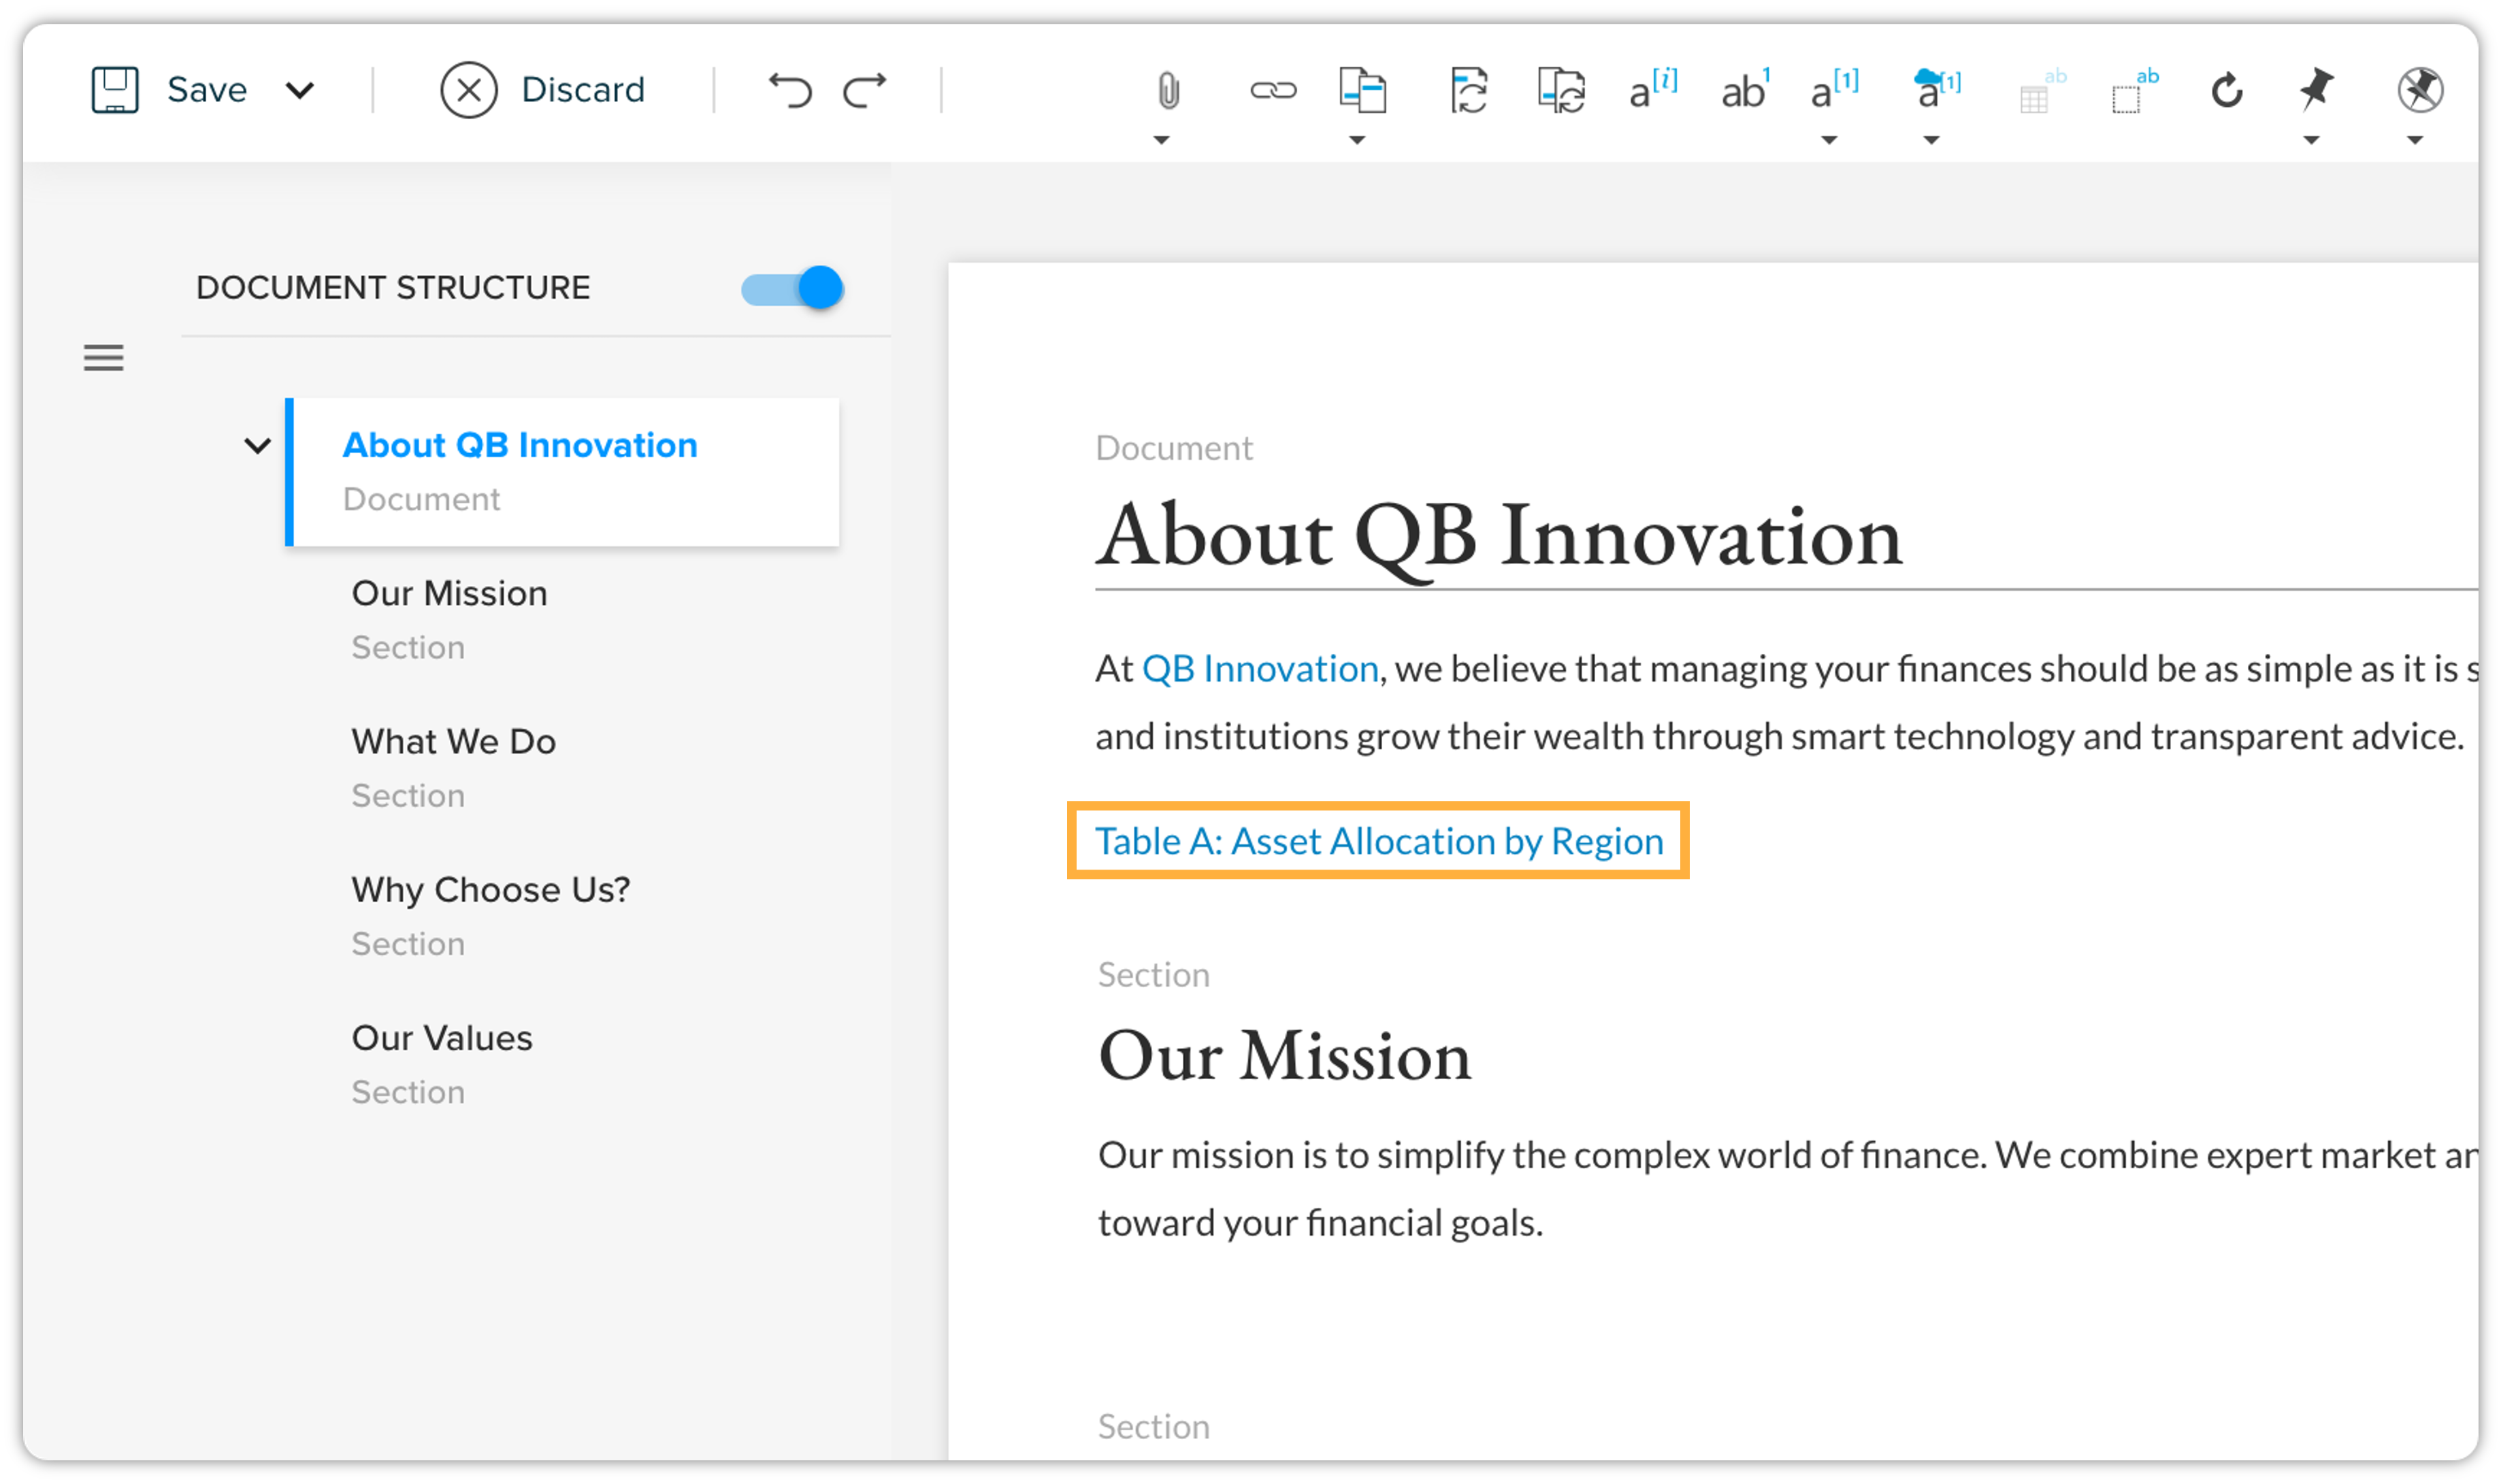
The inter-document cross-reference link is successfully inserted.
Insert an Attachment
The File Attachment feature in the Quark Author editor empowers content writers to enhance their documents with supplementary resources. Below is a comprehensive overview of how to effectively utilize this feature.
-
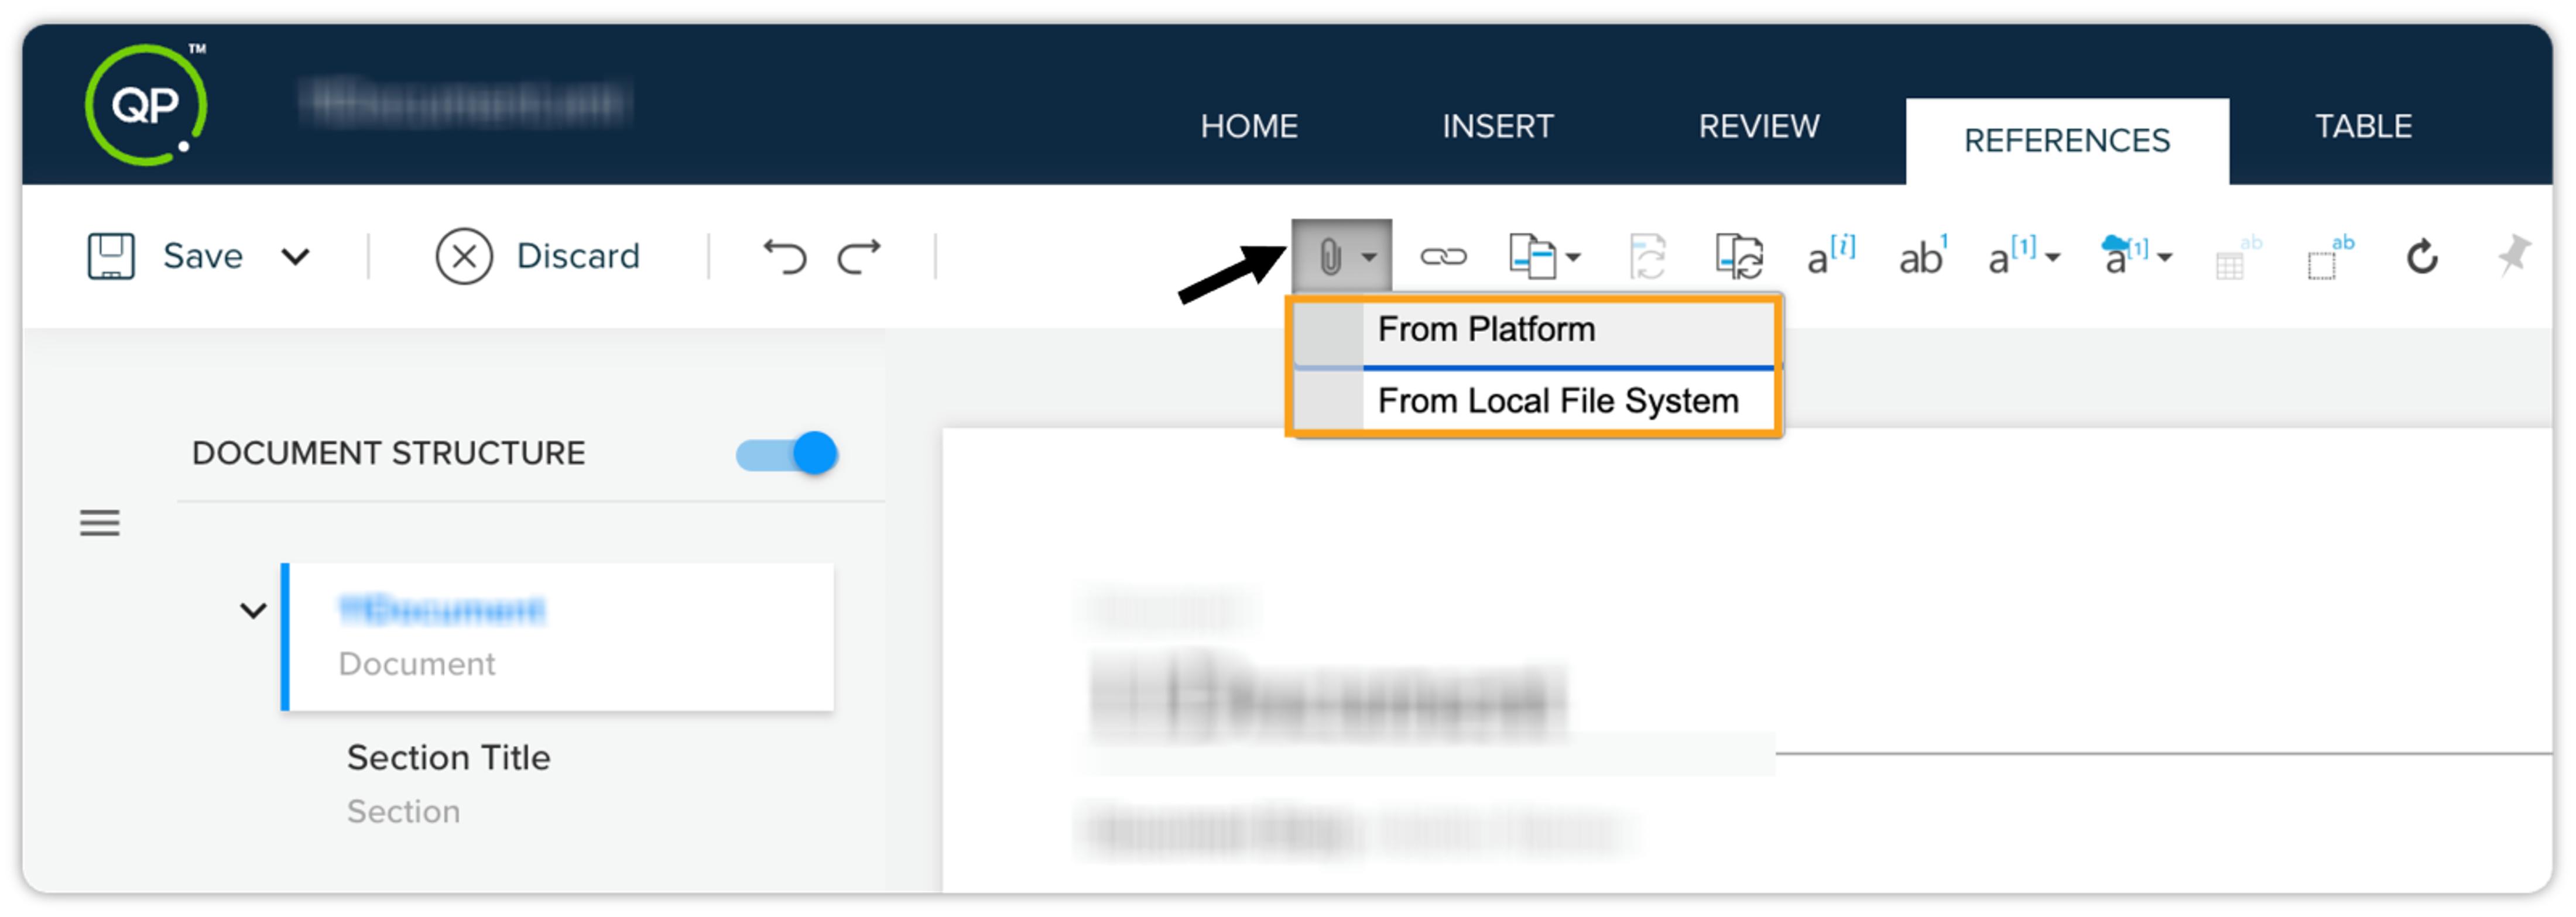
File Attachment Icon: To attach files, click on the File Attachment icon located on the toolbar of the References tab. This allows you to attach files of various formats at multiple levels within the document: document-level, section-level, table-level, and region-level.
-
Options for Attaching Files:
-
From QPP: You can select files directly from the QPP Platform repository.
-
From Local System: To attach files from the local system, note that the file will first be added to the platform repository before being attached to the document.
-
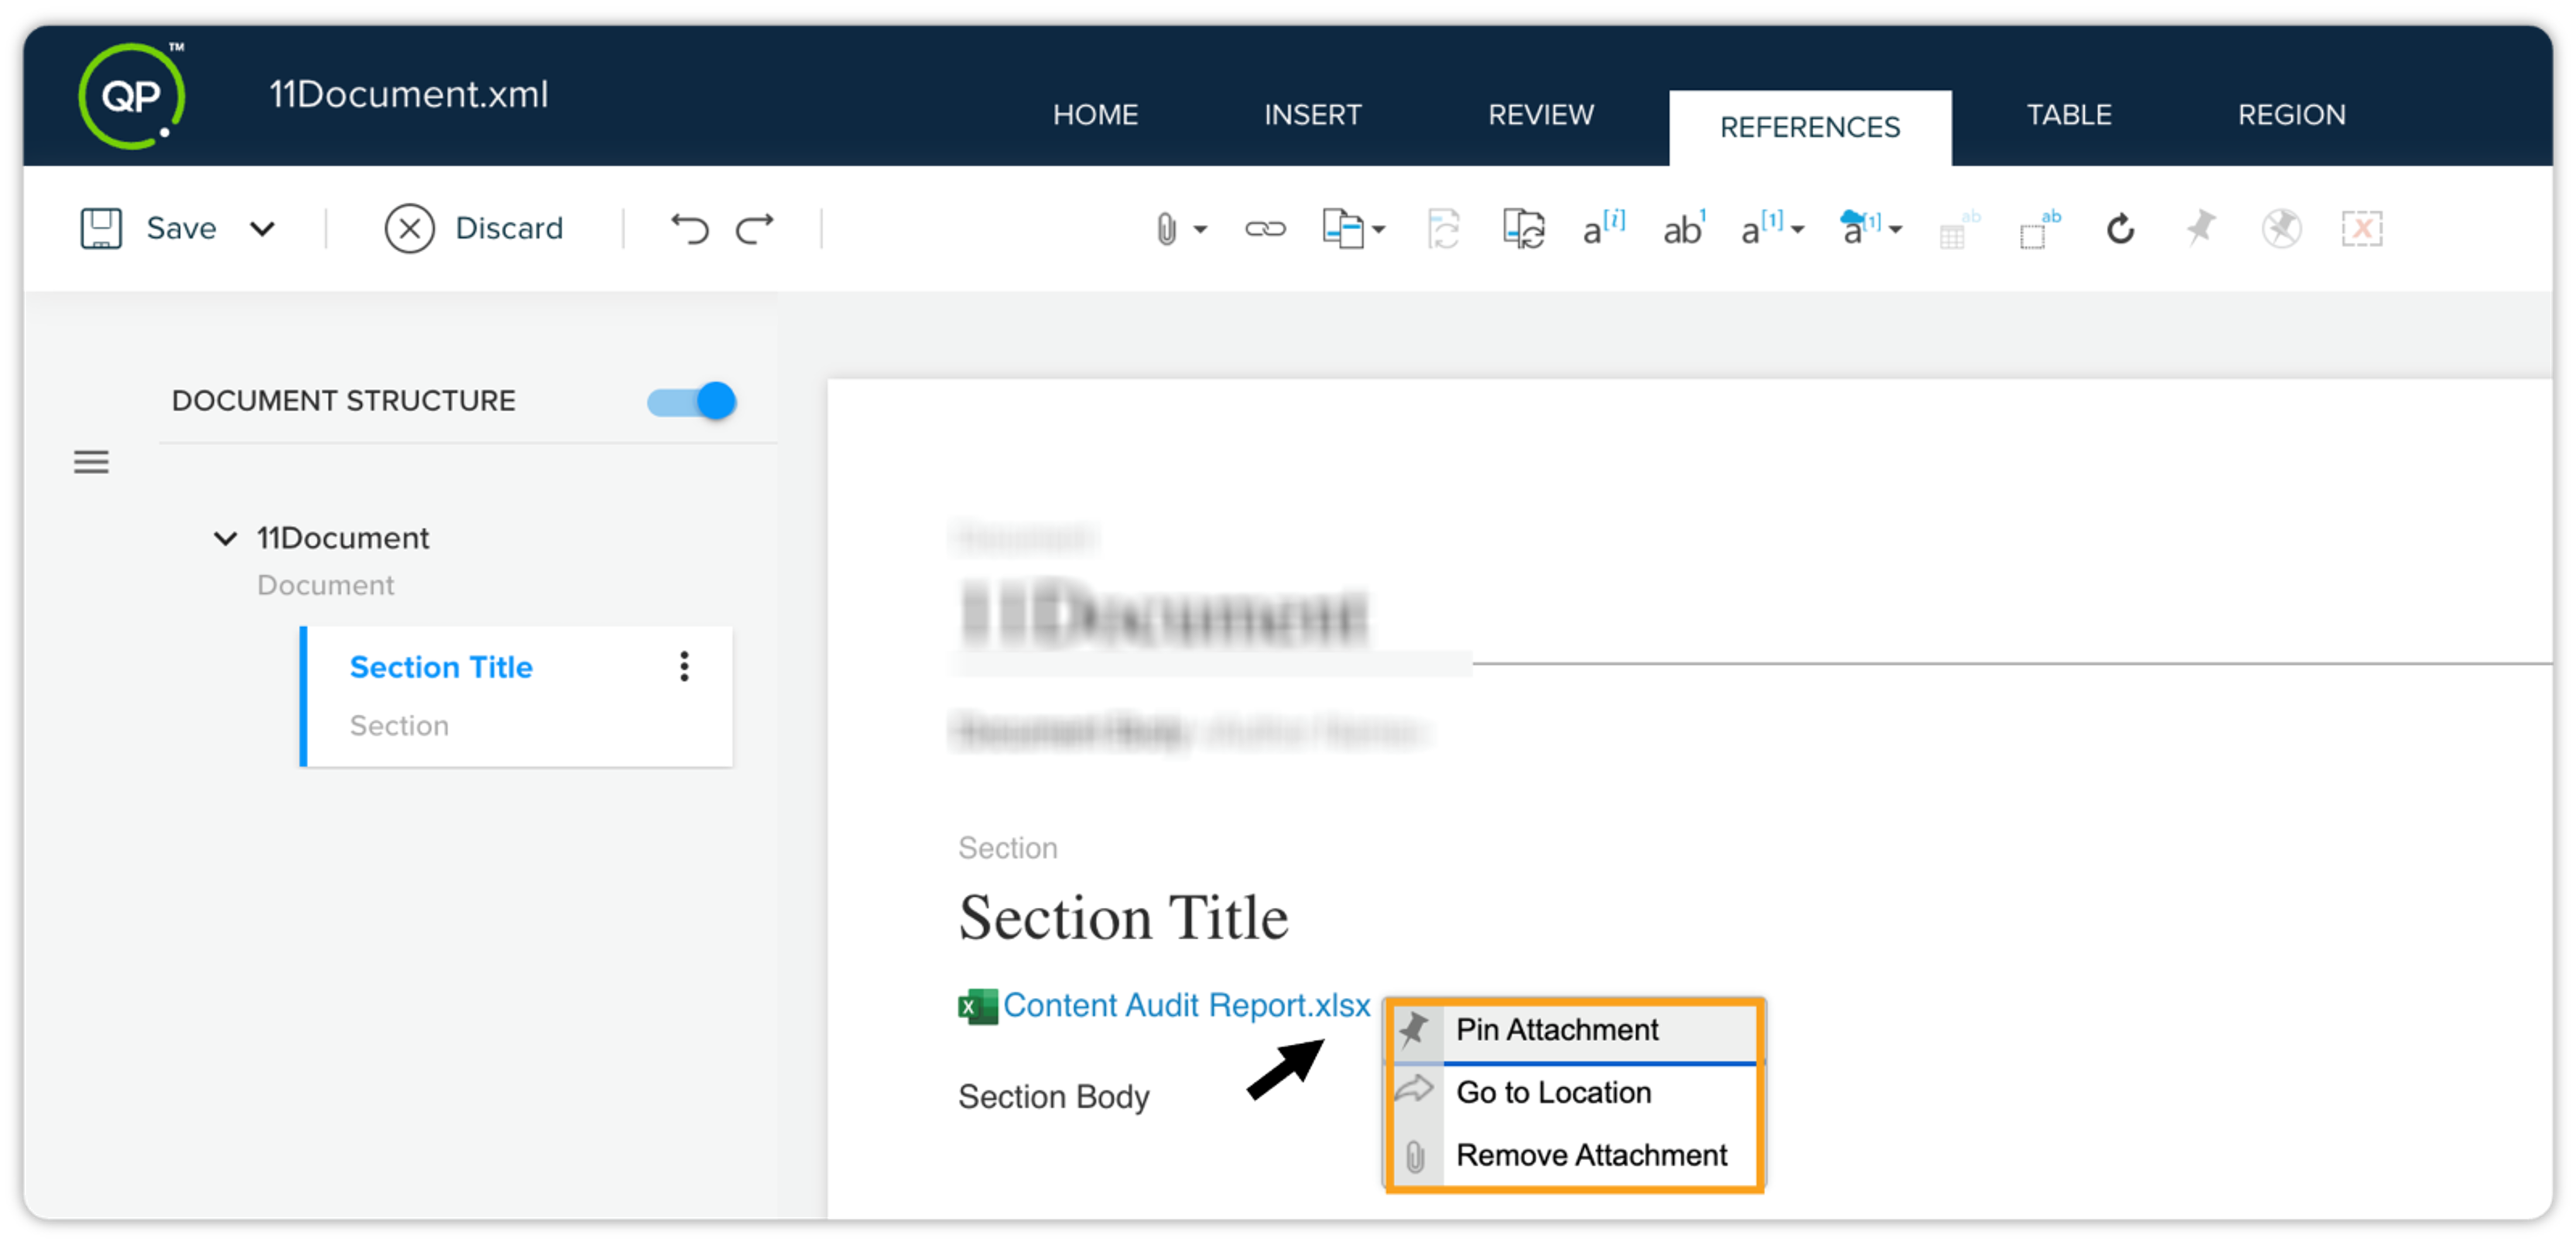
After inserting an attachment into the document, you can access a context menu with the following actions:
-
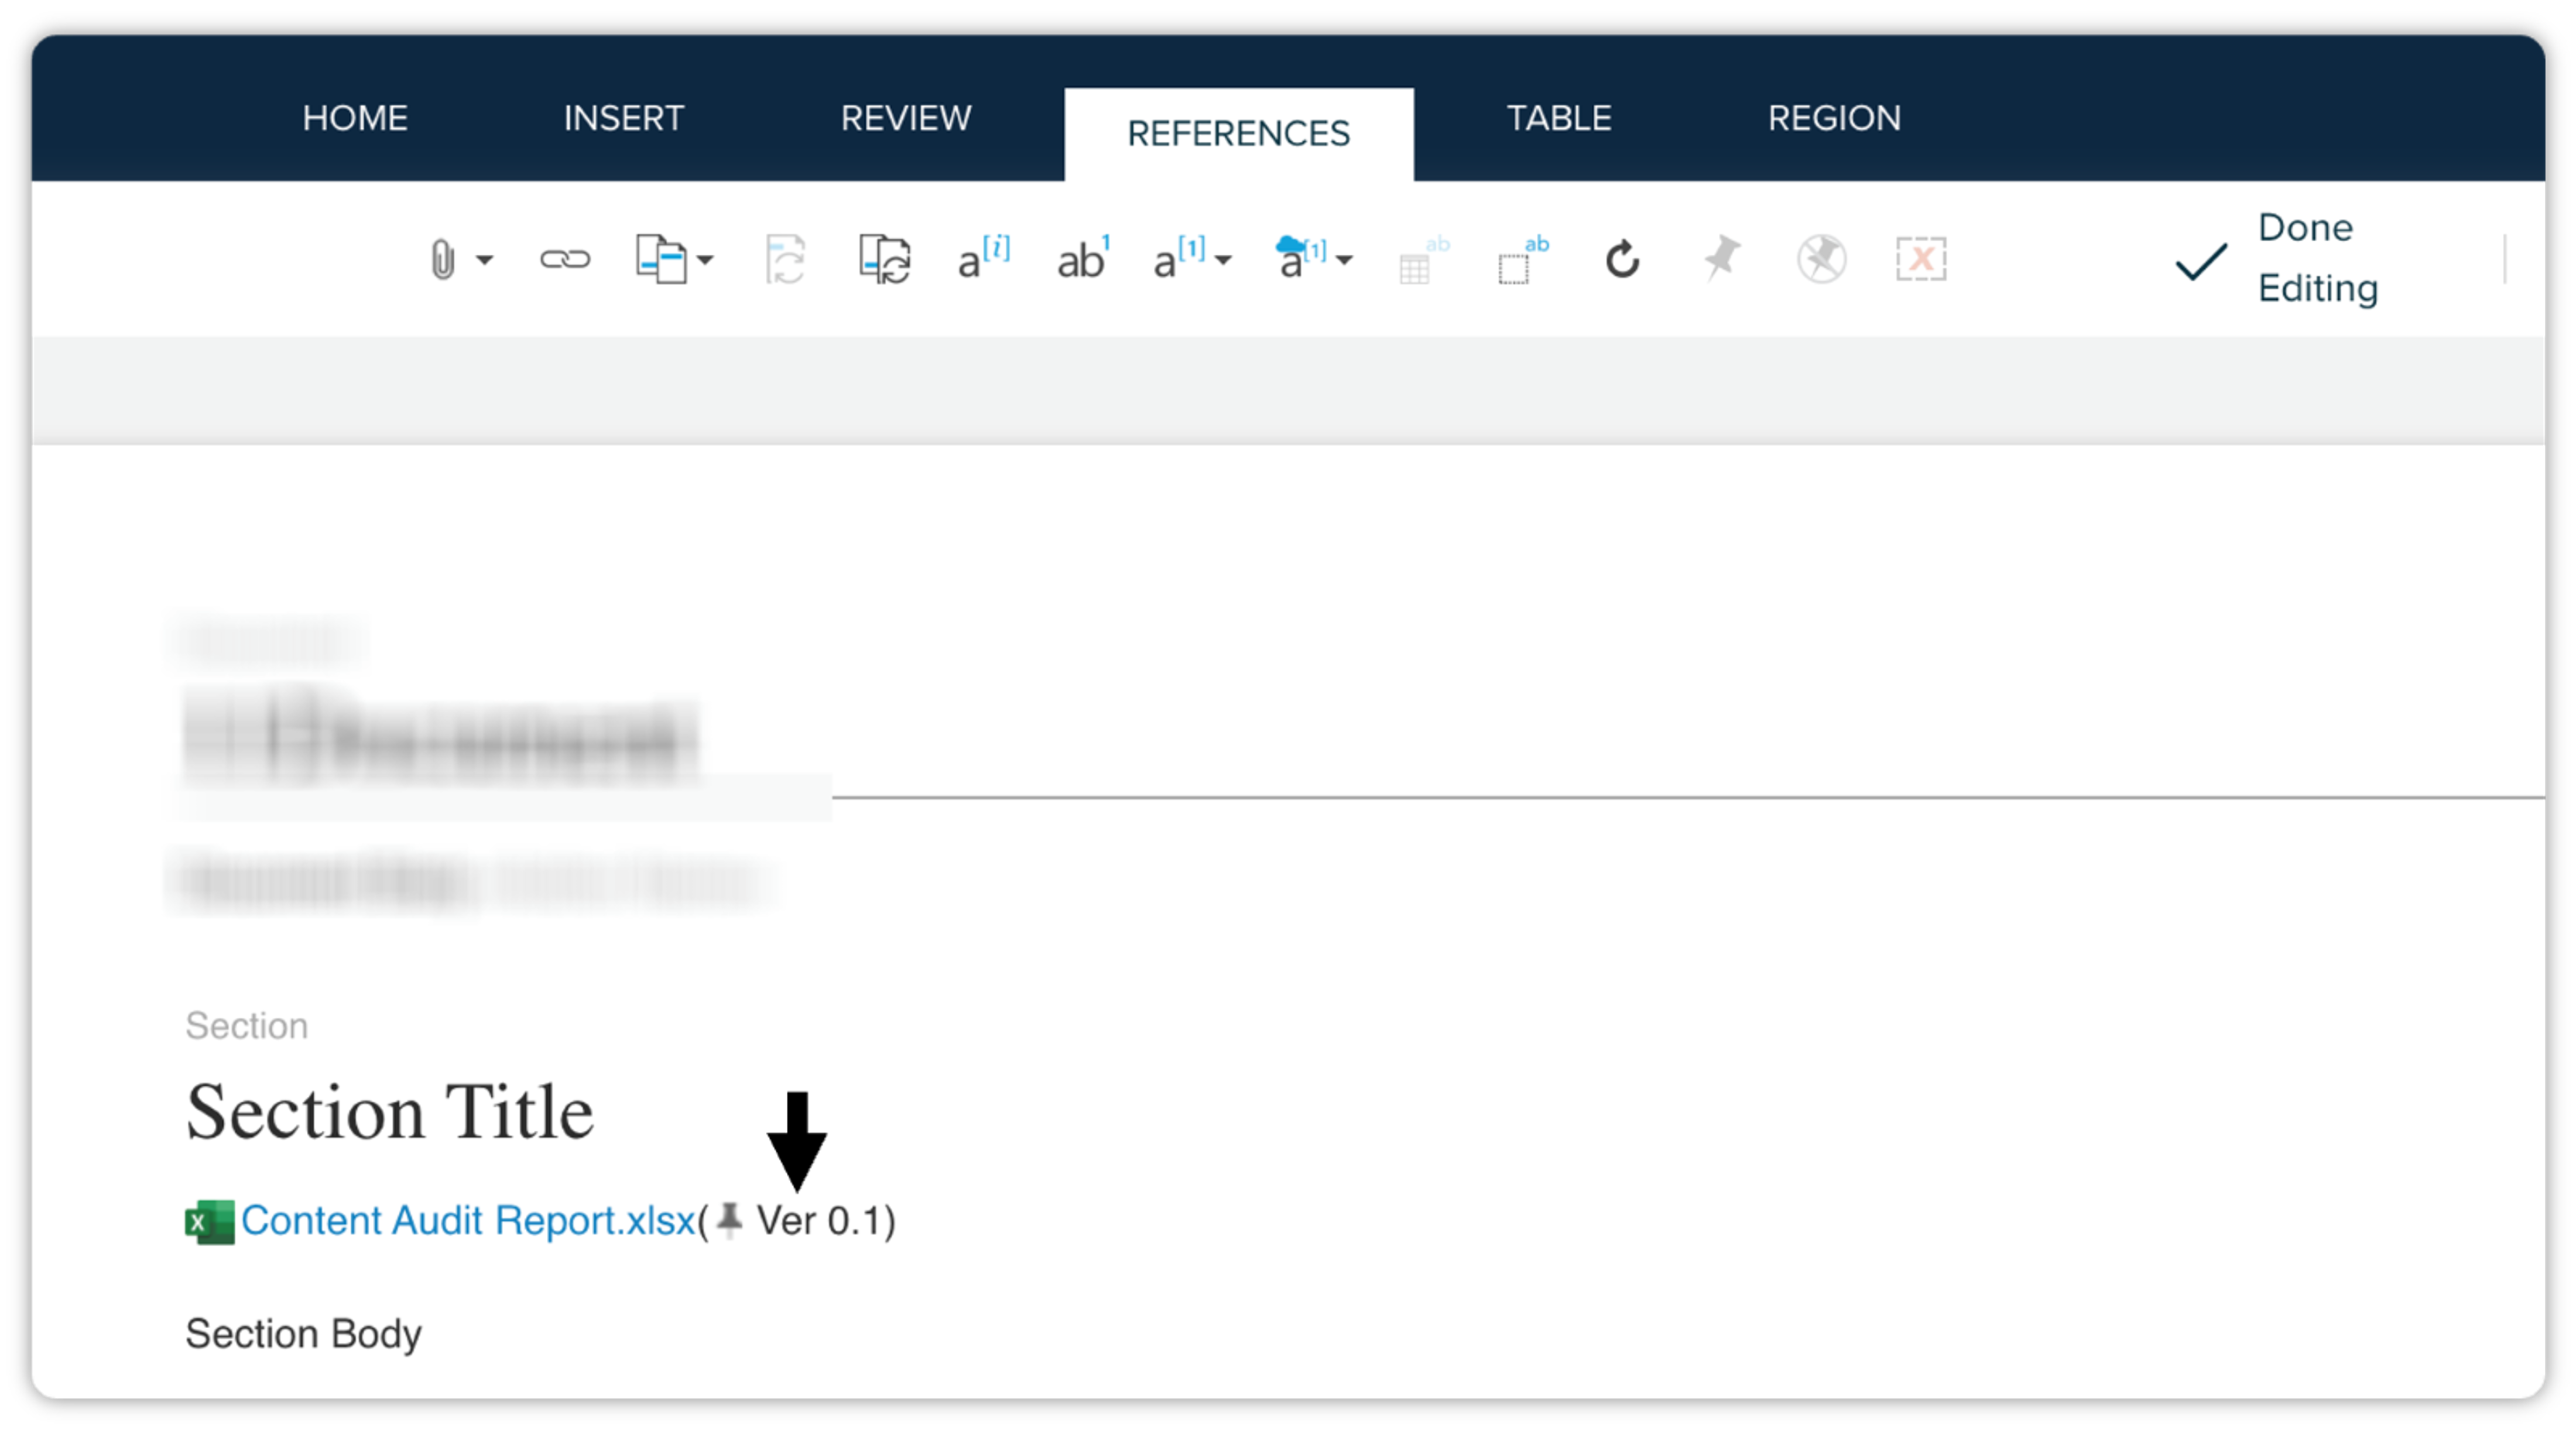
Pin Attachment: You can pin or unpin attachments. When pinned, the current version number will display next to the attachment. Upon updates, a highlighted pin icon with a notification will indicate that a new version is available (e.g., "unpin to update"). Once unpinned, the attachment updates to the latest version.
-
Go to Location: This option opens a new browser window, redirecting you to the original location of the attachment.
-
Remove Attachment: Selecting this option removes the attachment from the document, and it will no longer appear in the "Attachments" tab under "Links and Reference" in the Apps pane.
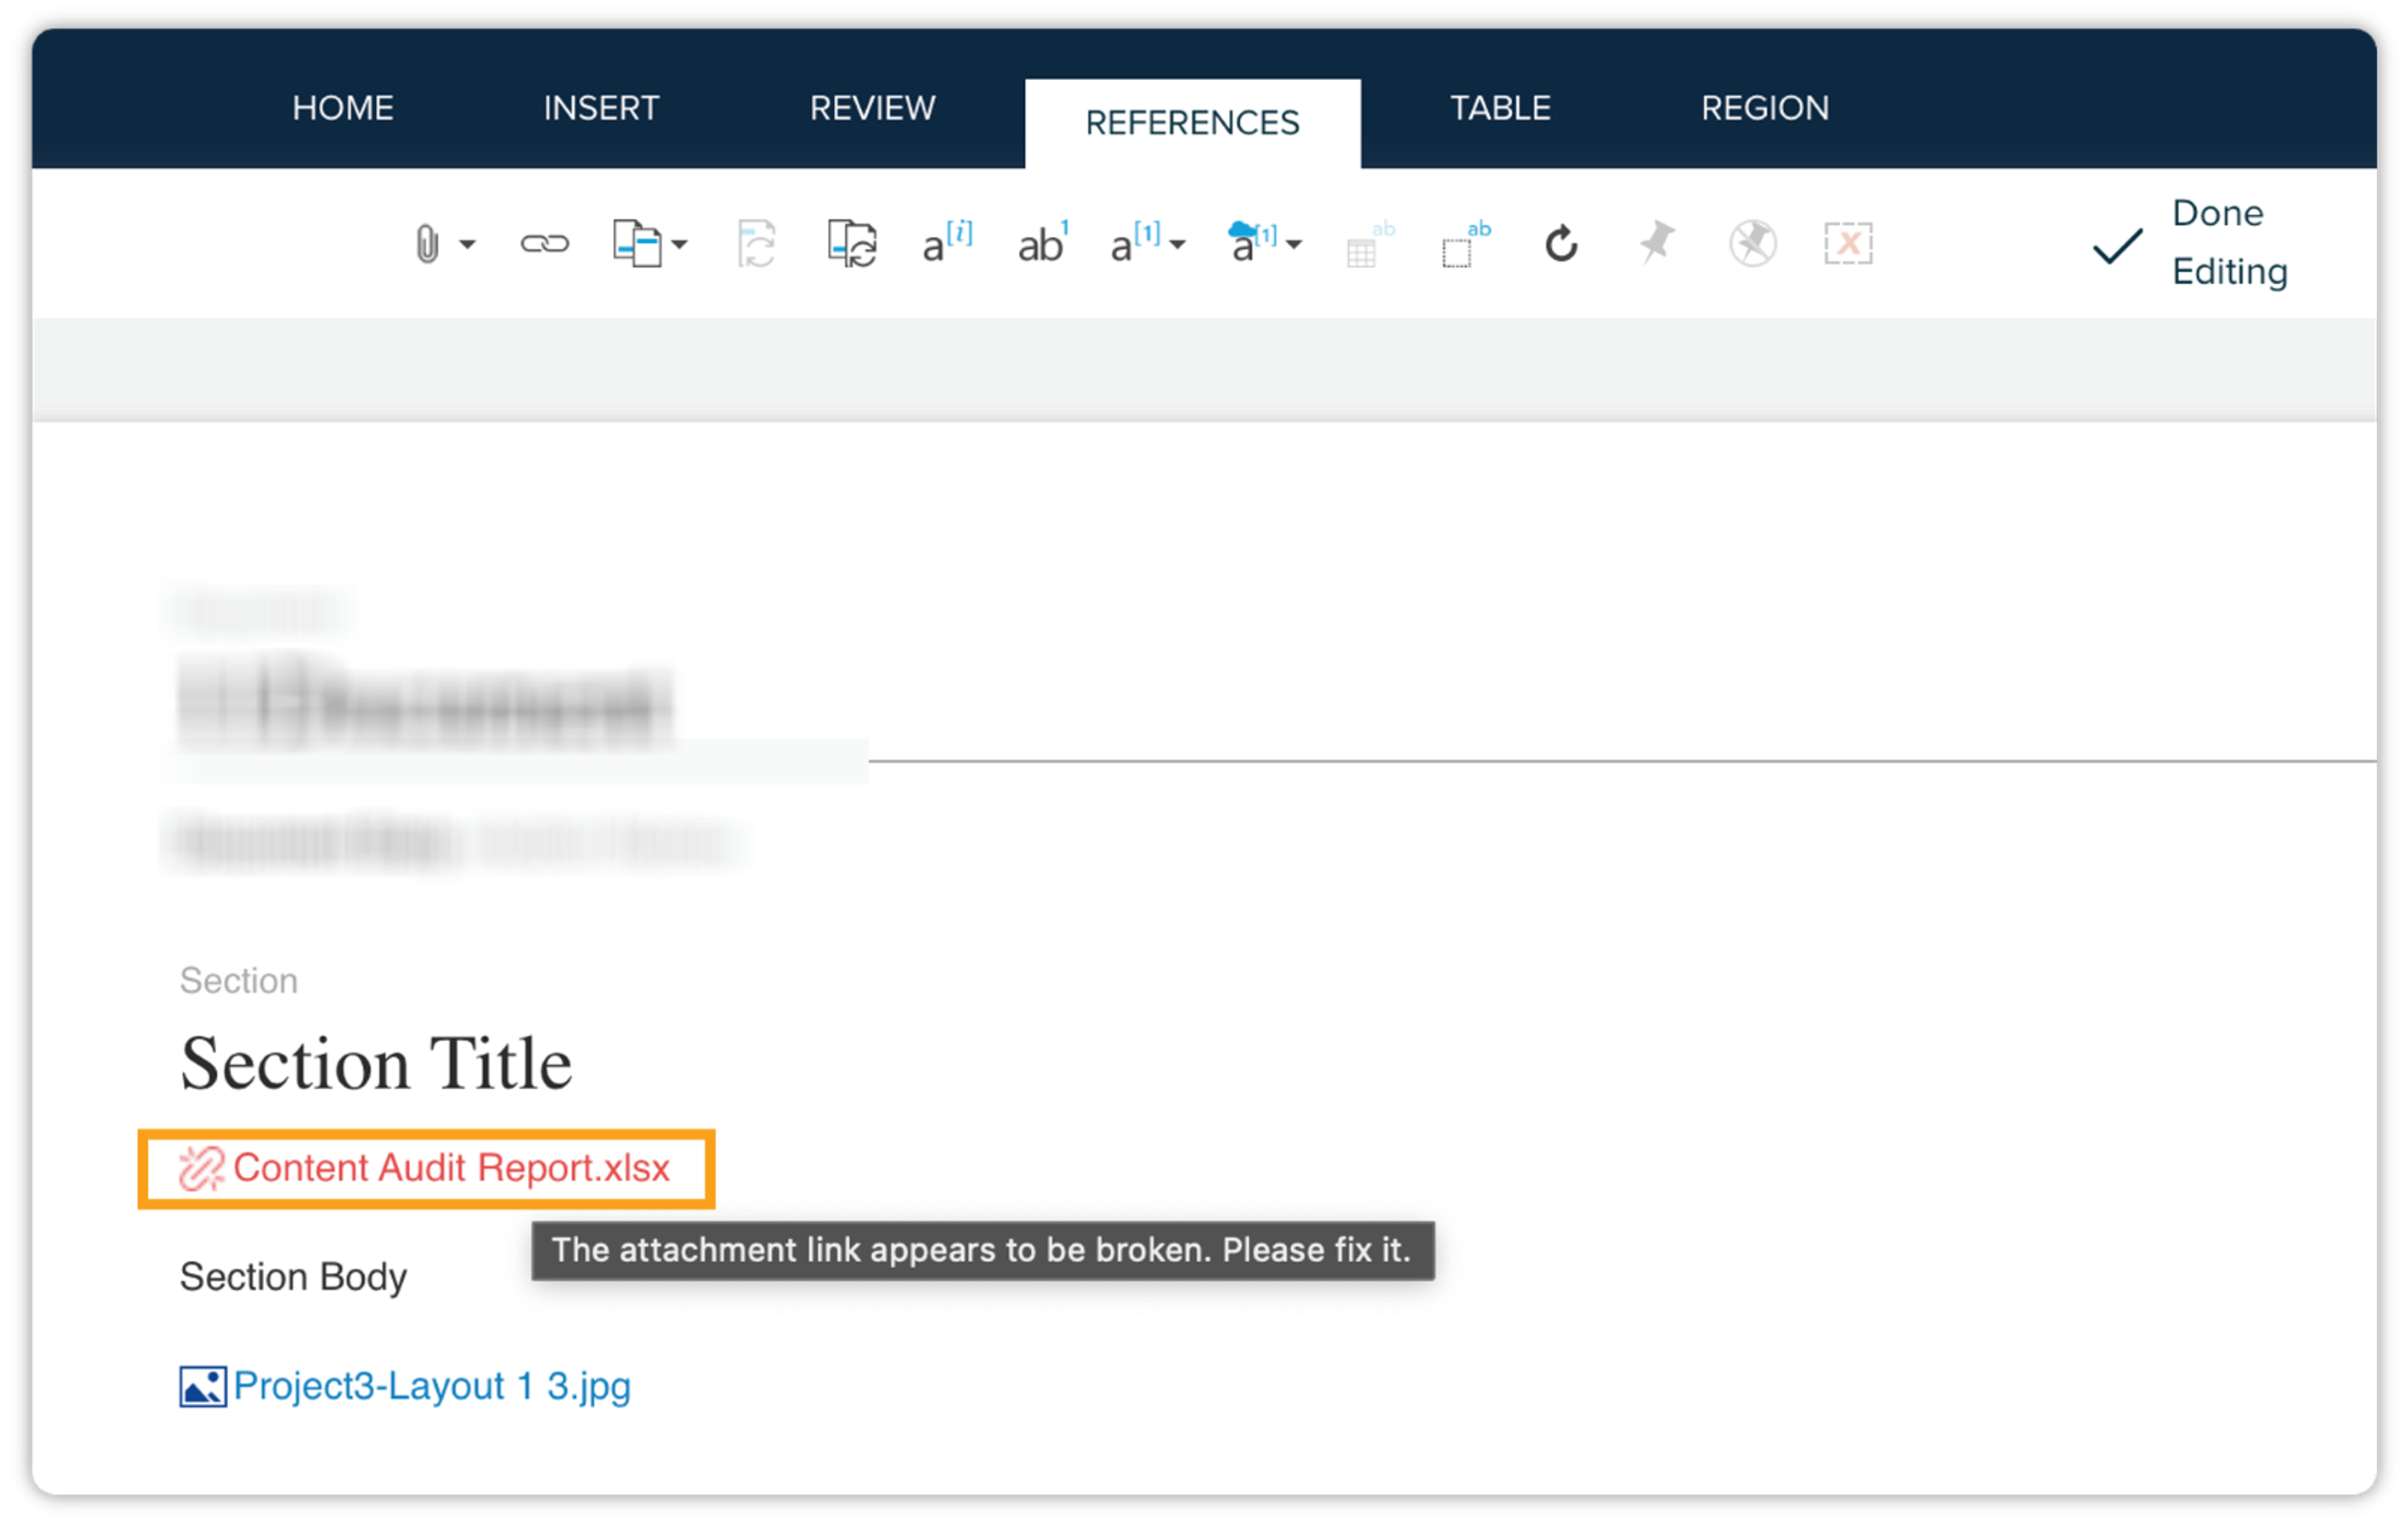
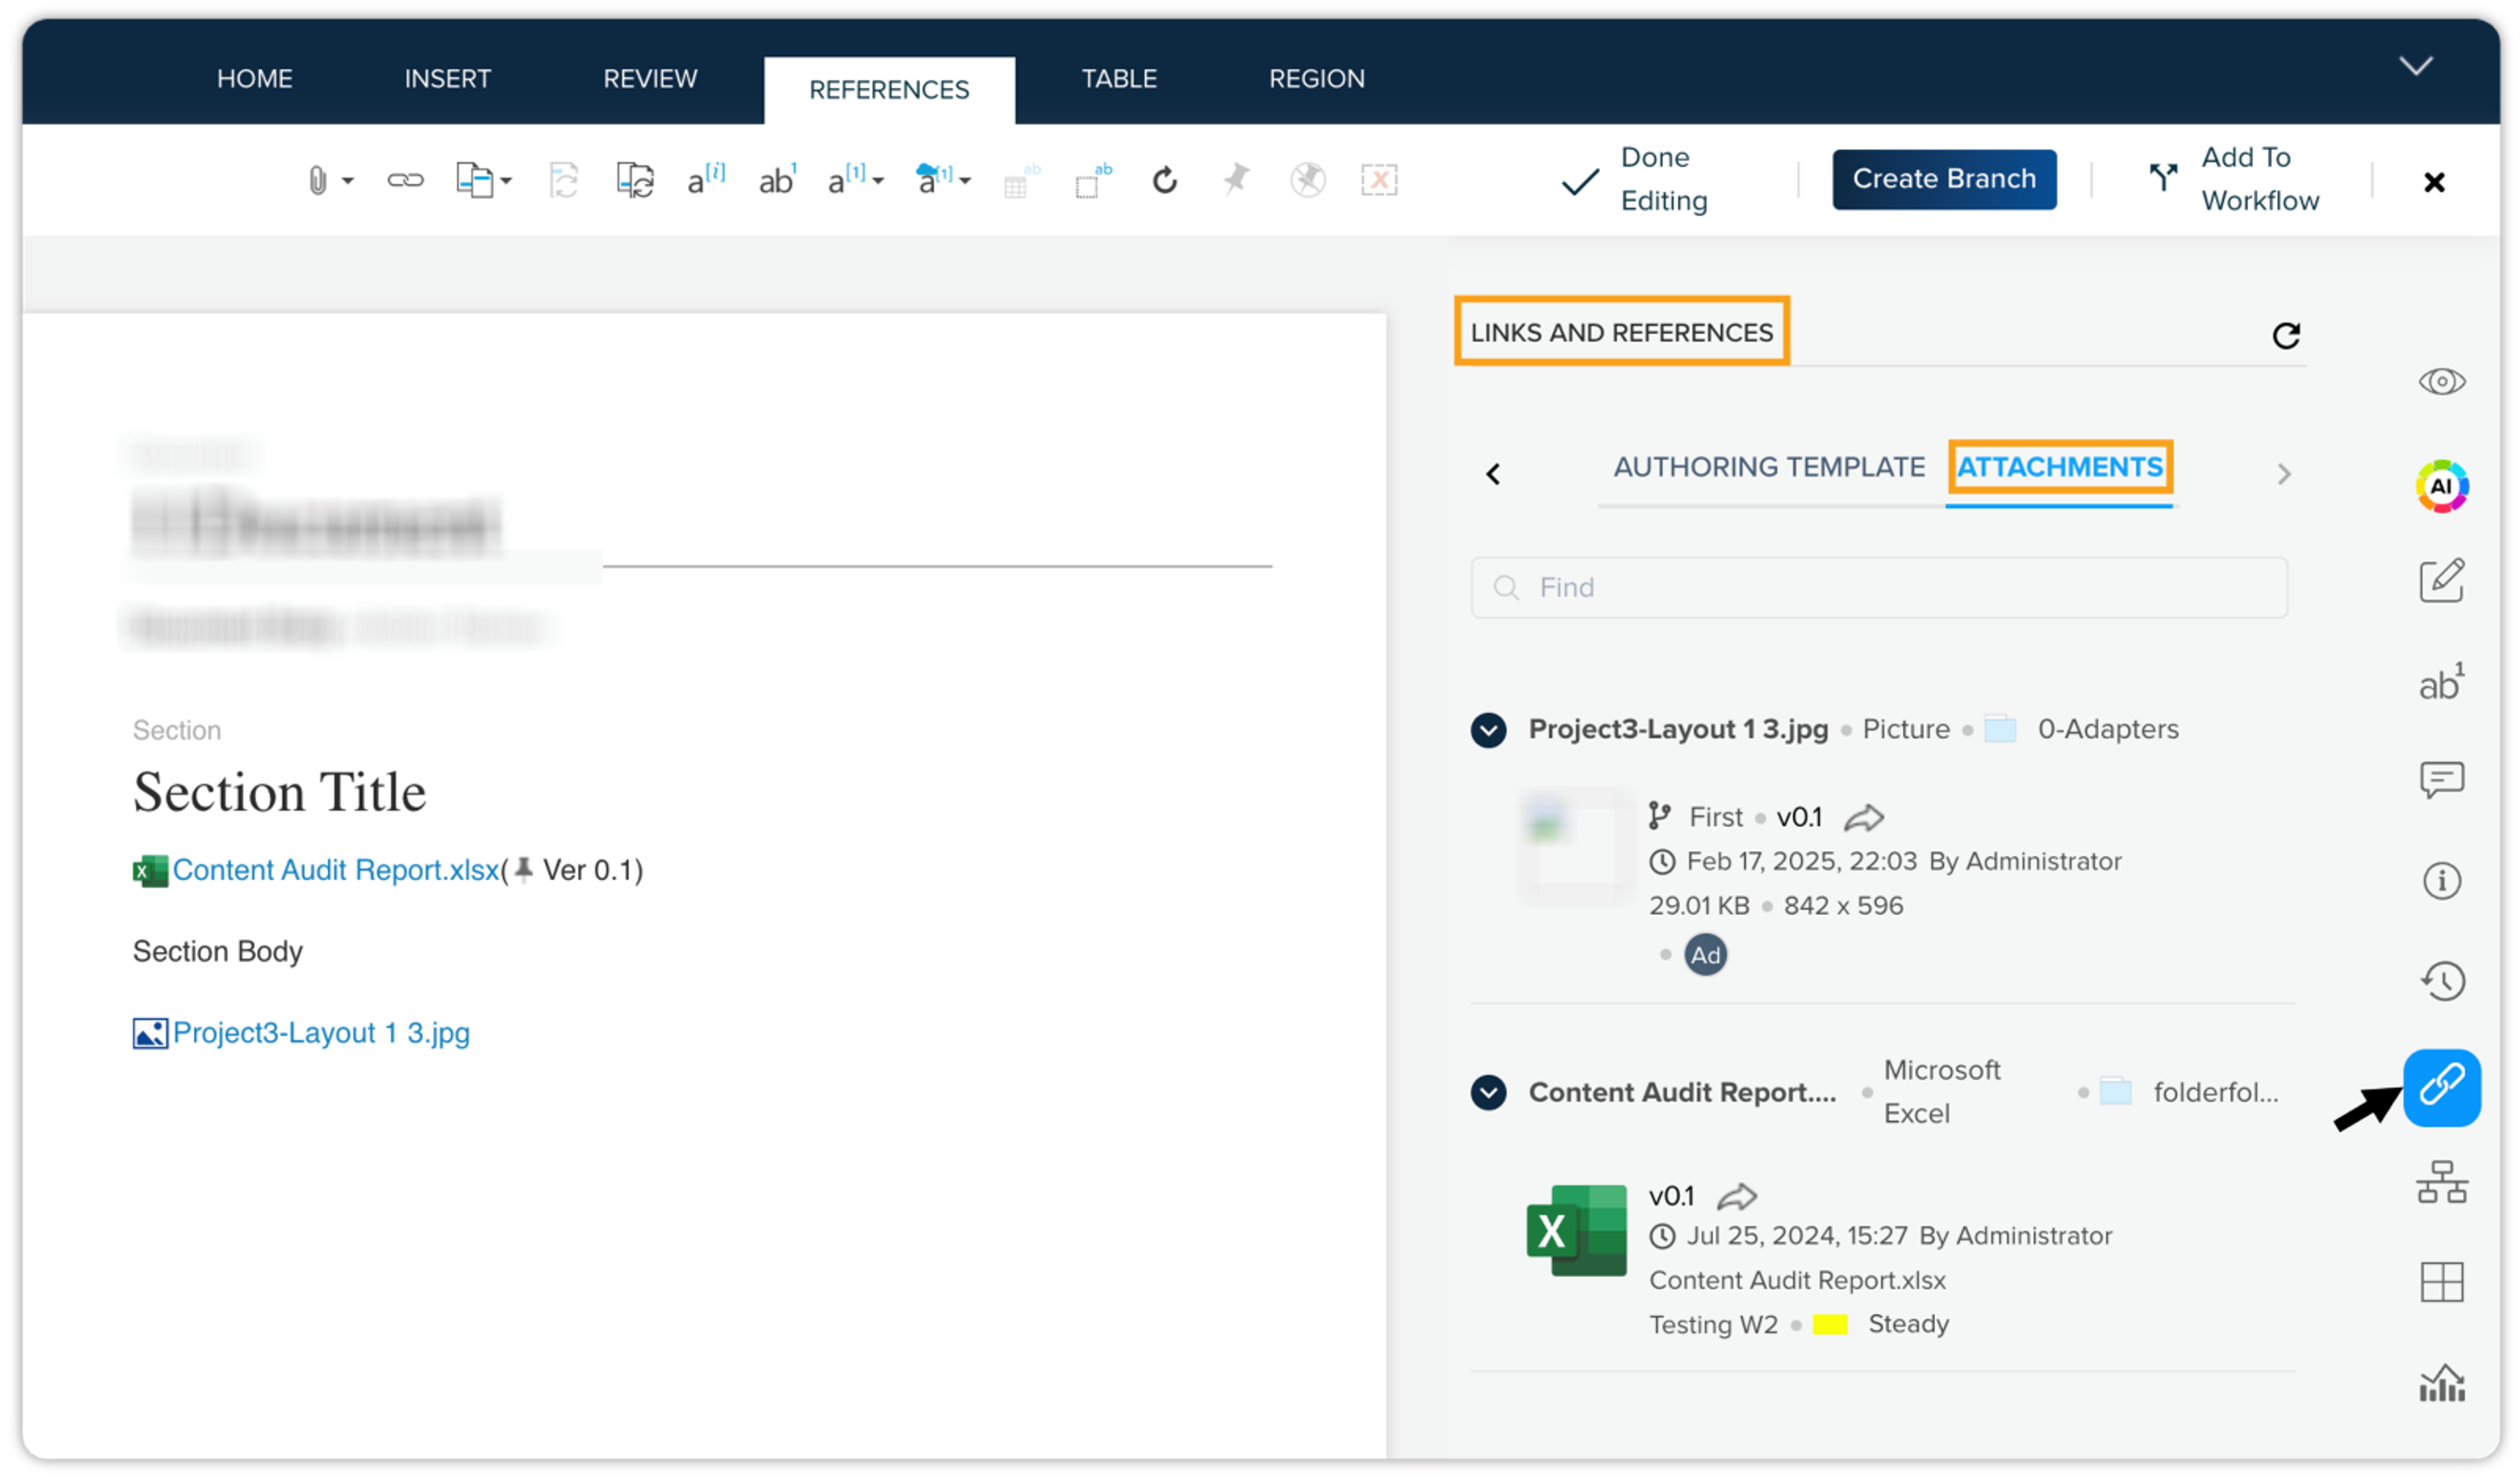
The Attachments tab within the Links and Reference section of the Apps pane will display a list of all attachments associated with the document. It's available in both the Quark Author and the workspace, granting you a holistic view of your attachments.
Attachments are visualized as part of the document's content when published in HTML format. However, note that attachments will be removed when publishing in other formats, such as PDF or DOCX.
-
Attachments can be reviewed in the document preview. Clicking on an attachment will either open it in a new window or download it, depending on the web browser settings.
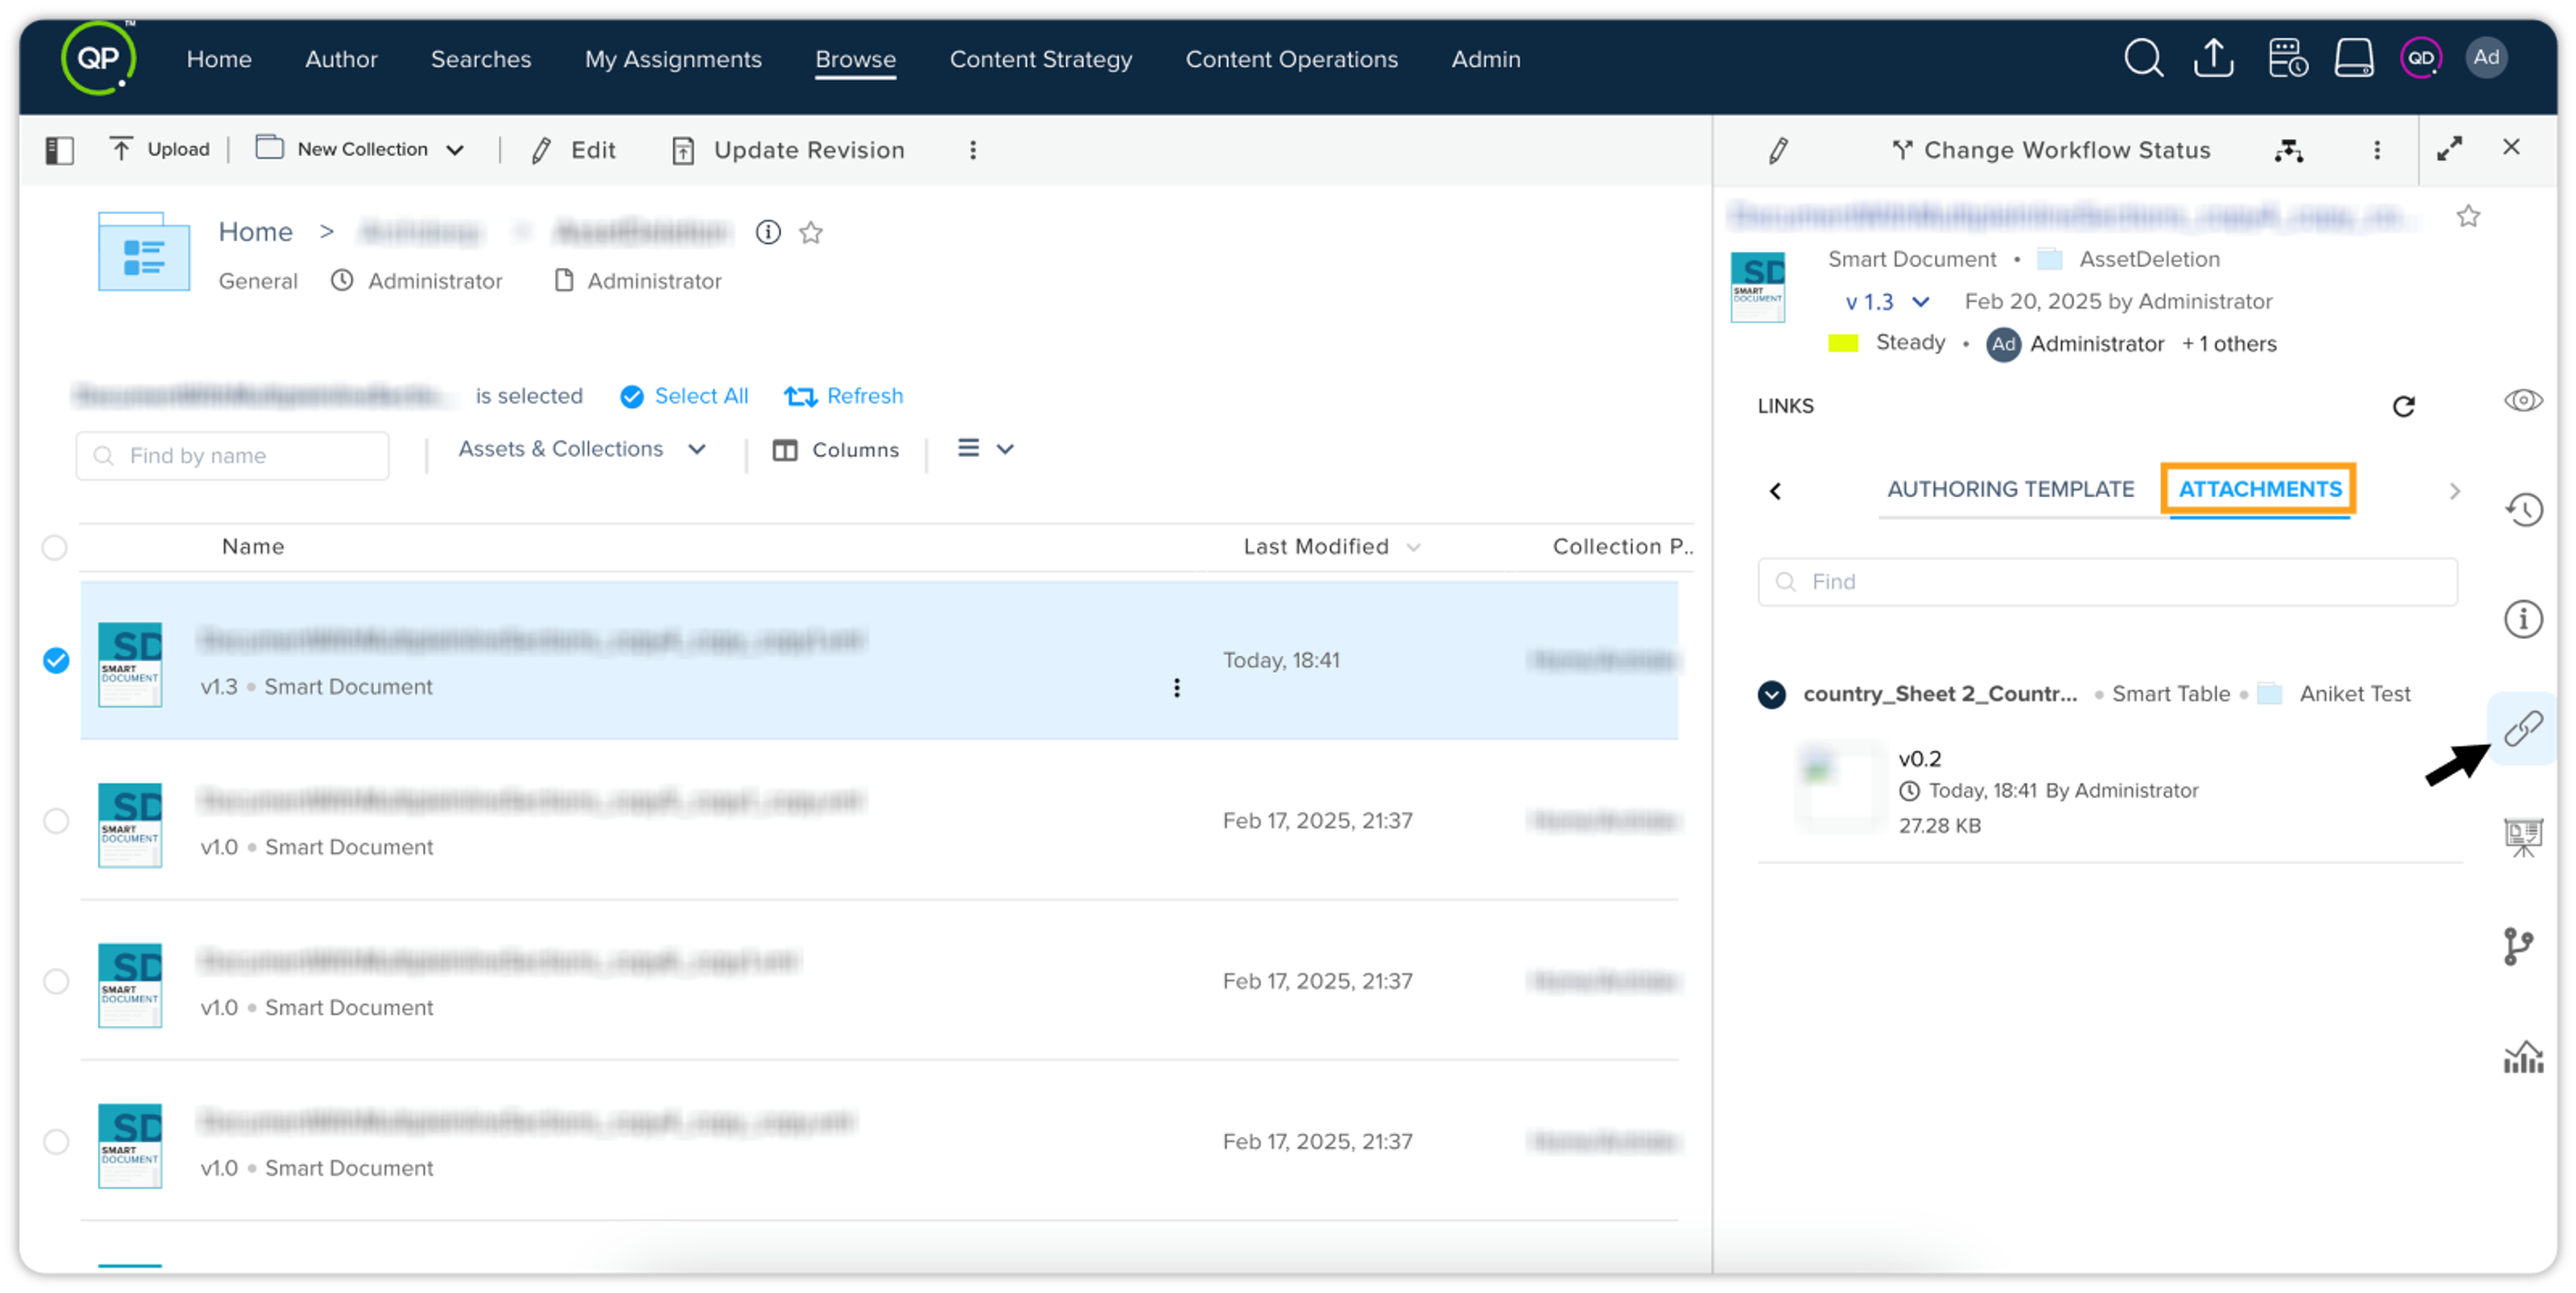
You can also access the Attachments tab within the workspace. This allows writers to:
-
View a complete list of attachments
-
Review and preview attachments as needed
Managing Component Pinning with Bulk Actions
Component pinning is a powerful feature in Quark Author that allows you to keep track of important elements within your document. This section explains the enhanced pinning functionality, including the new bulk actions that enable you to manage references more efficiently.
The pinning functionality has been expanded to include options for pinning and unpinning all references at once. This is particularly useful for large documents with numerous components.
-
Pinning References
-
Pin Reference: This option functions as before, allowing you to pin individual reference elements.
-
Pin All References: This new option pins all available reference elements within the current context (e.g., the current section or document).
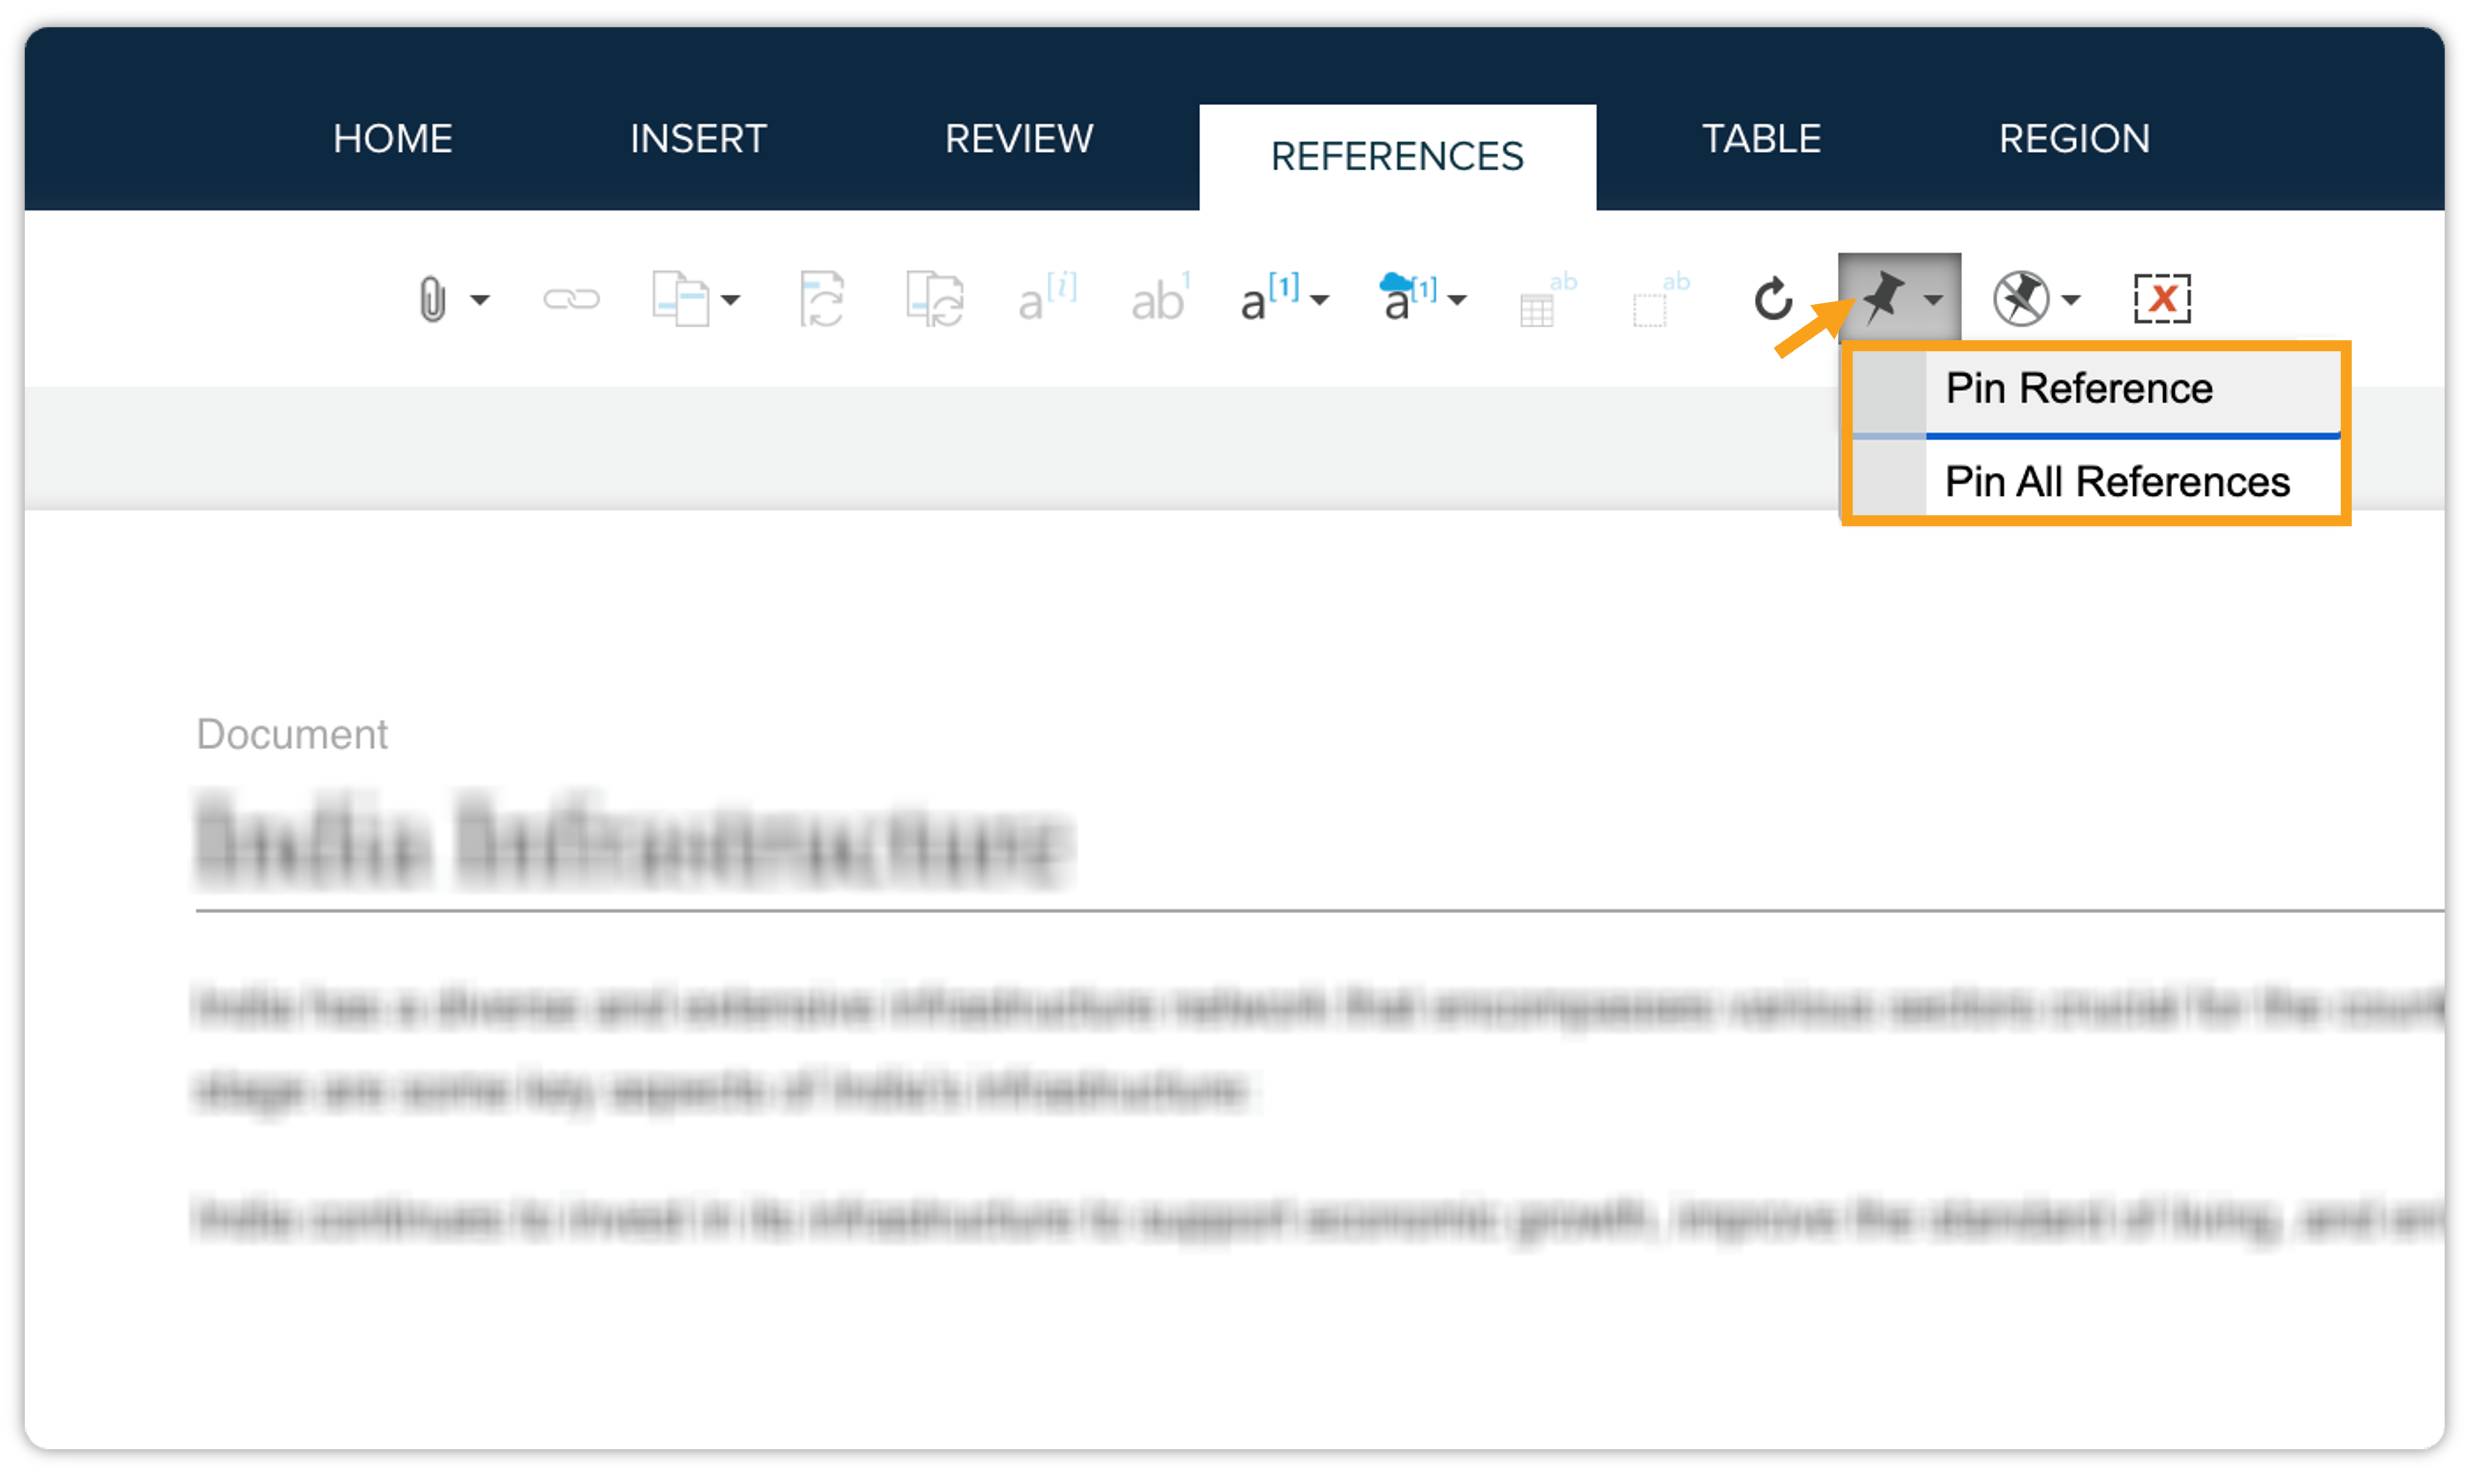
-
-
Unpinning References
-
Unpin Reference: This option functions as before, allowing you to unpin individual reference elements.
-
Unpin All References: This new option unpins all currently pinned reference elements within the current context.
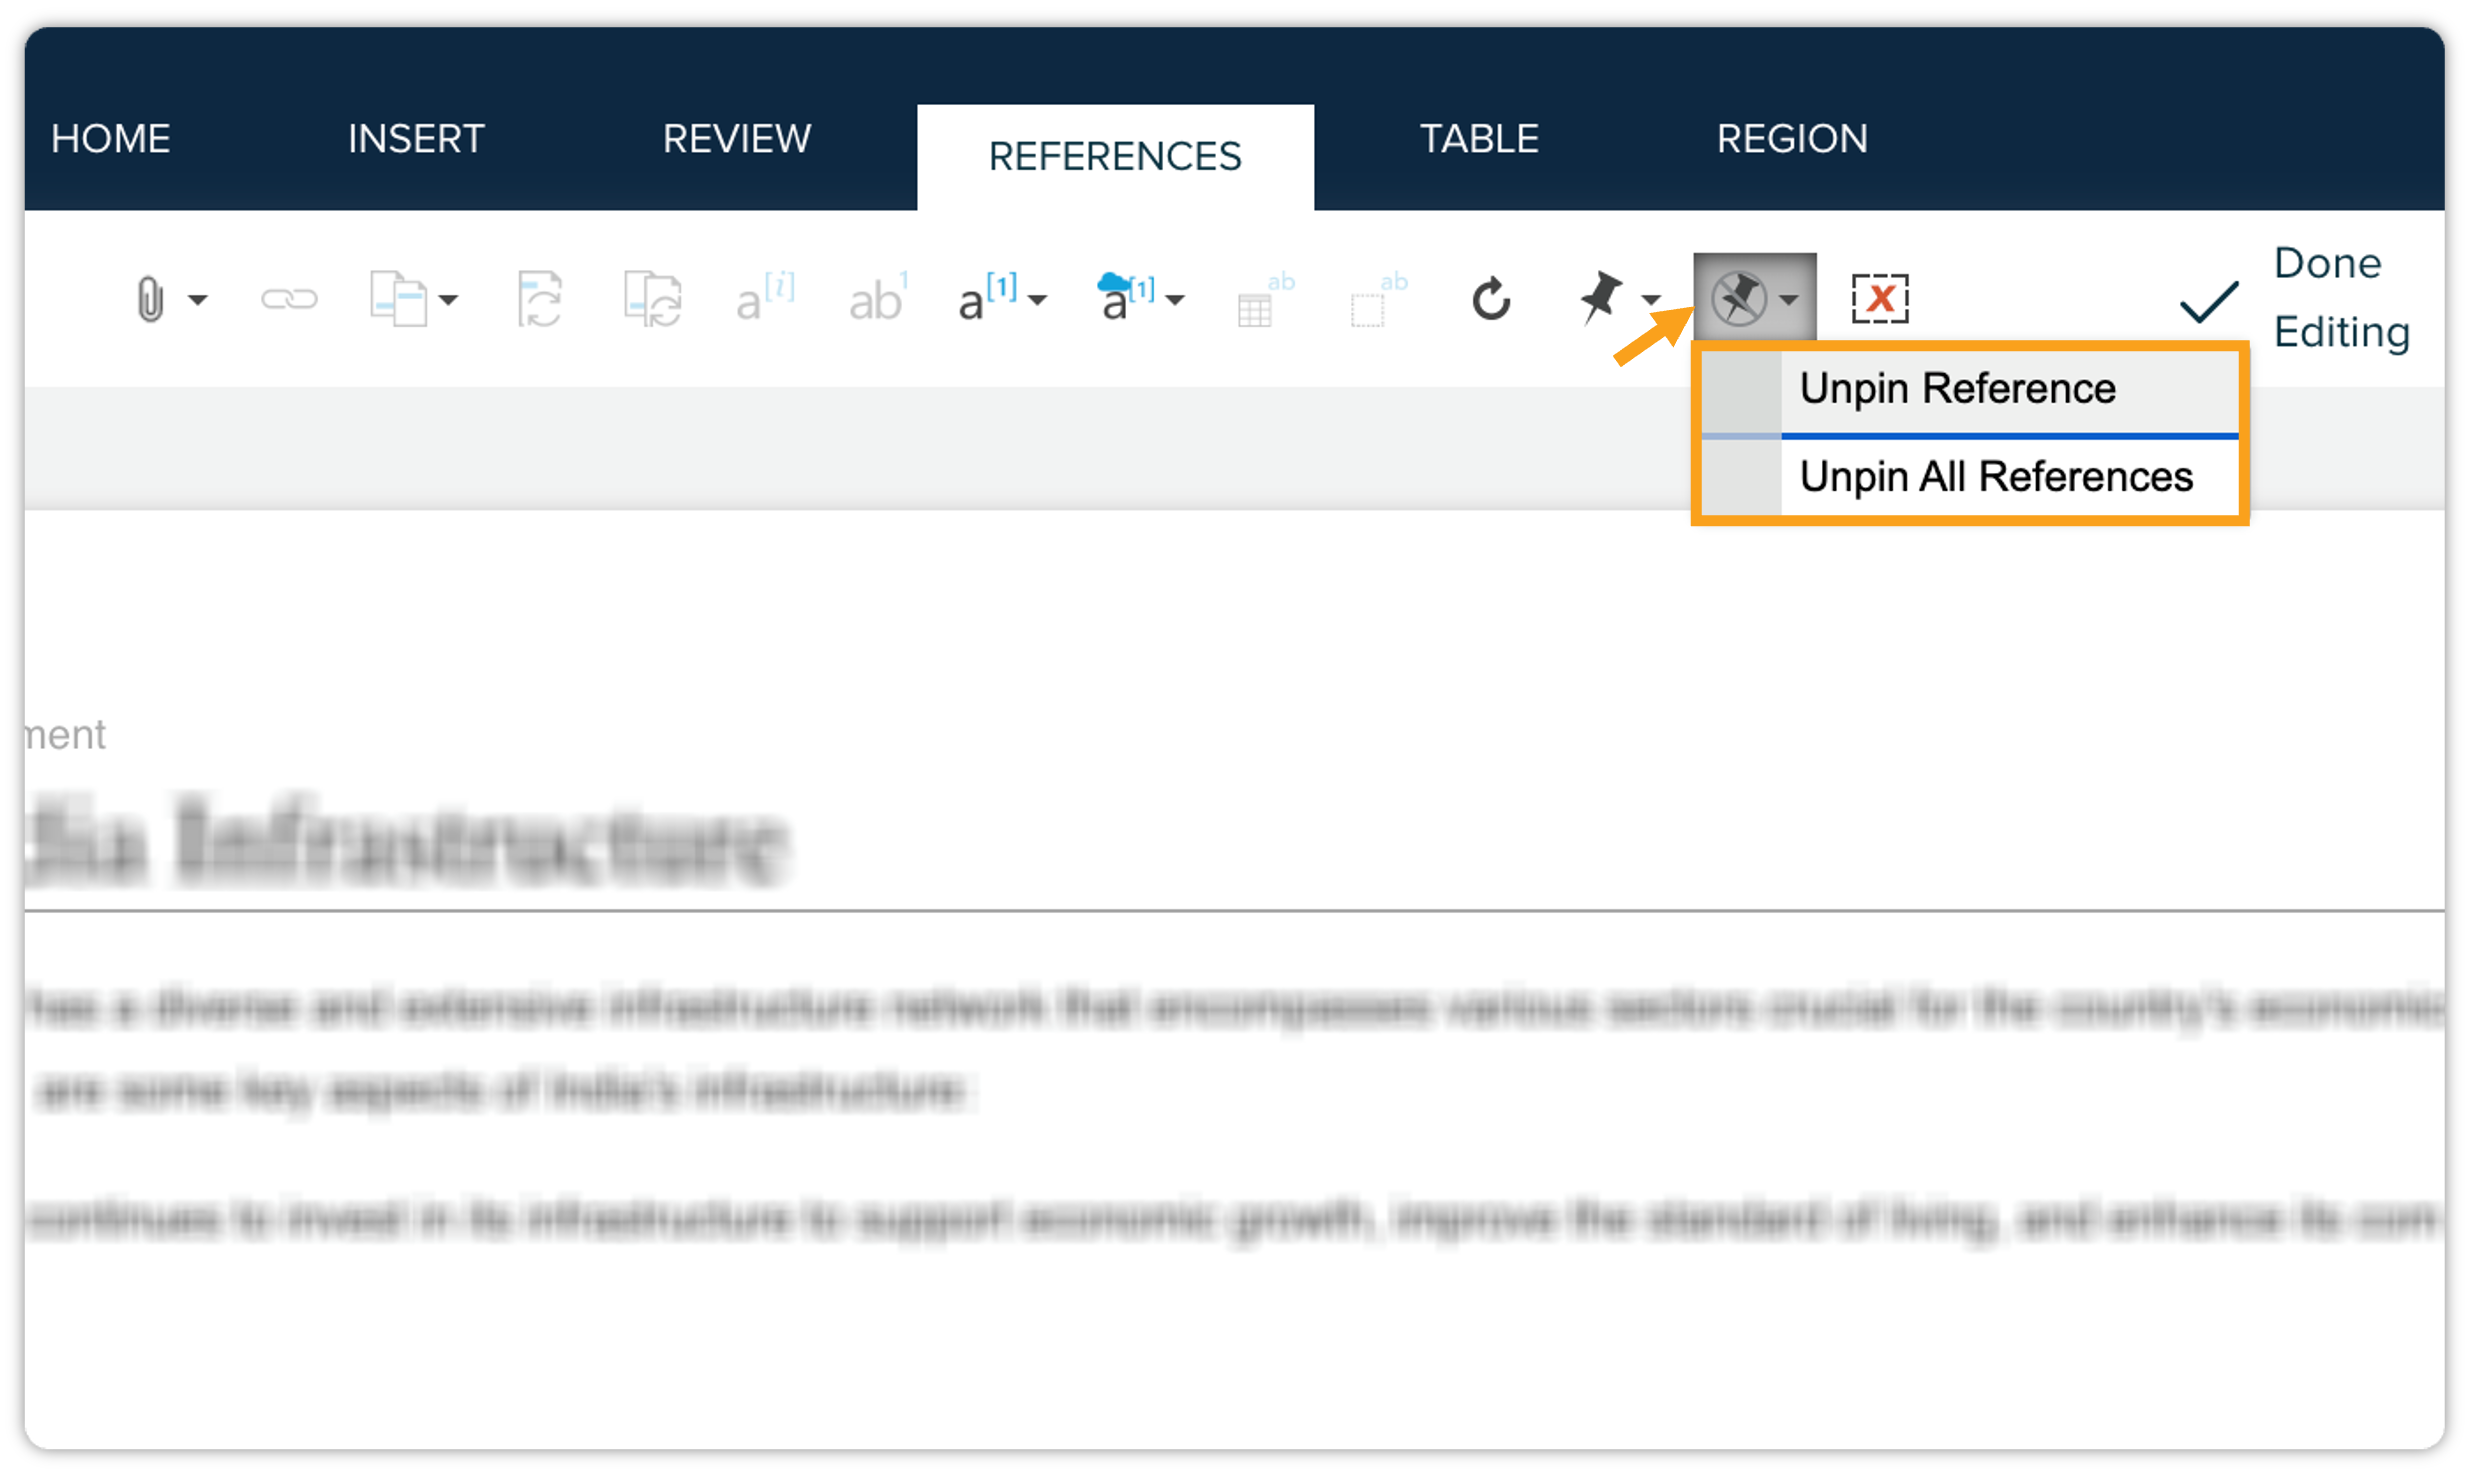
-
Supported Reference Types
Pinning can be done for various types of reference elements:
-
Section components
-
Images & figures
-
Attachments
-
Shared tables & excel tables
-
Audio & video files
Important Considerations
The Pin All and Unpin All operations have certain restrictions to ensure data integrity and prevent conflicts:
-
Document Errors: If the document contains any errors, bulk operations won't be executed. Resolve all errors before attempting to use Pin All or Unpin All.
-
Checked-Out Components: The bulk operations won't proceed if any components are currently checked out (either by you or another user).
-
Warning Message: If a component is in an editable state, a warning message will be displayed, indicating the component and the user who has it checked out. You must ensure all components are checked in before performing the bulk pinning/unpinning.
How to Use
-
In the editor, go to the References tab.
-
Choose either Pin Reference or Pin All References from the pinning dropdown, or Unpin Reference or Unpin All References from the unpinning dropdown.
-
Confirmation Dialog: Before the bulk action is executed, a confirmation dialog will appear. This is to prevent accidental pinning or unpinning of many components. Review the dialog and confirm if you wish to proceed.
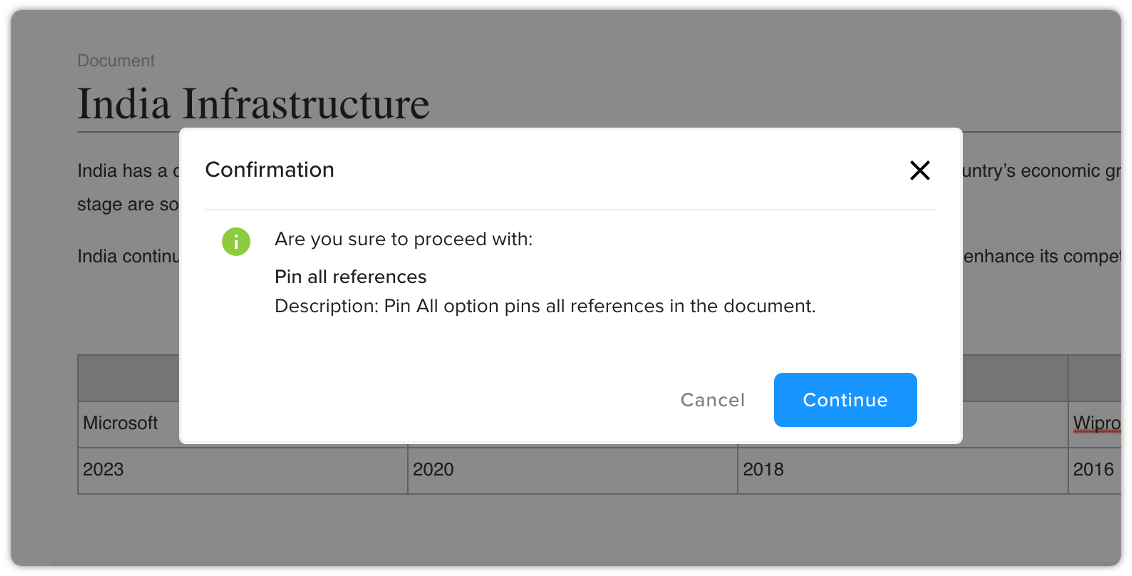
Create Component
Components are reusable sections of content that can be saved and inserted into multiple documents within QPP. This feature promotes consistency and efficiency by allowing you to create and maintain standardized content across the platform.
This section will guide you through the process of creating a component from an existing section of a document.
Creating a Component
Follow these steps to save a section of a document as a component:
-
In the document structure panel, click on the section you want to save as a reusable component. The selected section will typically be highlighted to indicate that it's active. Ensure that the section contains all the necessary content and formatting.
-
Click the Kebab menu (3 dots) icon located next to the section title.
-
From the dropdown menu, click Create Component option.
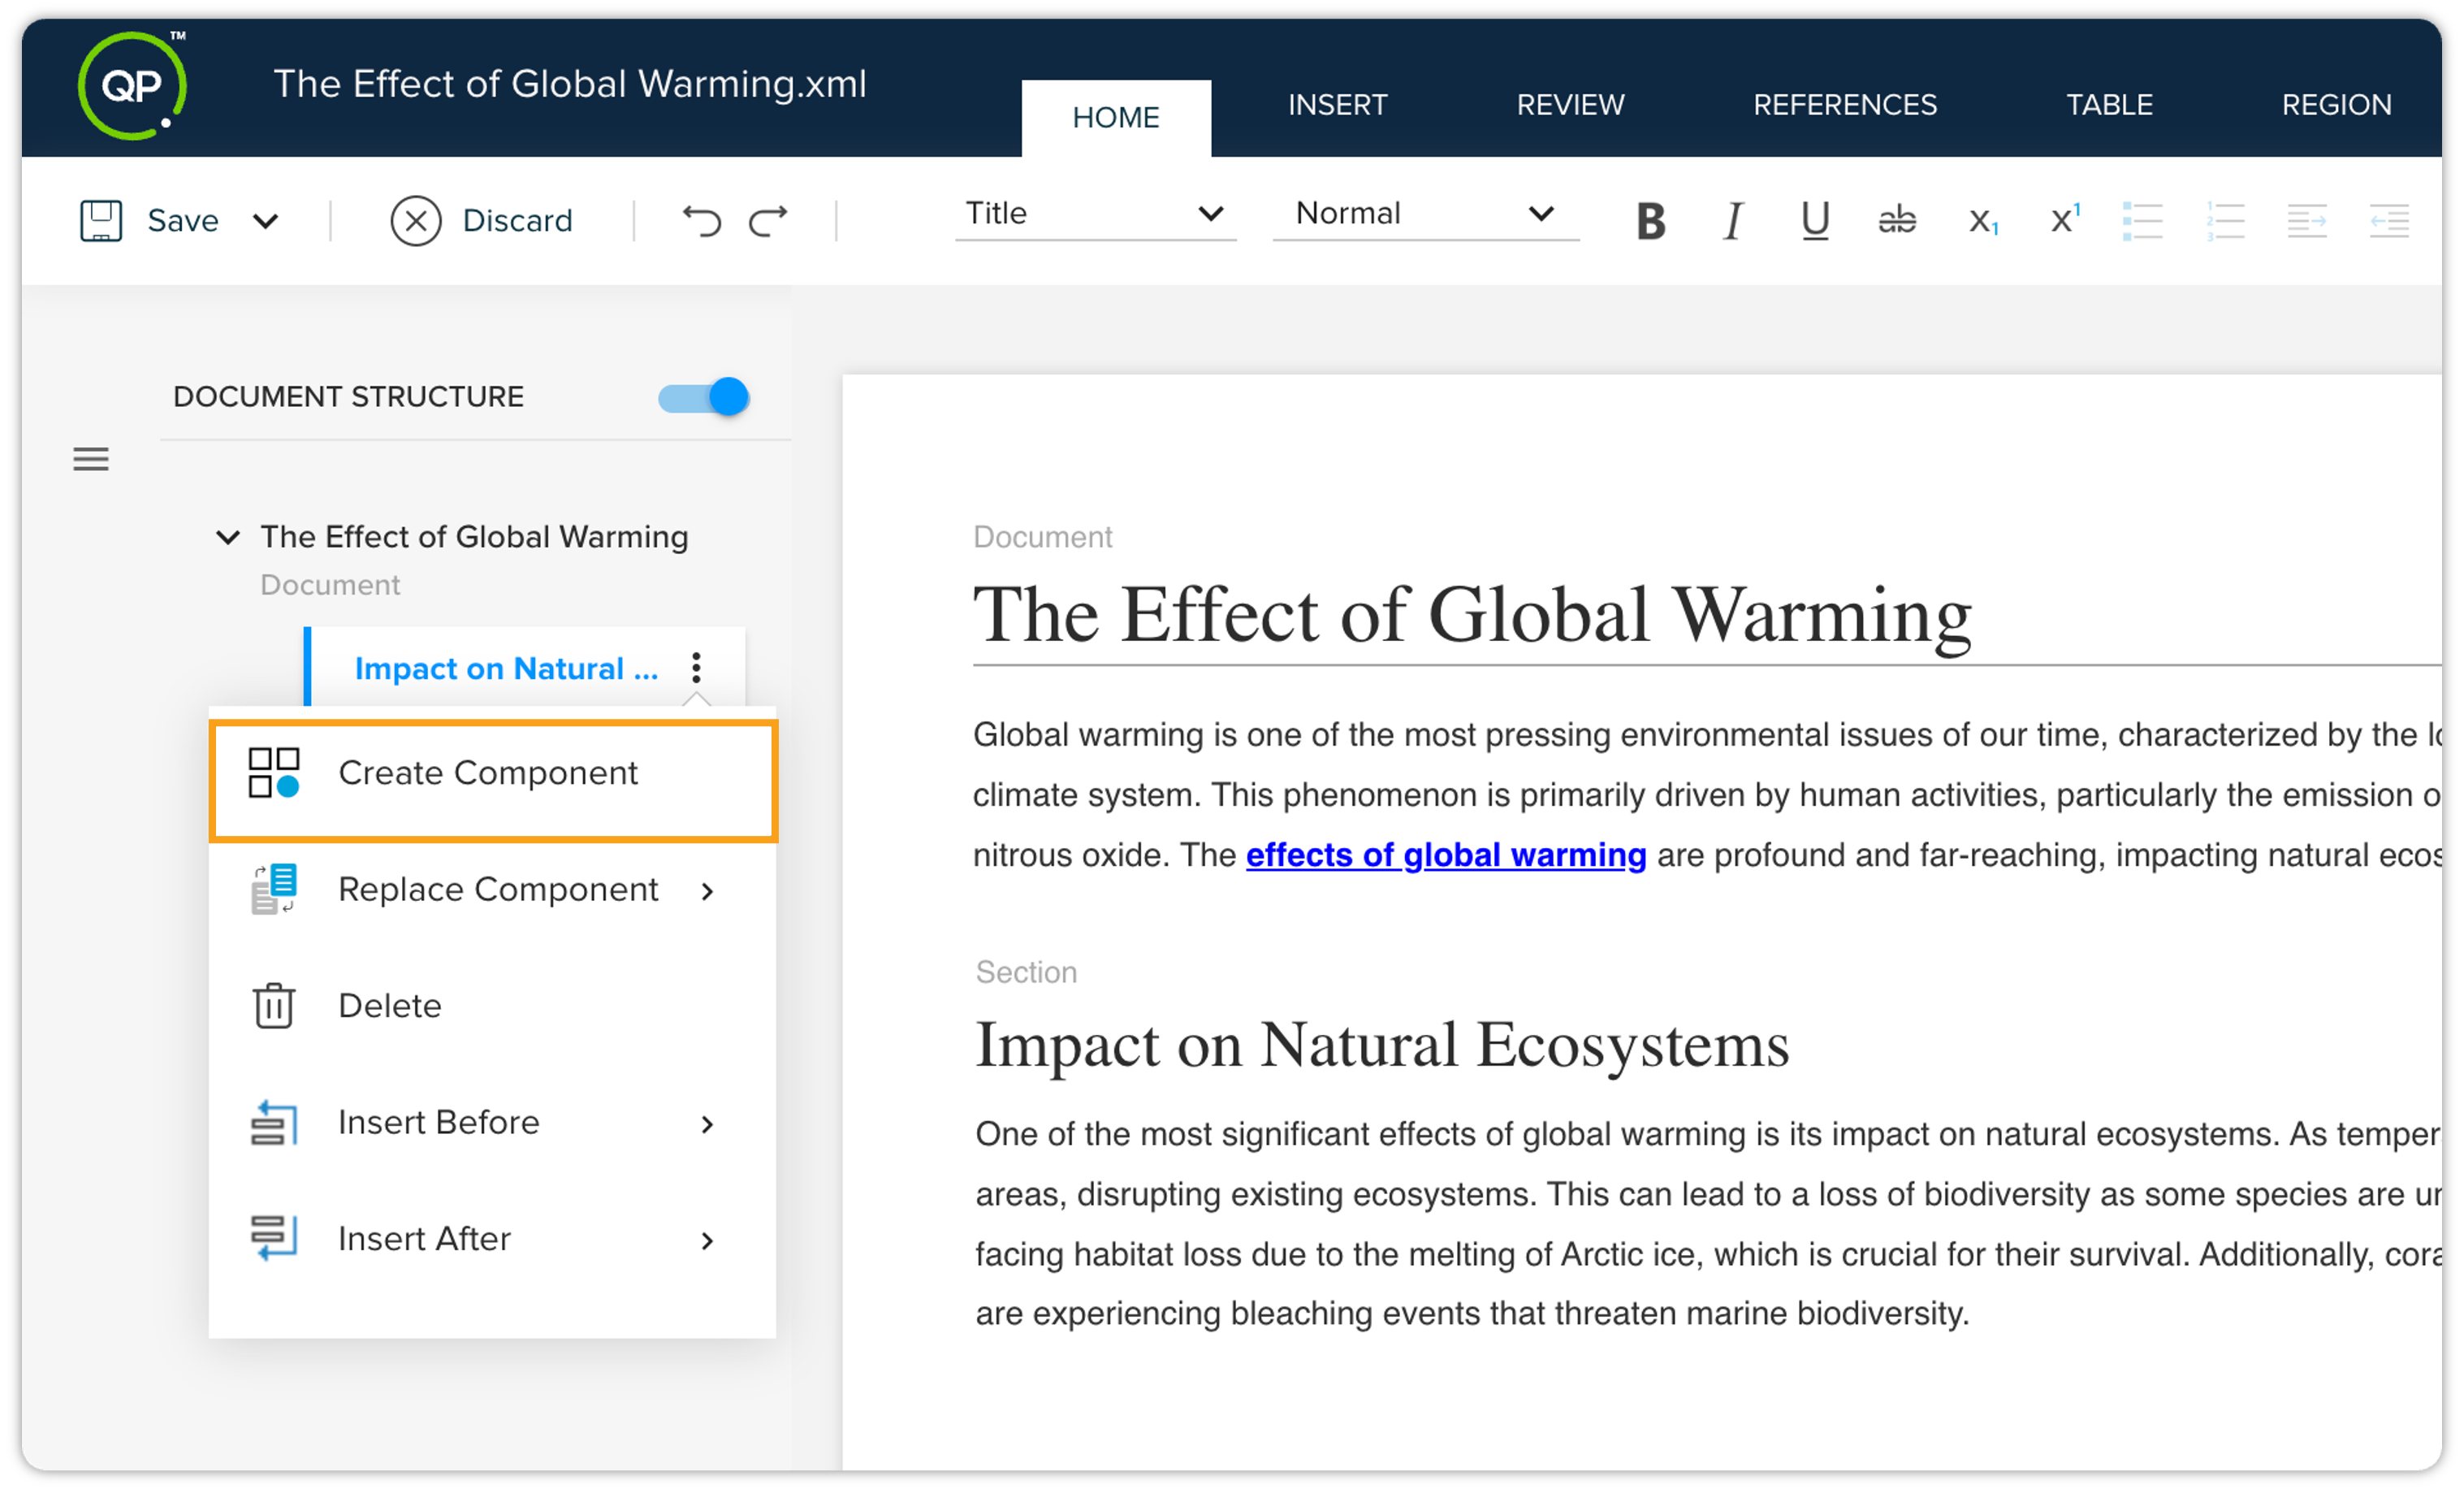
-
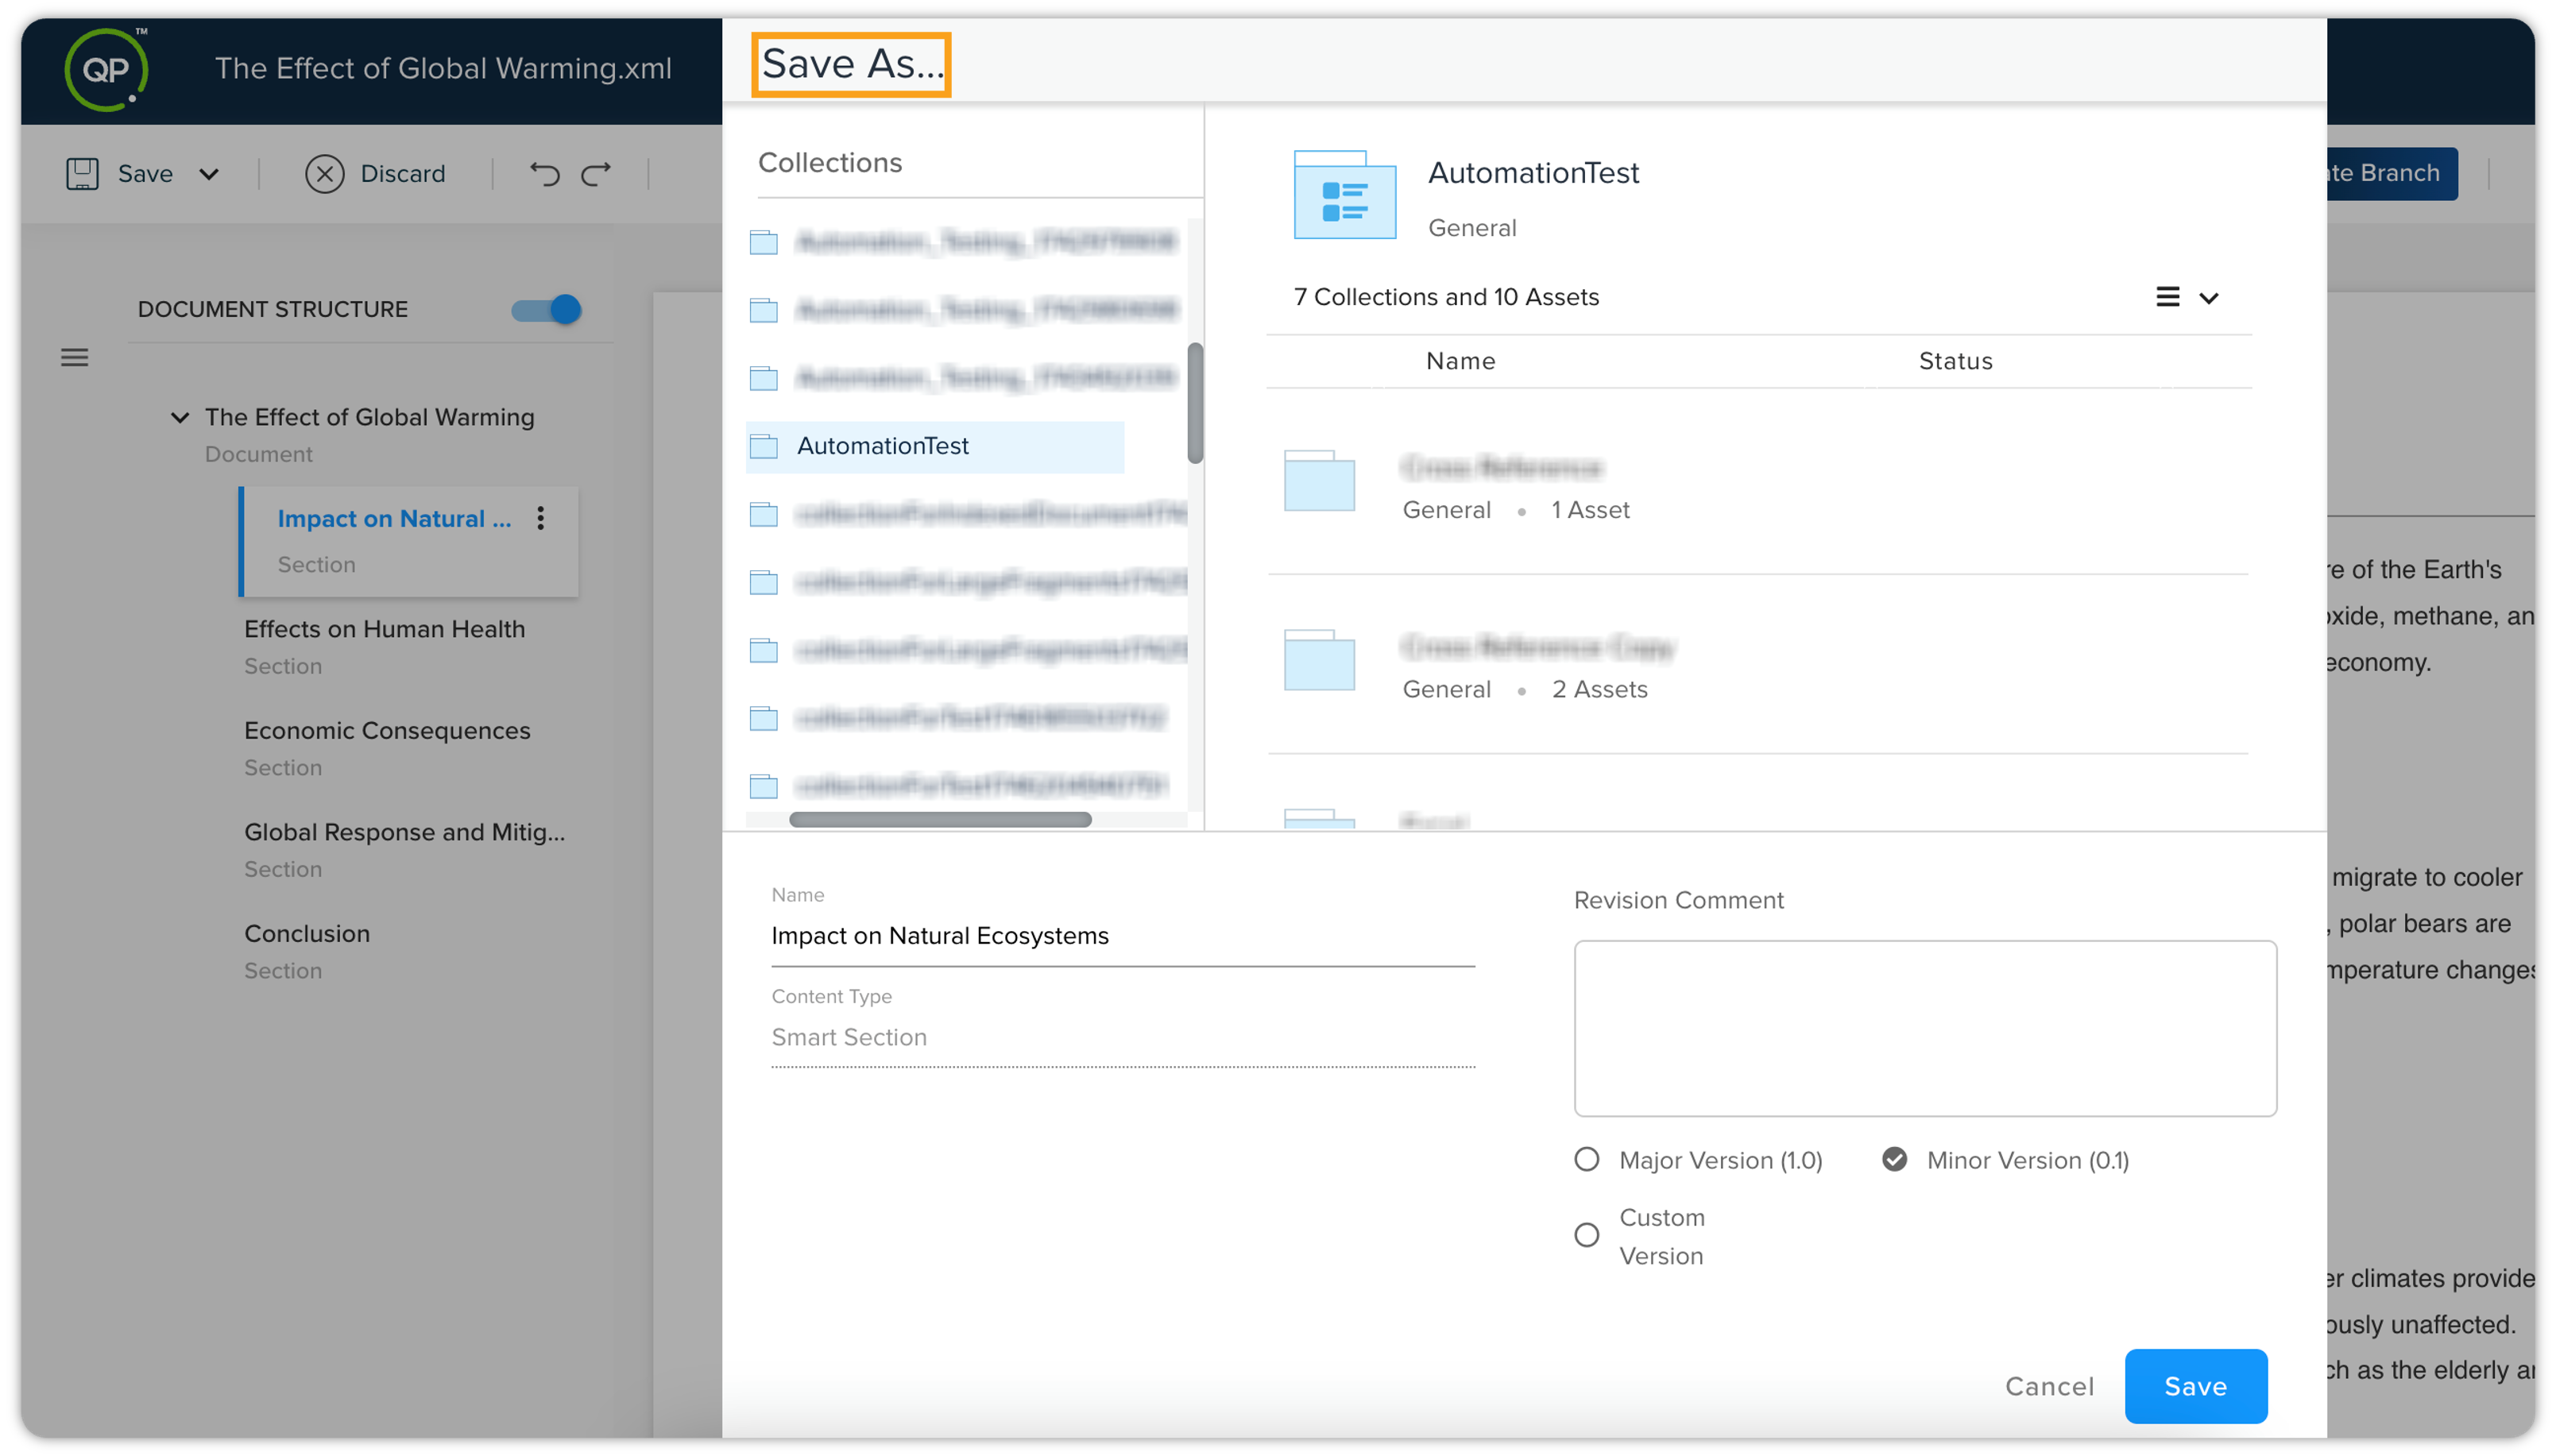
The Save As dialog box will appear, prompting you to choose a location for saving the new component.
-
Navigate to the desired collection within the Save As dialog. Collections are used to organize and manage your components. Select the appropriate collection where you want to save the component.
If you don't have a suitable collection, you may need to create one before saving the component. Refer to the "Managing Collections" section for instructions. -
Enter a descriptive name for the component in the File name field. Use a name that clearly indicates the component's purpose and content.
-
Click the Save button to save the section as a component within the selected collection.
Replacing Components
The Replace Components feature in Quark Author allows you to substitute existing components with other content. This section describes the enhanced functionality that allows you to replace components not only from within the same document but also from external structured documents.
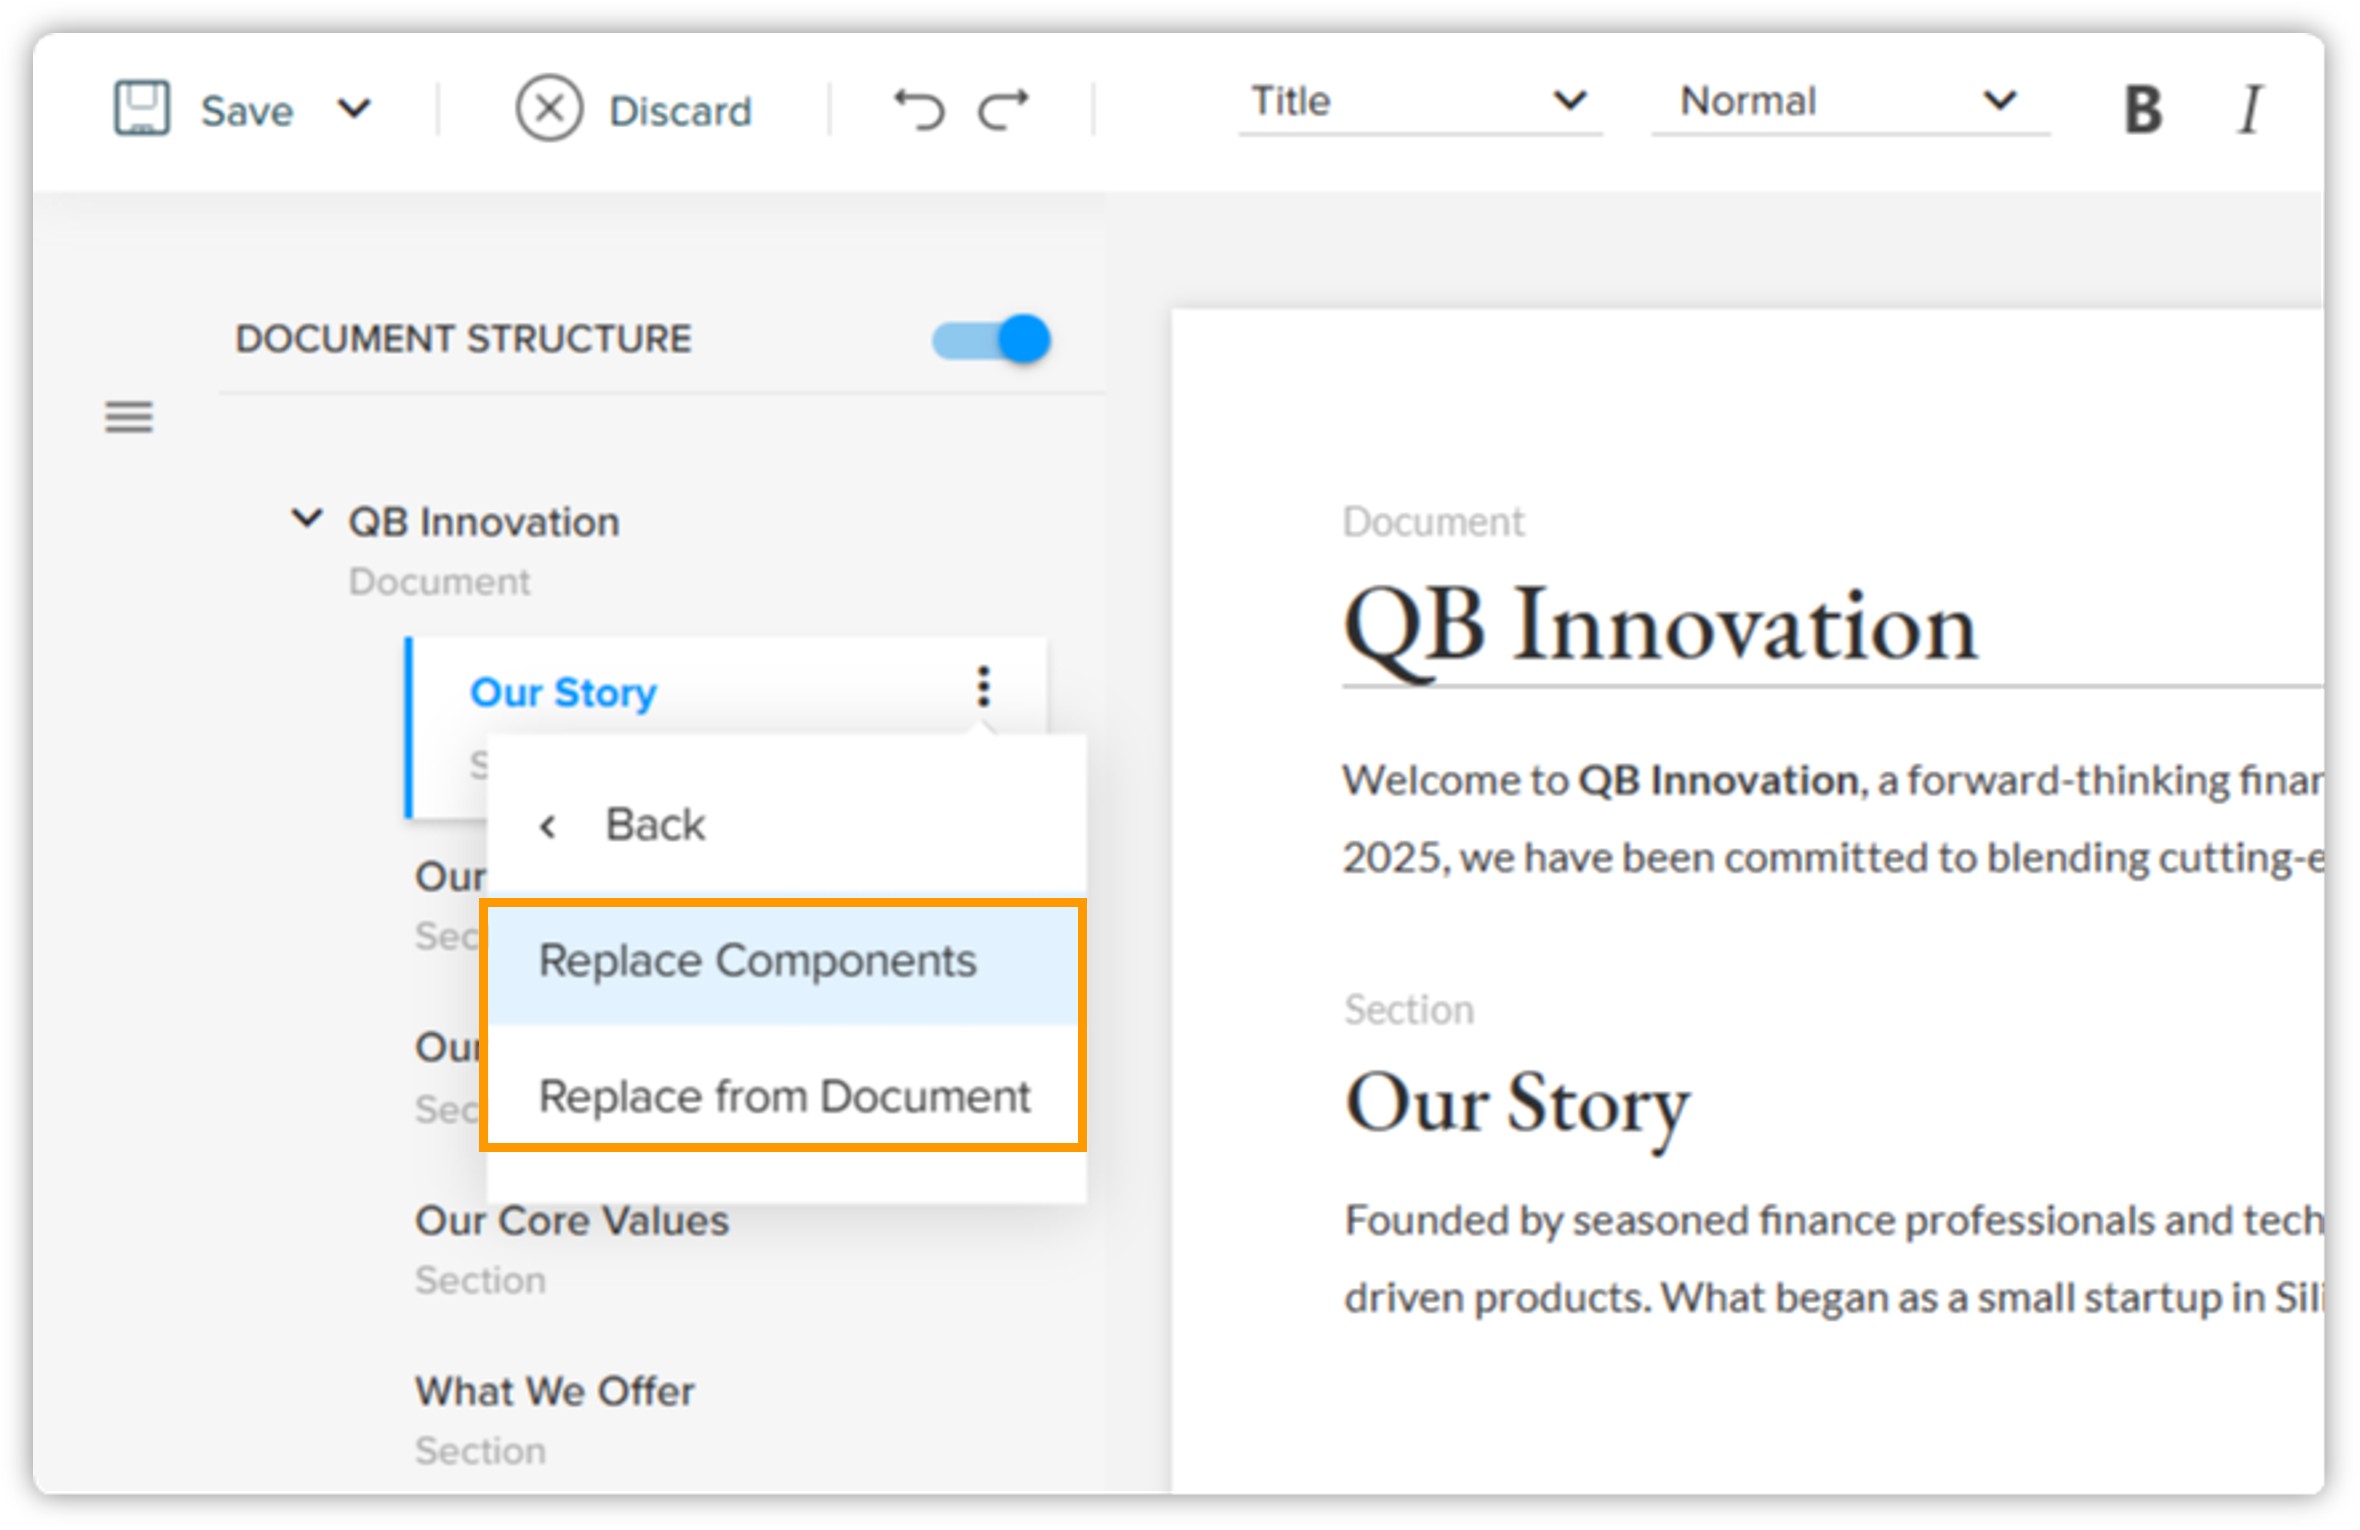
The Replace Components feature offers two distinct options:
-
Replace Components: This option allows you to replace a component with another component from within the same document. The selection process and available components will be limited to the current document.
-
Replace from Document: This option enables you to replace a component with content from an external structured document. This opens up powerful content reuse possibilities.
How to Use "Replace Components" Feature
-
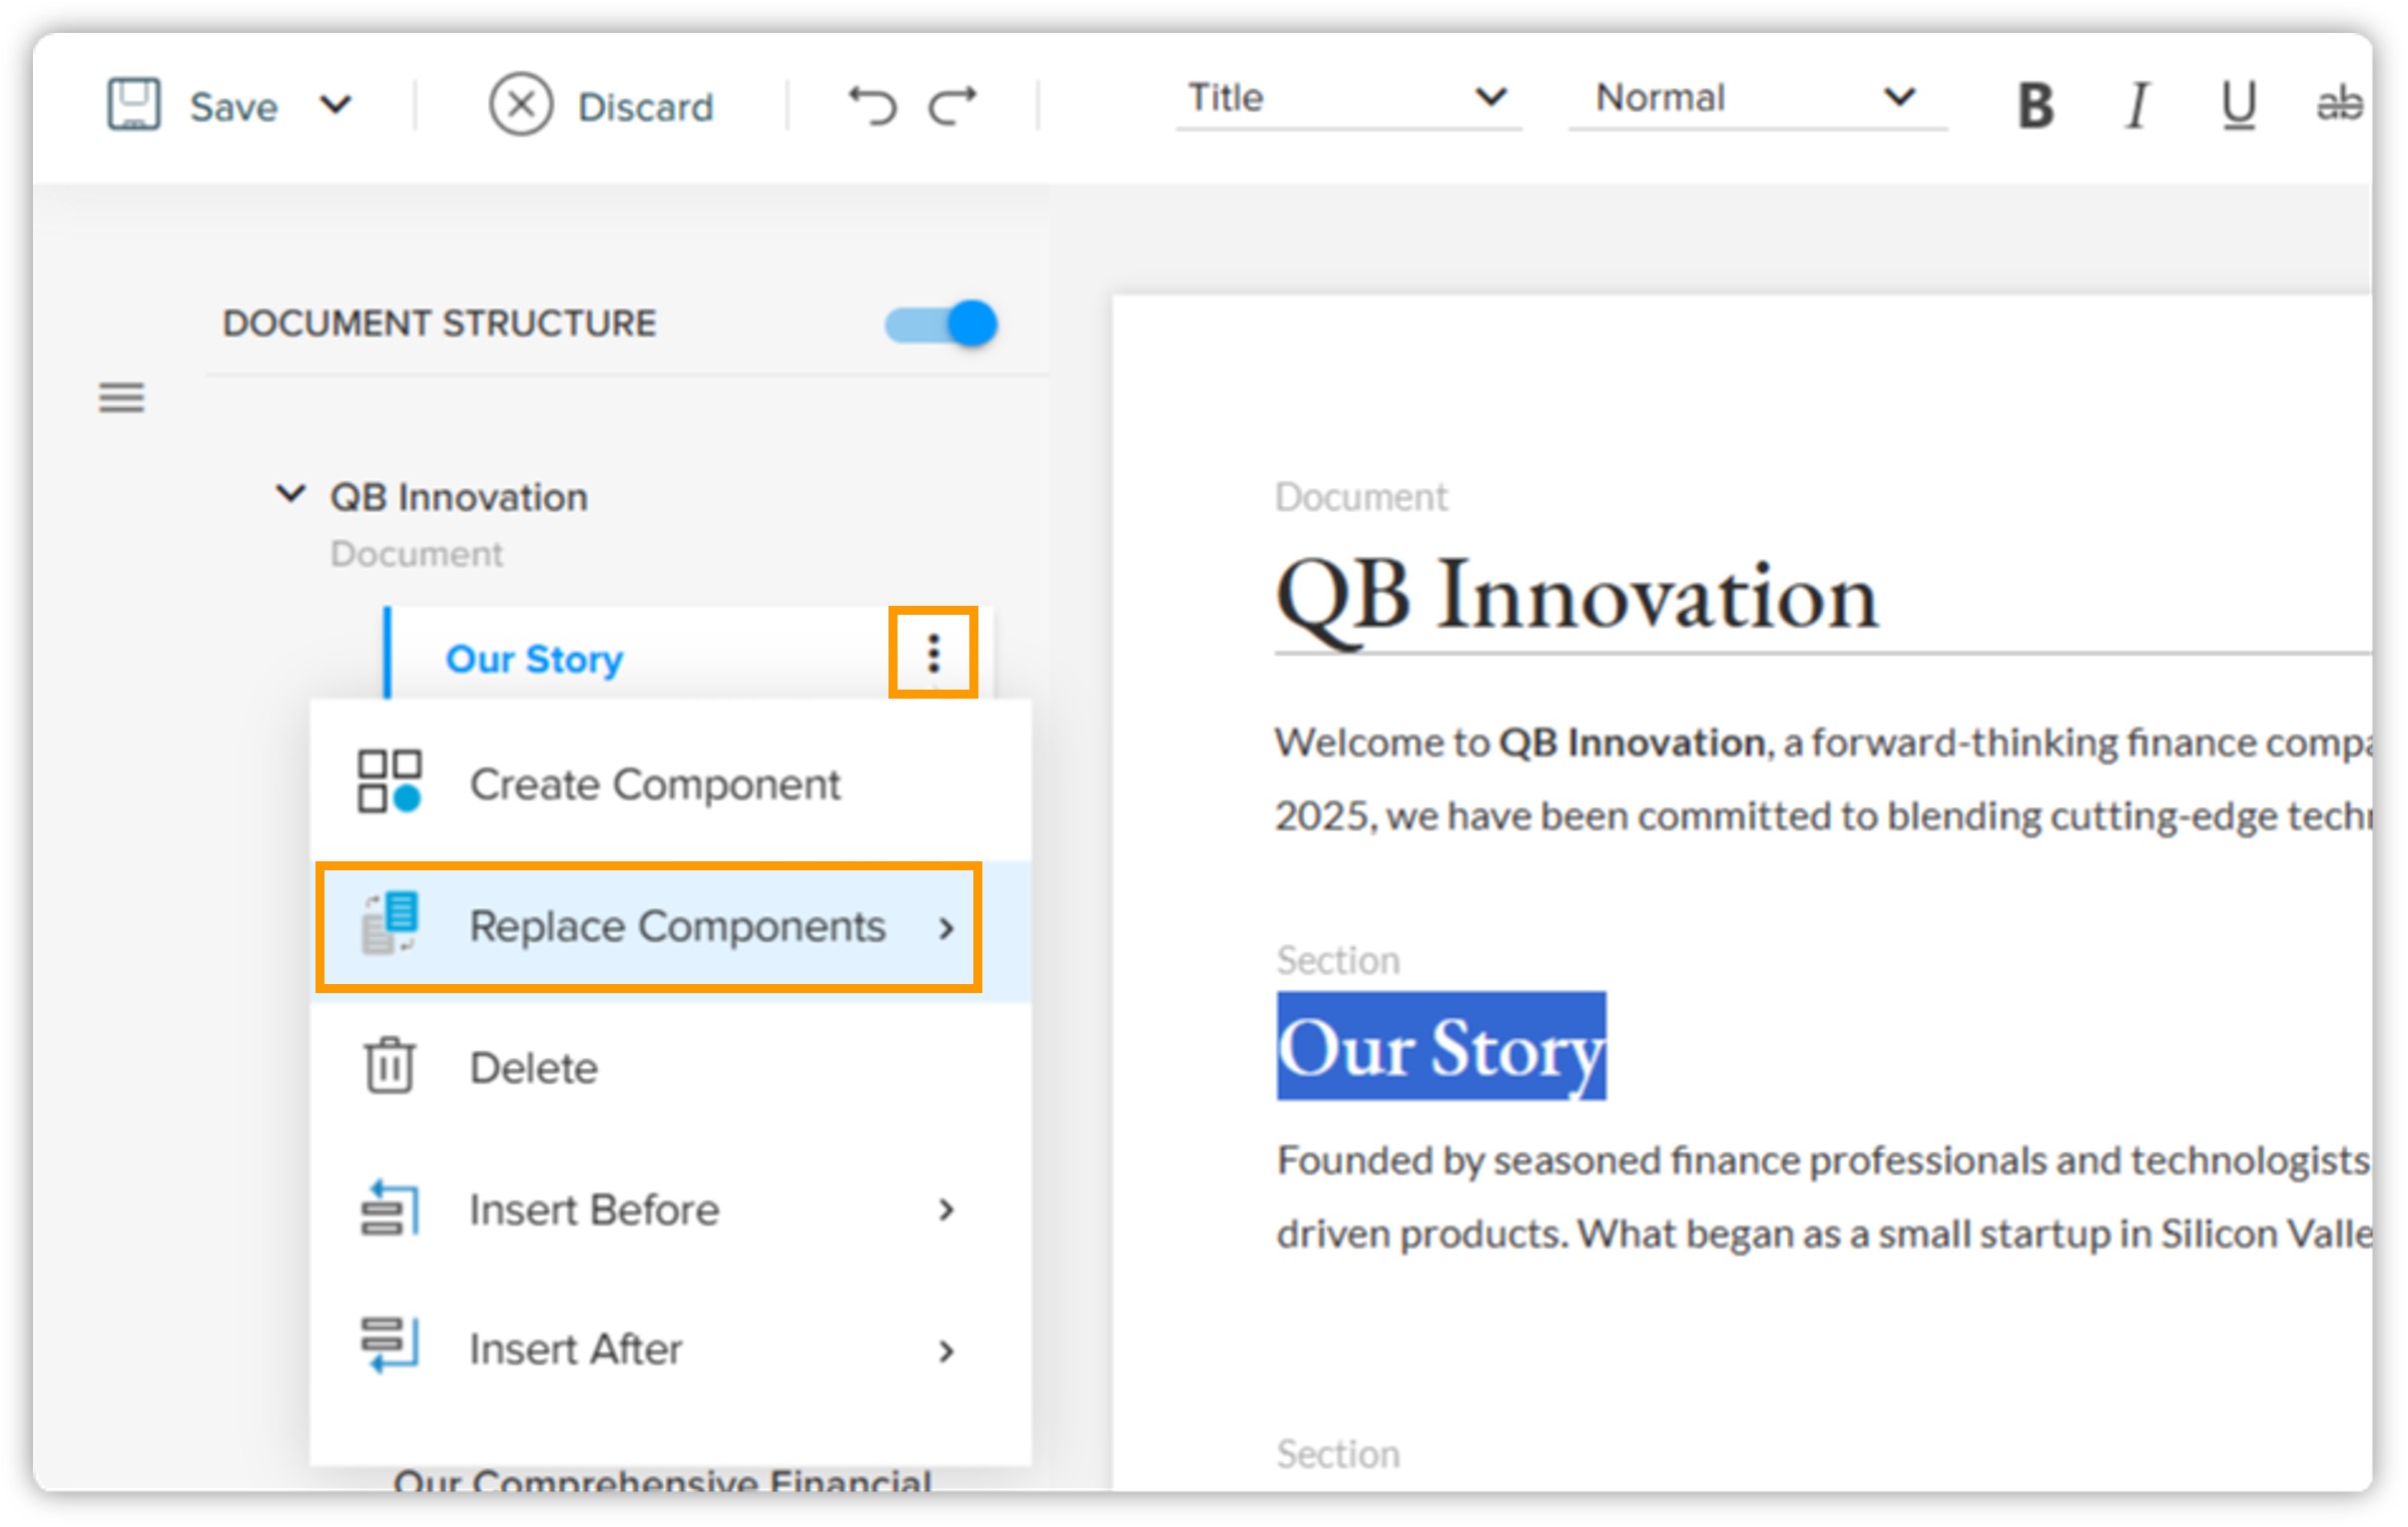
Initiate Replace Component: Click the Kebab icon
 next to the component you wish to replace and click Replace Components.
-
In the submenu, choose the desired option: Replace Components or Replace from Document.
-
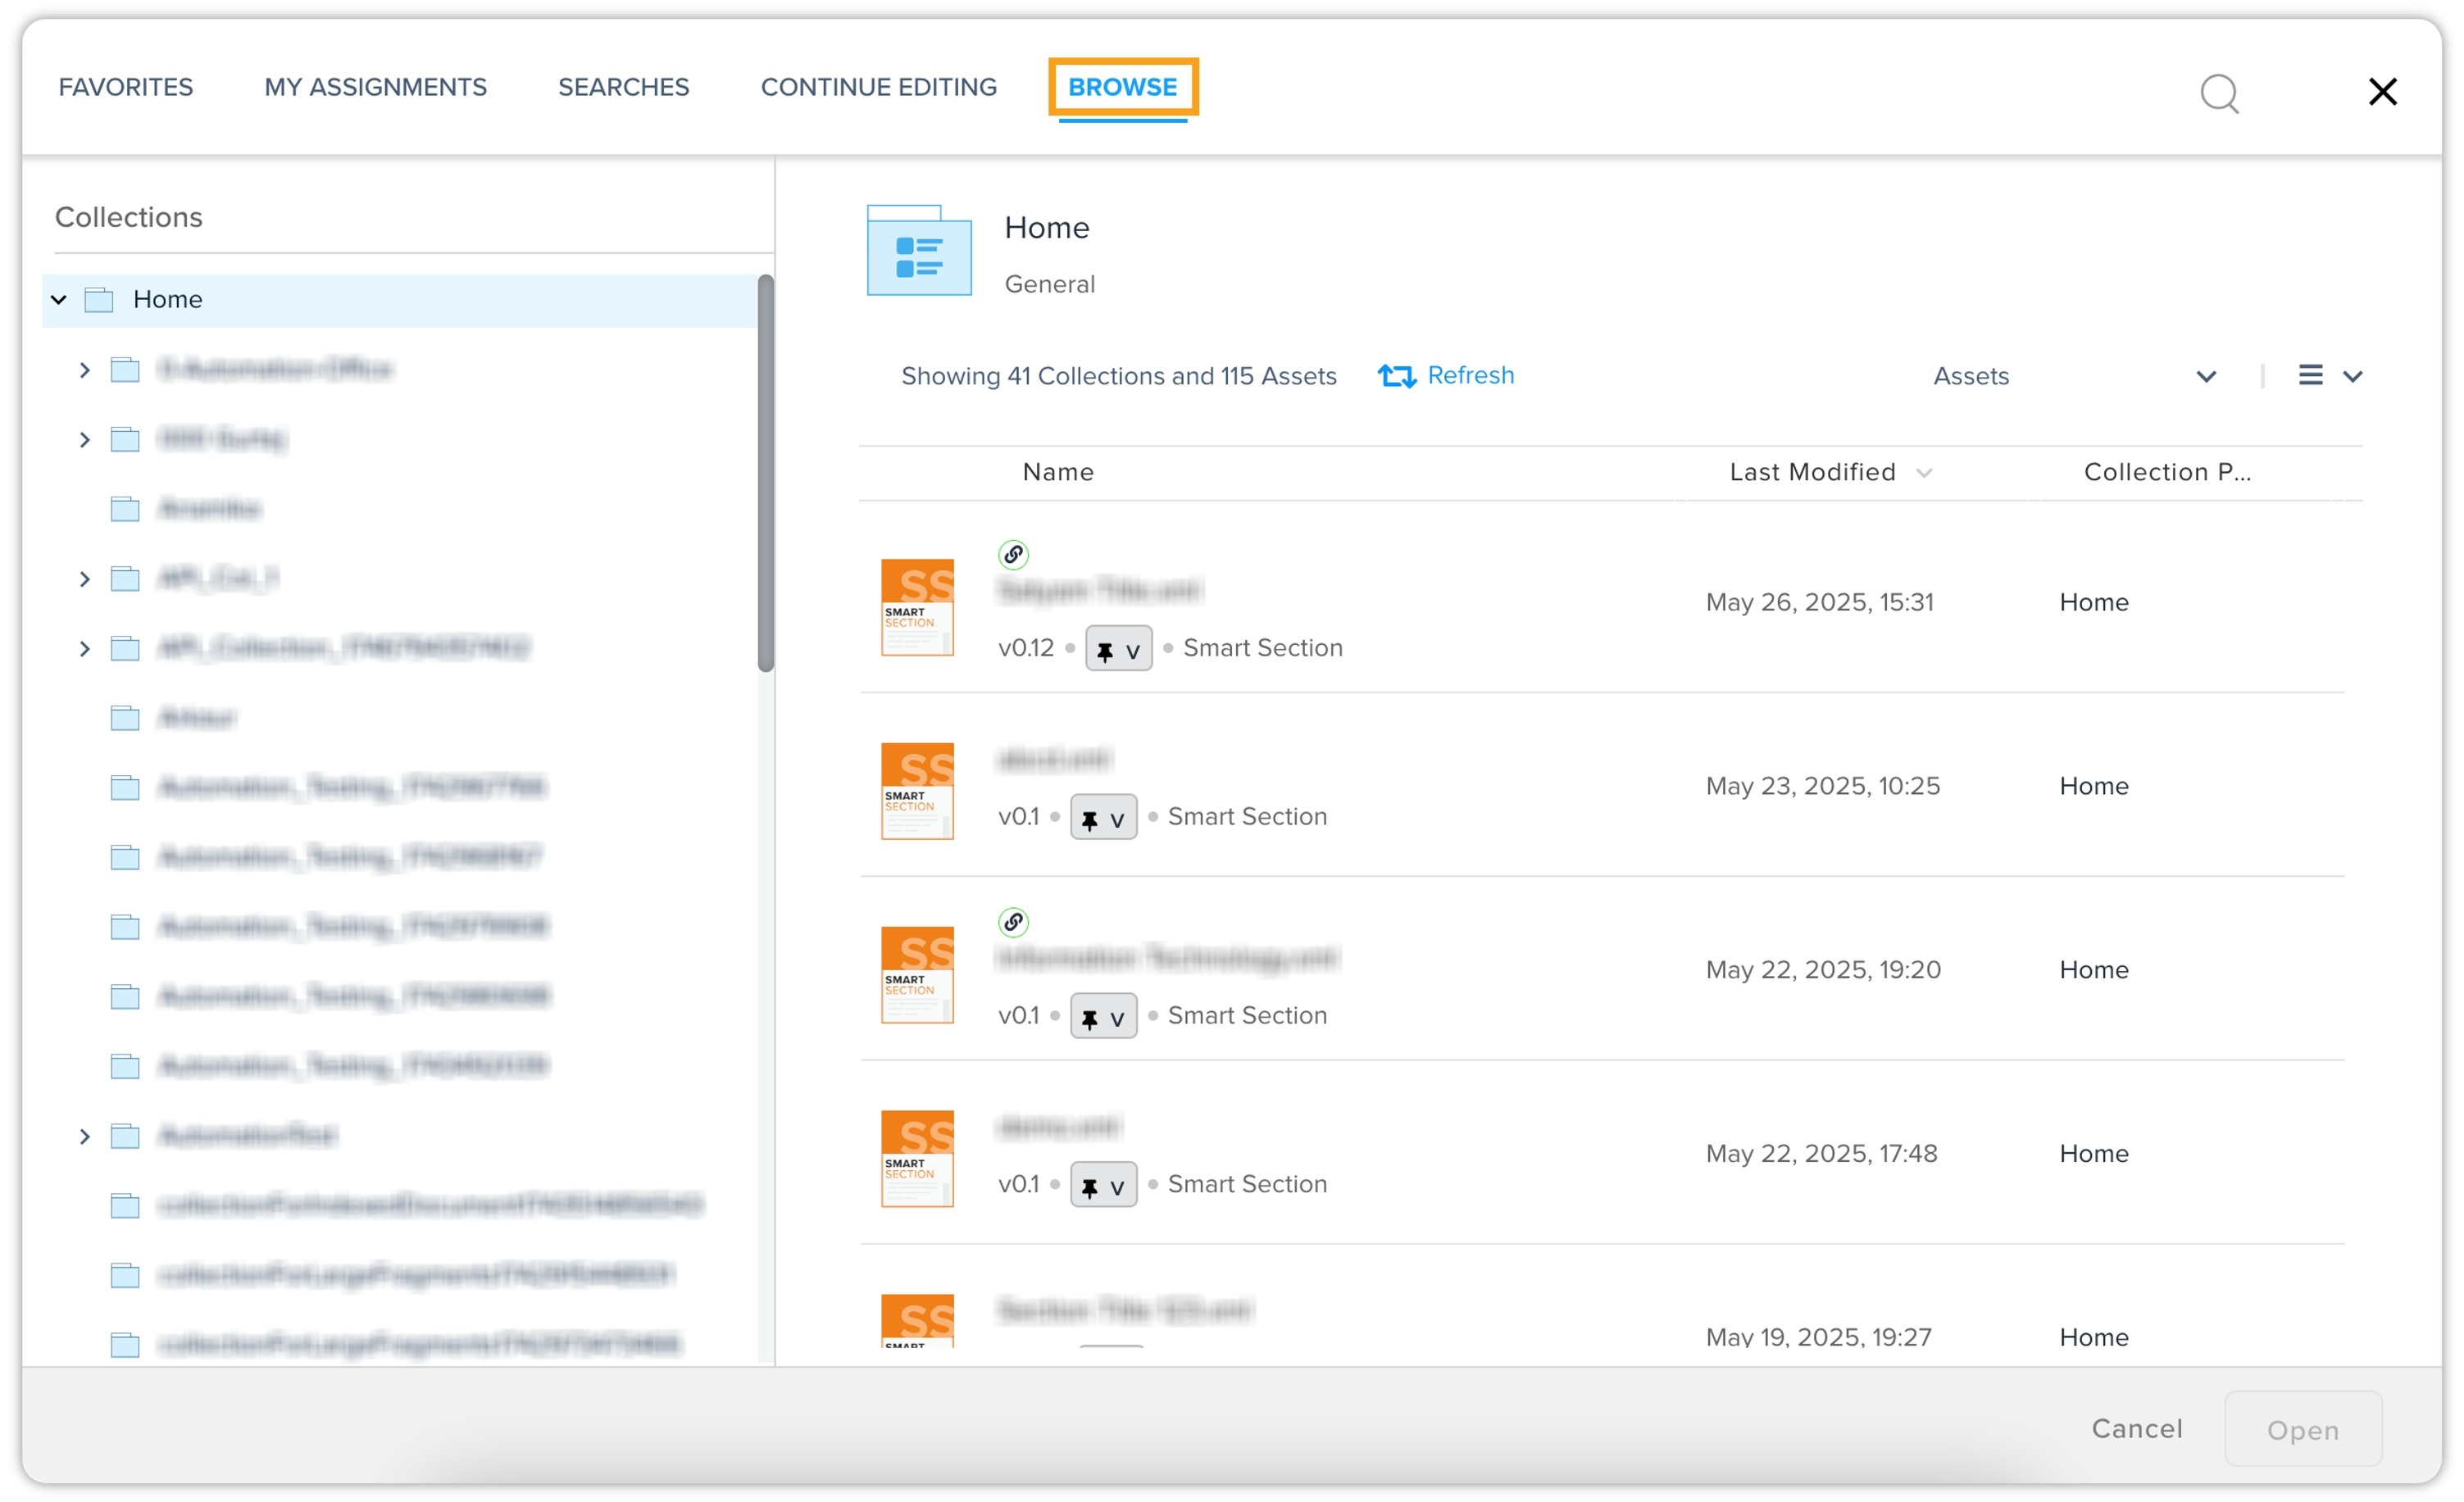
Click Replace Components option. This will open the asset picker window.
-
In the asset picker, go to the Browse tab.
-
Navigate to the collection where the desired component is located.
-
Select the component(s) you want to use for replacement. You can select multiple components at a time.
-
Click Open.
The selected component will replace the existing section in your document.
-
Clicking Replace from Document will also open the asset picker, allowing you to browse and select the desired structured document that contains the component you want to use as a replacement.
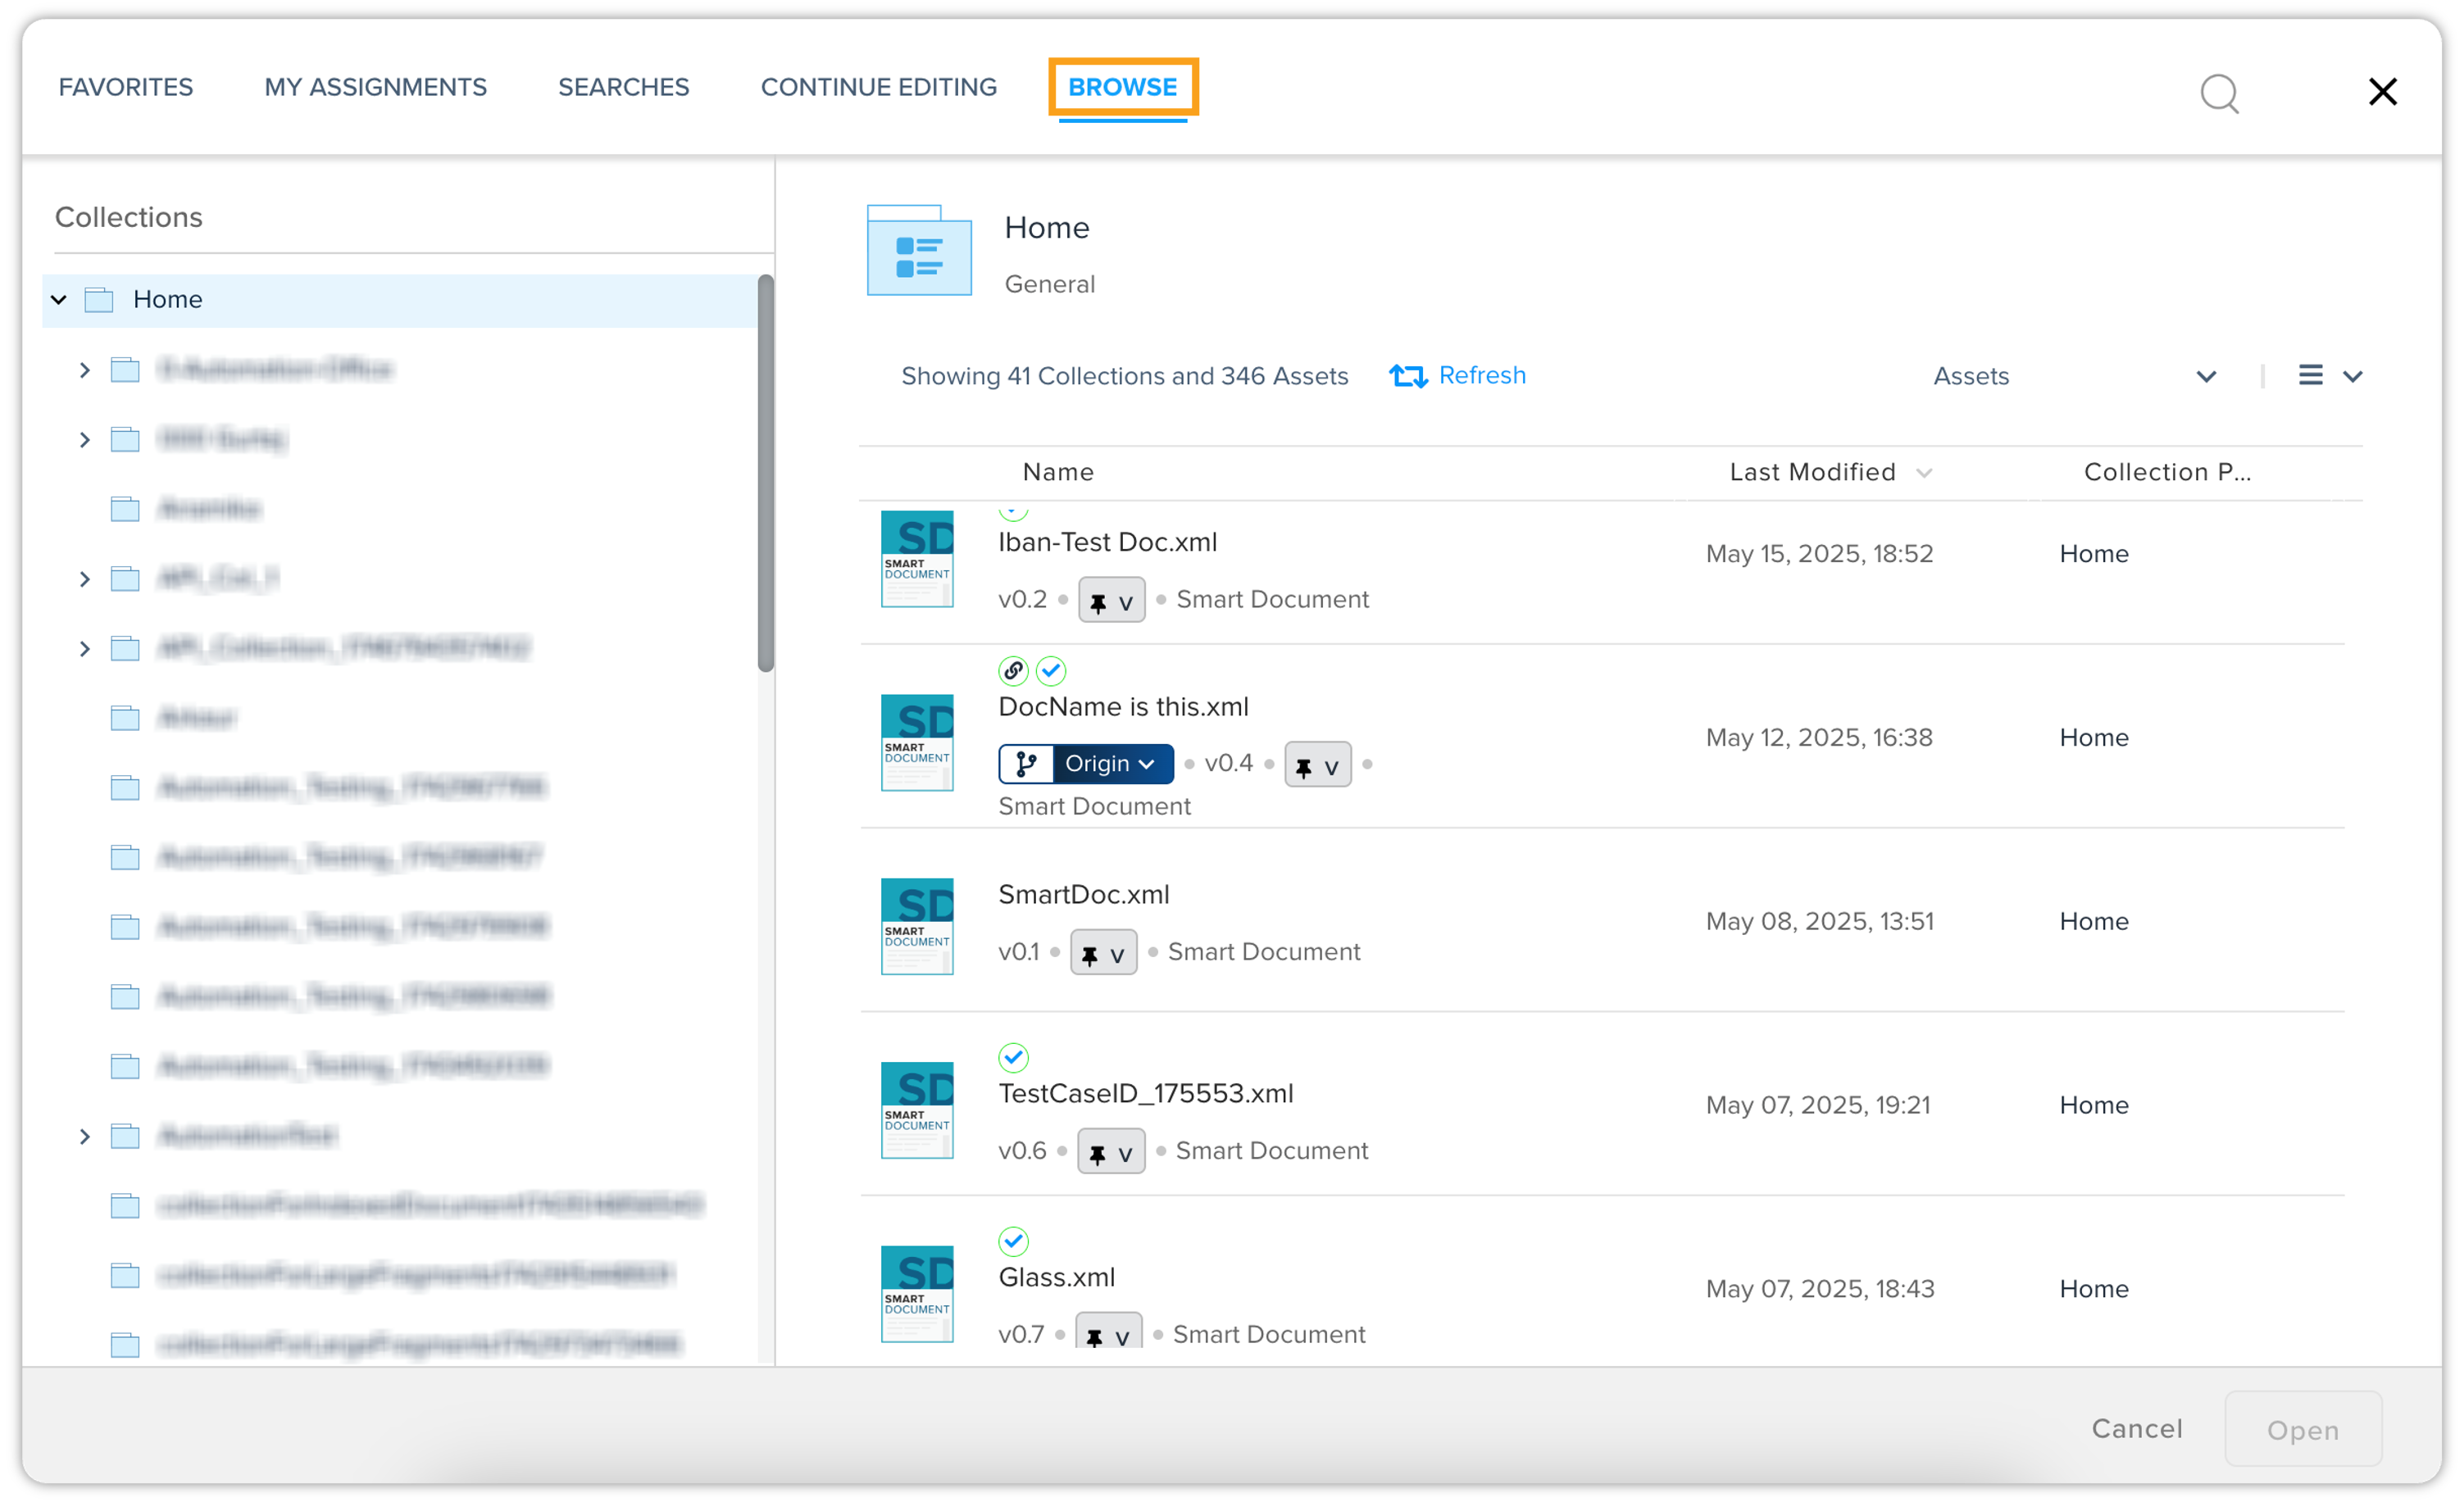
-
Upon selecting the document, Replace Component from Document dialog box will appear. This dialog displays a list of valid components within the selected document that can be used to replace the original component.
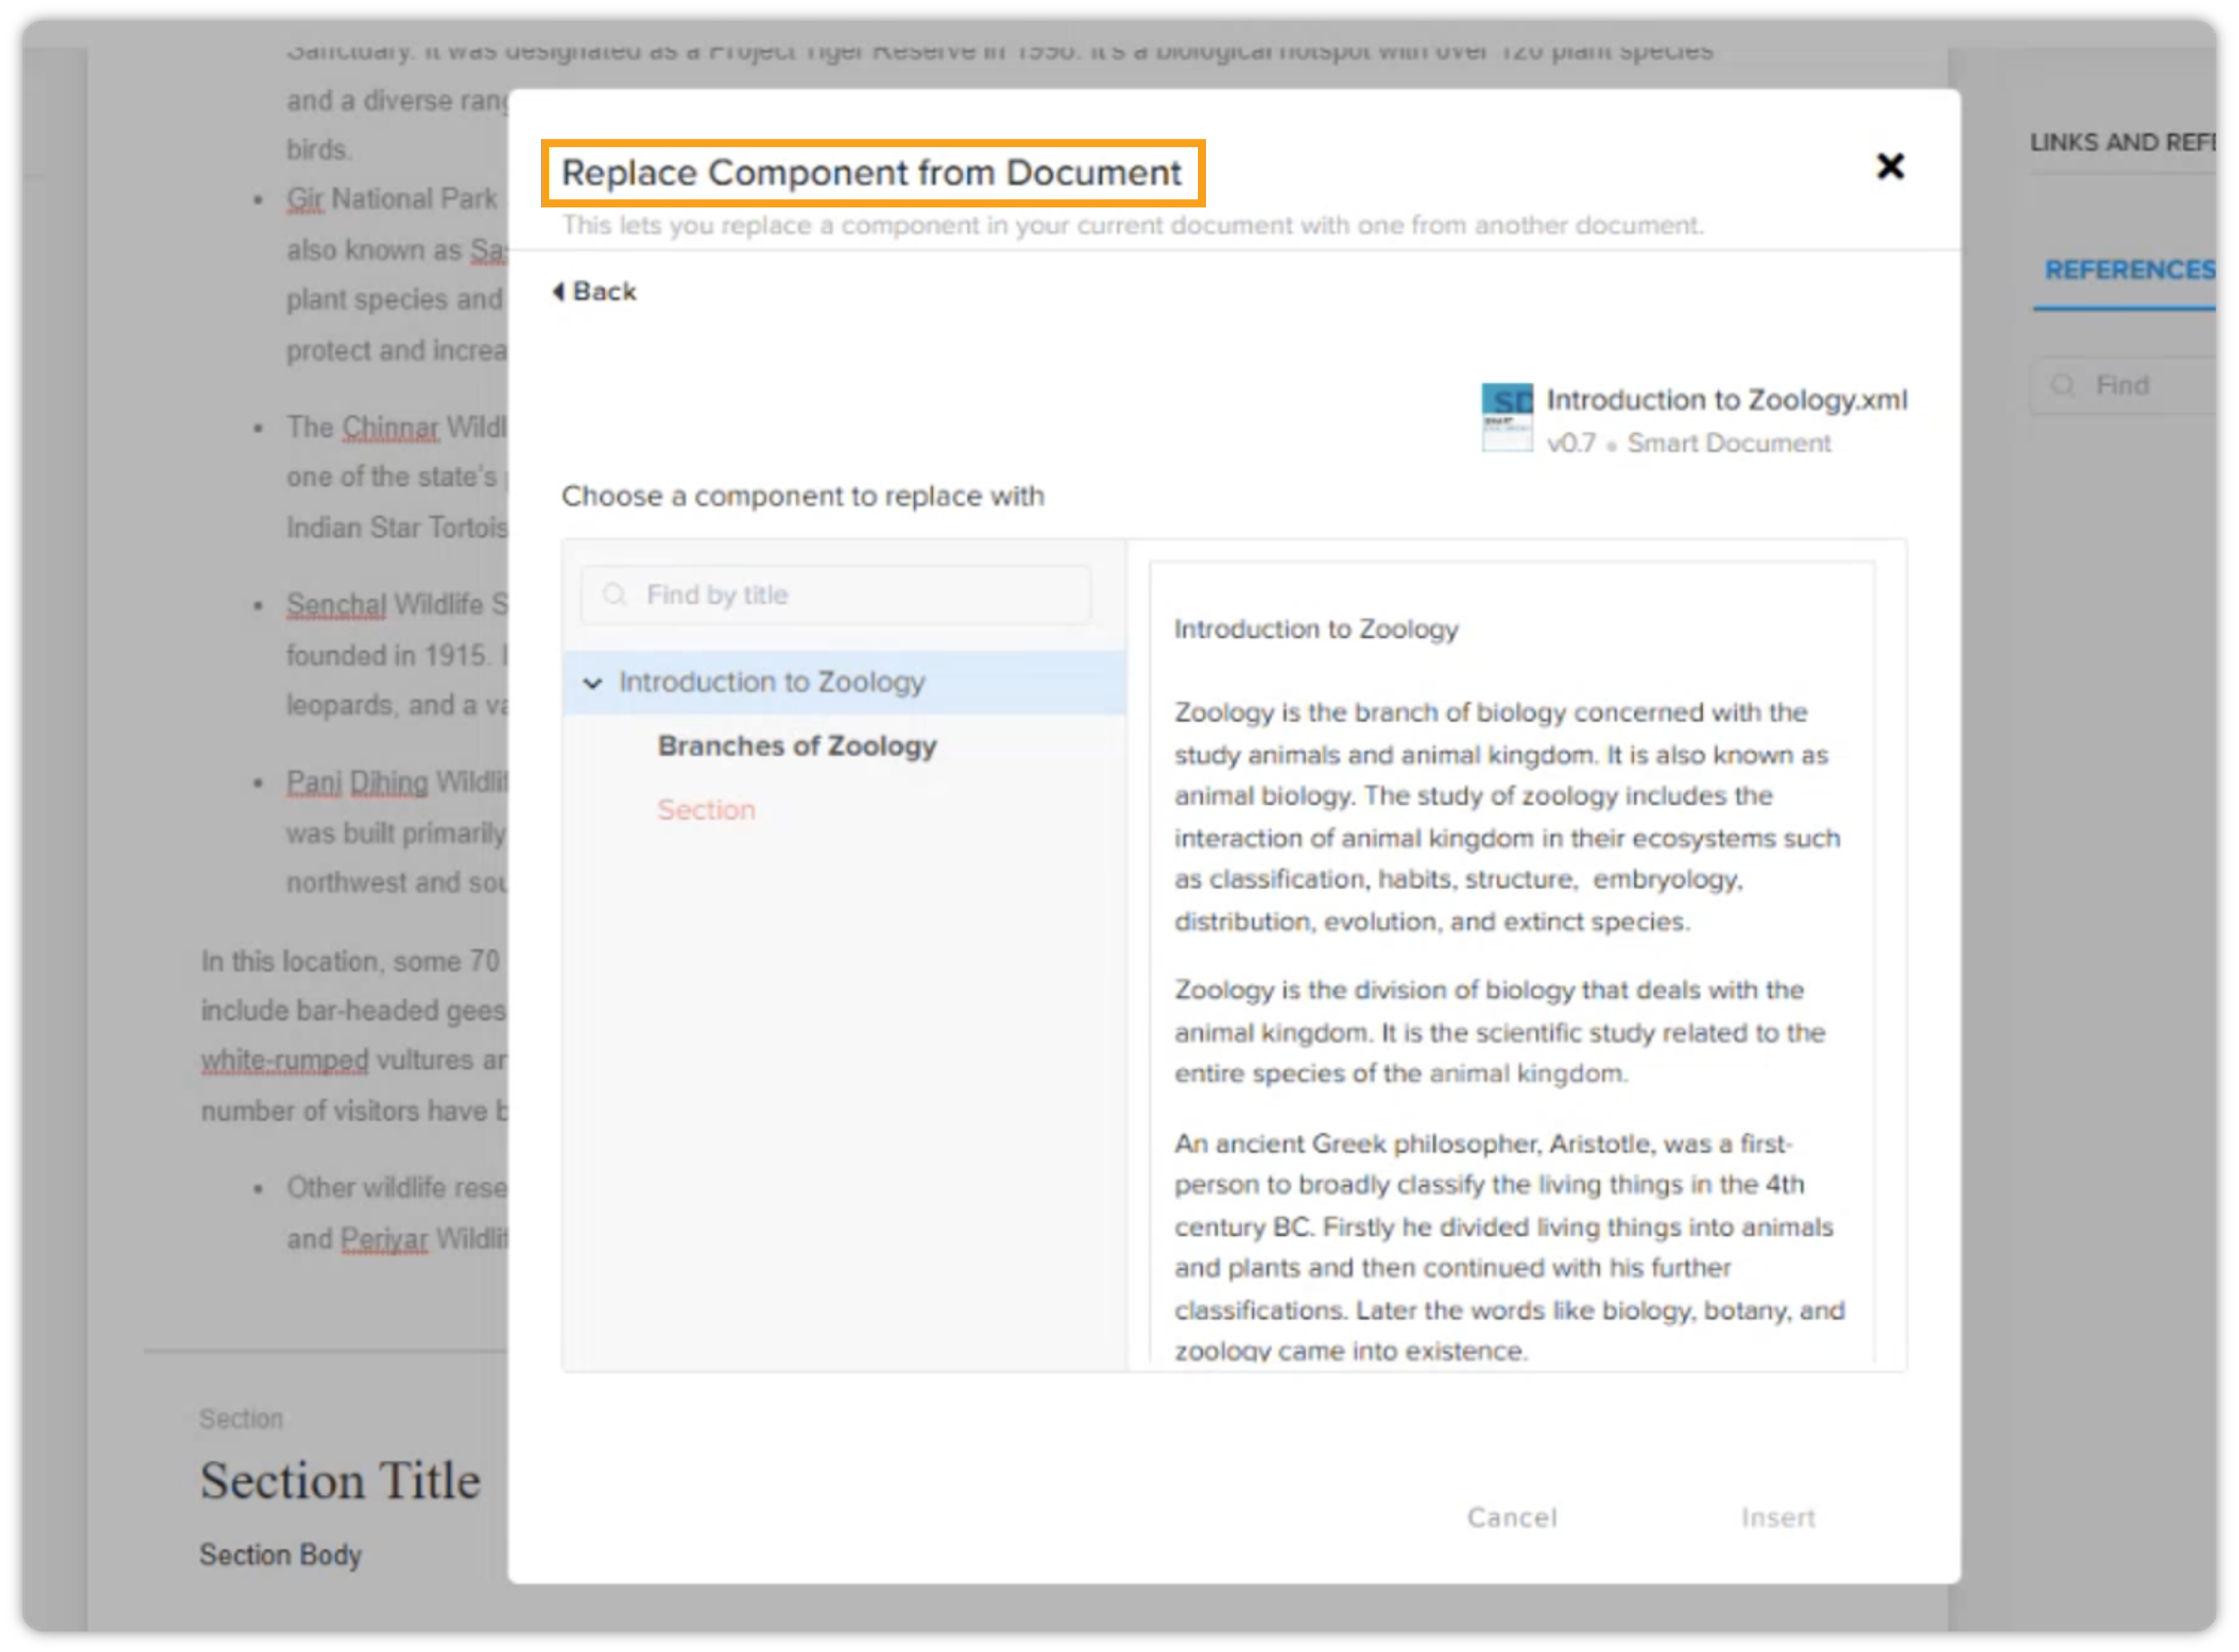 Components that are not suitable for replacement may appear faded, while broken or unavailable components will be highlighted in red.
-
Select a component from the list. If available in the UI, a preview pane will show its content, allowing you to confirm it's the correct component.
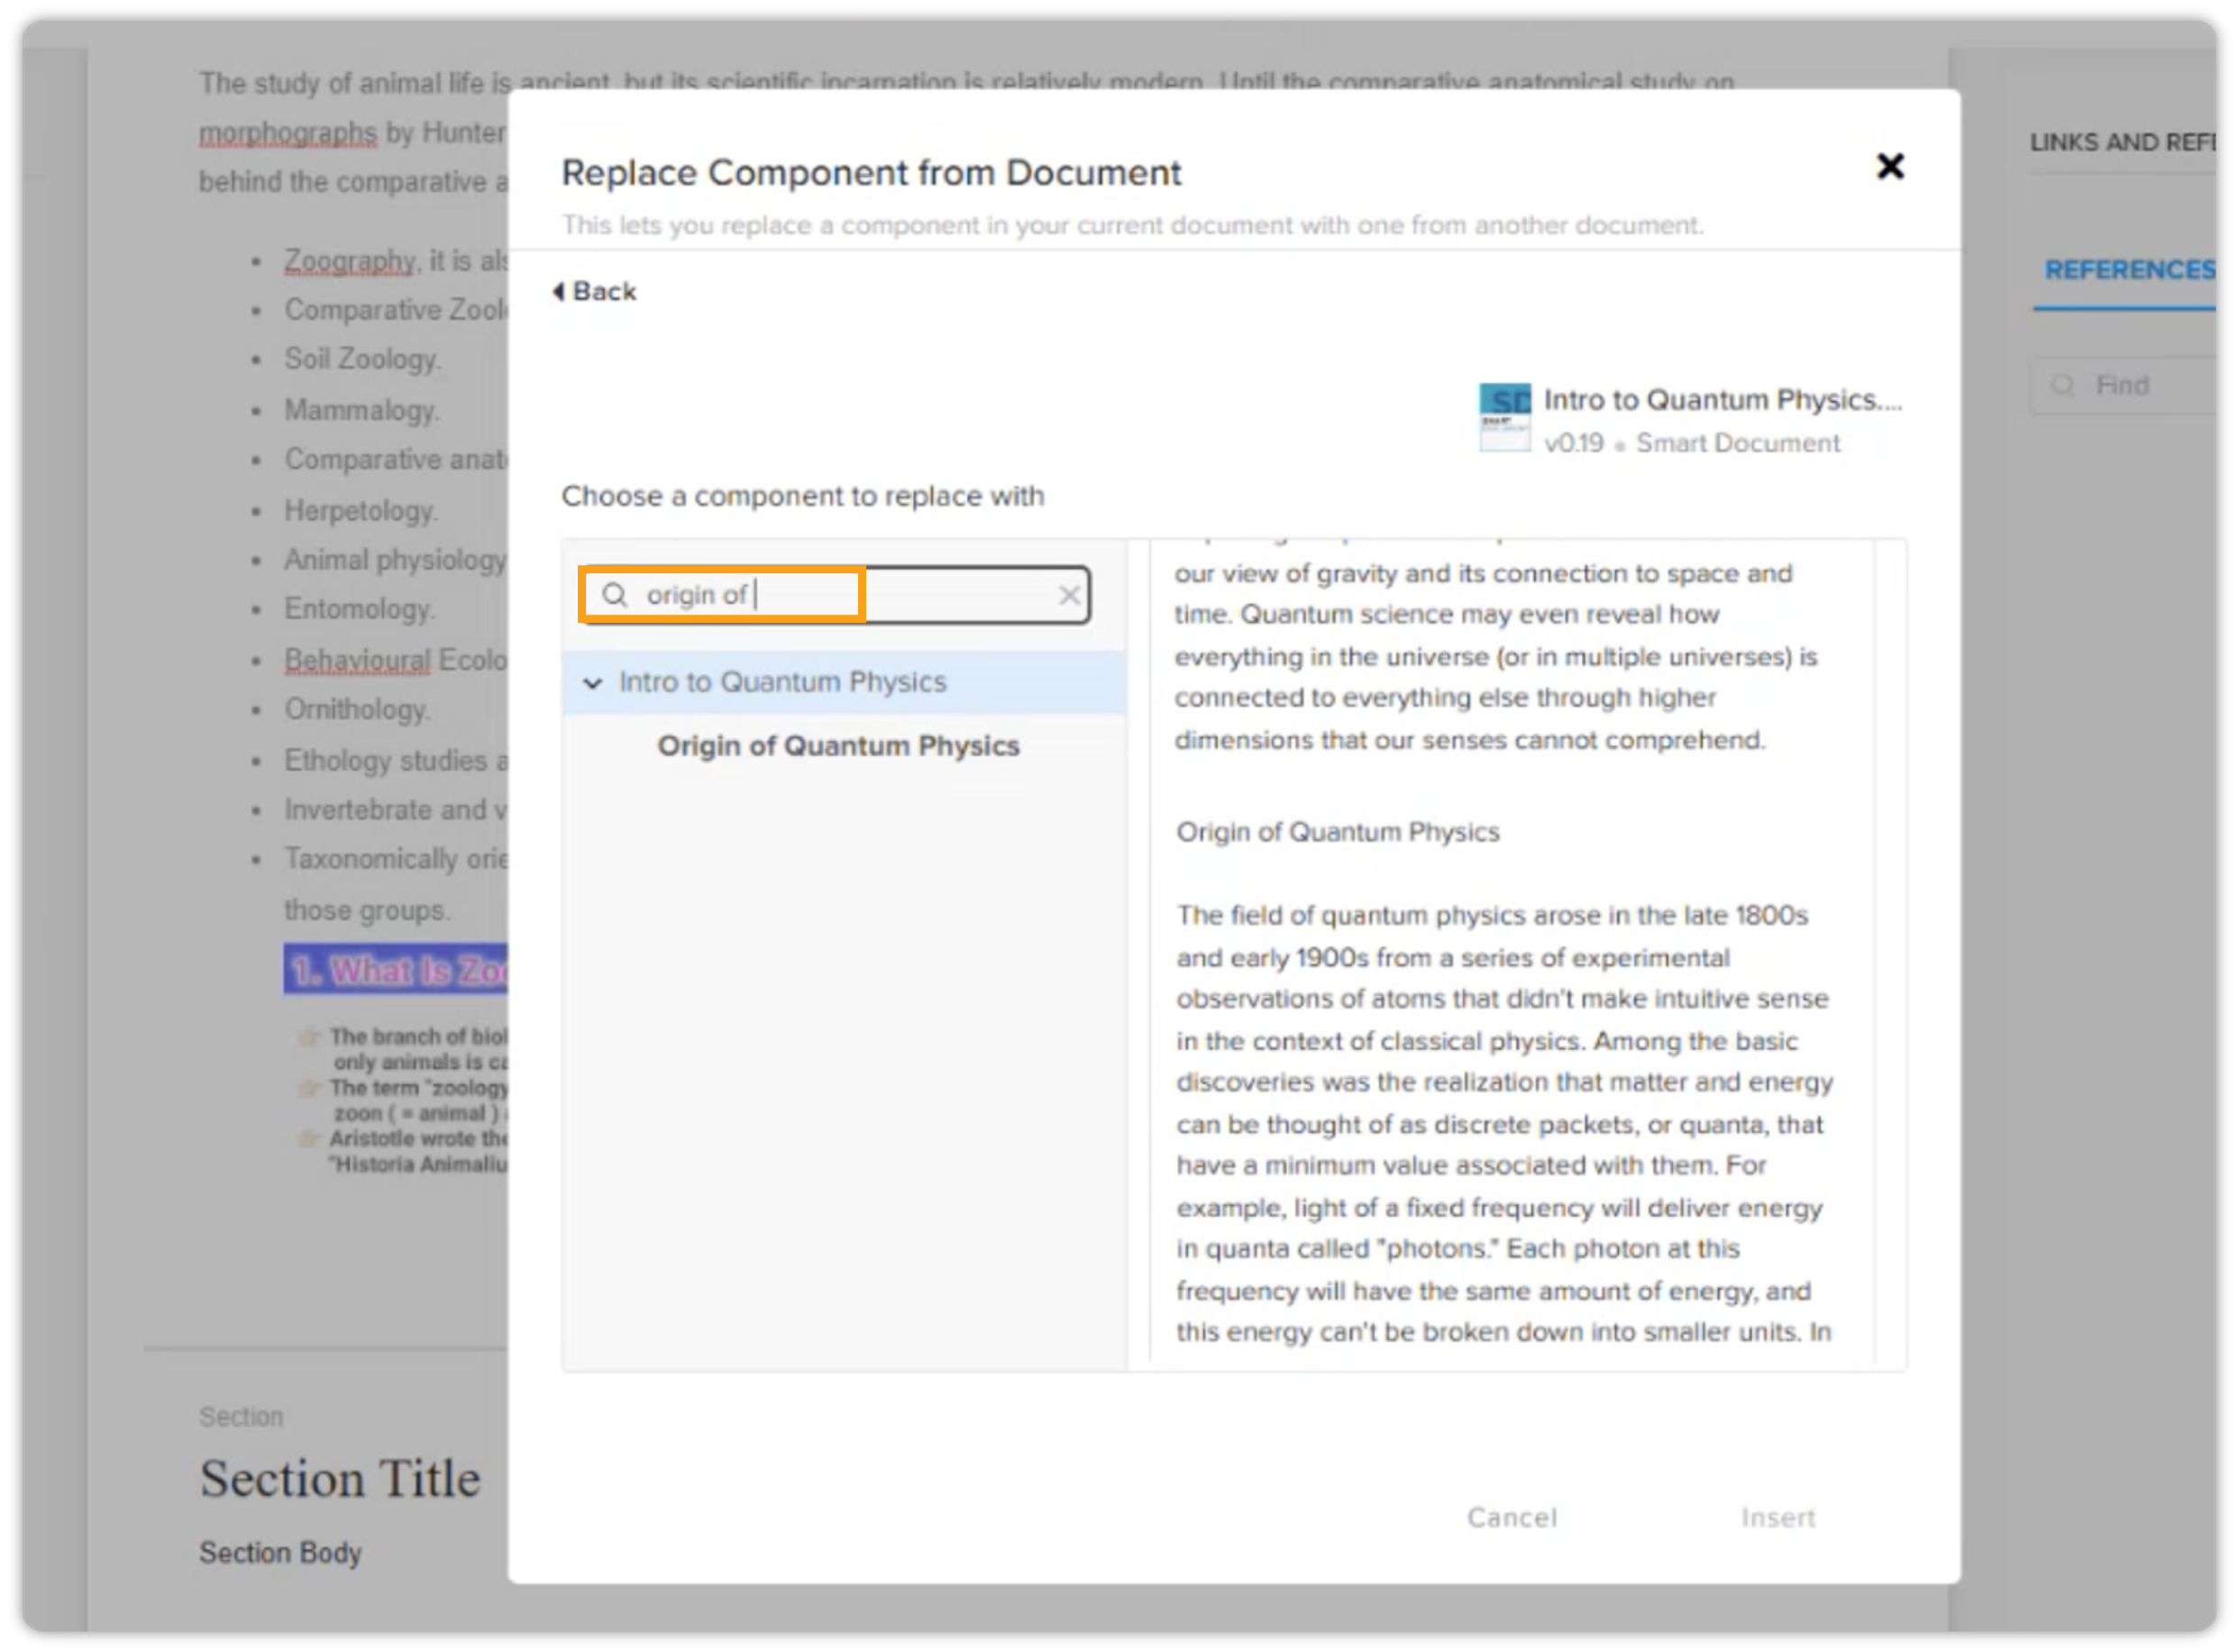 Tip: If the list of components is long, use the search bar within the dialog to quickly find the desired section or component by title.
-
Once you've selected the correct valid component, click Insert.
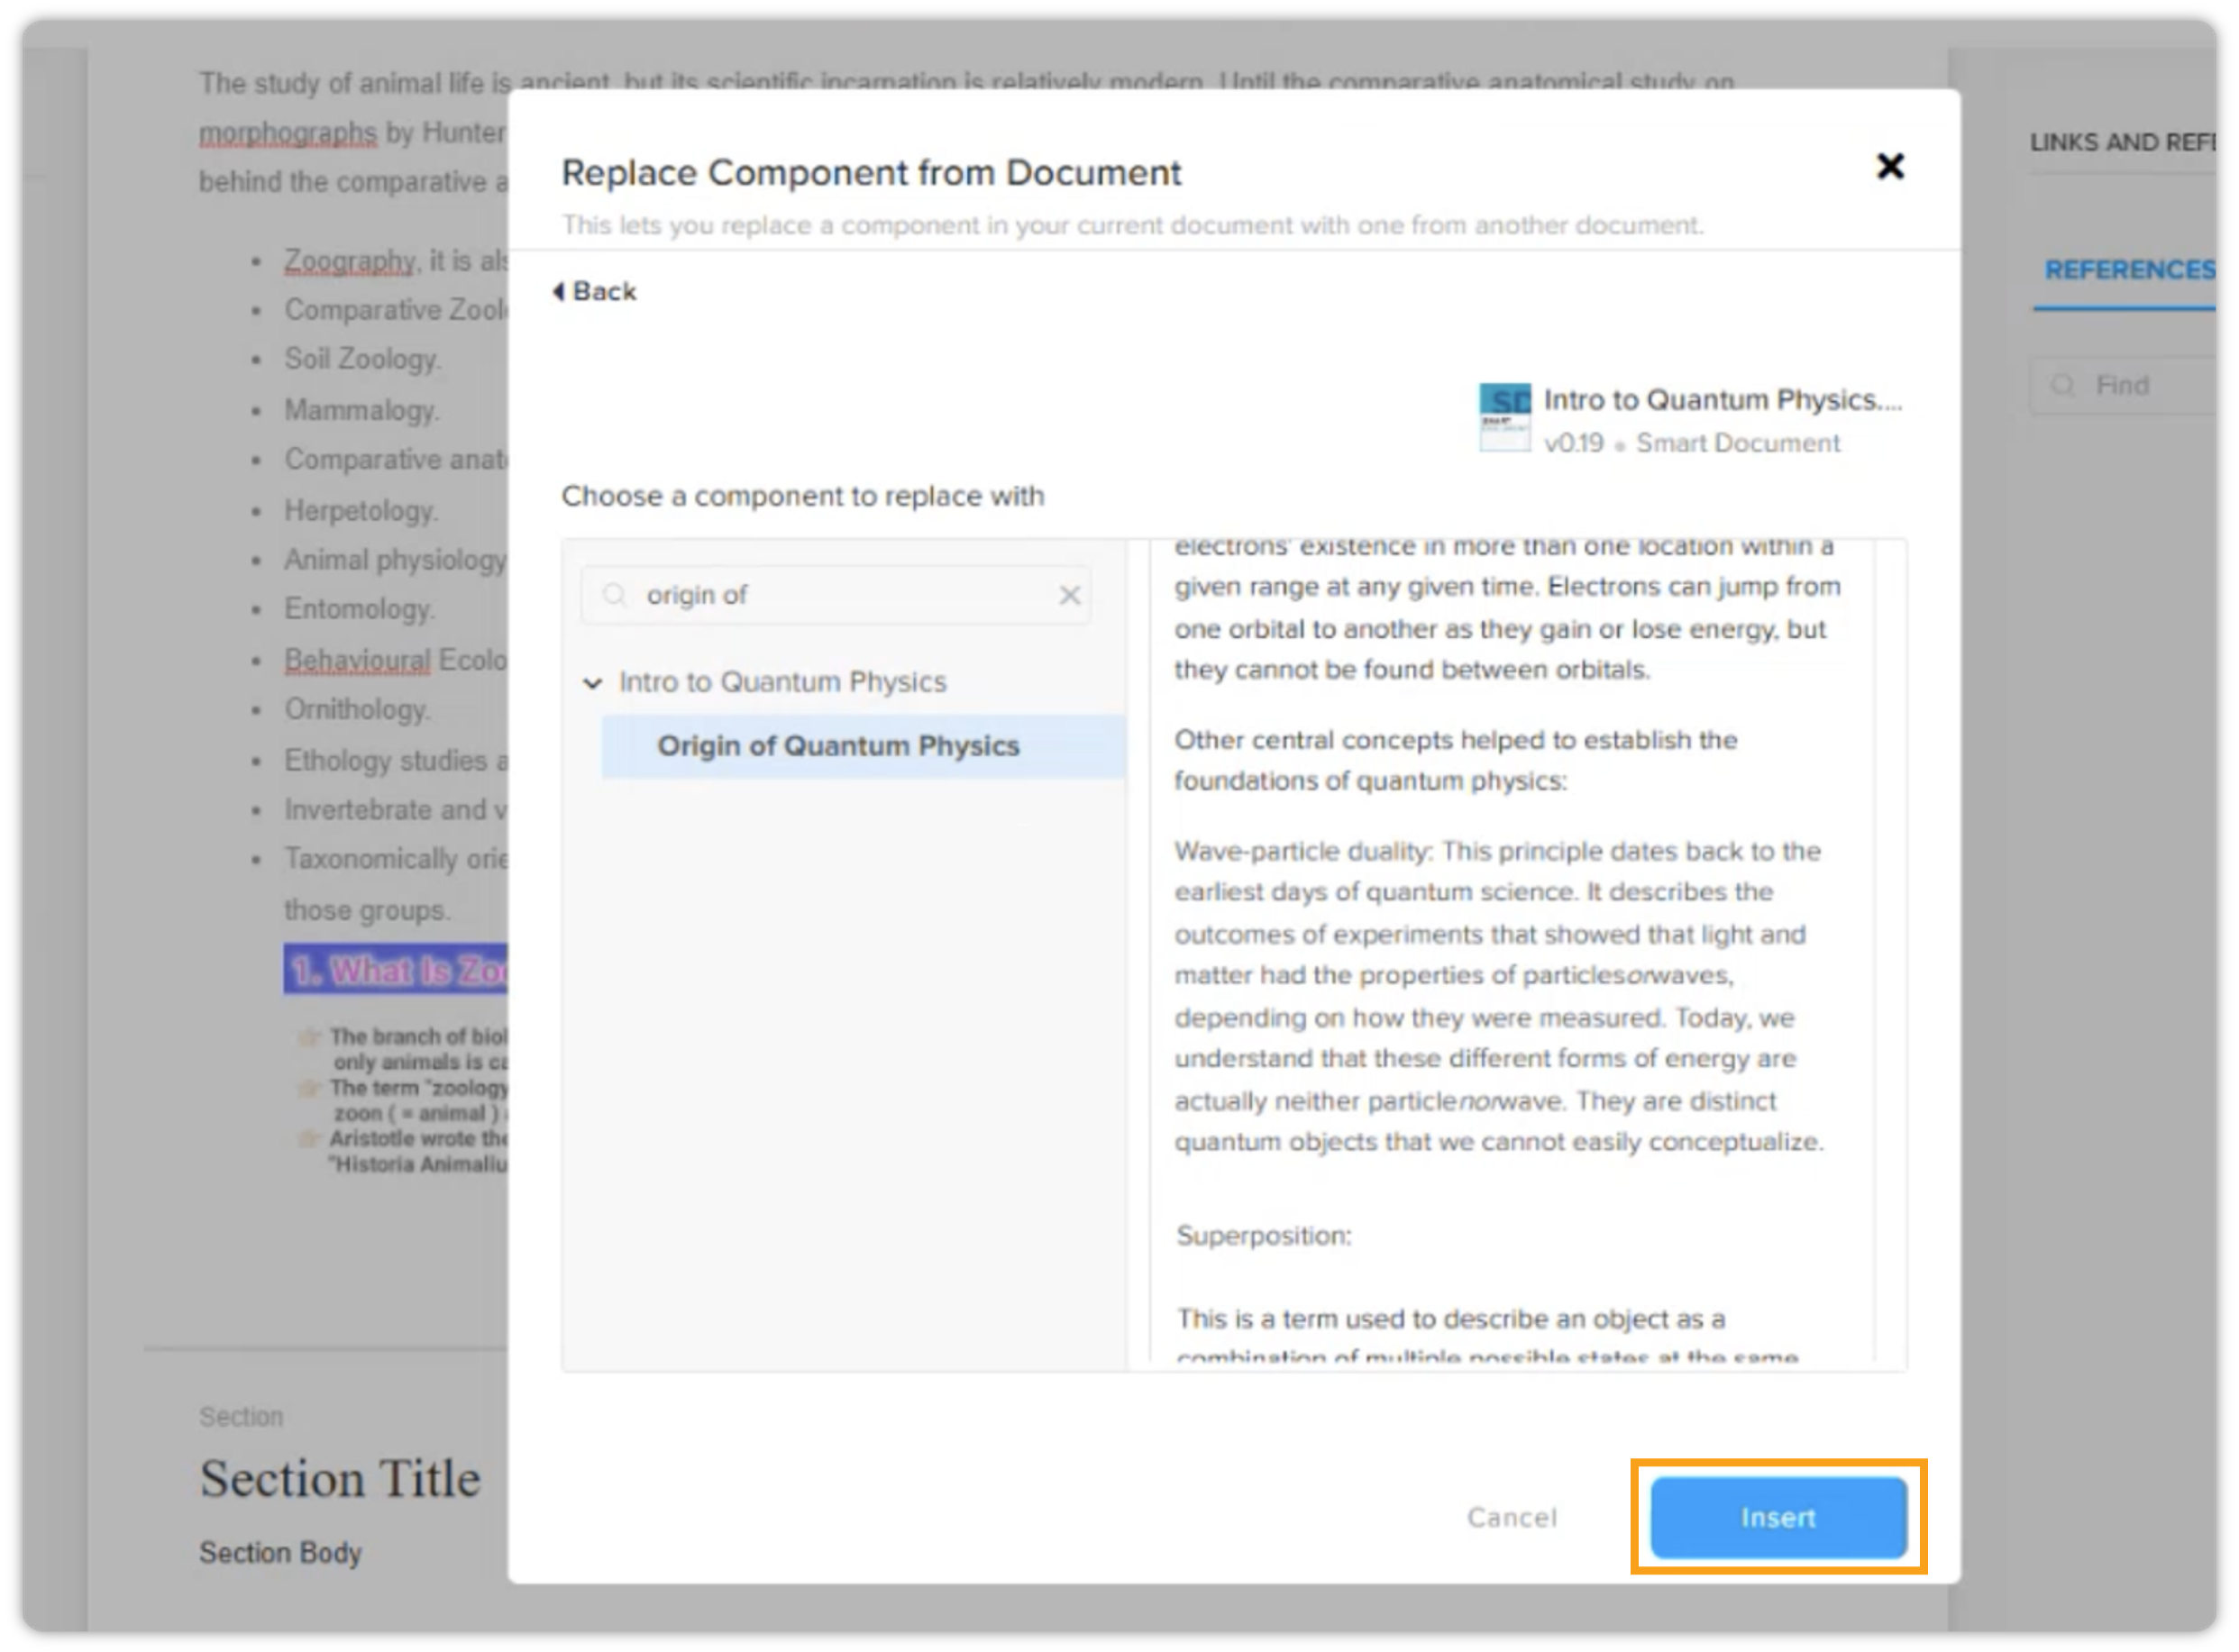
The original component in your document will be replaced by the component you selected from the external document. You can then proceed to edit the newly inserted component directly in the editor if needed.
Lock/Unlock Component
Content Component Locking lets administrators and content designers protect critical statement blocks from unwanted removal or inline conversion, ensuring that key legal and compliance text remains intact.
Prerequisites
-
QPP (version 5.2.0 or later)
-
User role with Lock & Unlock Components privilege
Access Points
You can lock or unlock any smart section (component) via its kebab menu in two locations:
-
Component Reference toolbar
-
Document Structure pane (left-hand TOC)
Locking a Component
-
Open your document in Quark Author.
-
Go to the component you want to lock.
-
Click the kebab menu that appears on the Component Reference toolbar.
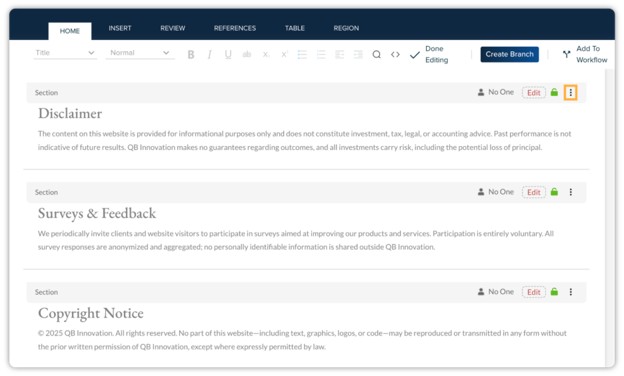
-
Choose Lock Component.
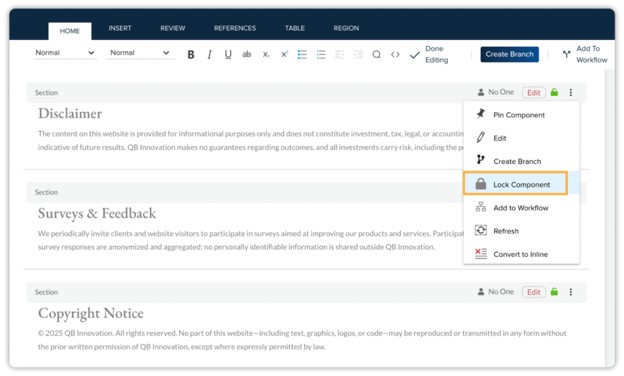
-
The padlock icon turns closed—your component is now locked.
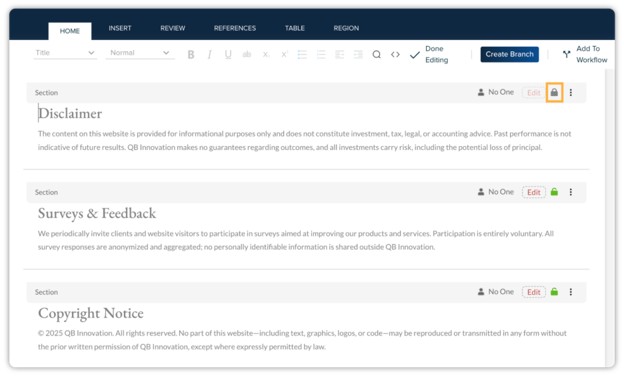
-
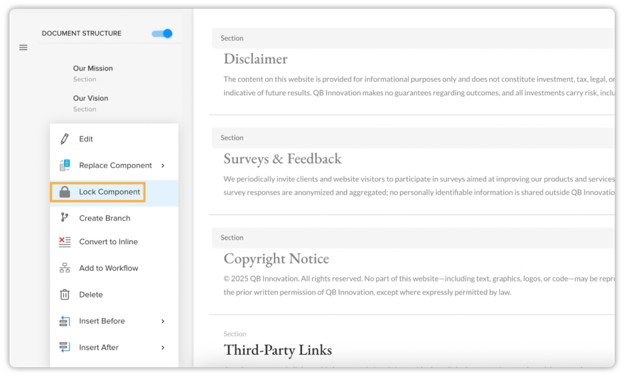
Go to the Document Structure pane on the left.
-
Locate the component in the TOC list.
-
Click the kebab menu beside its name.
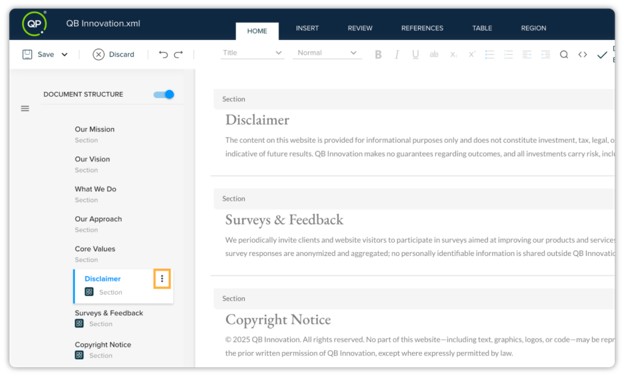
-
Choose Lock Component.
-
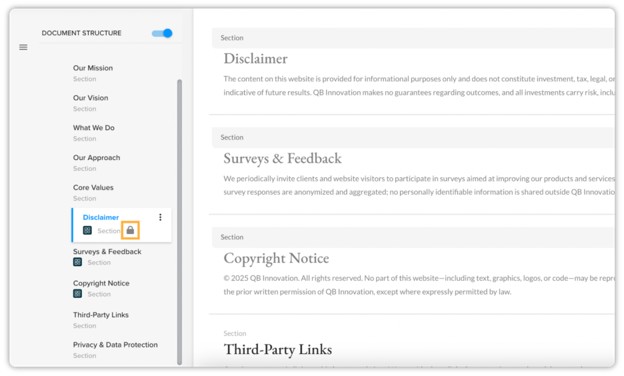
Confirm the closed-padlock icon next to the component.
Unlocking a Component
-
Navigate to the locked component (editor or document structure pane).
-
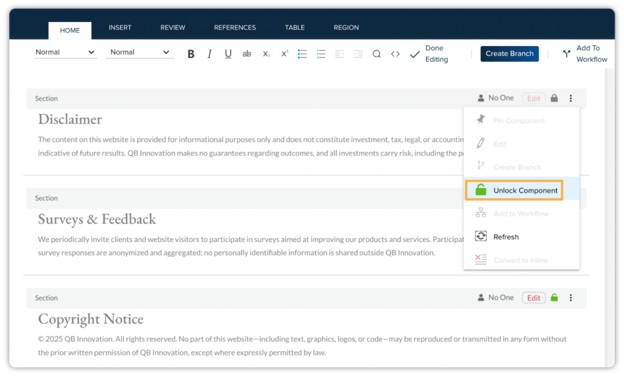
Click its kebab menu.
-
Choose Unlock Component.
-
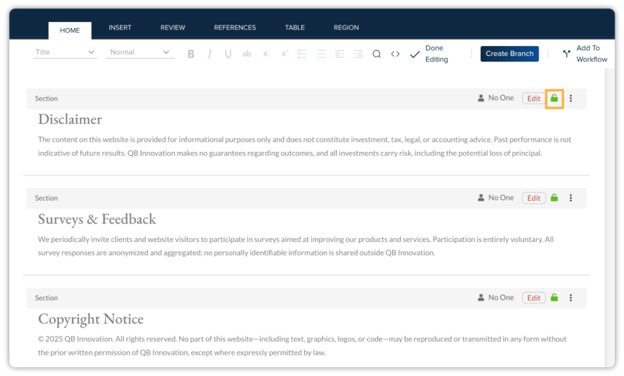
The padlock icon opens—component is editable again.
Disable Actions While Locked
When a component is locked, the following actions are disabled:
-
Pin Component
-
Edit
-
Create Branch
-
Add to workflow
-
Convert to Inline
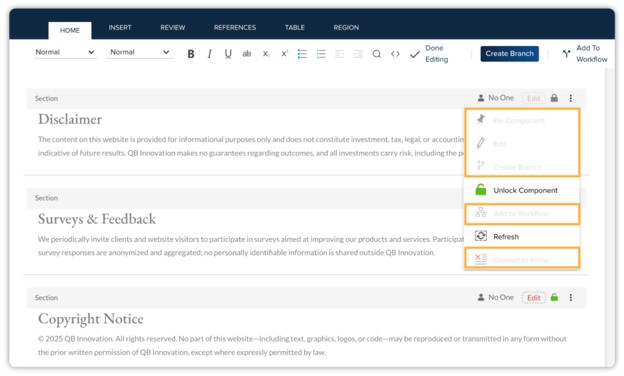
Attempting any of these will display a tooltip: "This component is locked. Unlock to proceed."
Best Practices
-
Lock Early: Secure all compliance-critical components immediately after document creation.
-
Audit Regularly: Review locked components before each major release cycle.
-
Train Your Team: Ensure editors know which users can lock/unlock to avoid workflow confusion.
Batch Component Operations
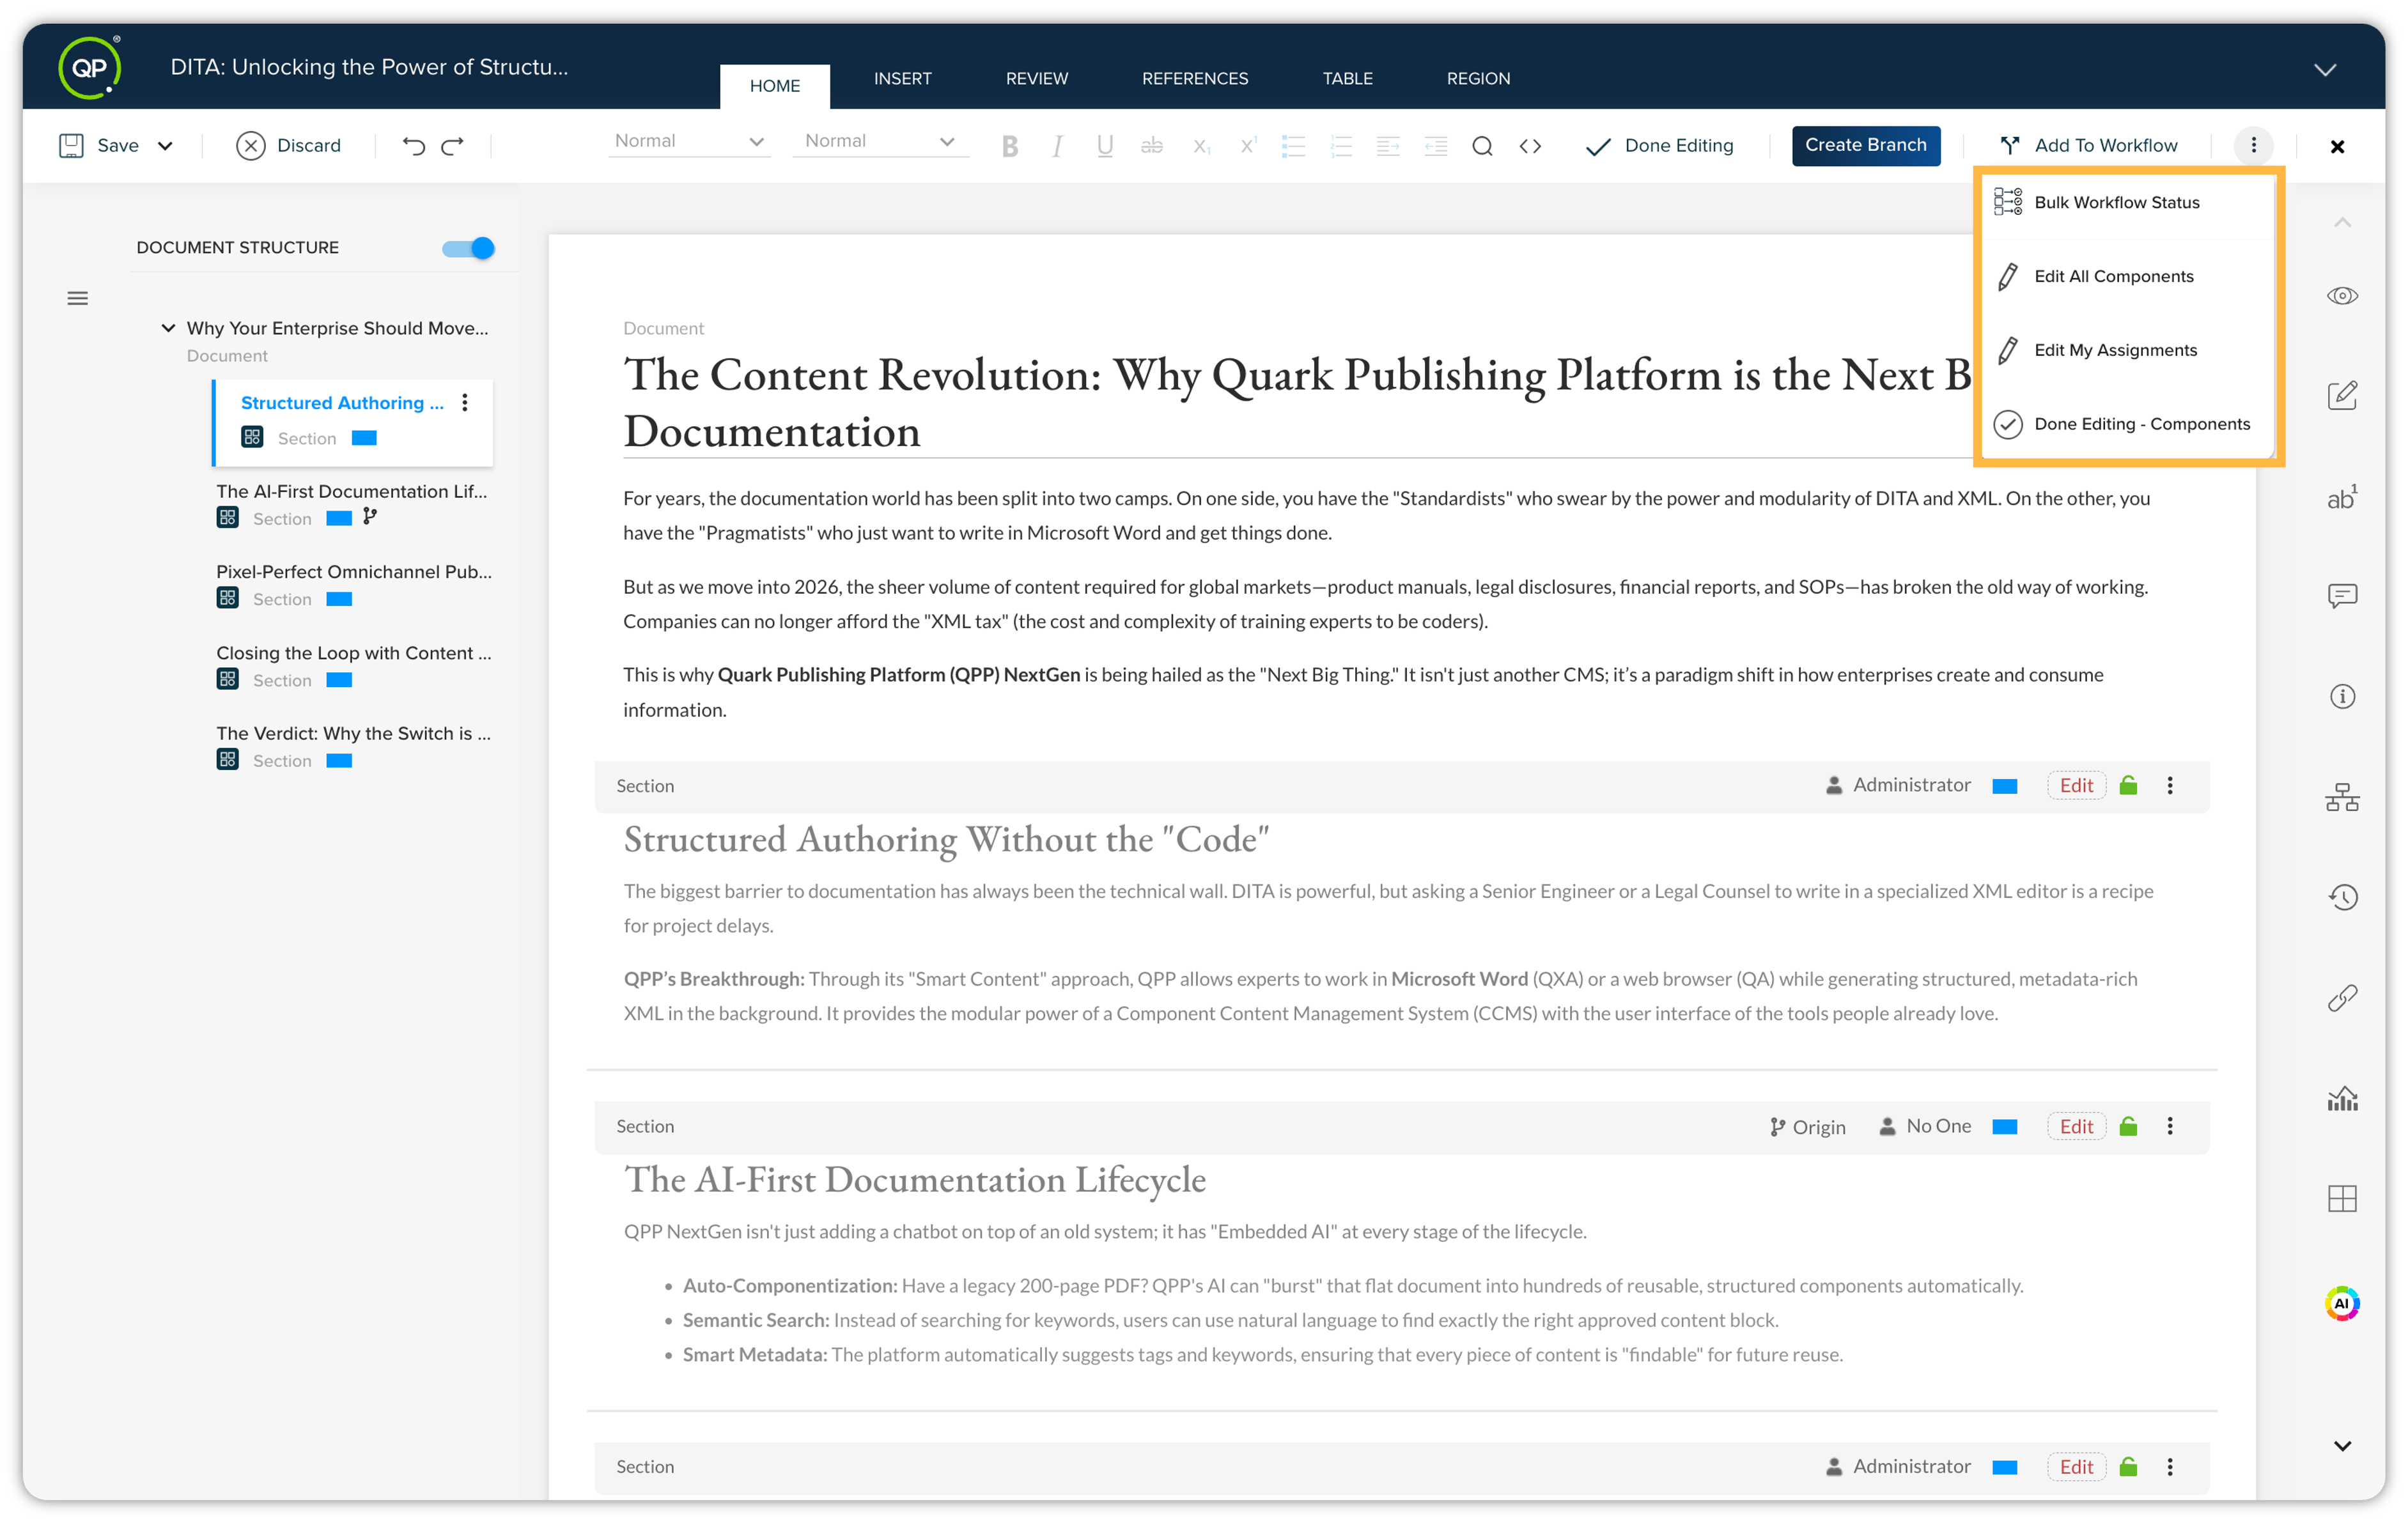
Batch Component Operations is designed to significantly simplify your content management tasks, allowing for greater productivity and smoother workflow. It allows you to manage multiple content components in Quark Author efficiently. This section will walk you through the functionality and usage of this powerful tool.
Accessing the feature
-
Open any document within Quark Author (QA).
-
Locate the newly added Batch Component Operations options on the taskbar.
Bulk Workflow Status
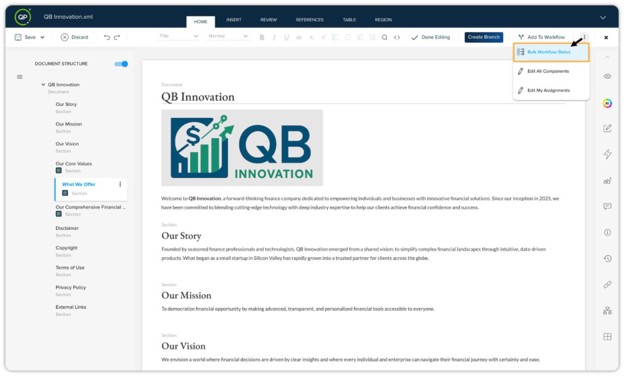
To change to workflow status of your components in bulk, follow these steps:
-
Click the kebab menu icon and then click Bulk Workflow Status.
-
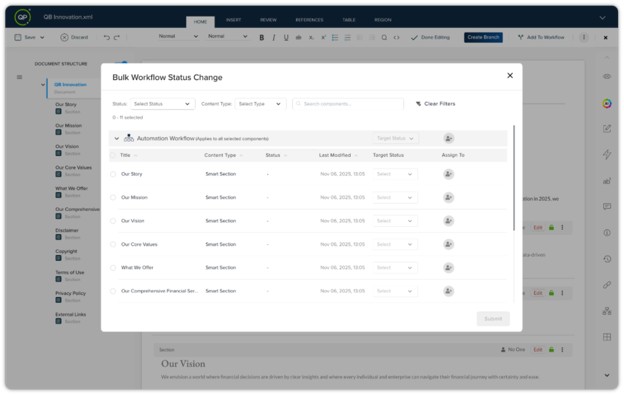
The Bulk Workflow Status Change dialog appears, displaying a comprehensive list of components, their content types, current statuses, and last modification dates.
-
Utilize the filter options to narrow down the list, allowing you to focus only on the desired workflow statuses and content types you wish to manage.
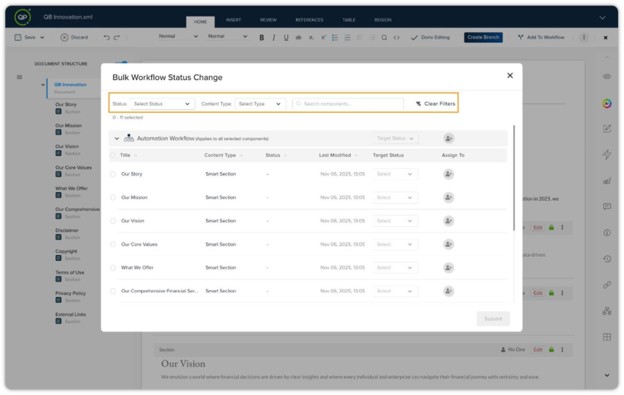
-
You can choose either individual components, a selection of components, or all components belonging to a specific workflow (or across all workflows) simultaneously for updating their statuses.
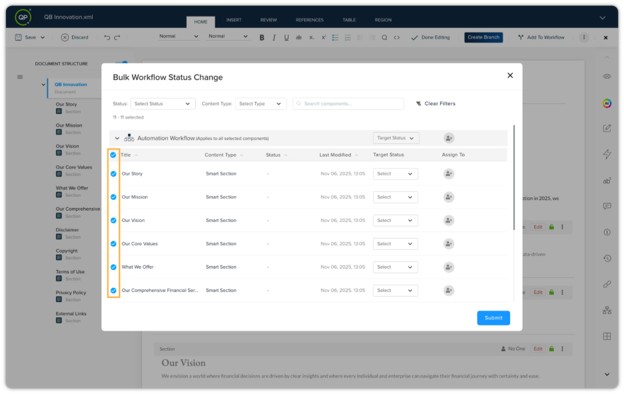
-
Once components are selected, you can choose to set the target status for those components based on different criteria: either for all components within a single workflow, across multiple workflows, or individually.
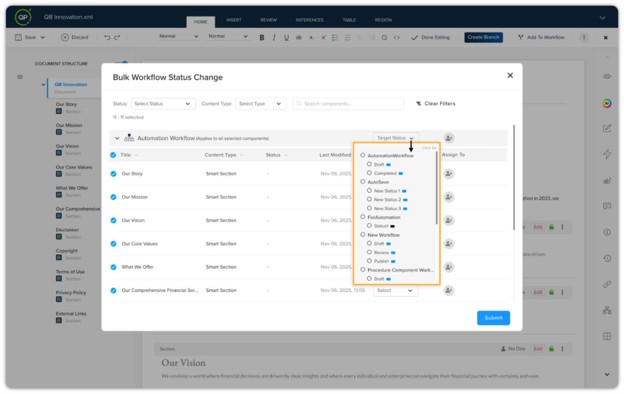
-
After setting the target status, you can assign specific users or user groups to those selected components, ensuring proper management and accountability.
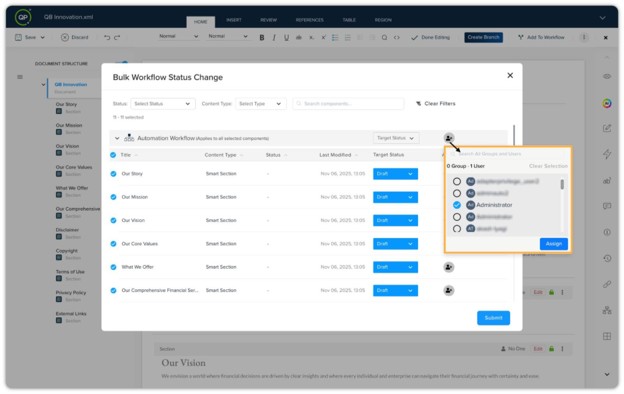
-
If you prefer not to set the status for all selected components at the global level for a specific workflow or across workflows, you can individually set the status for multiple components one at a time and assign them to desired users or user groups.
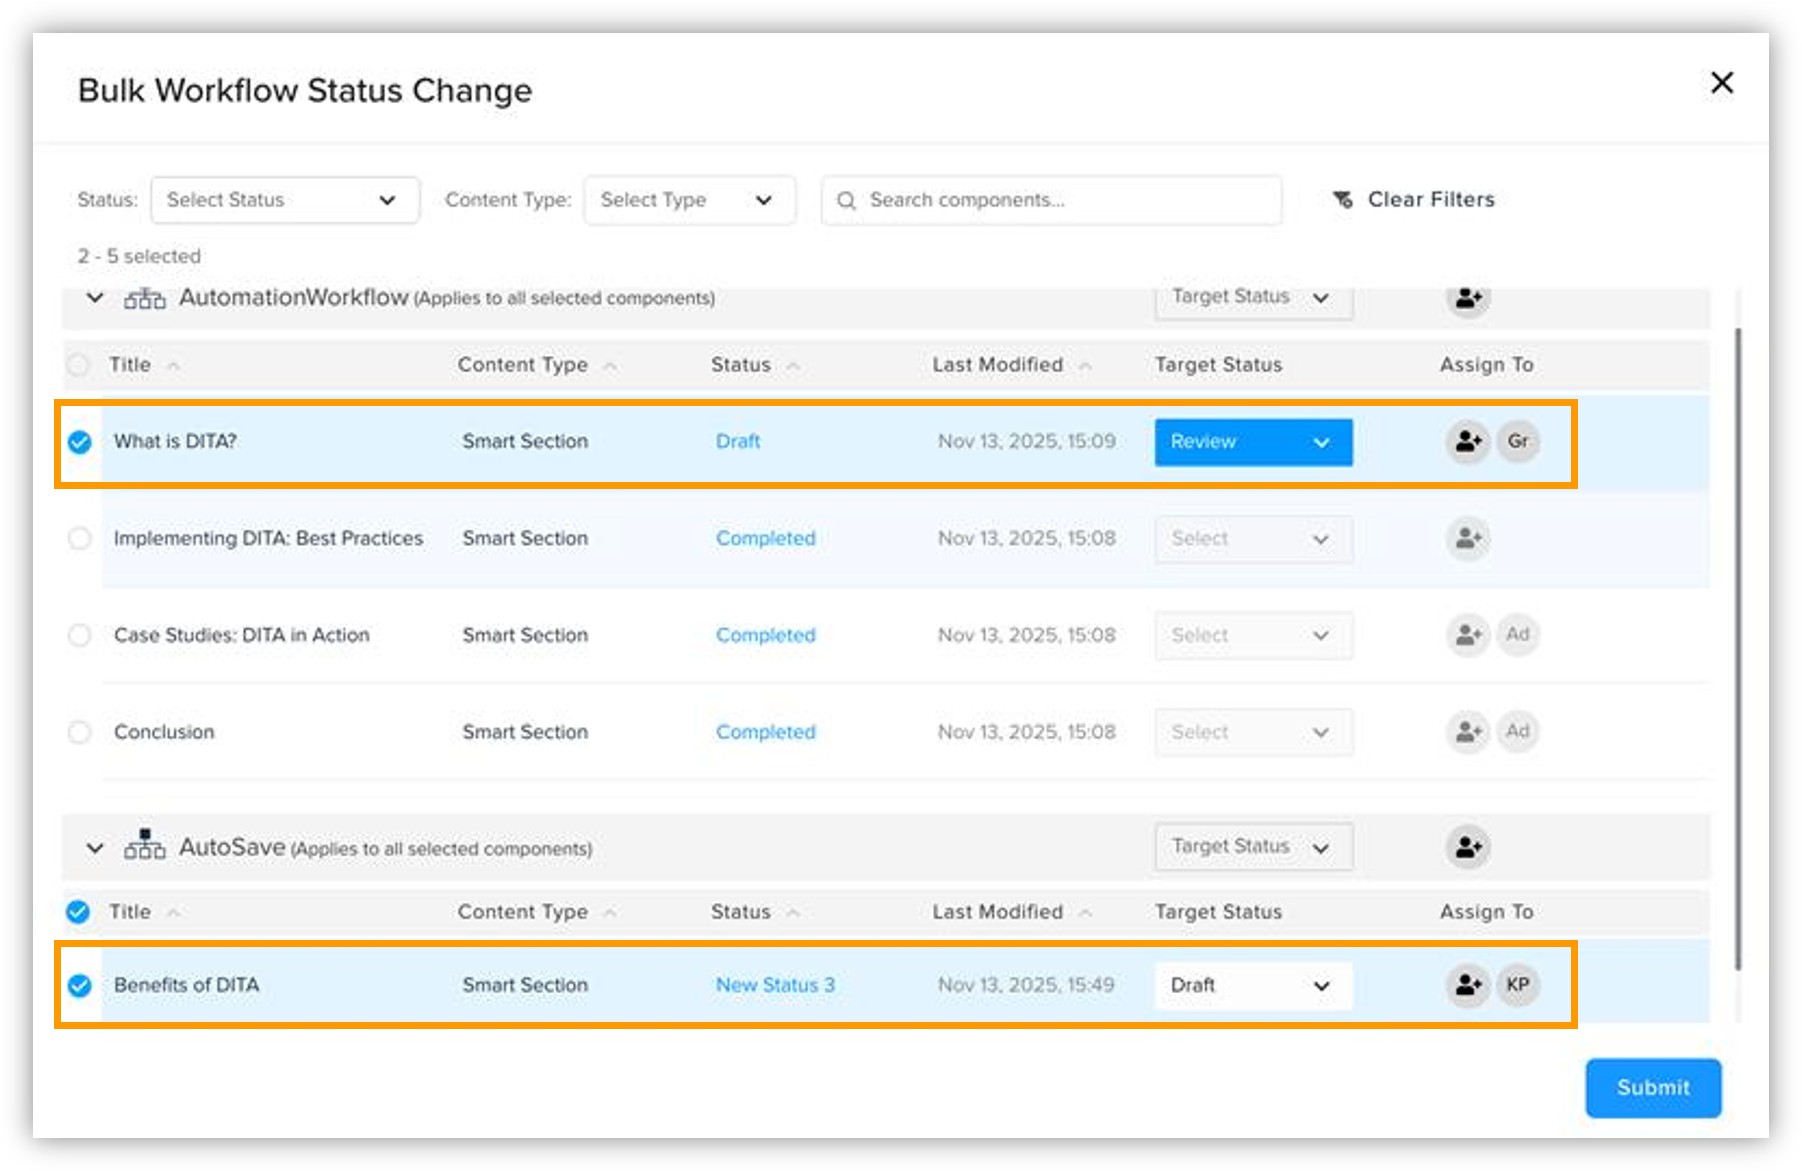
-
Once all selections are made, click Submit, which opens a confirmation dialog to finalize the changes.
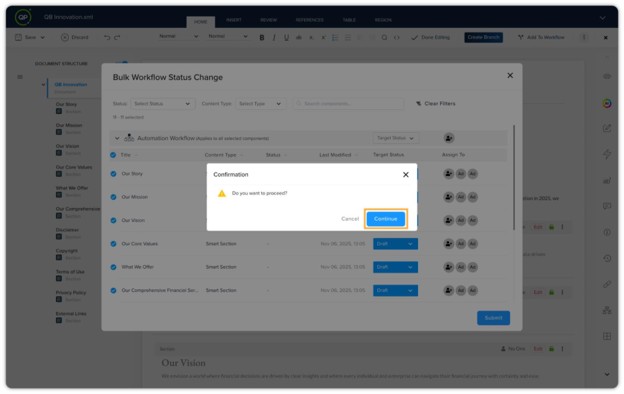
-
The processing will start, and it typically completes within seconds.
-
Upon successful completion of the process, a message will appear on the screen, confirming that the changes have been applied.
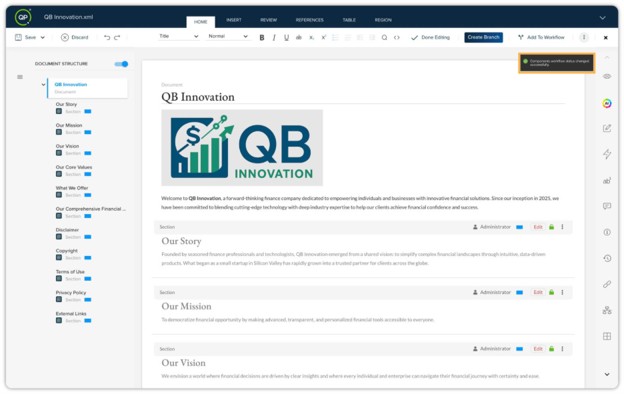
-
The workflow status or status change has been successfully applied to the selected components, along with their assigned users.
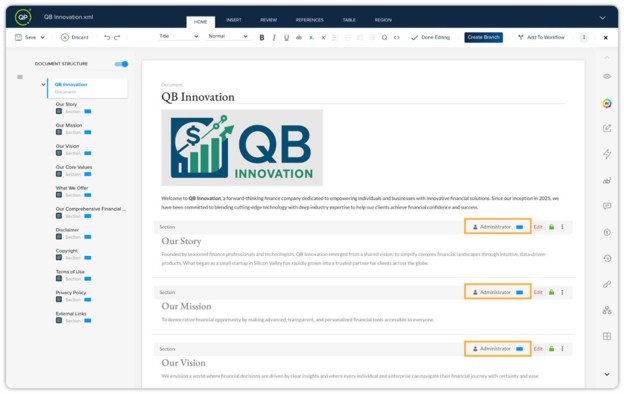
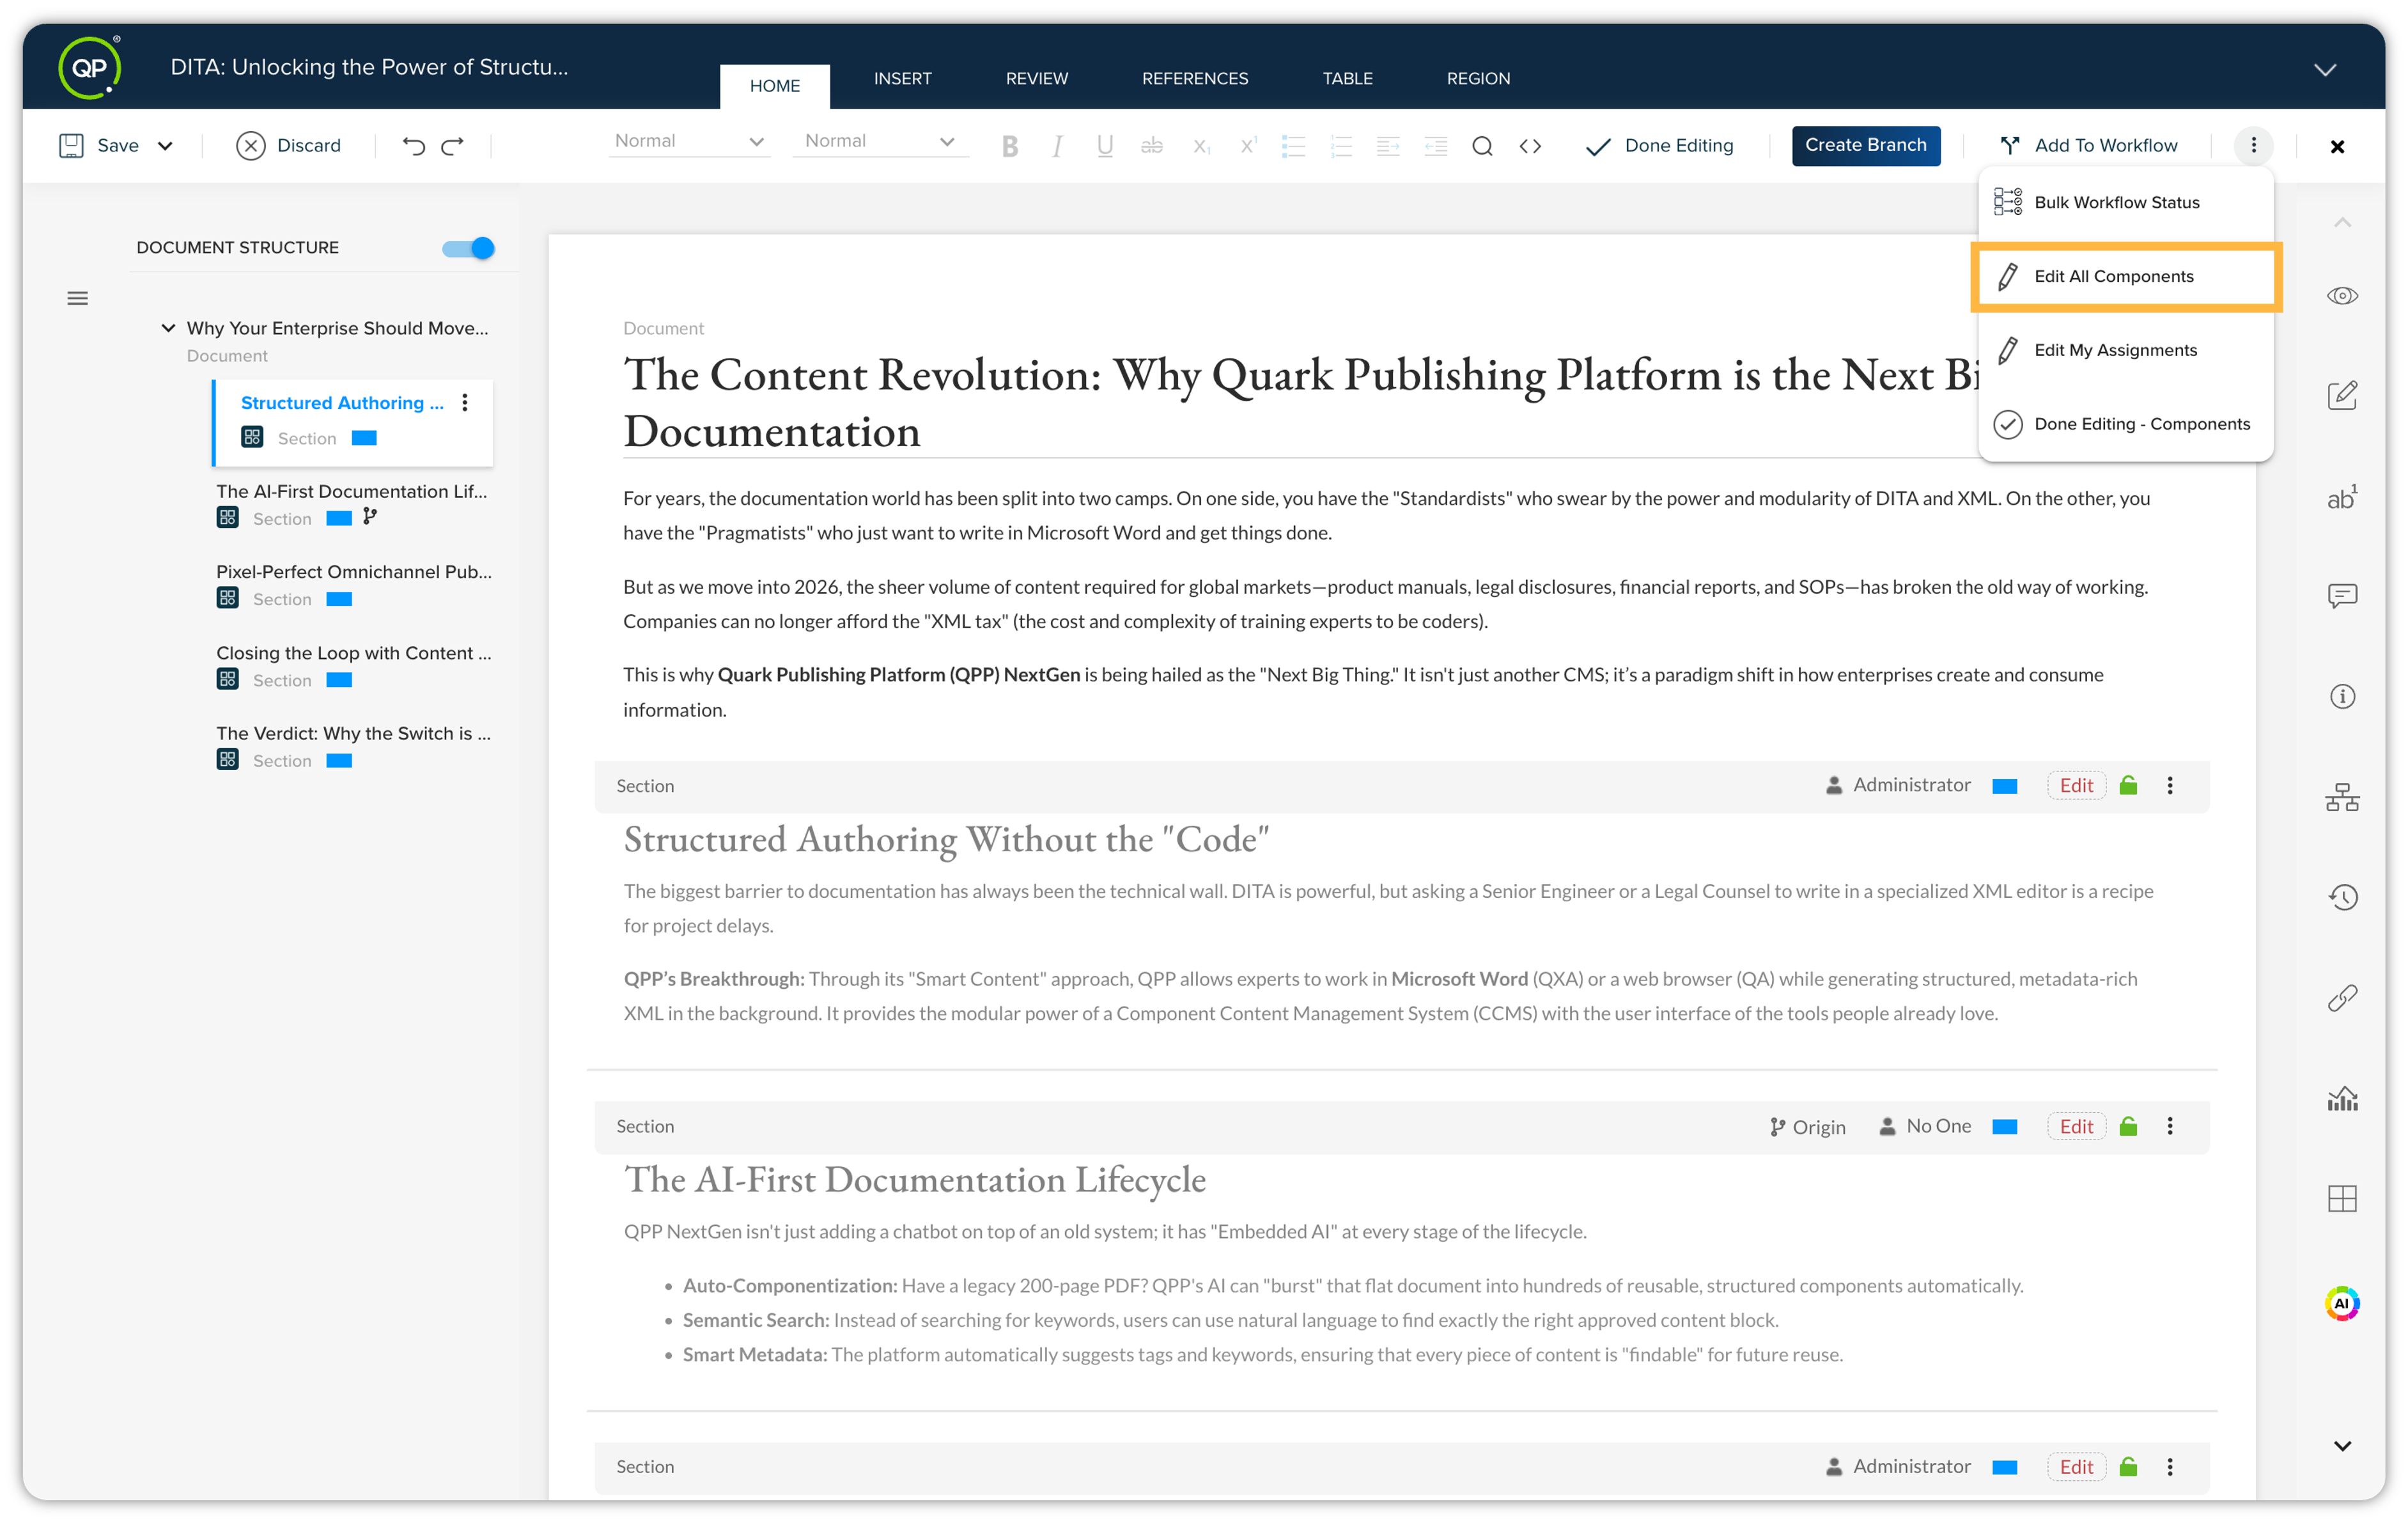
Edit All Components
You can instantly check out all available components within the document with just one click. This option automatically identifies and opens every editable, unlocked component, providing you with comprehensive access to the entire document without needing to select items individually.
-
Click the kebab menu icon and then click Edit All Components.
-
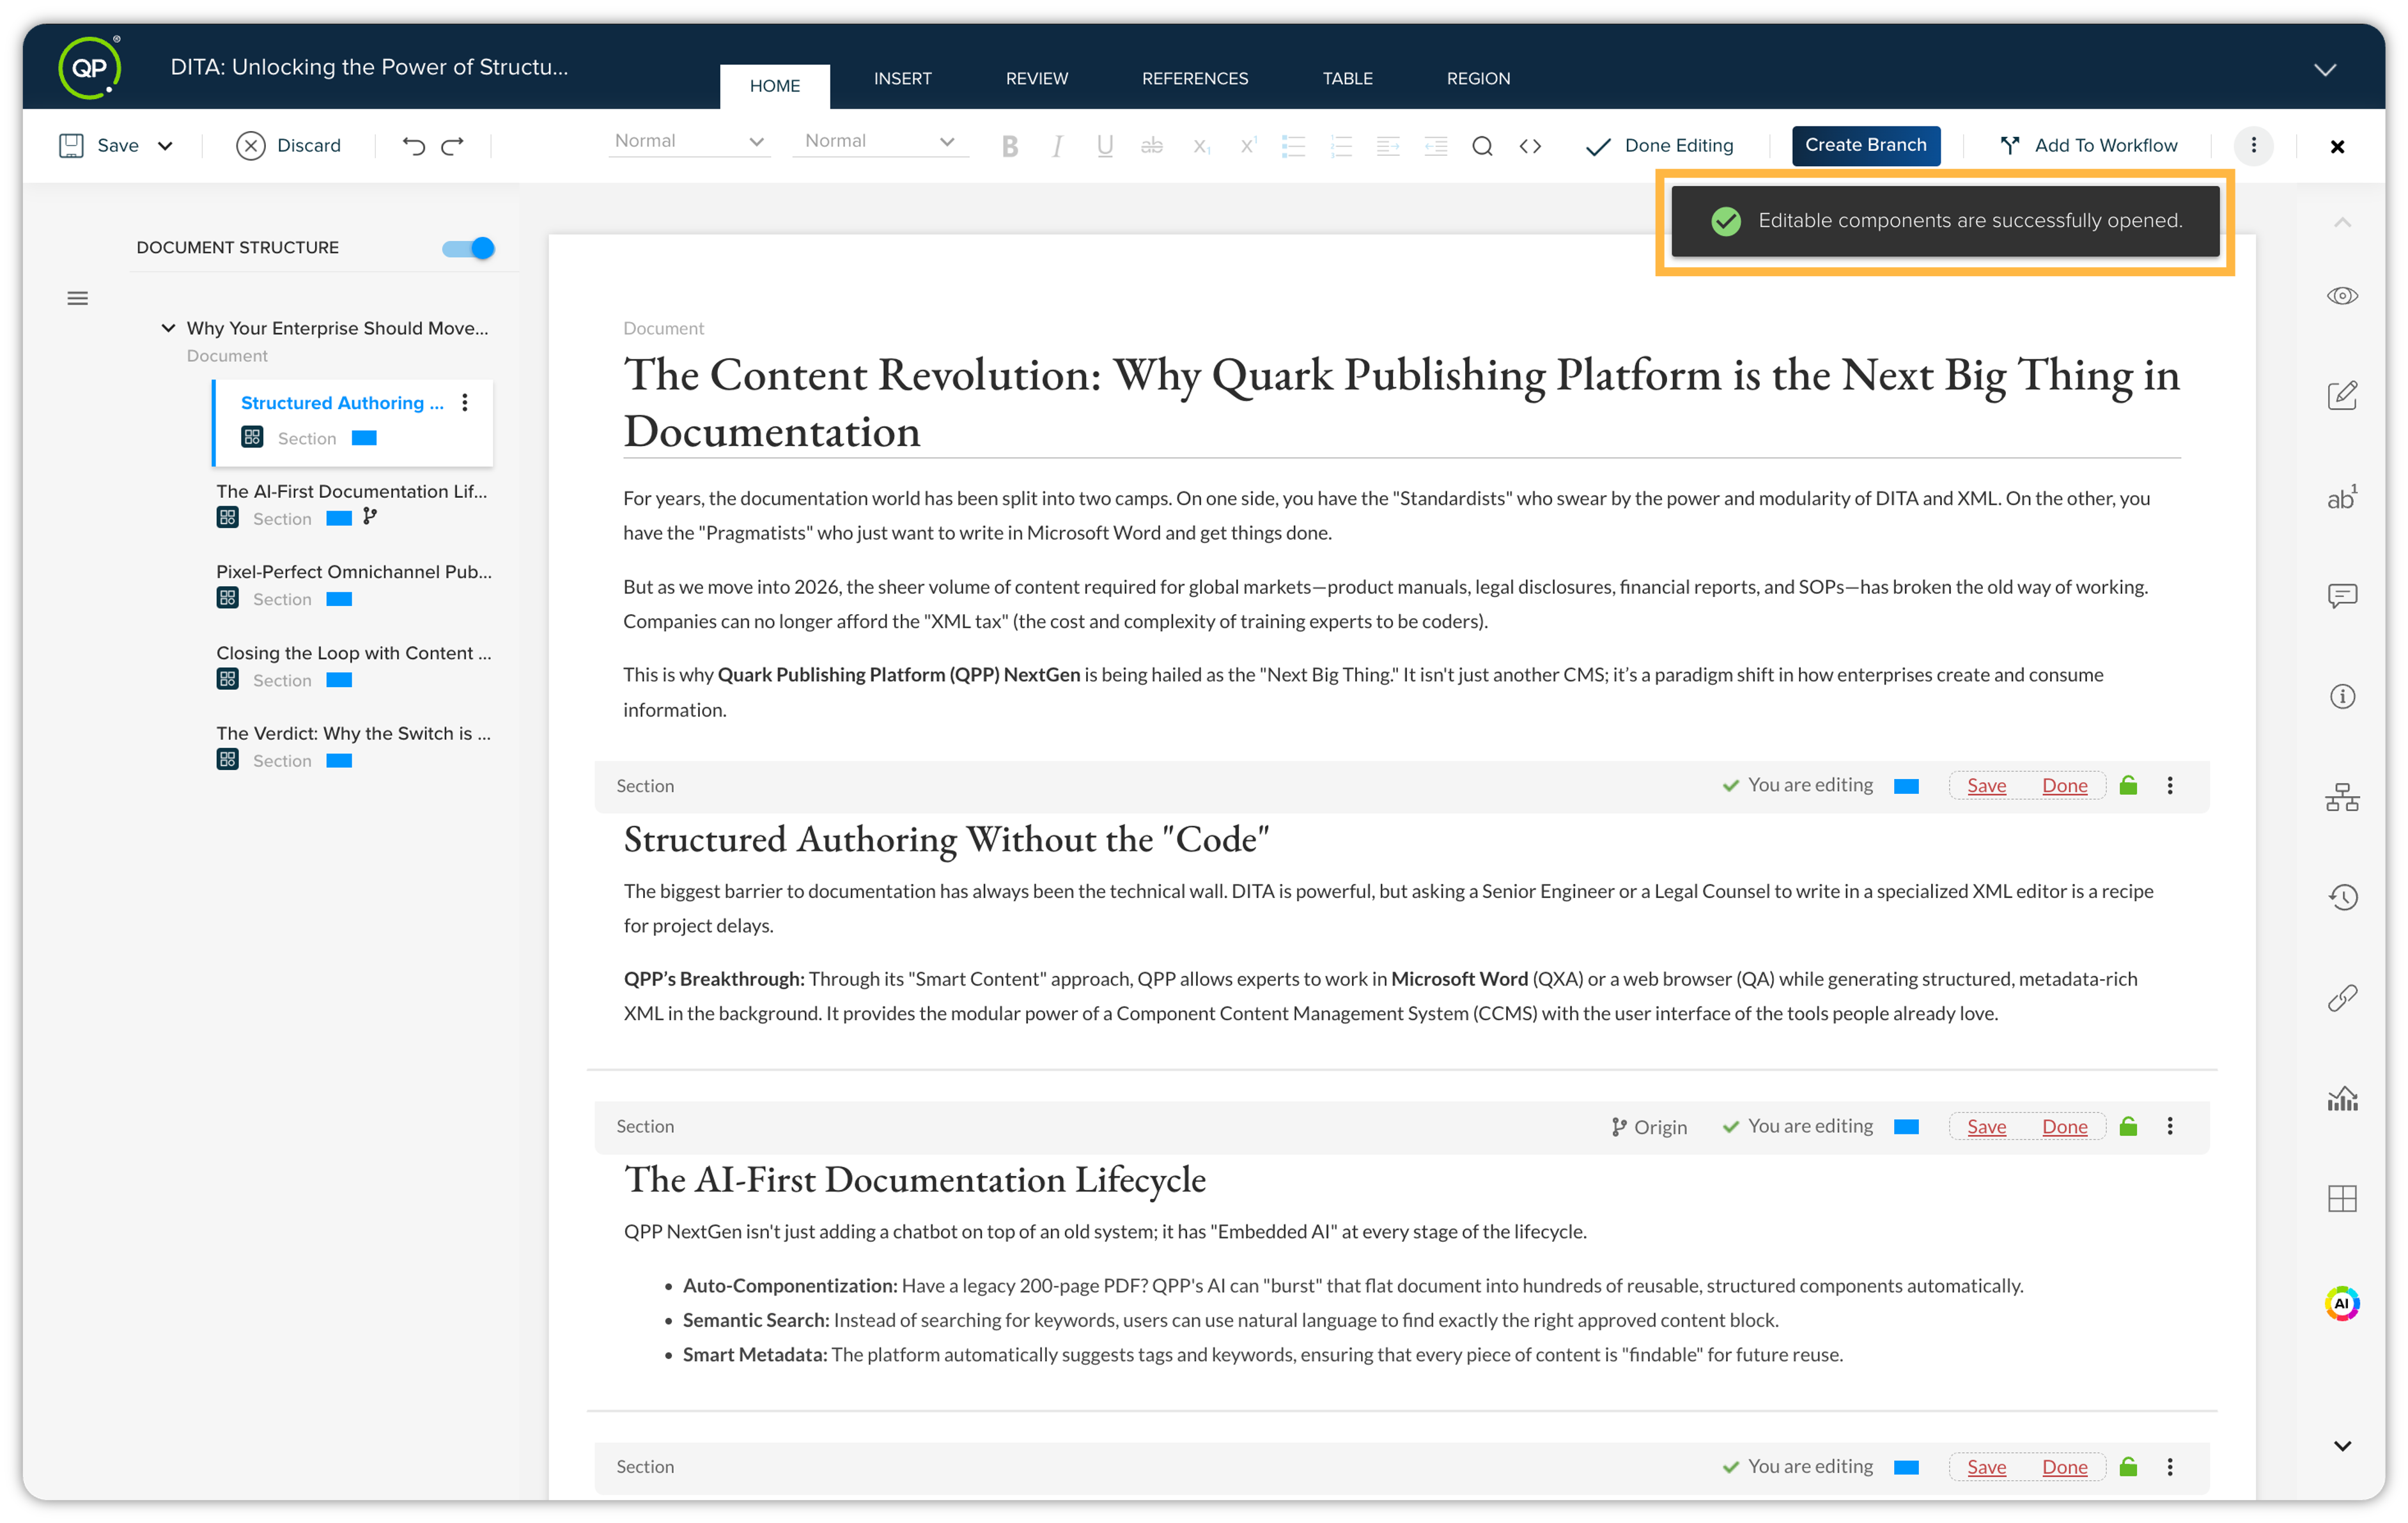
All the components within this document have been successfully checked out and are ready to edit.
Edit My Assignments
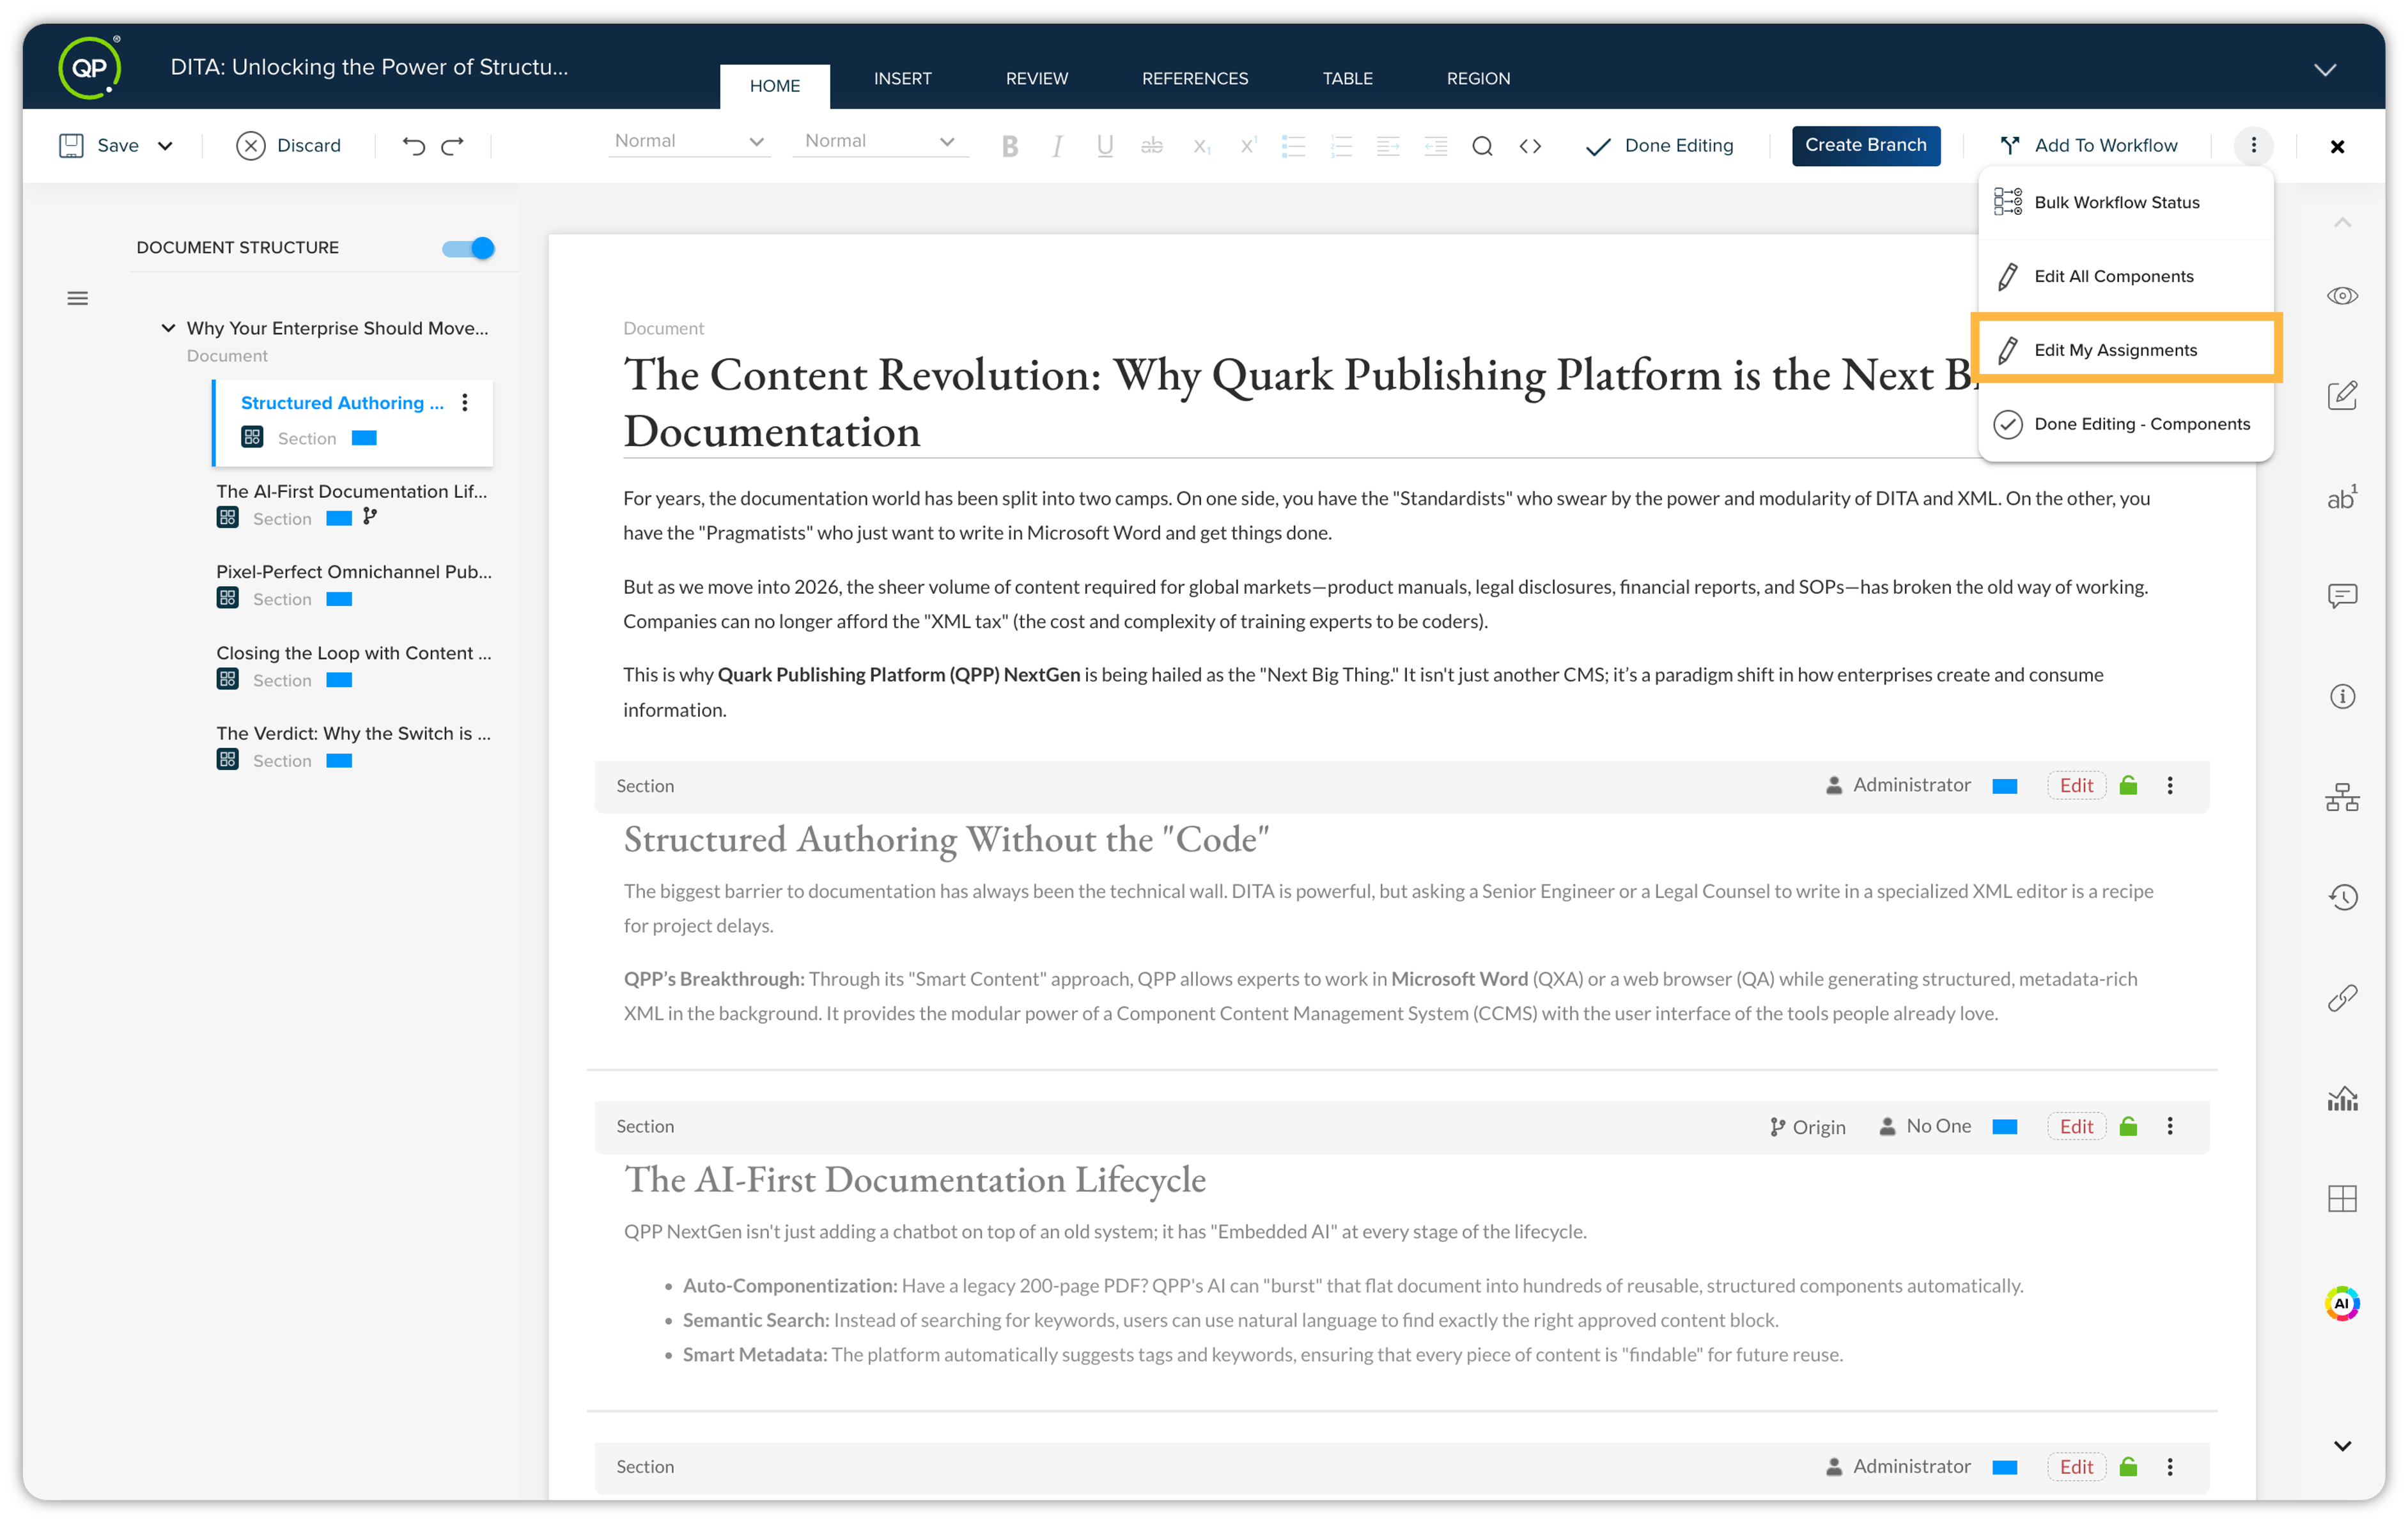
You can instantly check out all components assigned to you with just one click, allowing you to focus more on content creation without the hassle of manual edits on the individual components assigned to you.
-
Click the kebab menu icon and then click Edit My Assignments.
-
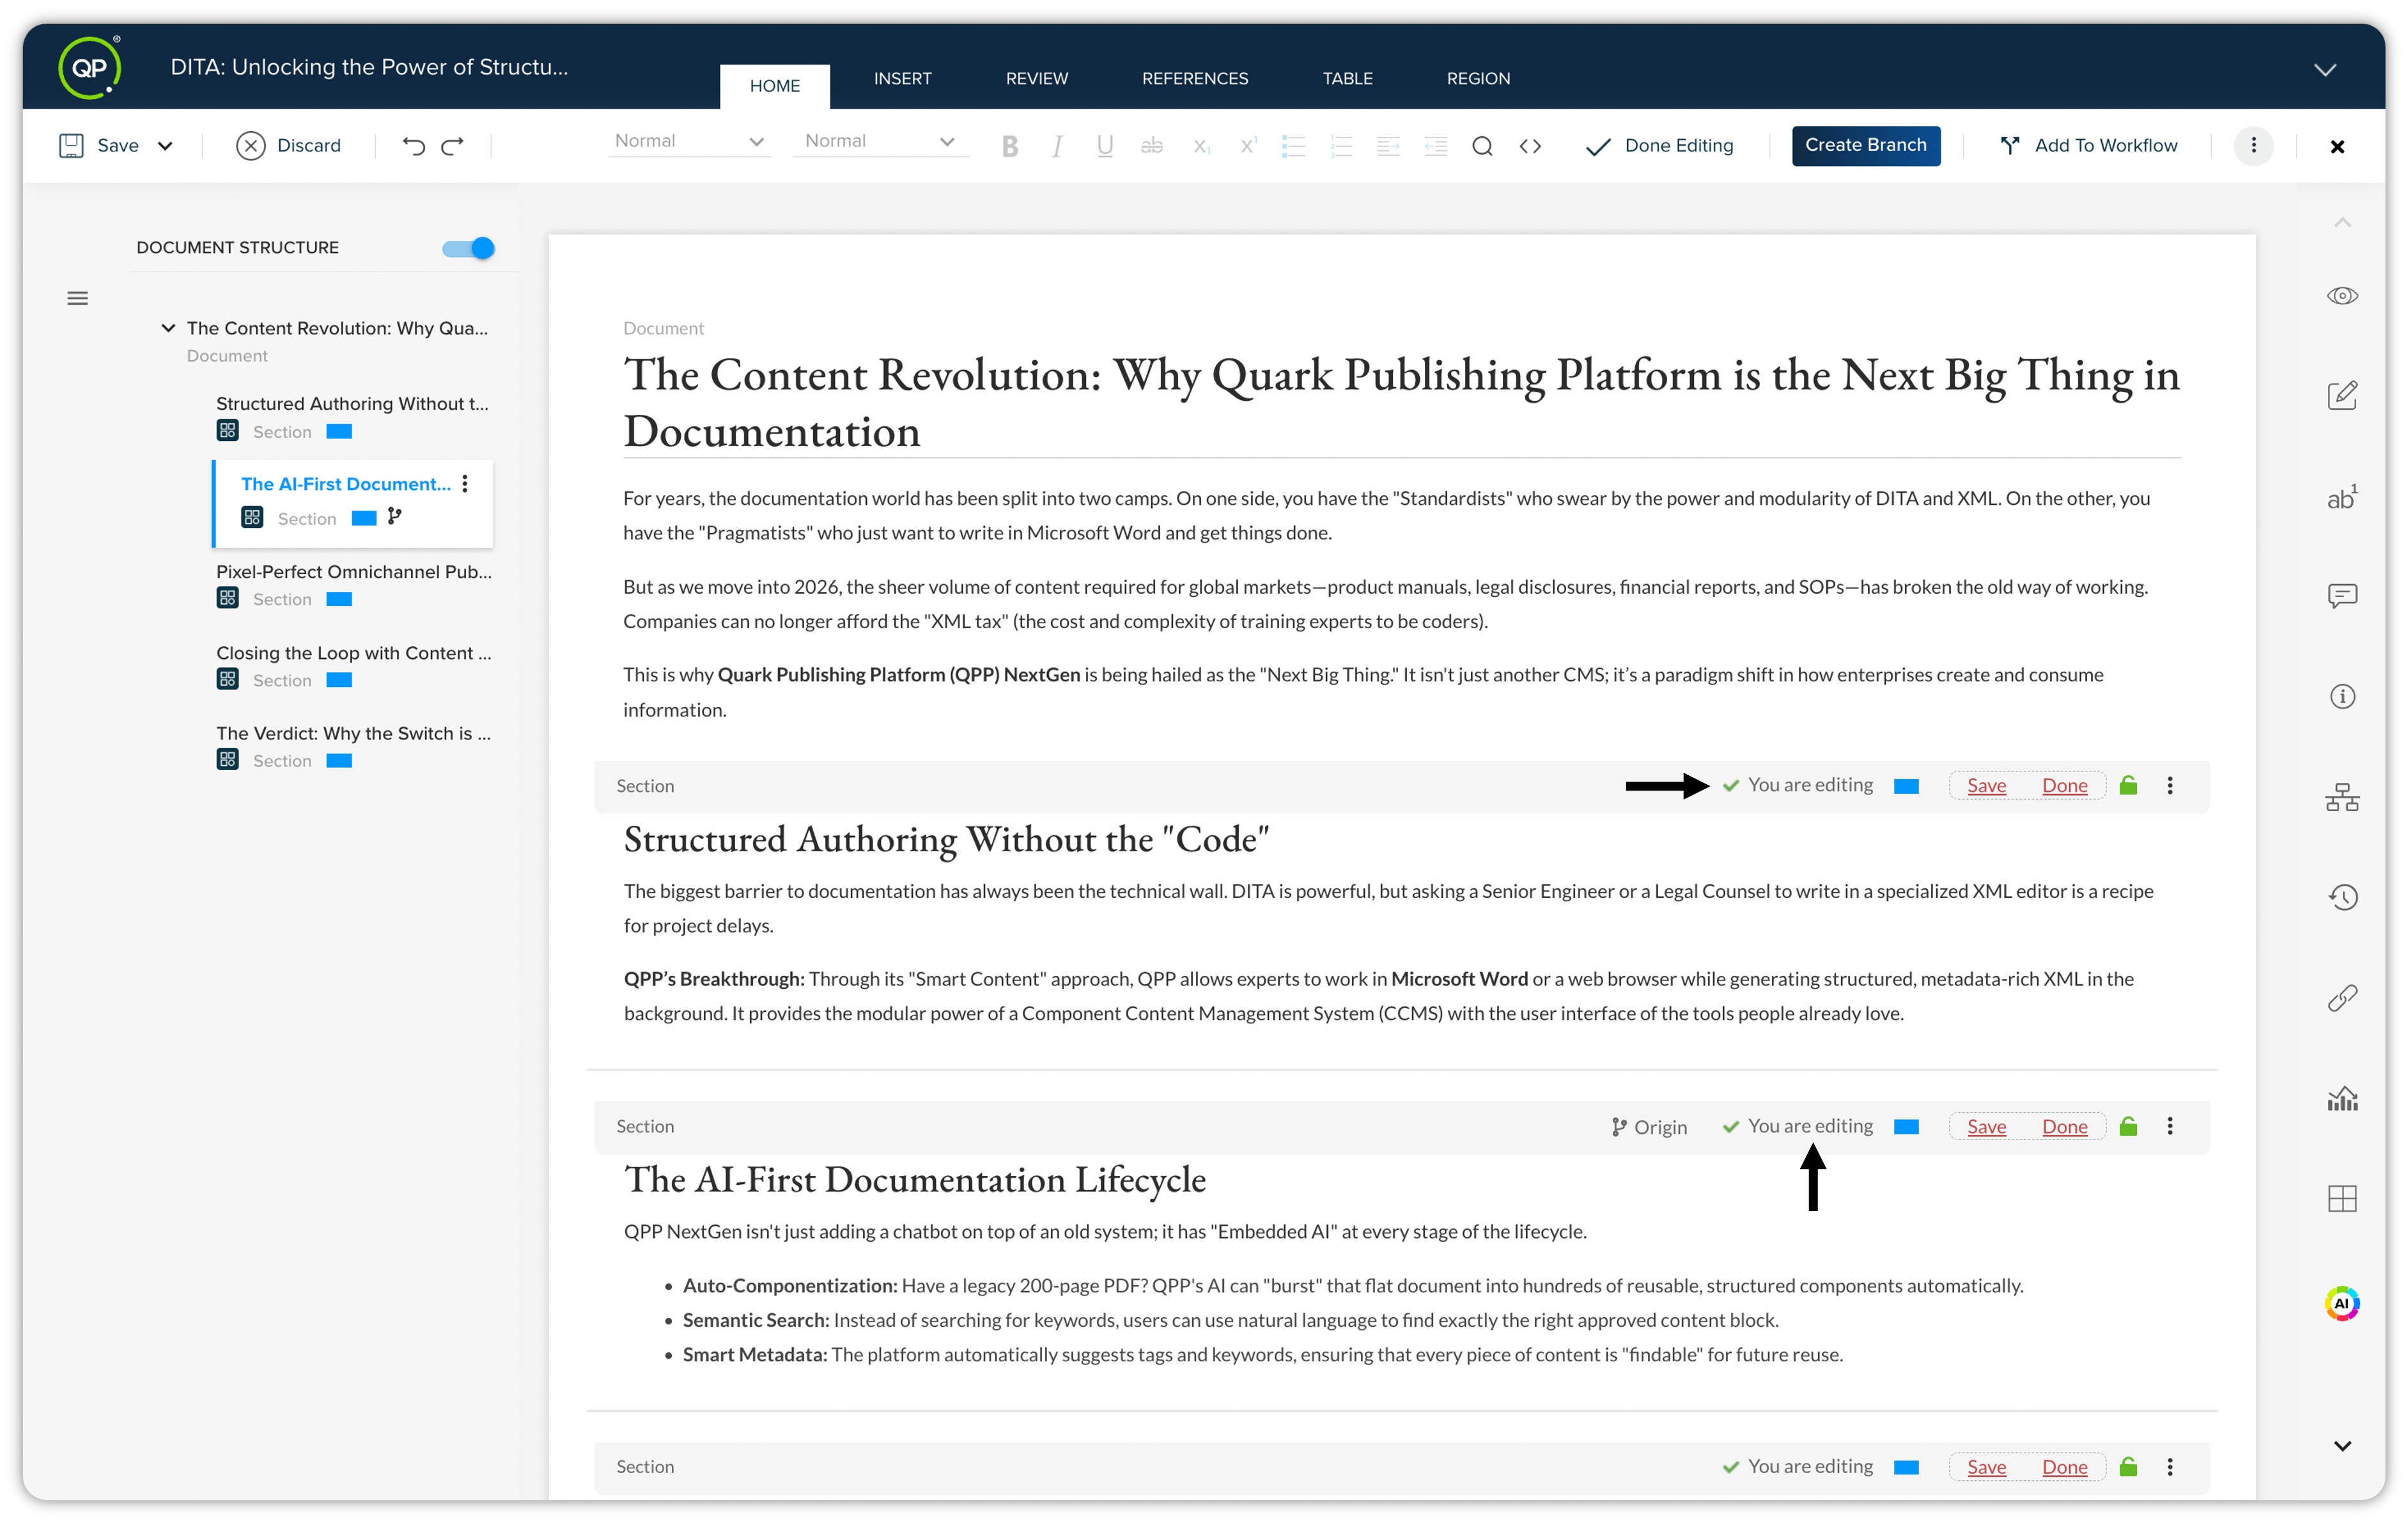
All the components assigned to you within this document have been successfully checked out and are ready to edit.
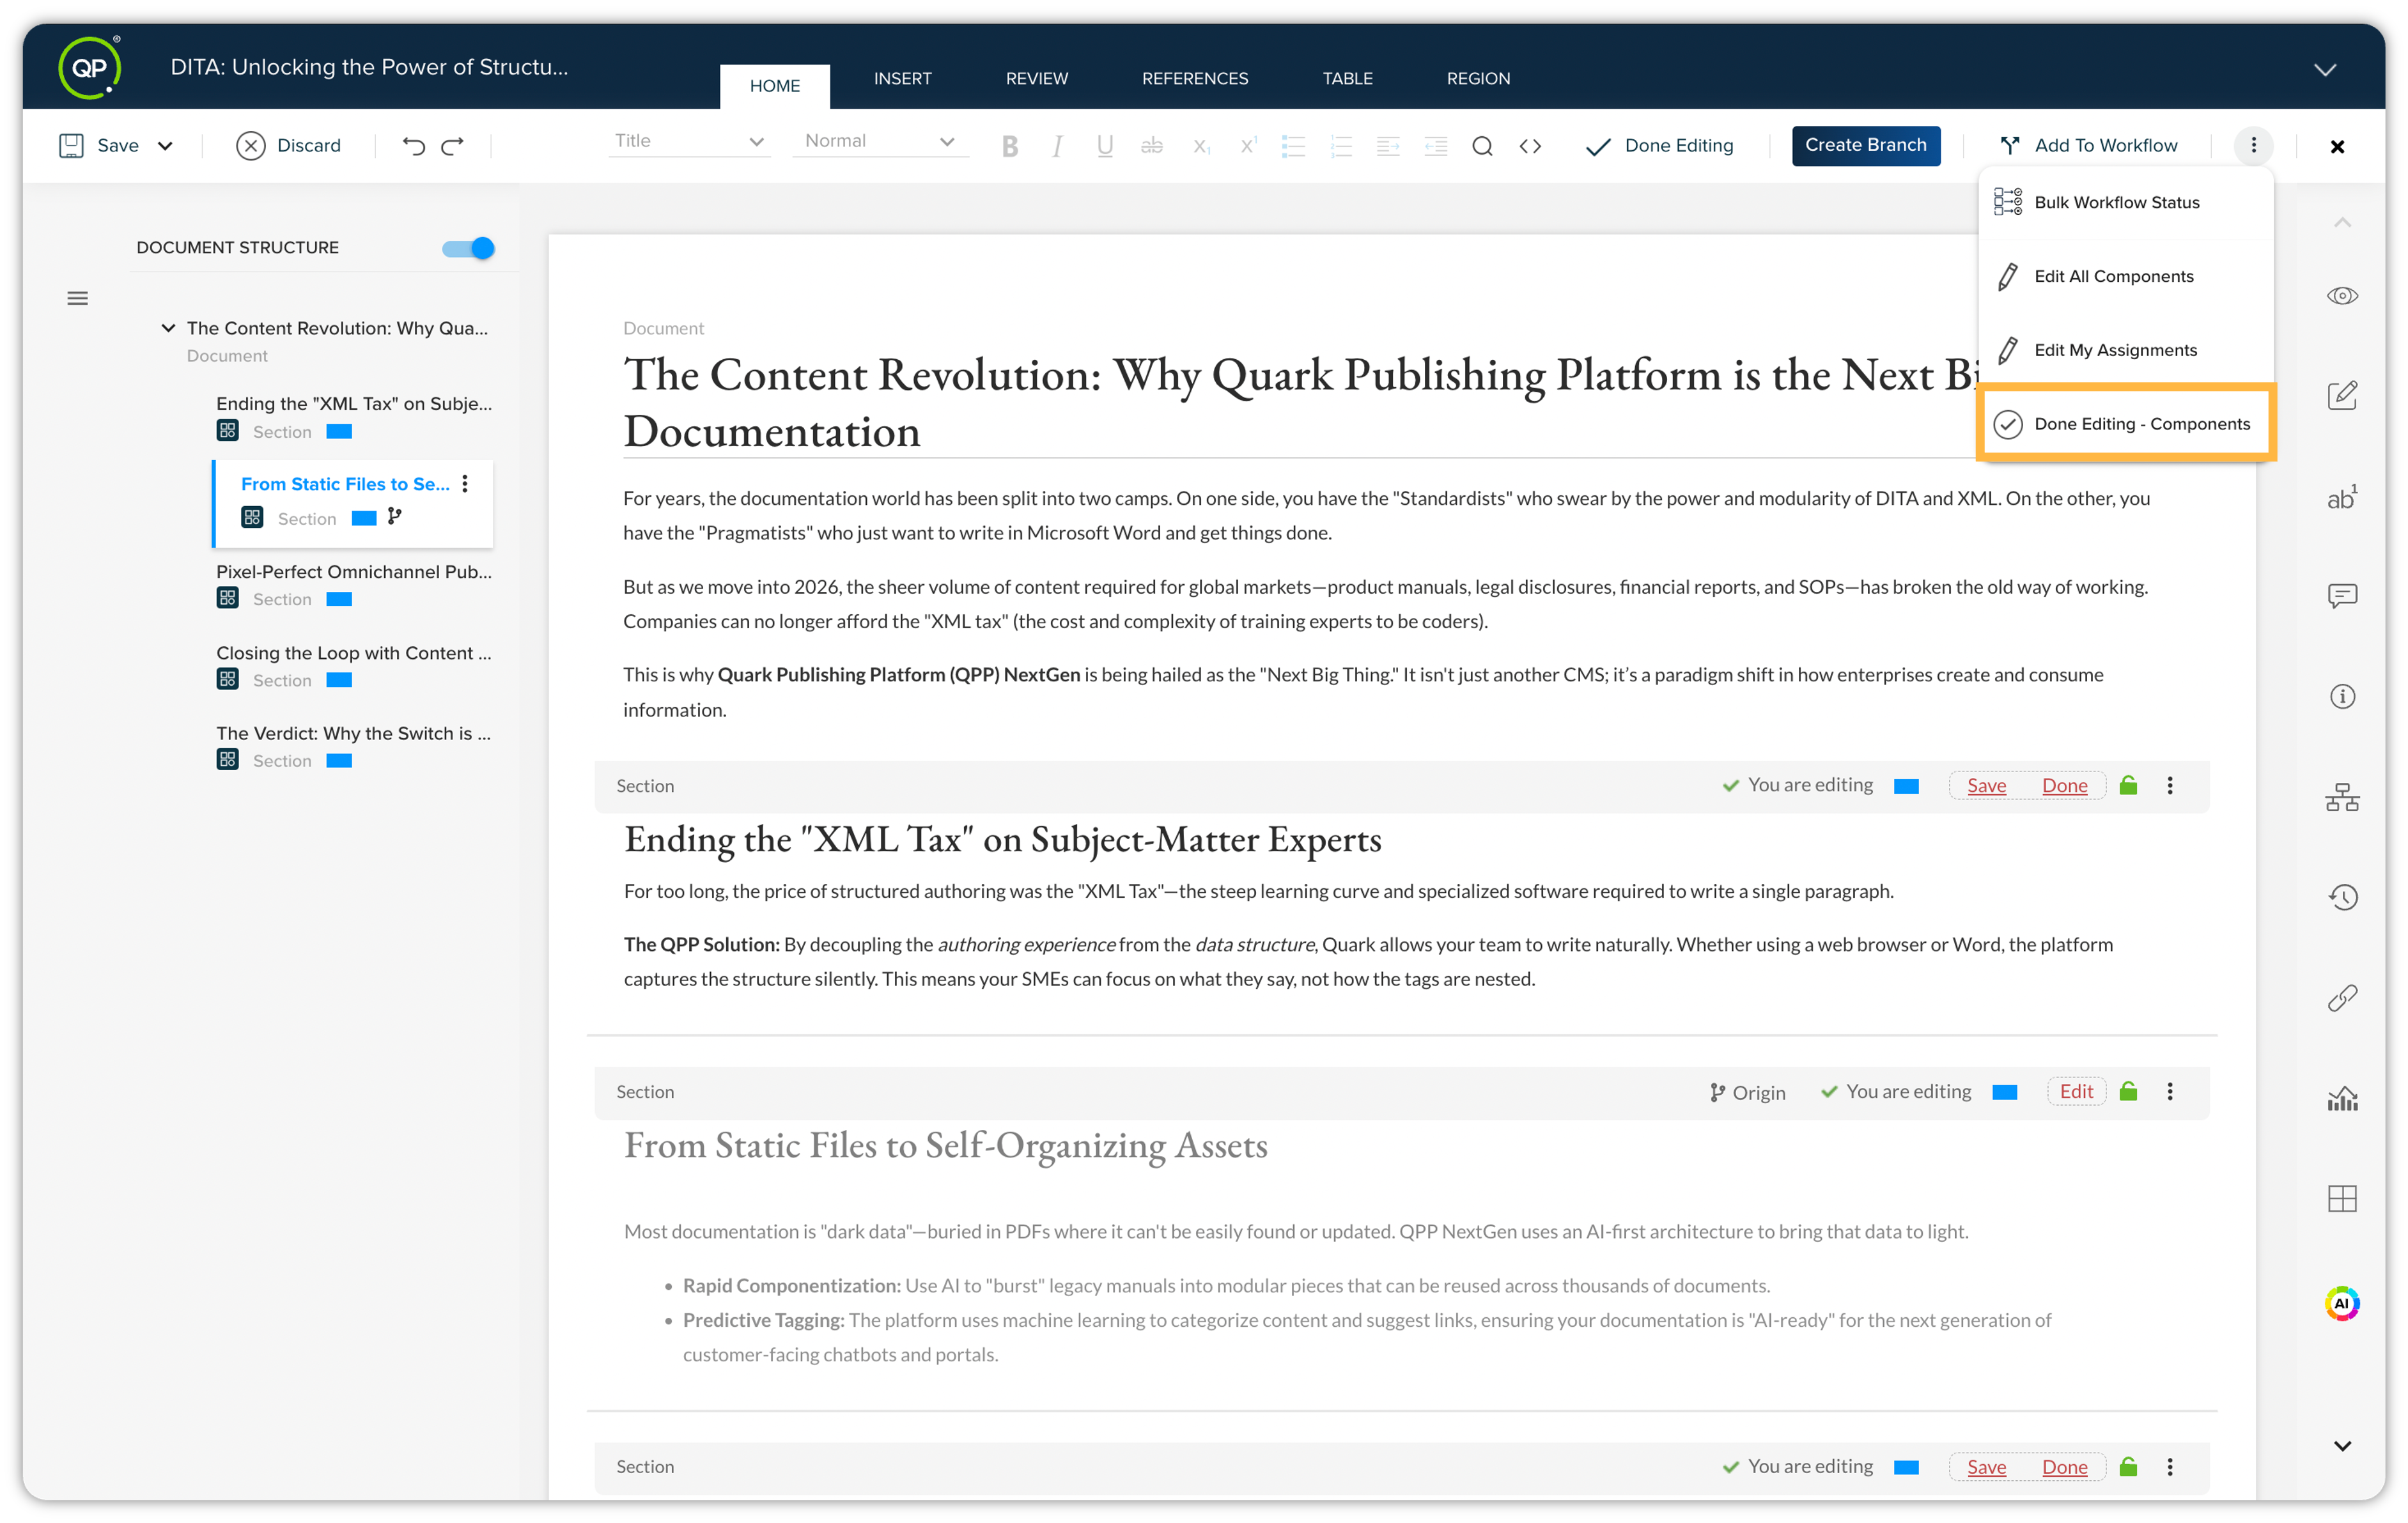
Done Editing — Components
You can instantly finalize your work and check in all active components with just one click. Regardless of how you initiated your session, this option saves your progress and closes all components you currently have open, ensuring your changes are synced and the files are released for others.
-
Ensure you have completed all changes to the components you currently have checked out.
-
Go to the kebab menu and click Done Editing - Components option.
-
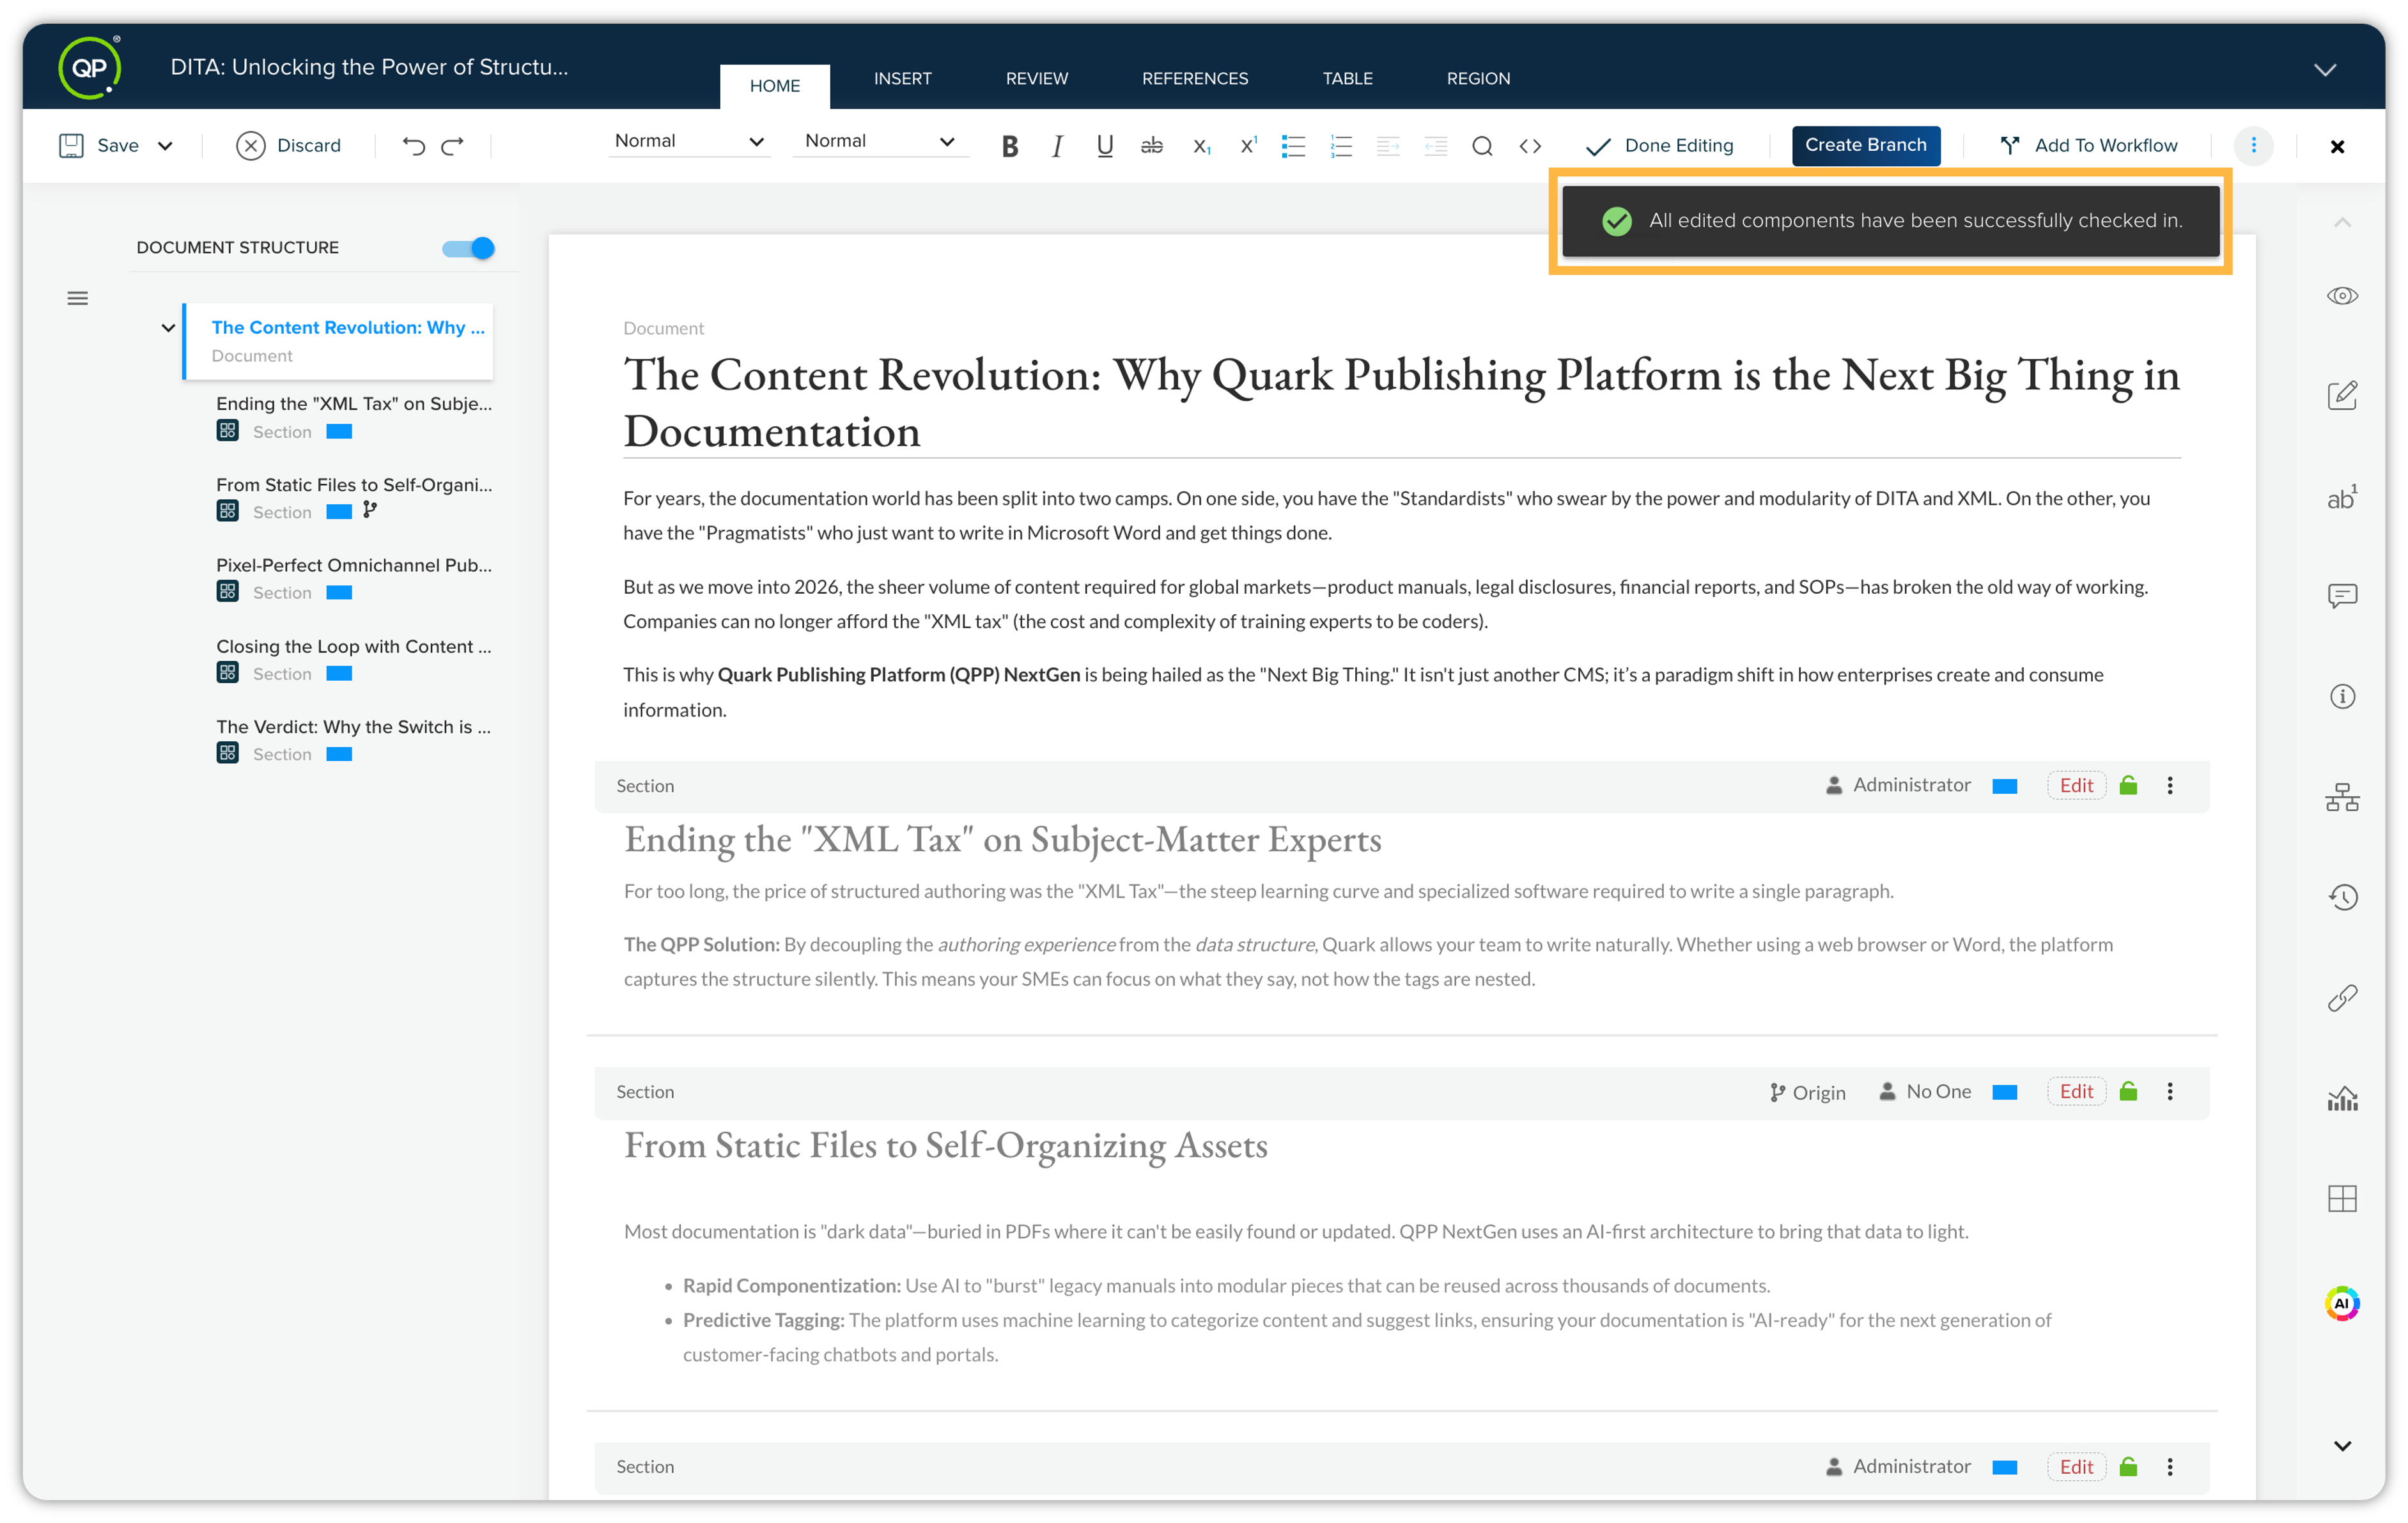
QPP will process the batch action in just a few seconds and display a success message once all components are successfully checked in and returned to the workflow.
Canvas View Properties
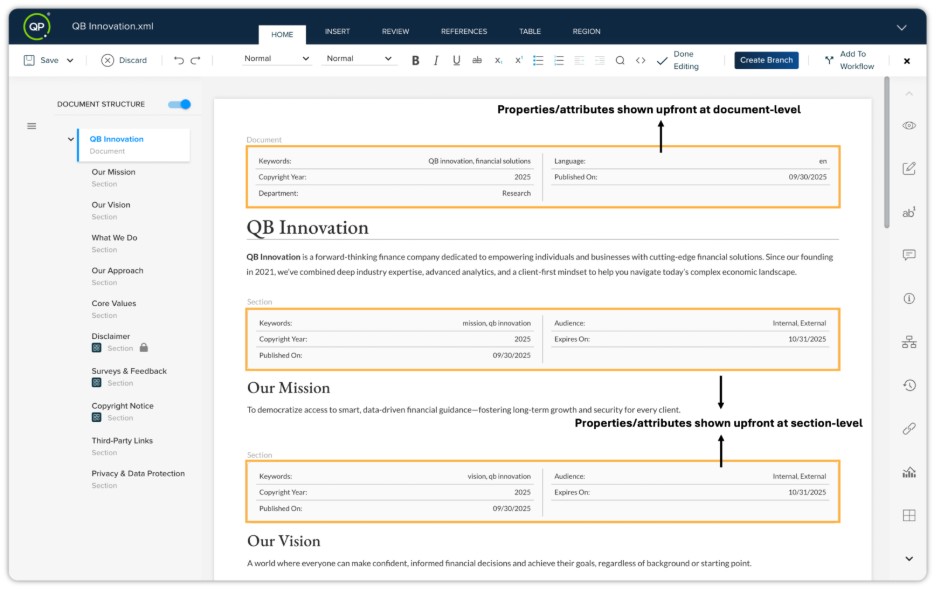
Whatever properties you have enabled for the Canvas View in Manage Section Properties, they will appear upfront in the editor canvas of Quark Author. These properties will remain visible as you create or edit content, letting you view key data immediately.
To change Canvas View visibility
-
Go to the Manage Section Properties tab at any time to update your Canvas View settings.
-
Check or uncheck the Canvas View box for properties as needed. Your changes take effect immediately.
Why use Canvas View?
-
Increases efficiency: See important metadata without extra navigation
-
Improves accuracy: Make better decisions with relevant info in context
-
Customizes your workflow: Tailor your editing environment based on the needs of your content type/model
Save a Document
When you click the button Create on the asset properties page, QPP opens the selected template in a Web Content Editor. After you make your edits, you can save your asset through the following process:
-
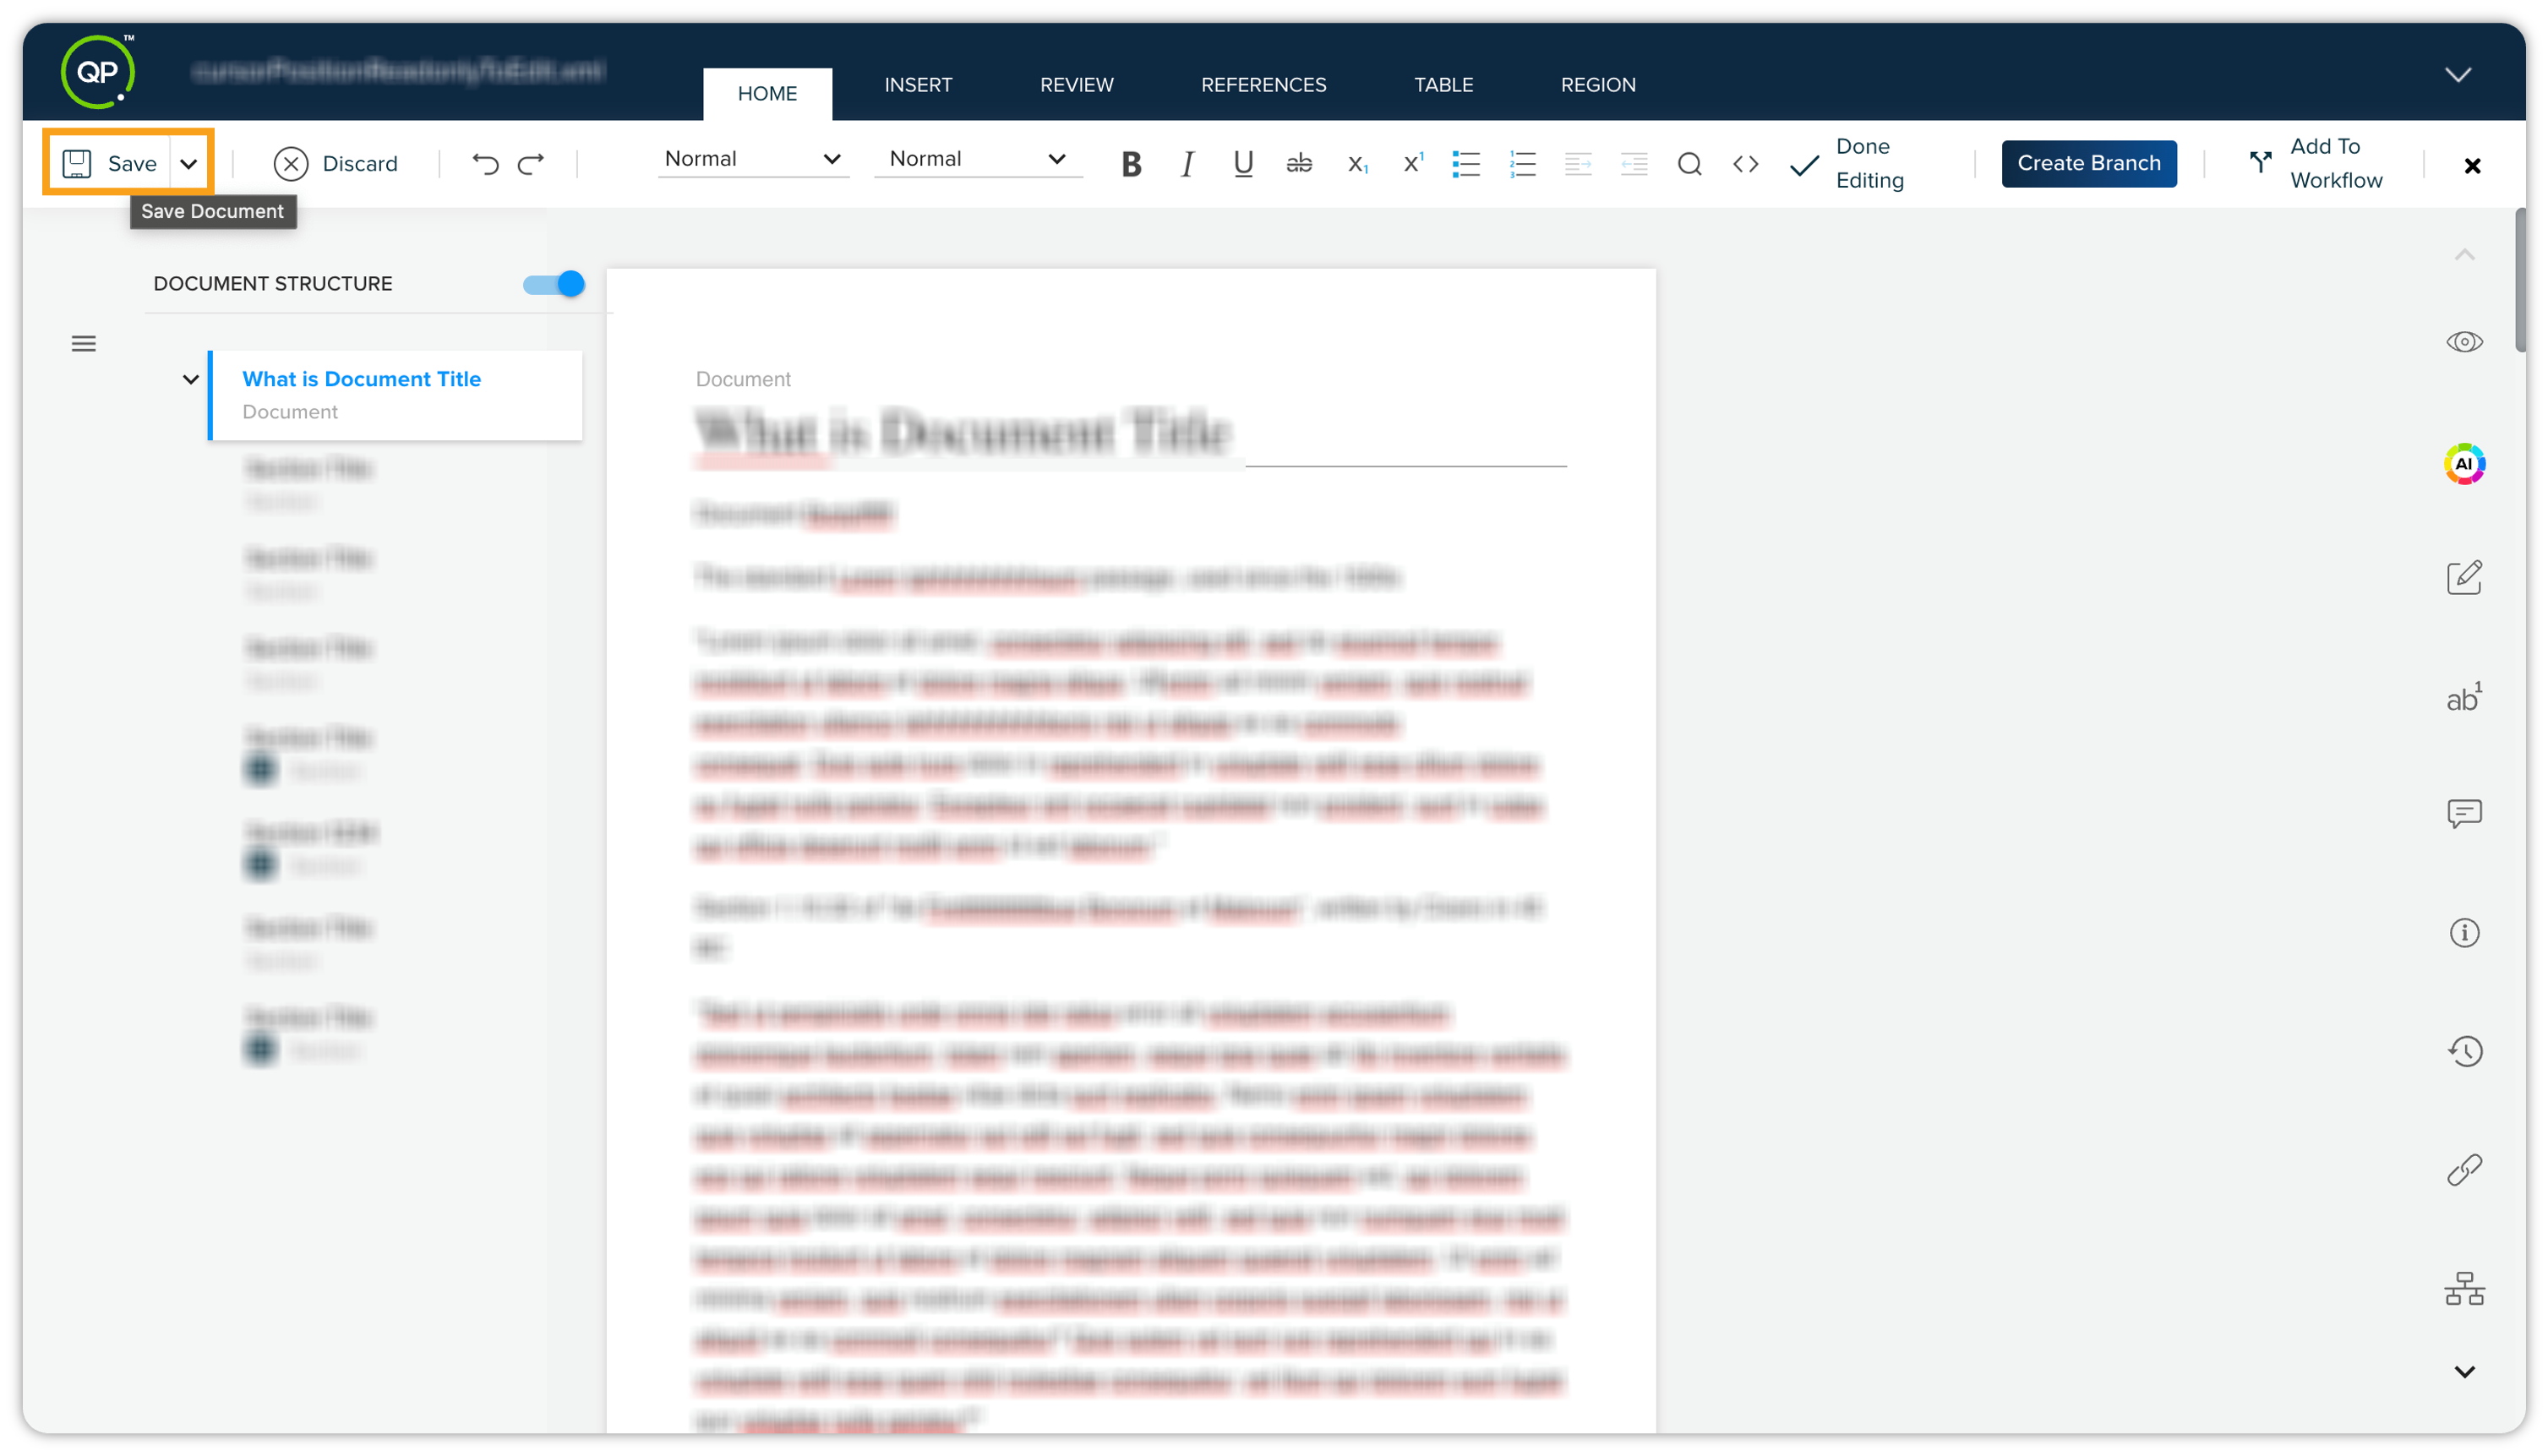
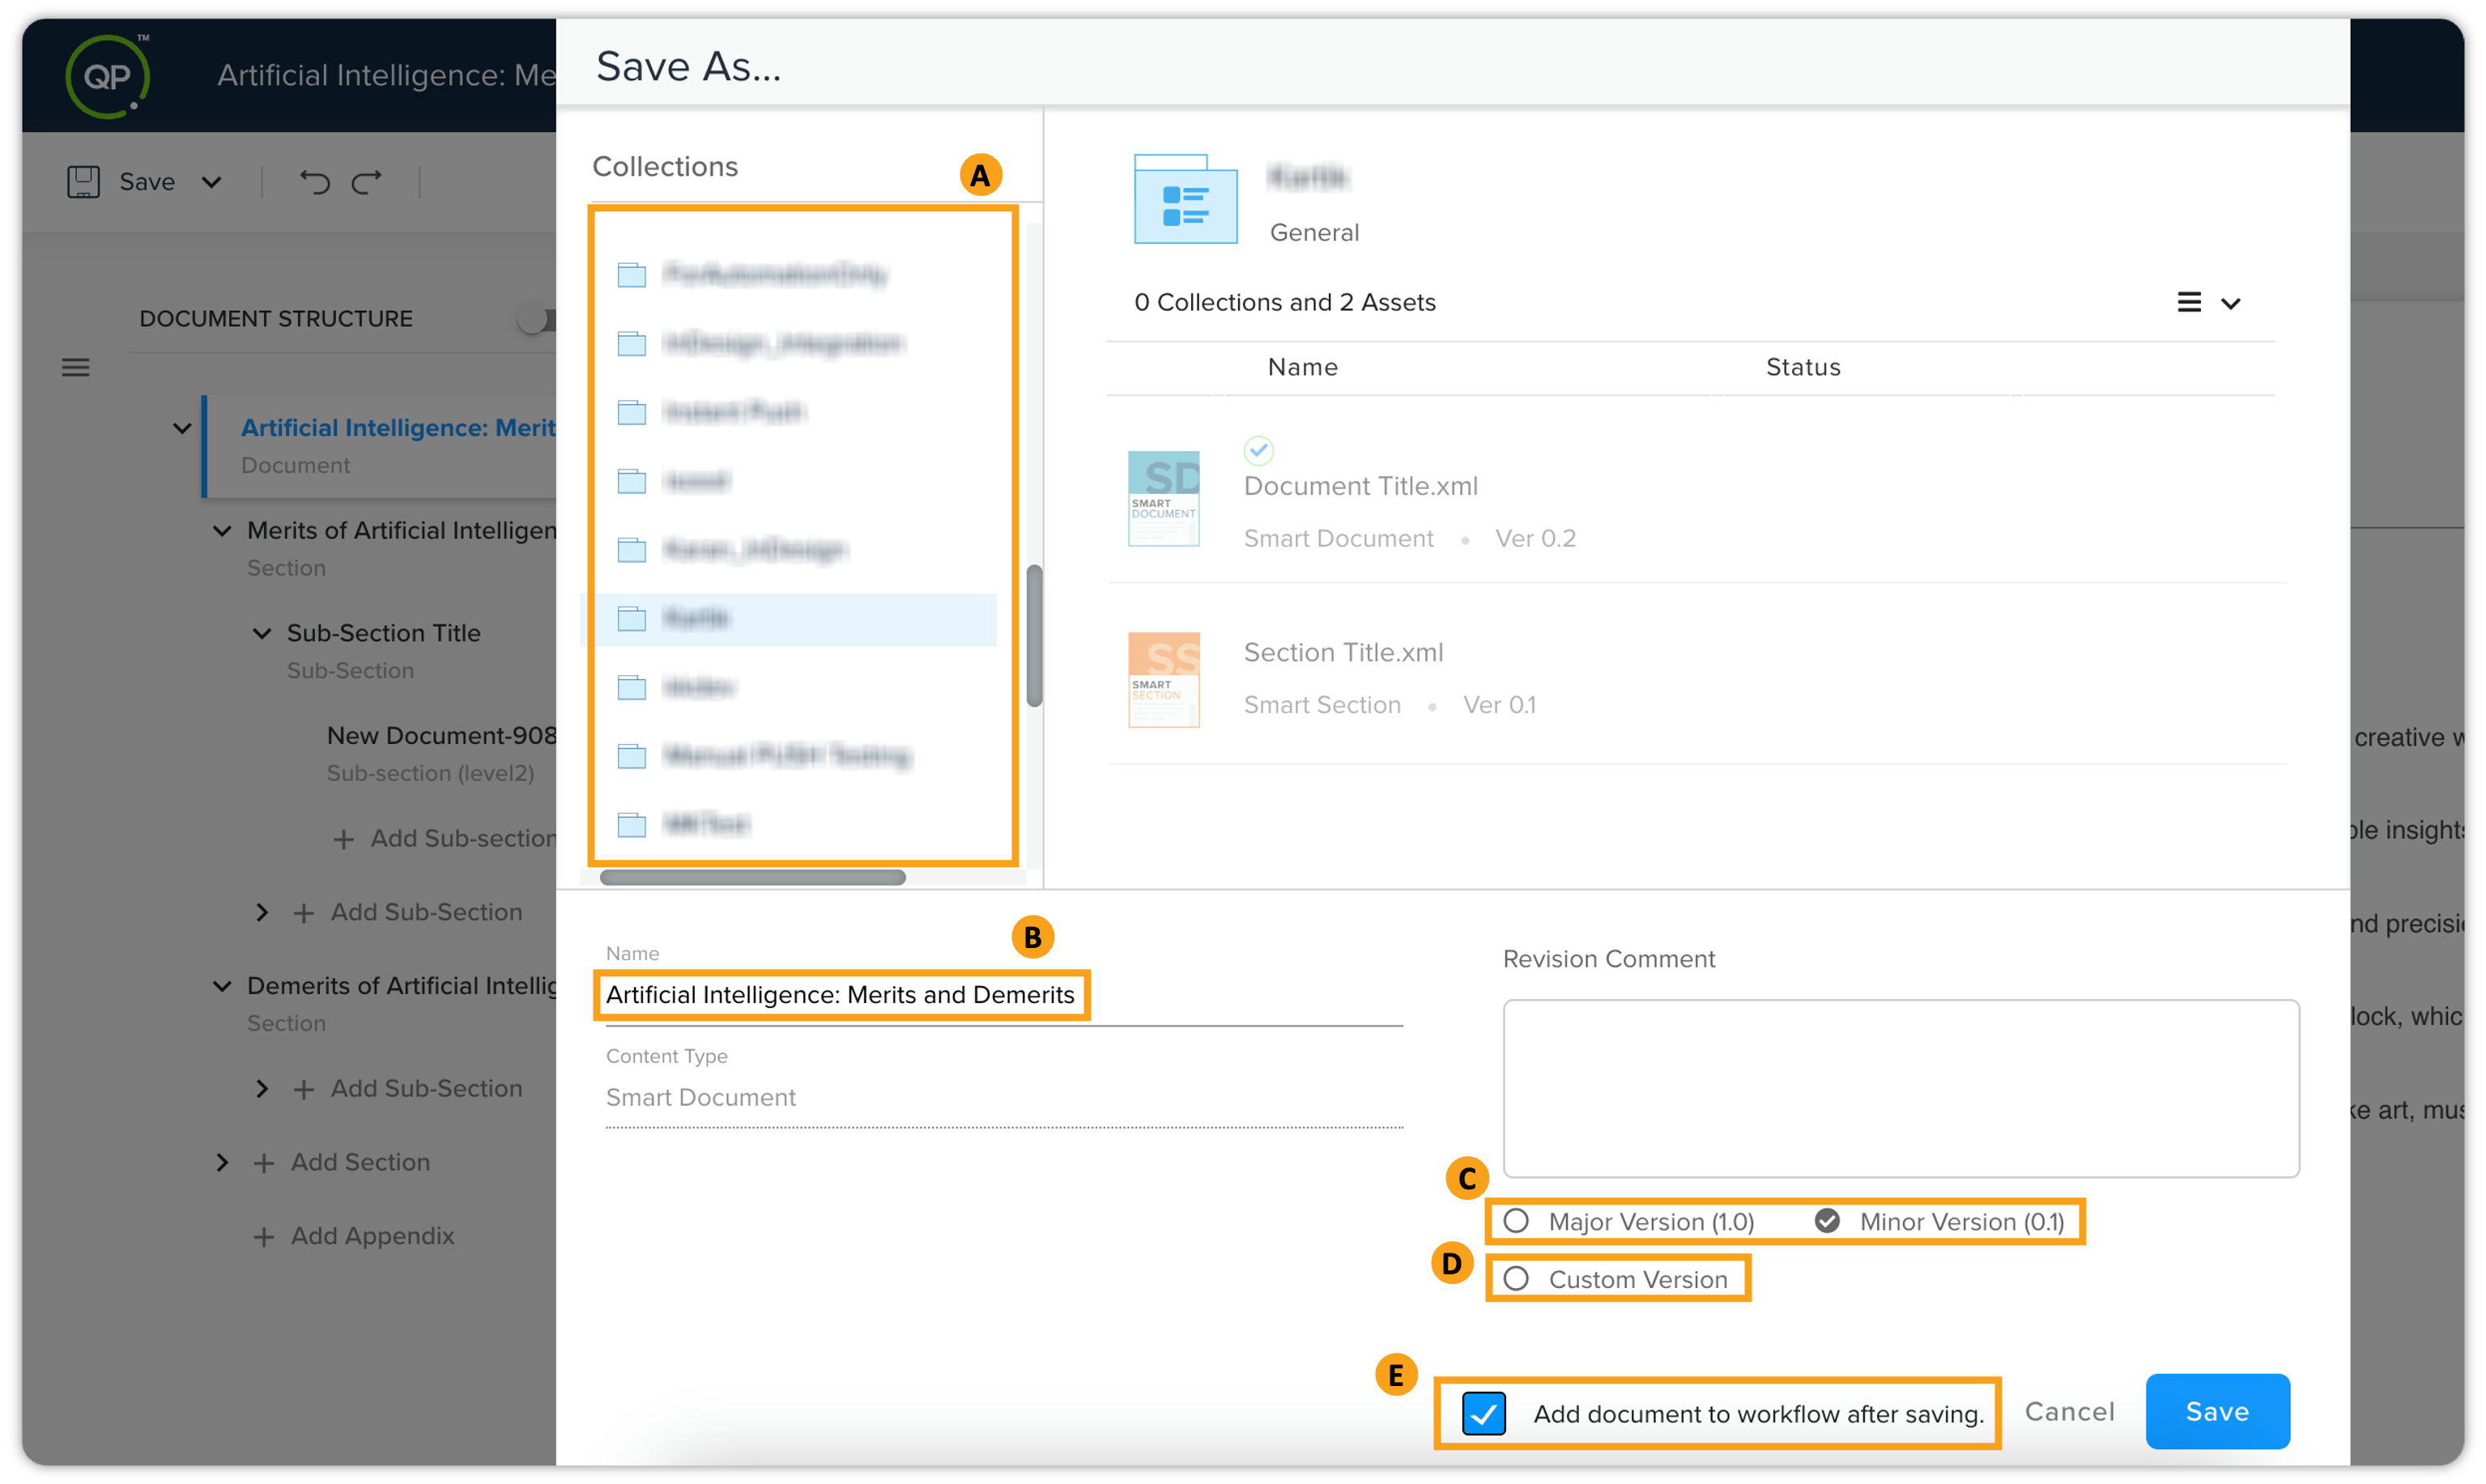
Click the Save icon at the upper left corner to open the Save As dialog box.
-
In the Save As dialog box, select the following:
-
(A). Location: Begin by choosing the desired location (collection) on the server where the document will be saved. The document will be stored in the selected collection.
-
(B). Name of the document: After selecting the collection, enter a unique name for the document. The content type section will be automatically filled, typically indicating Smart Document.
-
(C). UI Text if auto-burst is enabled: If you have enabled the auto-burst feature during content model creation, all the inline sections will be transformed into reusable content components upon saving the document.
-
(D). Major/Minor Version: Next, specify the document version, which is important for tracking its history. You can choose between a major version (e.g., 1.0) or a minor version (e.g., 0.1), depending on your needs.
-
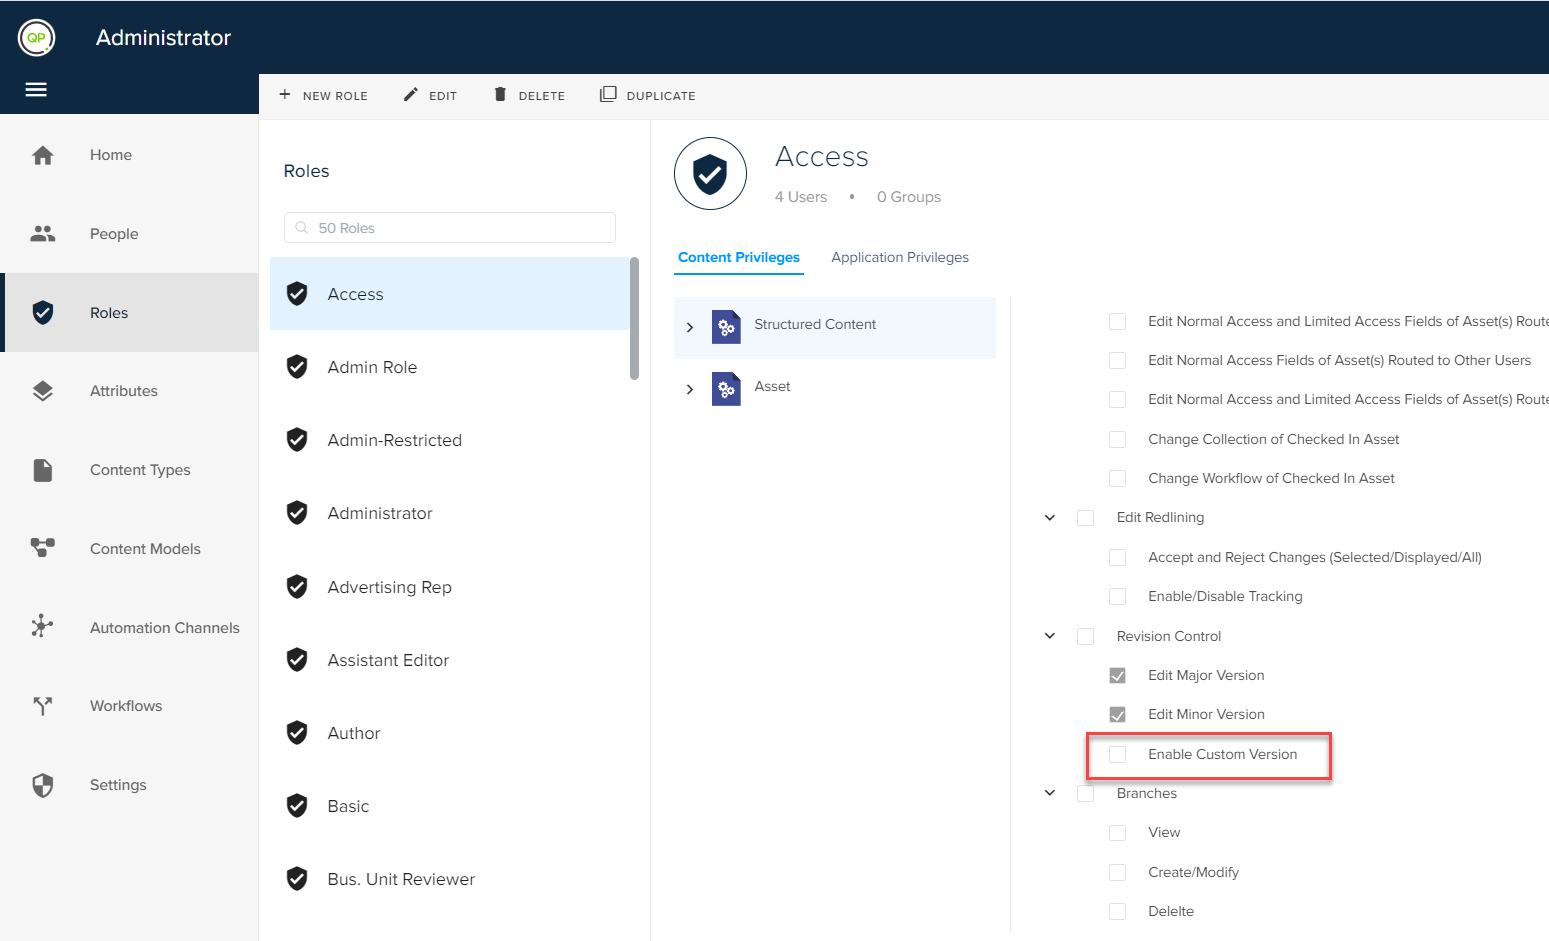
(E). Custom Version: Additionally, you have the option to set a custom version by selecting Custom Version, allowing them to define both major and minor versions for the document.
-
(F). Add document to workflow after saving: There’s also an option labeled "Add document to workflow after saving". If this box is checked, a dialog will appear to facilitate adding the document to the workflow, but this will only be activated upon clicking Save.
-
-
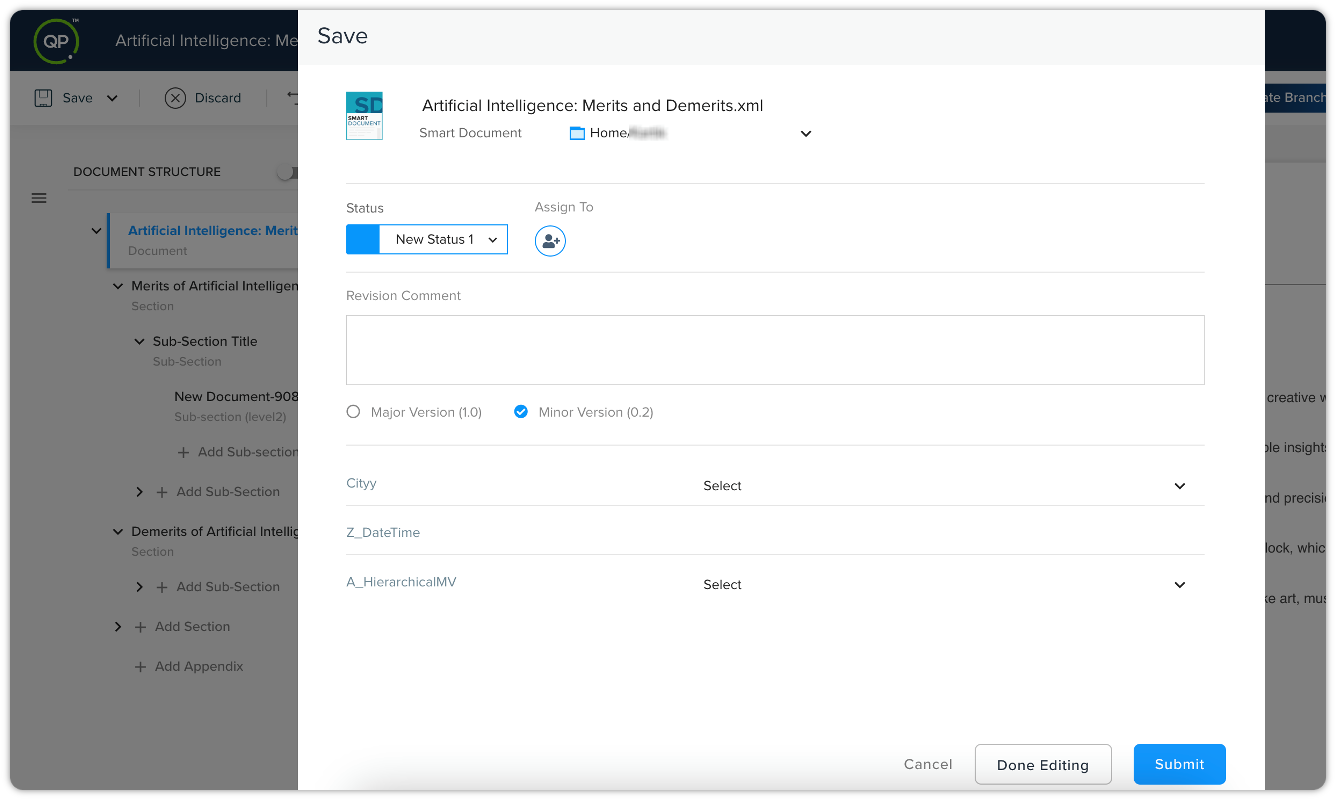
Upon clicking Save, the option to add the document to the workflow will be available. The workflow represents various stages the document will undergo, such as review or publication.
-
If you wish to have someone review the document while in the review stage of the workflow, you can utilize the "Assign To" option to delegate the review task to another user.
-
Finally, click Submit to complete the process.
Save Document as Authoring Template
To save the document as an authoring template
-
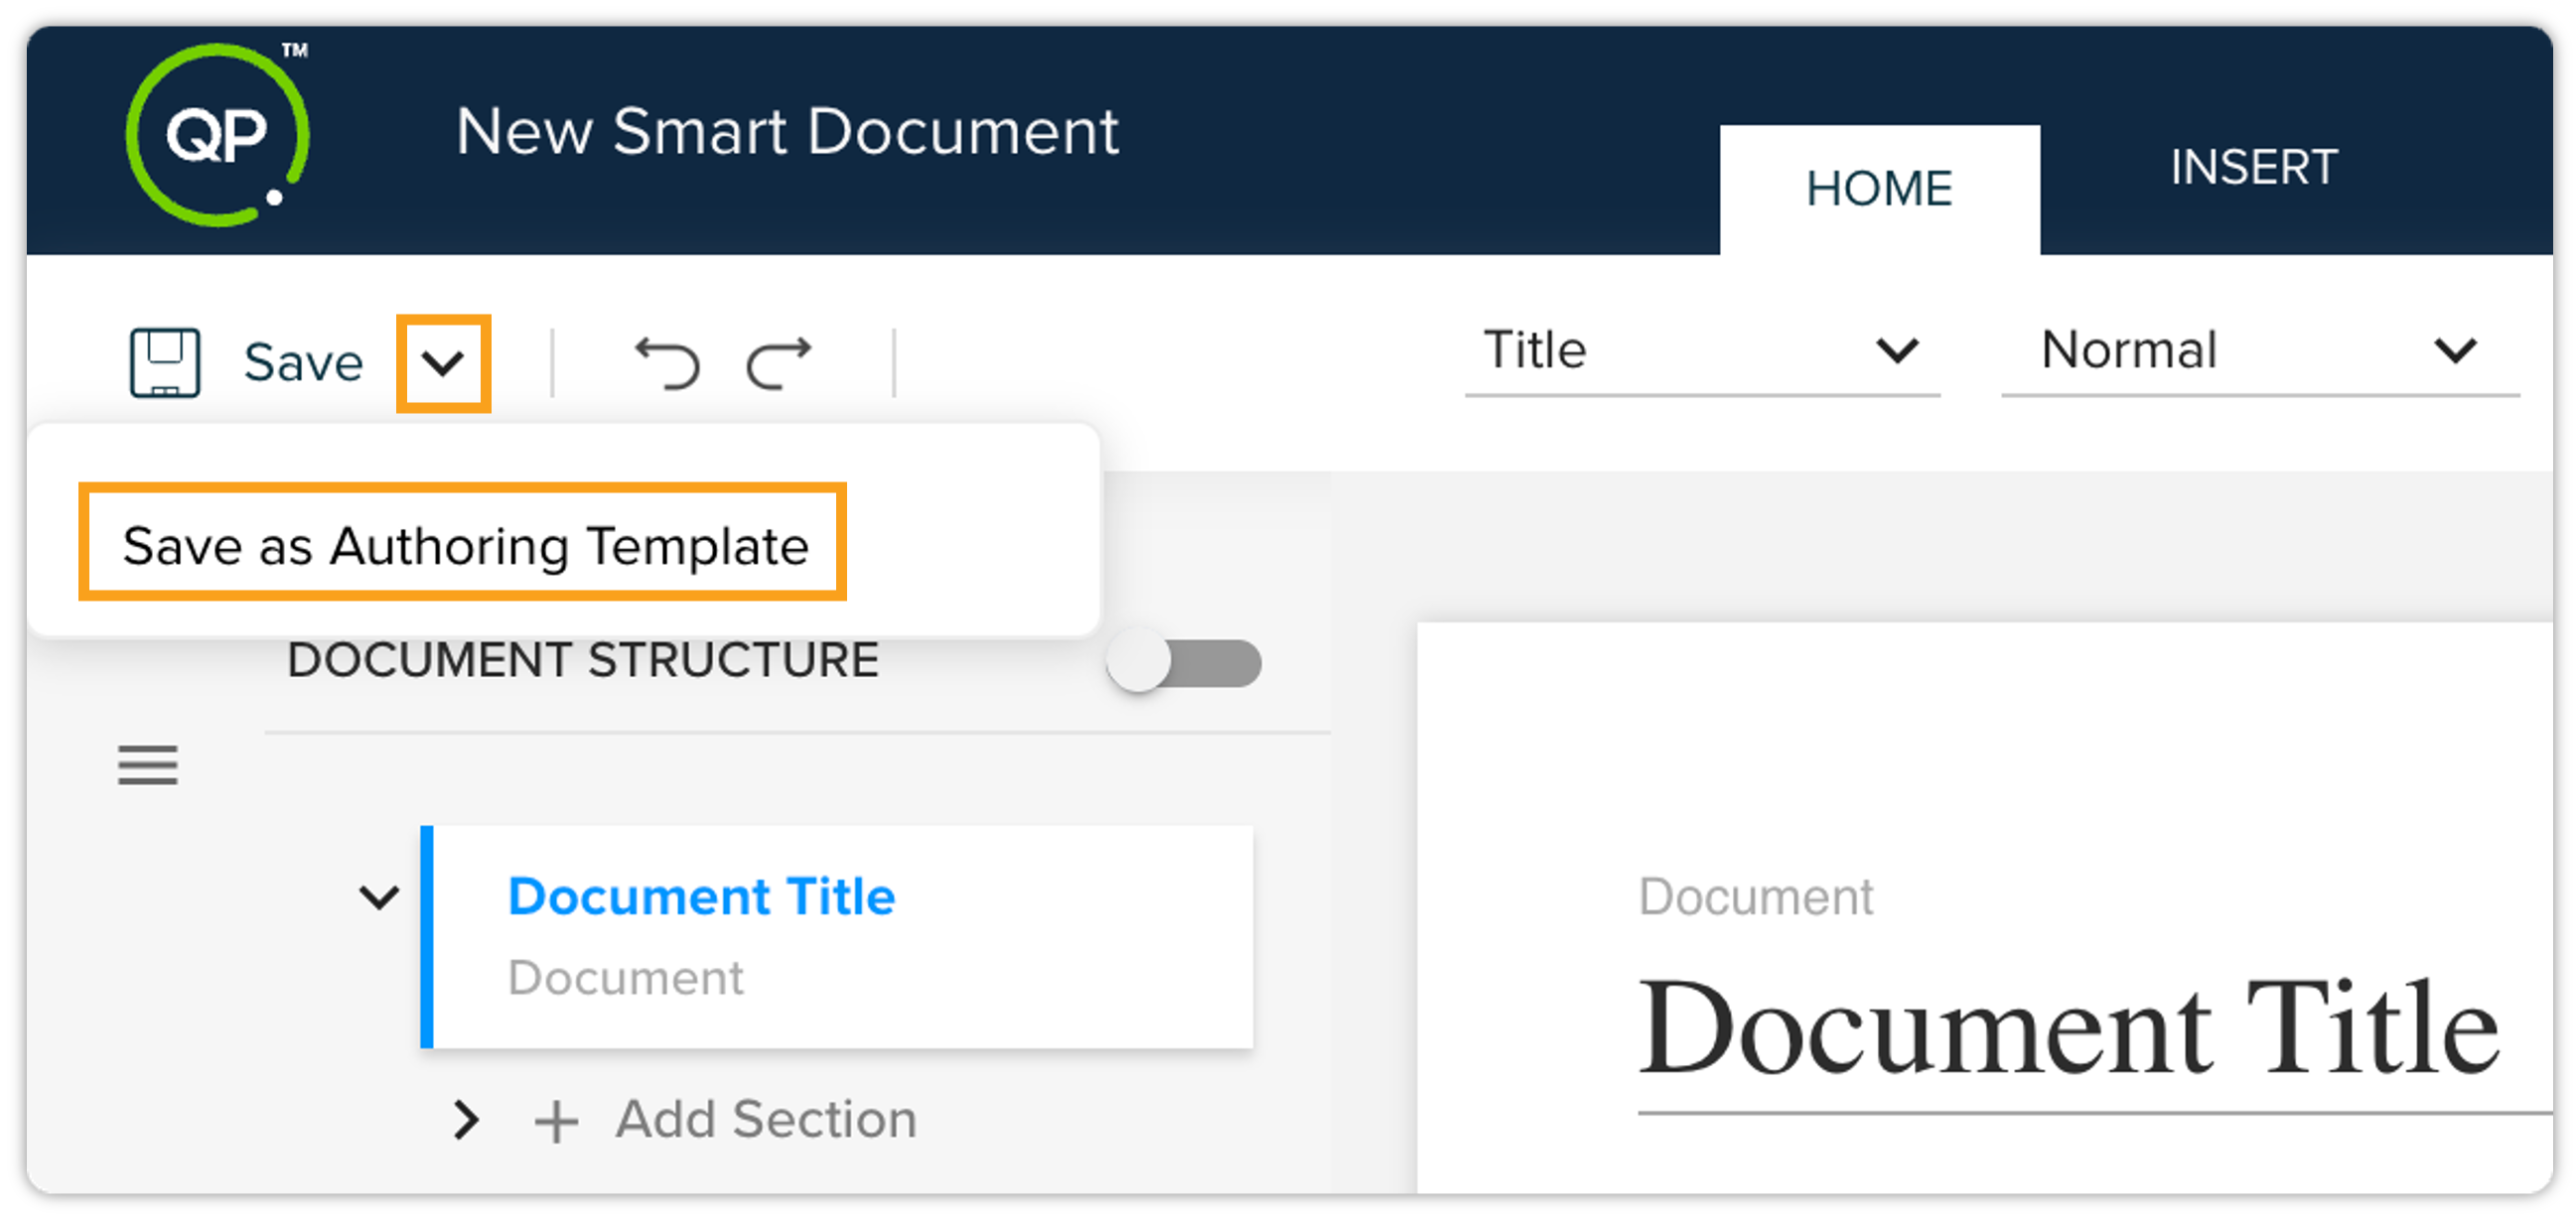
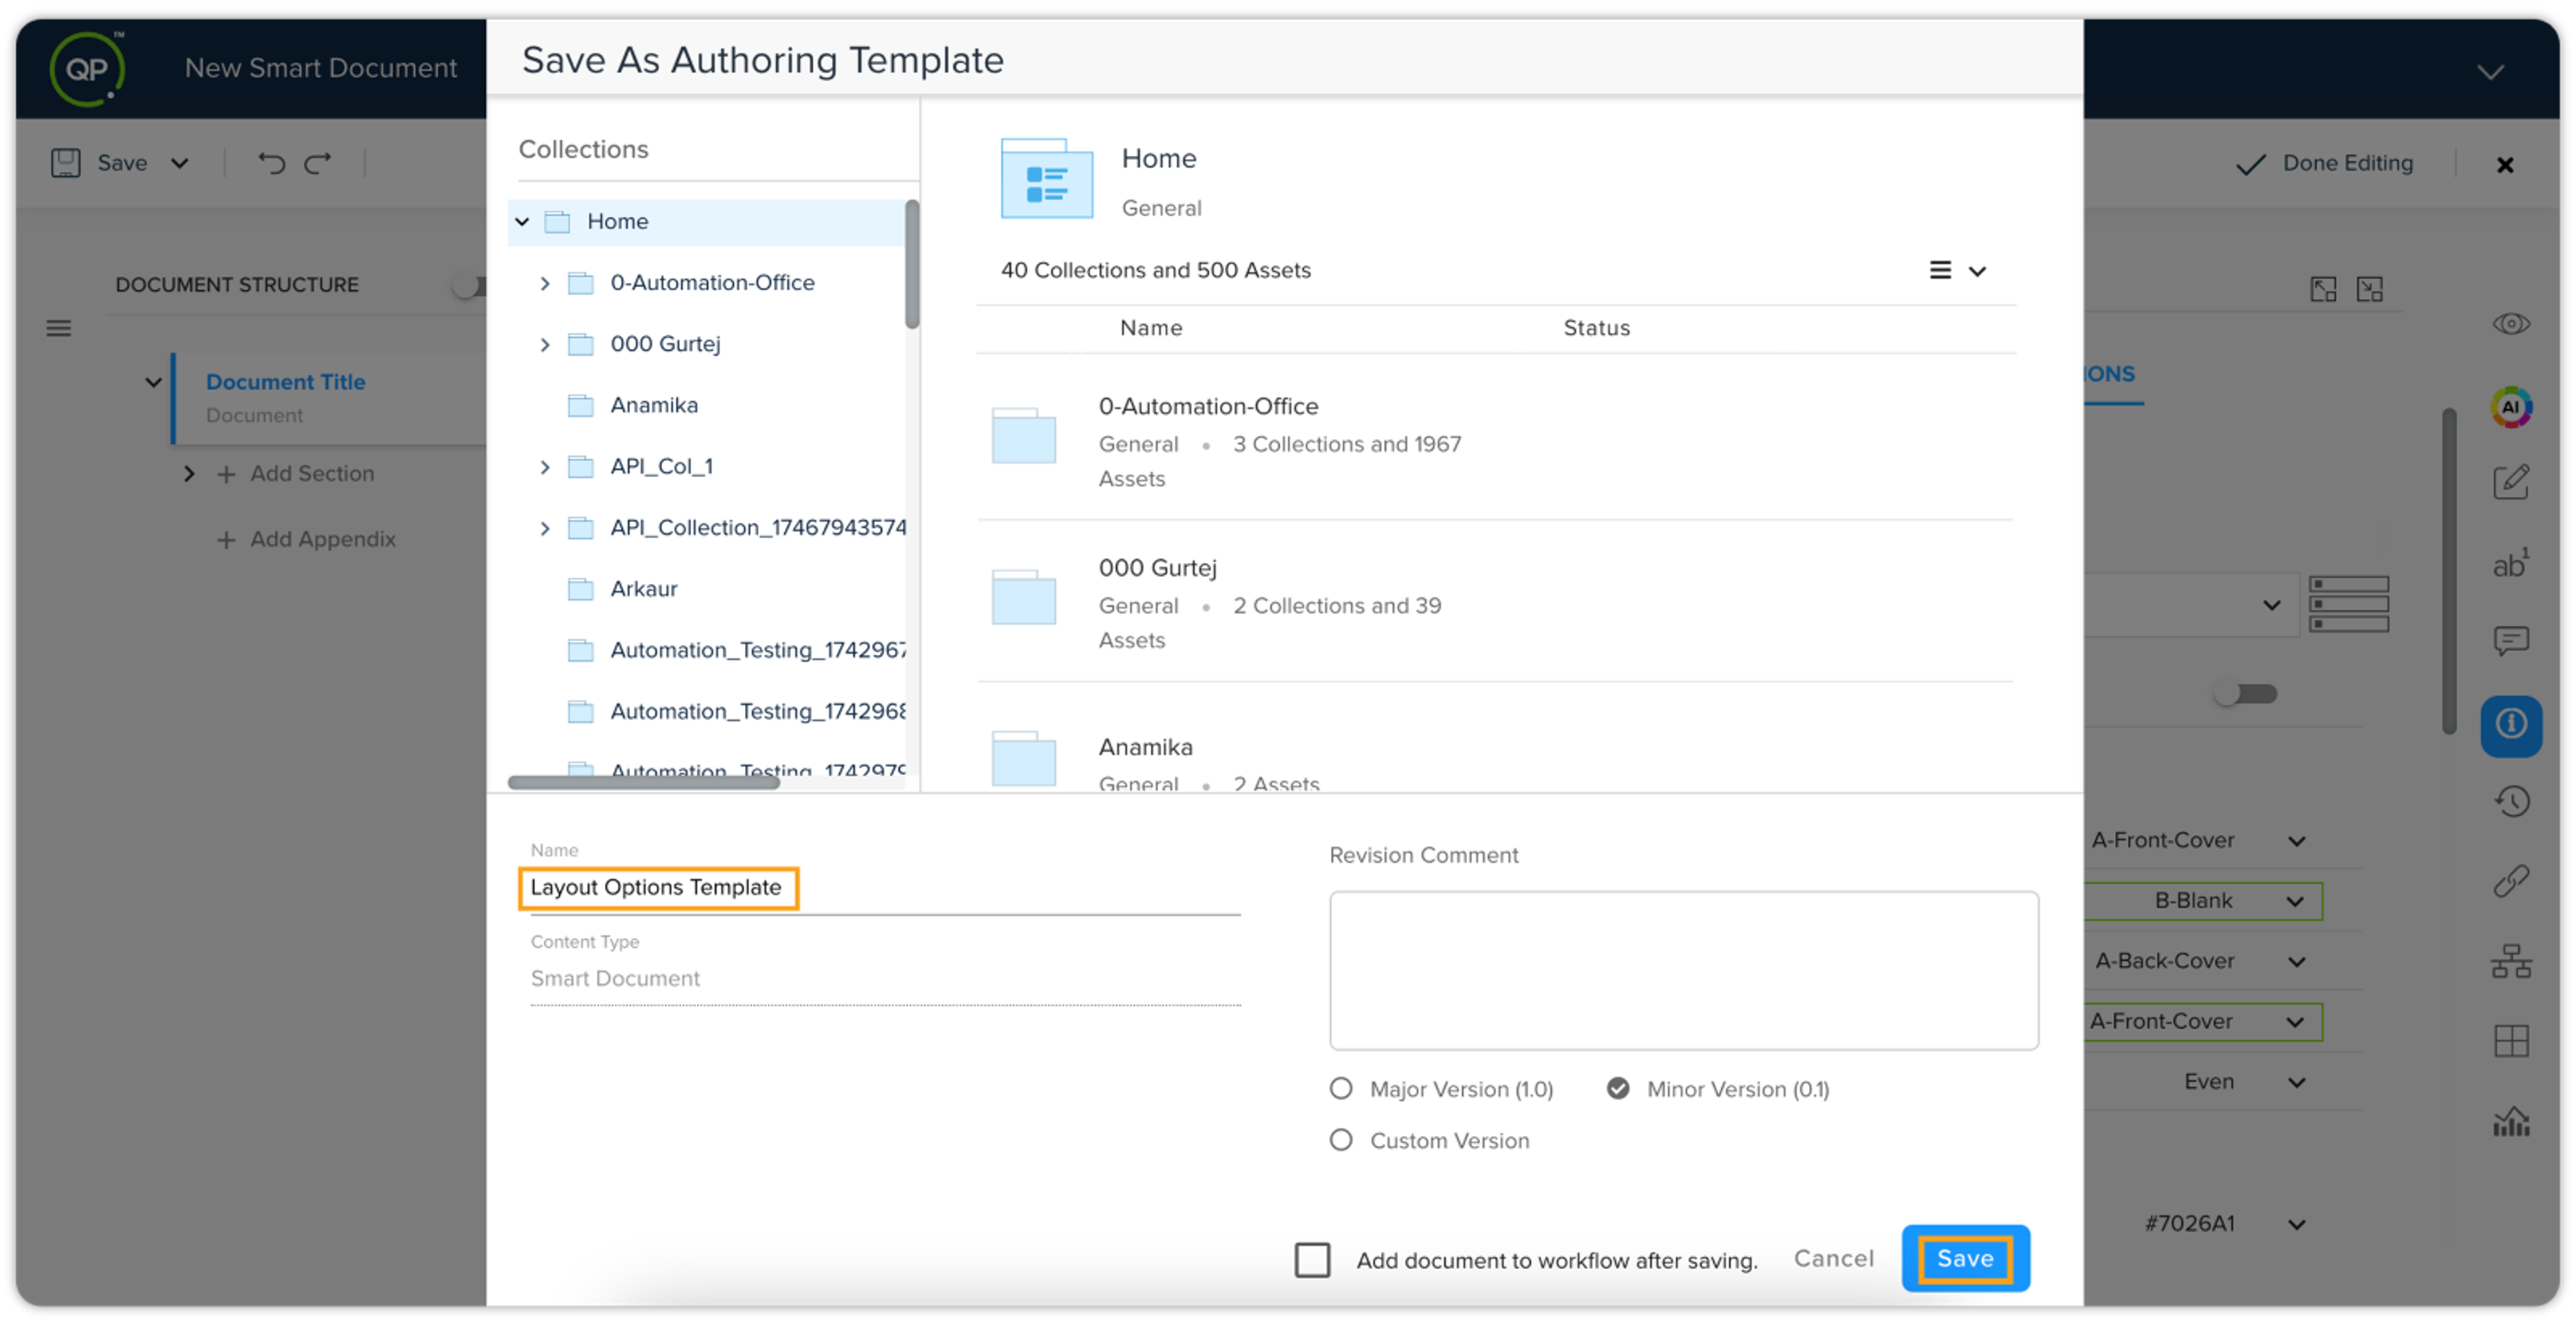
Click the dropdown icon next to the Save button (top left) and select Save as Authoring Template.
-
In the Save As Authoring Template dialog box, enter a name for the authoring template and select a location in the QPP repository. Click Save.
Add to Workflow
There are two primary methods for adding a smart document to a workflow: during the saving process or after the document has already been saved. This section describes how to add a document to a workflow while saving.
Adding to Workflow During Save:
-
When saving your smart document, you'll notice a checkbox labeled "Add document to workflow after saving". Click the checkbox and then click Save.
-
This will open a new dialog where a dropdown menu presents a list of available workflows. Click "Select a Workflow to begin" option and choose the workflow you want to apply to your document.
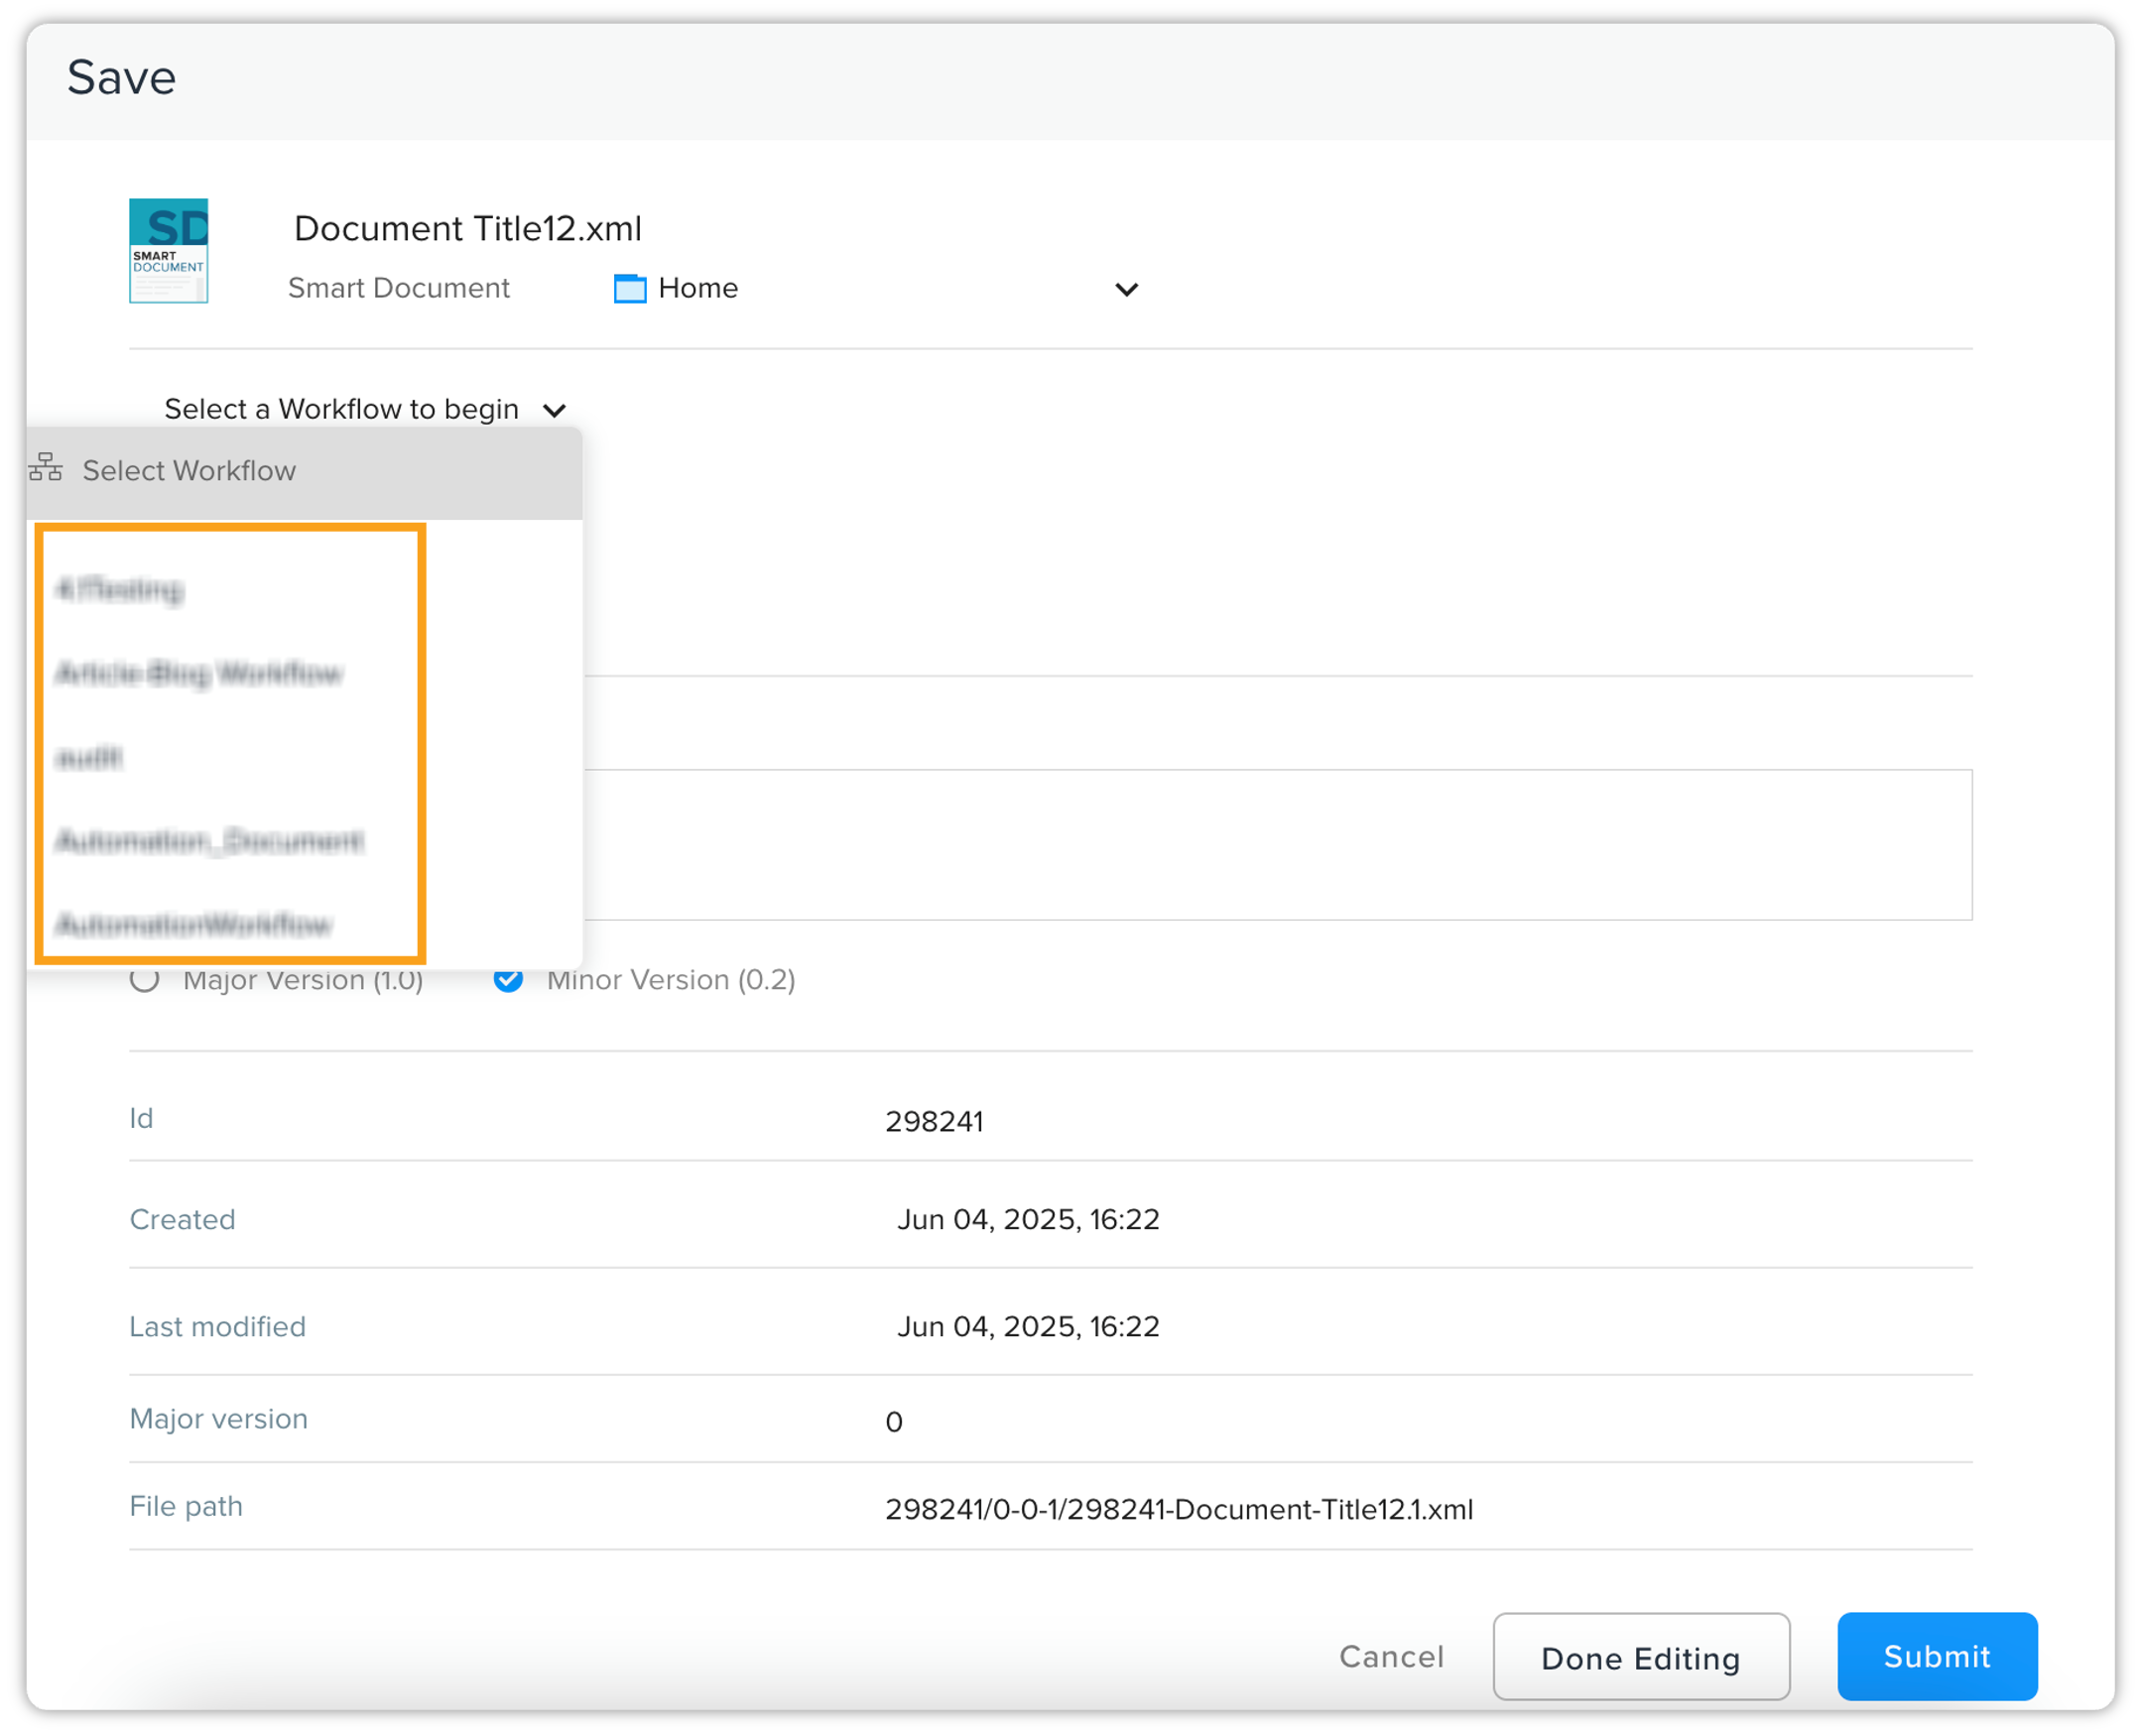 Only workflows defined for the specific document type you've created will appear in this list. For example, if you created a "Smart Document," only workflows associated with the "Smart Document" type will be displayed.
-
Upon selecting a workflow, the document will automatically be assigned the first status in that workflow (e.g., "Authoring").
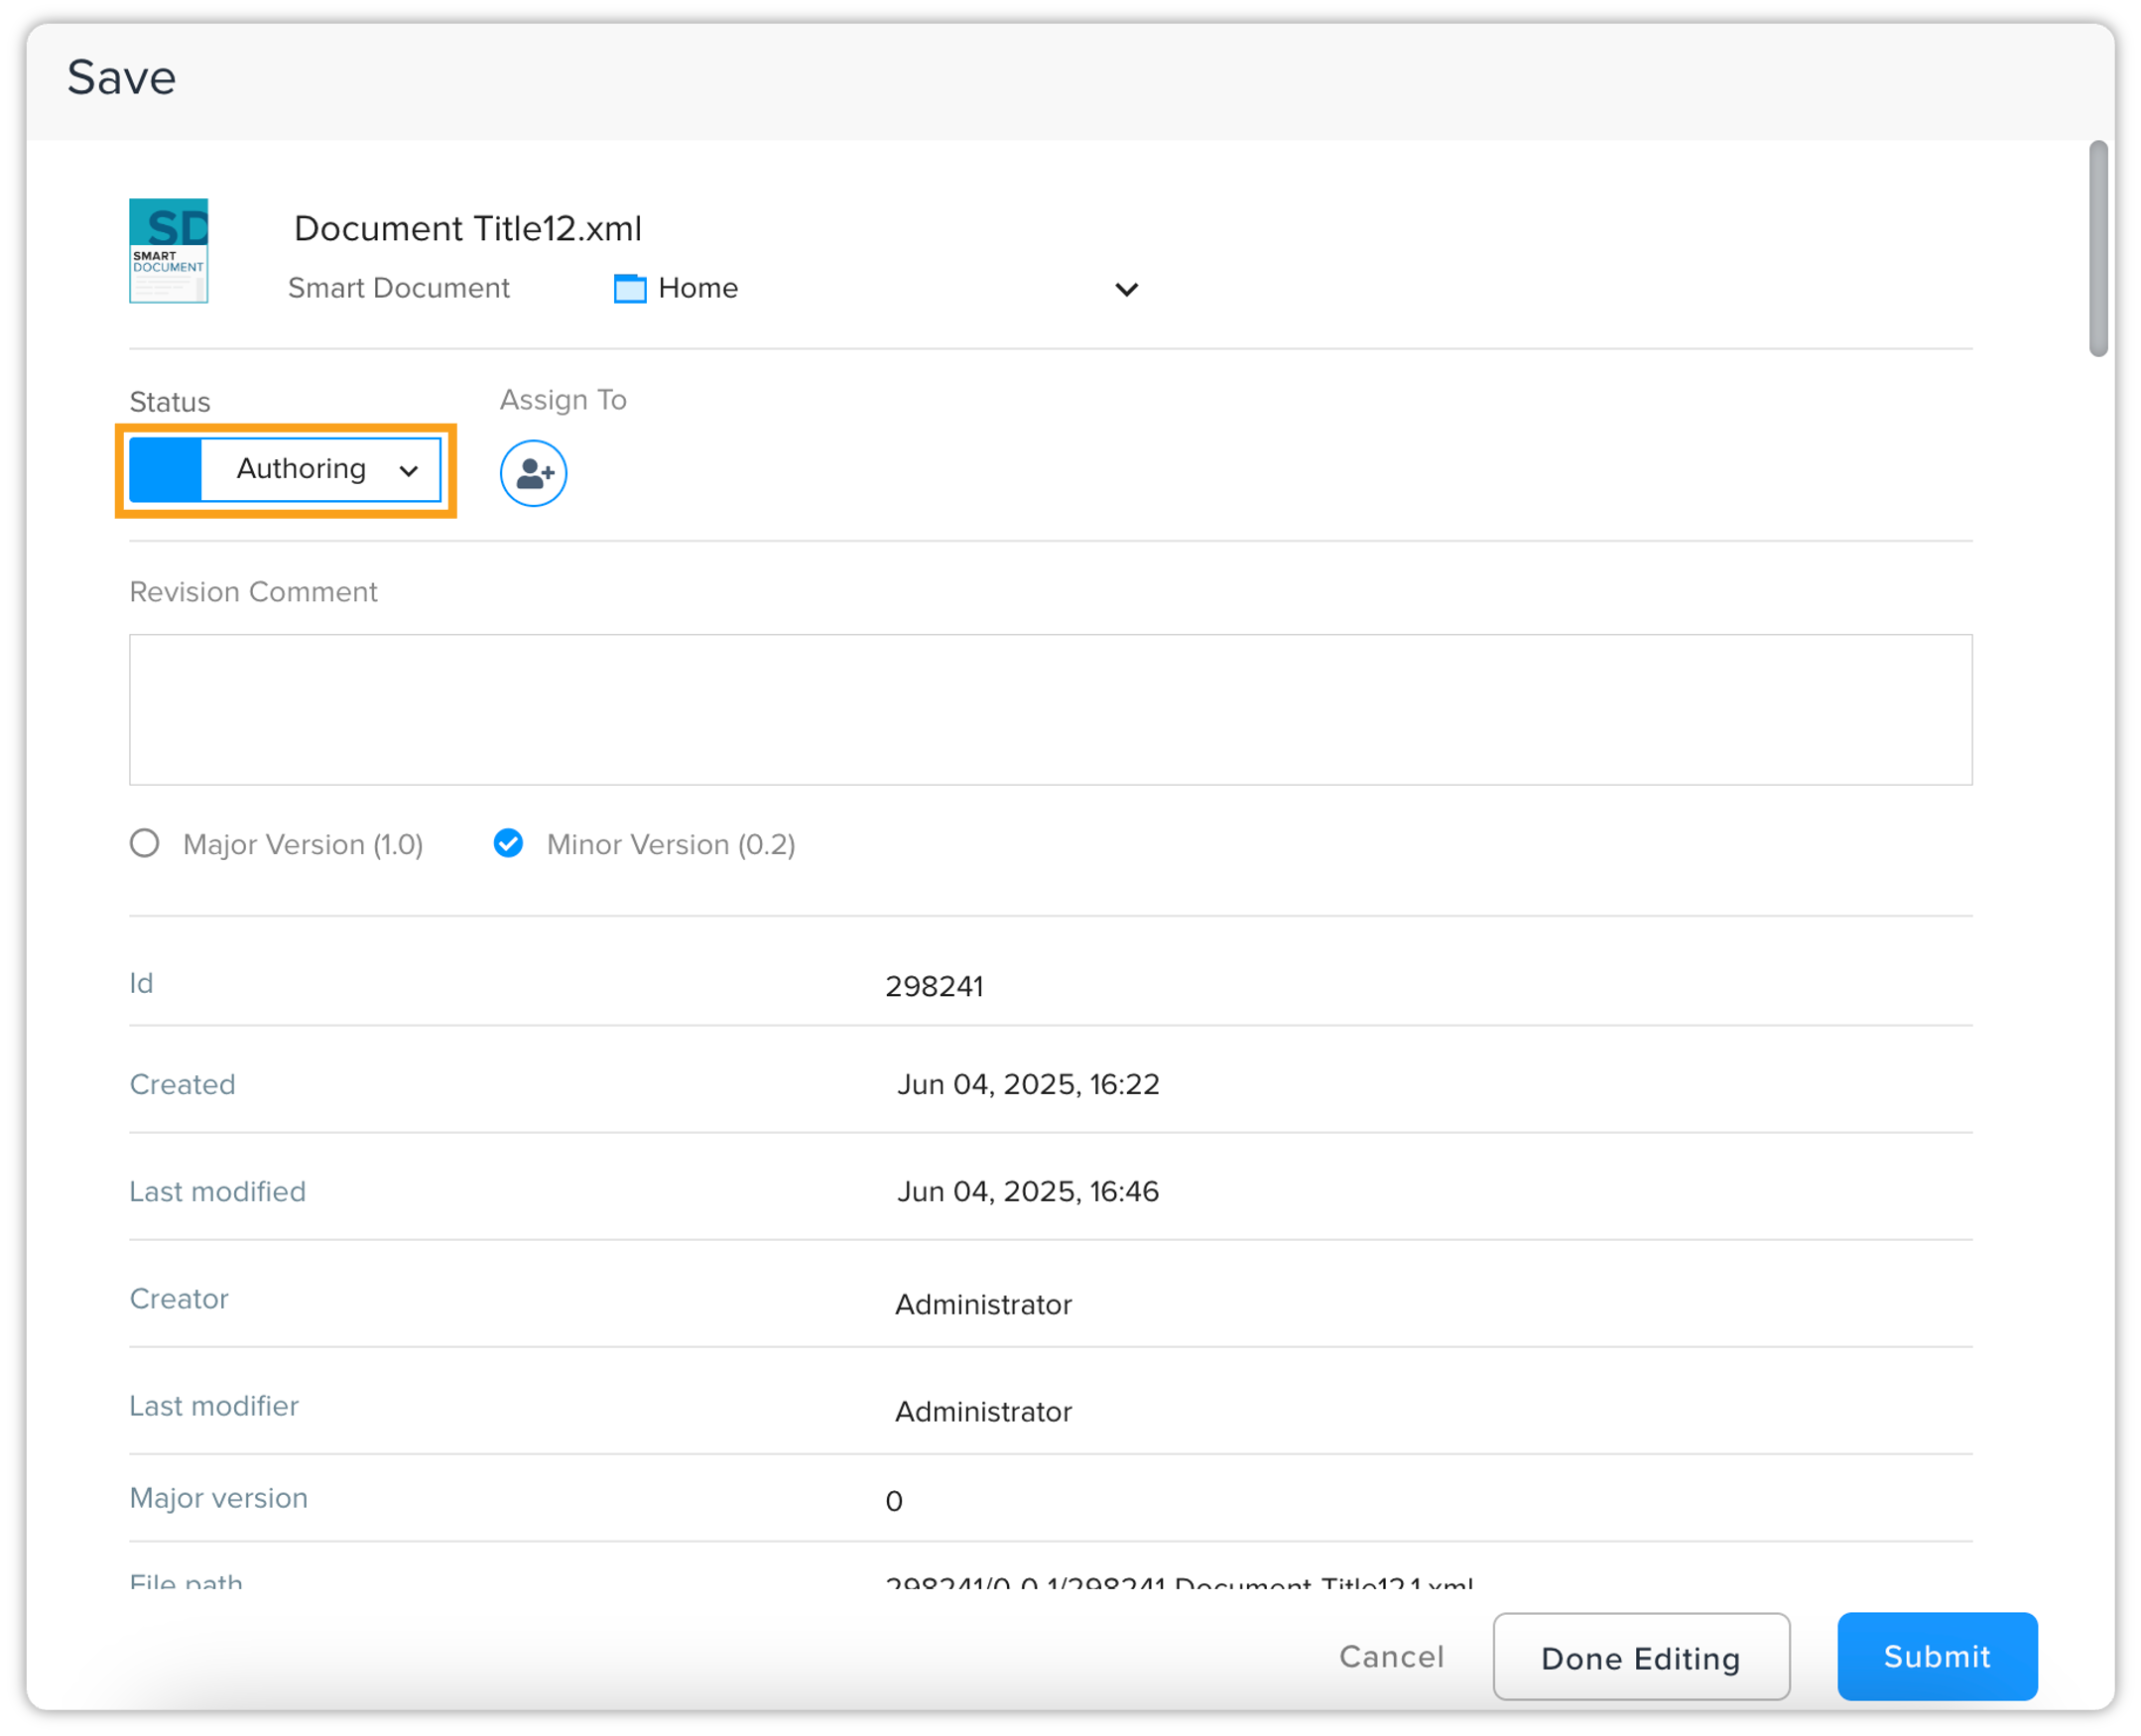 The first status is pre-defined when the workflow is created. A workflow can consist of two or more statuses, such as "Status 1", "Status 2", and "Status 3". The document always begins its workflow journey in the first status.
-
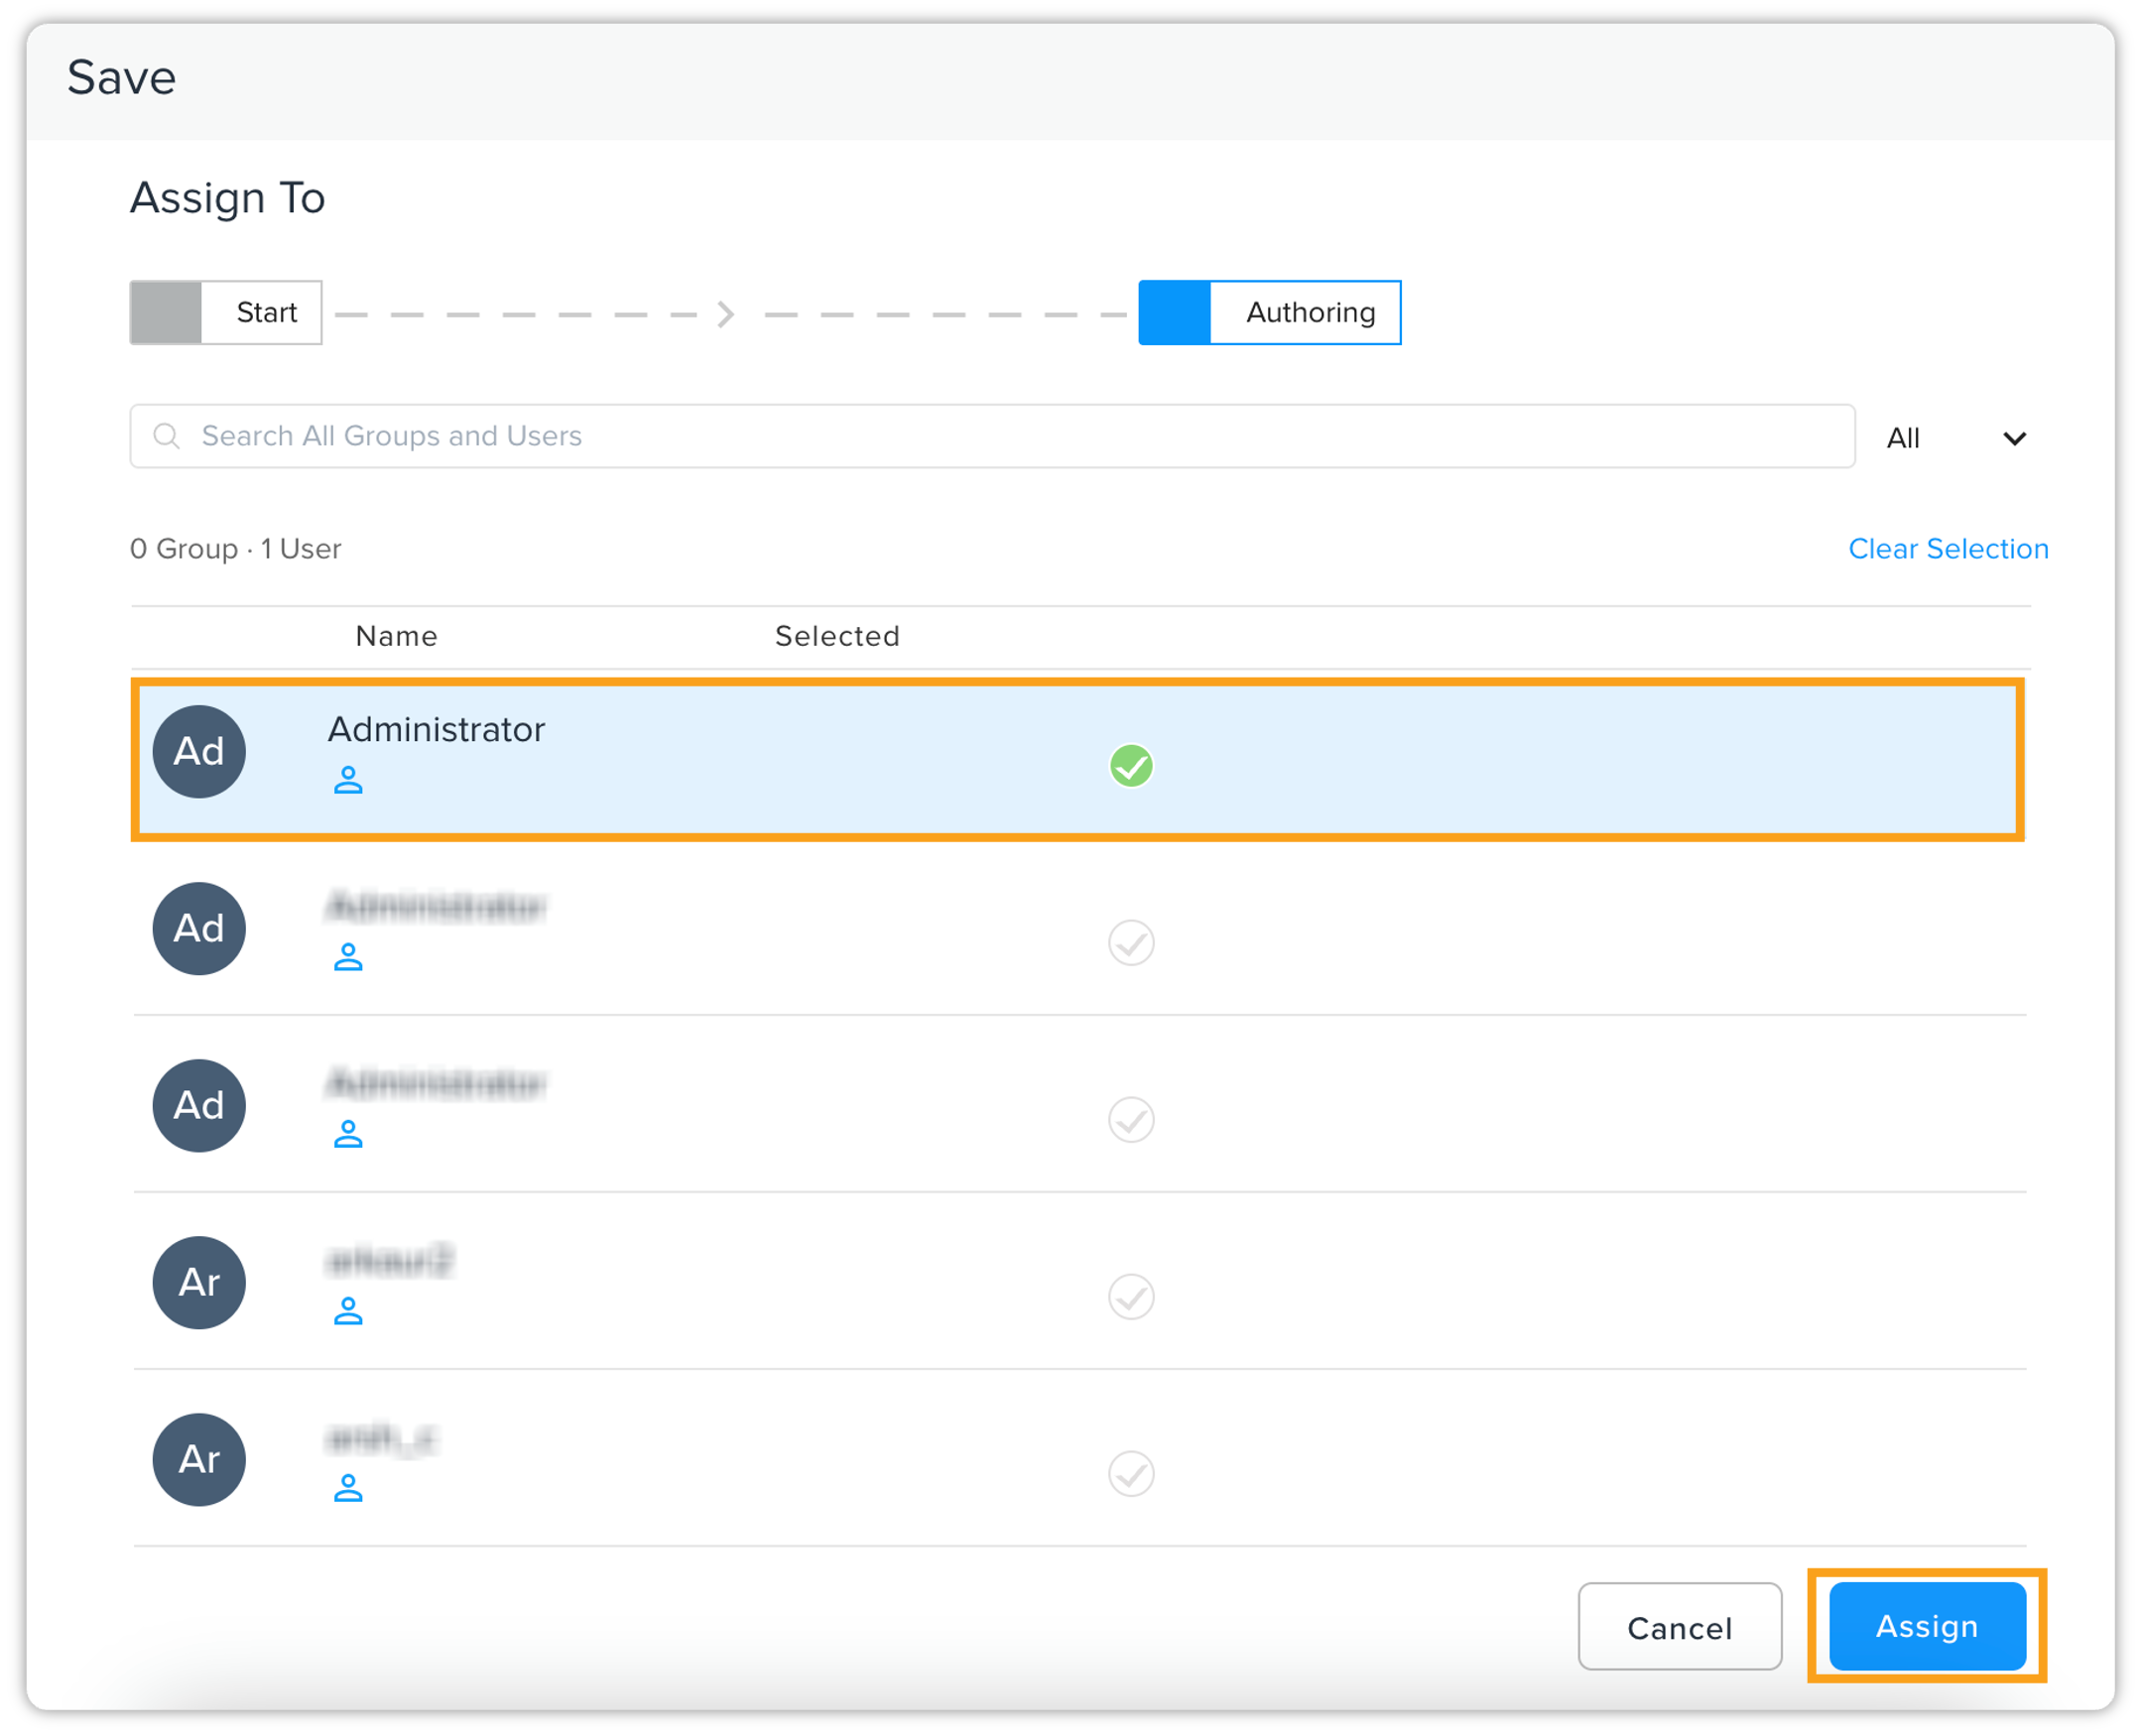
Next, you'll need to assign the task to a user or user group. Select the appropriate user or group from the available options.
-
In the Revision Comment field, provide any relevant instructions or notes for the assigned user or group.
-
Choose the document version type:
-
Major: Designates a significant revision (e.g., 1.0).
-
Minor: Indicates a smaller update (e.g., 0.1). Subsequent saves without changes will automatically increment the minor version (e.g., 0.1 to 0.2).
-
-
Click the Submit button. Your document is now added to the selected workflow and assigned to the initial status.
You can also add a document to a workflow after it has been saved. If you chose not to add the document to a workflow during the save operation, you can do so directly from the editor:
-
After saving the document, an "Add to Workflow" option will appear in the top actions bar of the editor.
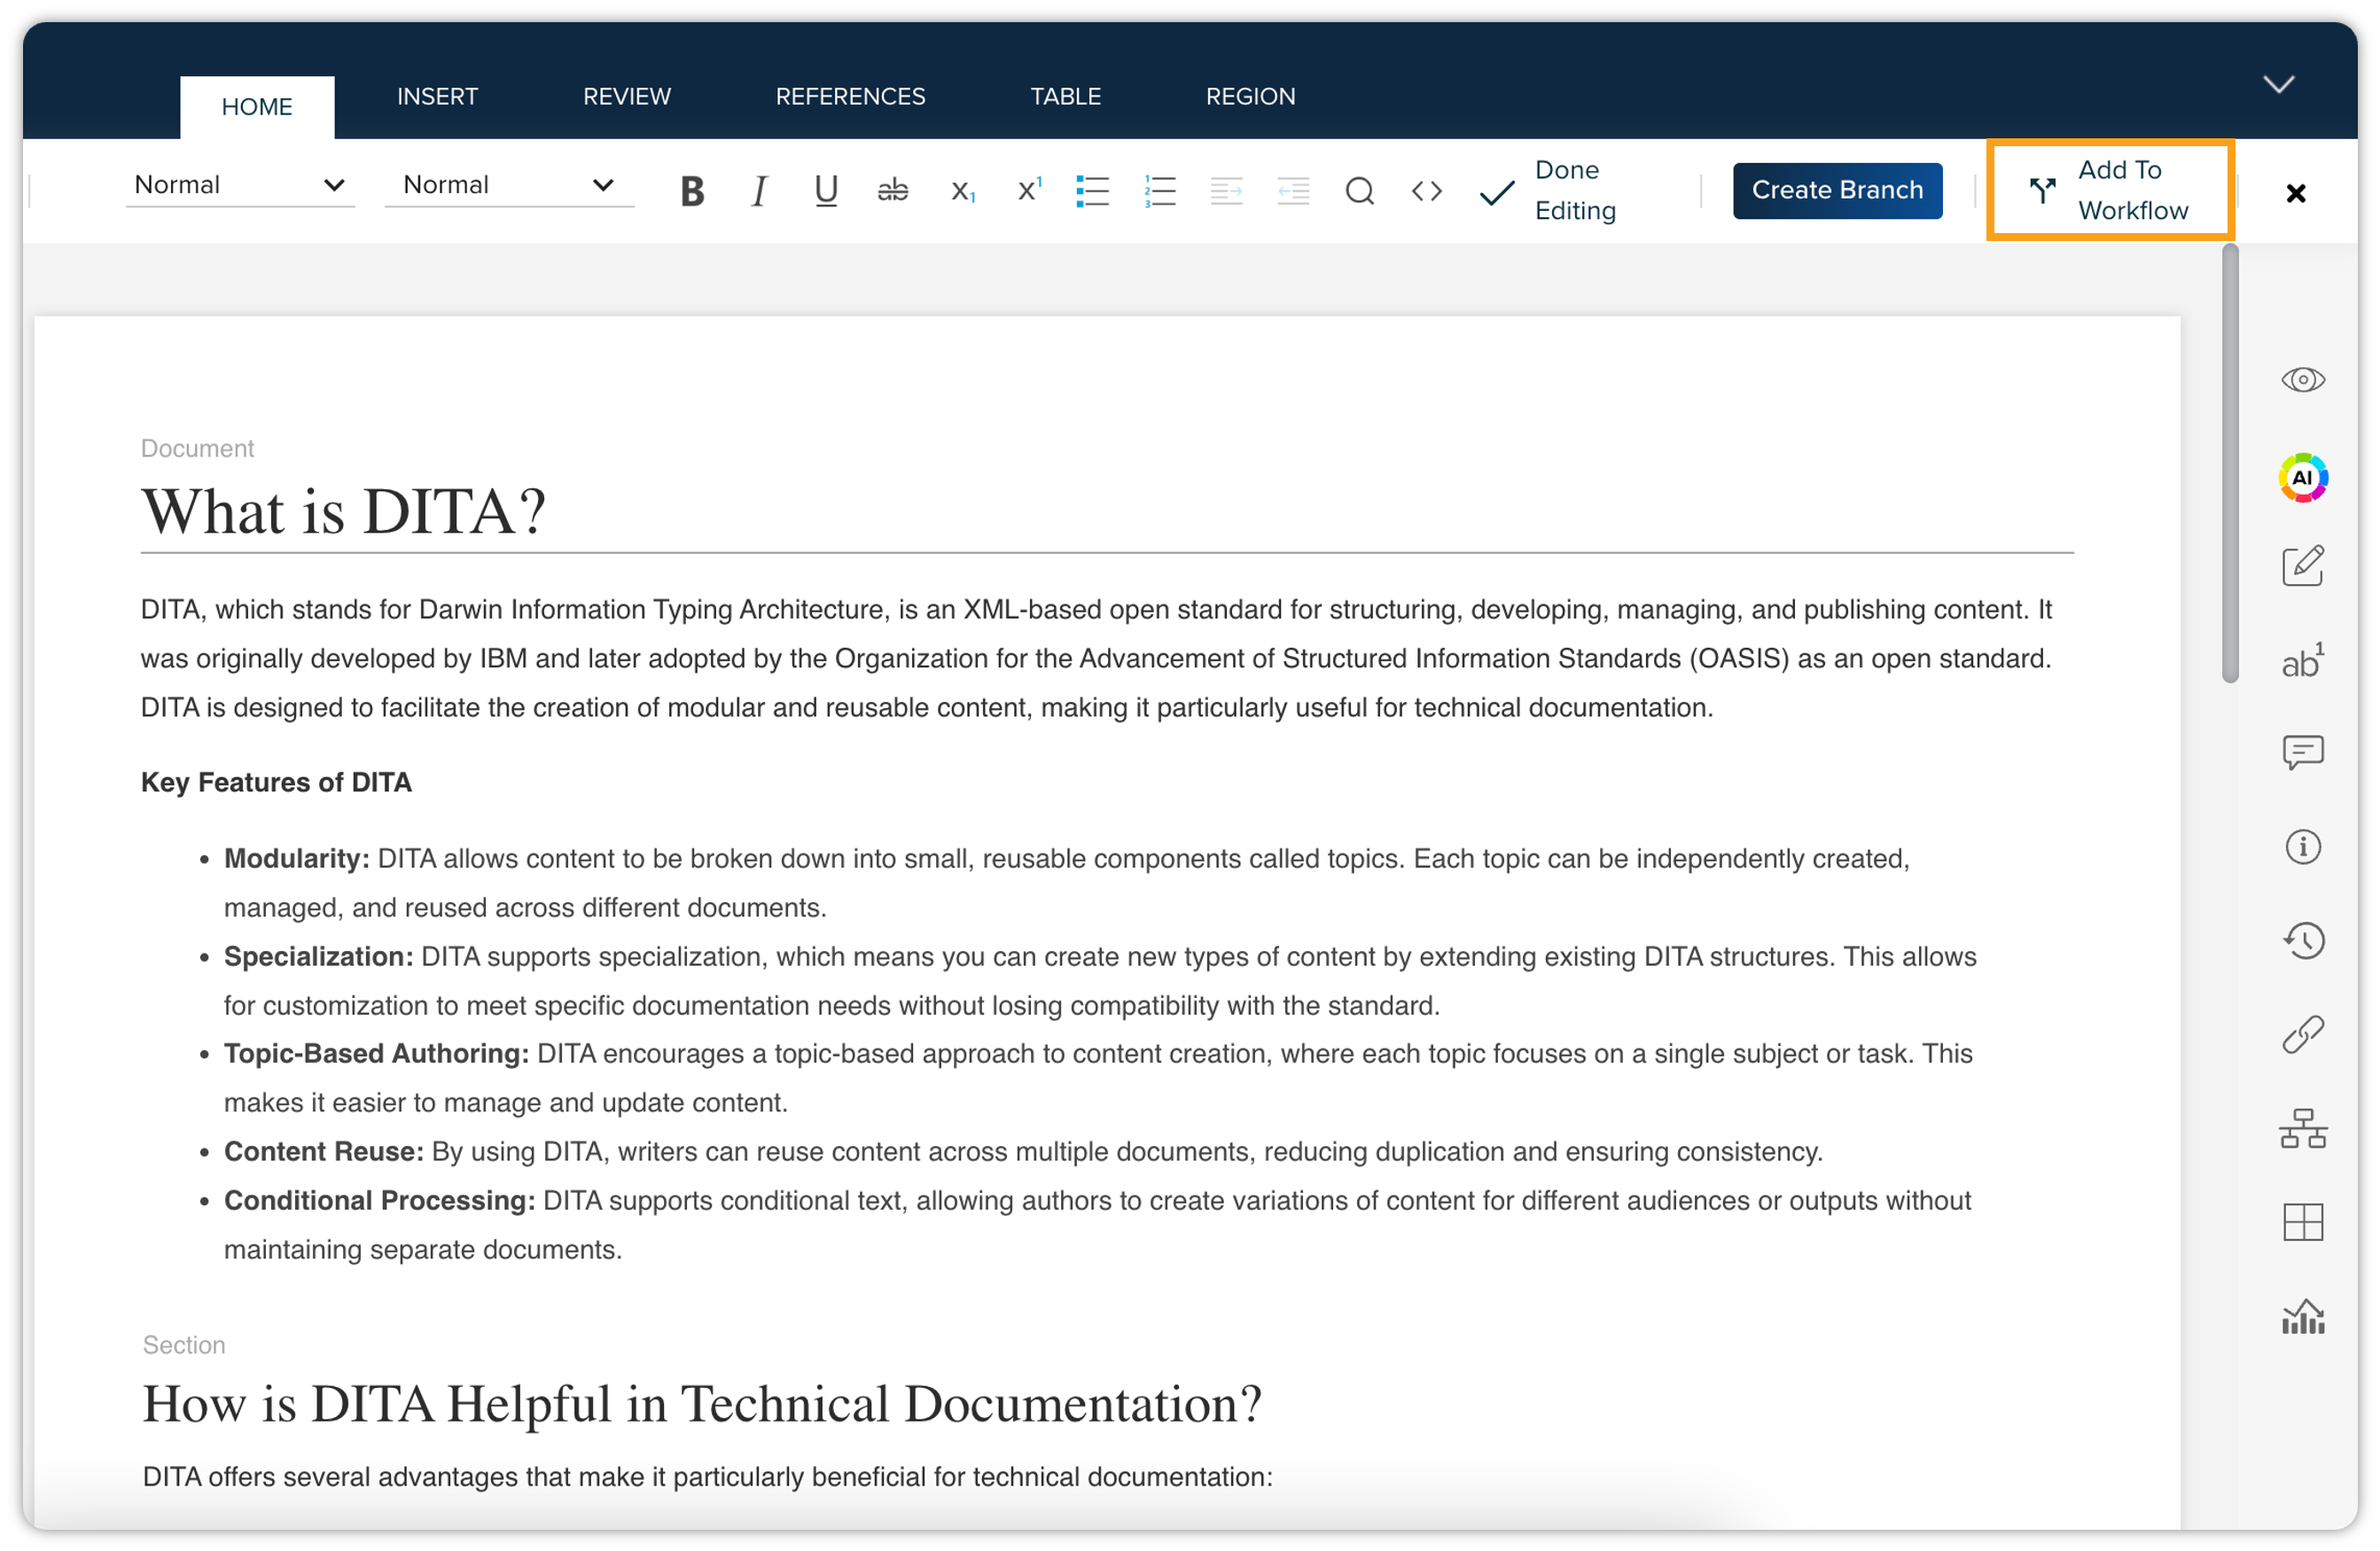
-
Click the "Add to Workflow" option. This will open the Workflow Settings dialog in the apps pane.
-
Configure Workflow Settings: The process from this point is identical to the "Adding to Workflow During Save" process. Refer to those steps for detailed instructions on selecting a workflow, assigning a task, adding revision comments, and choosing a version.
Document Structure
The Document Structure pane on the left of the authoring space outlines the hierarchy of the sections within the document.
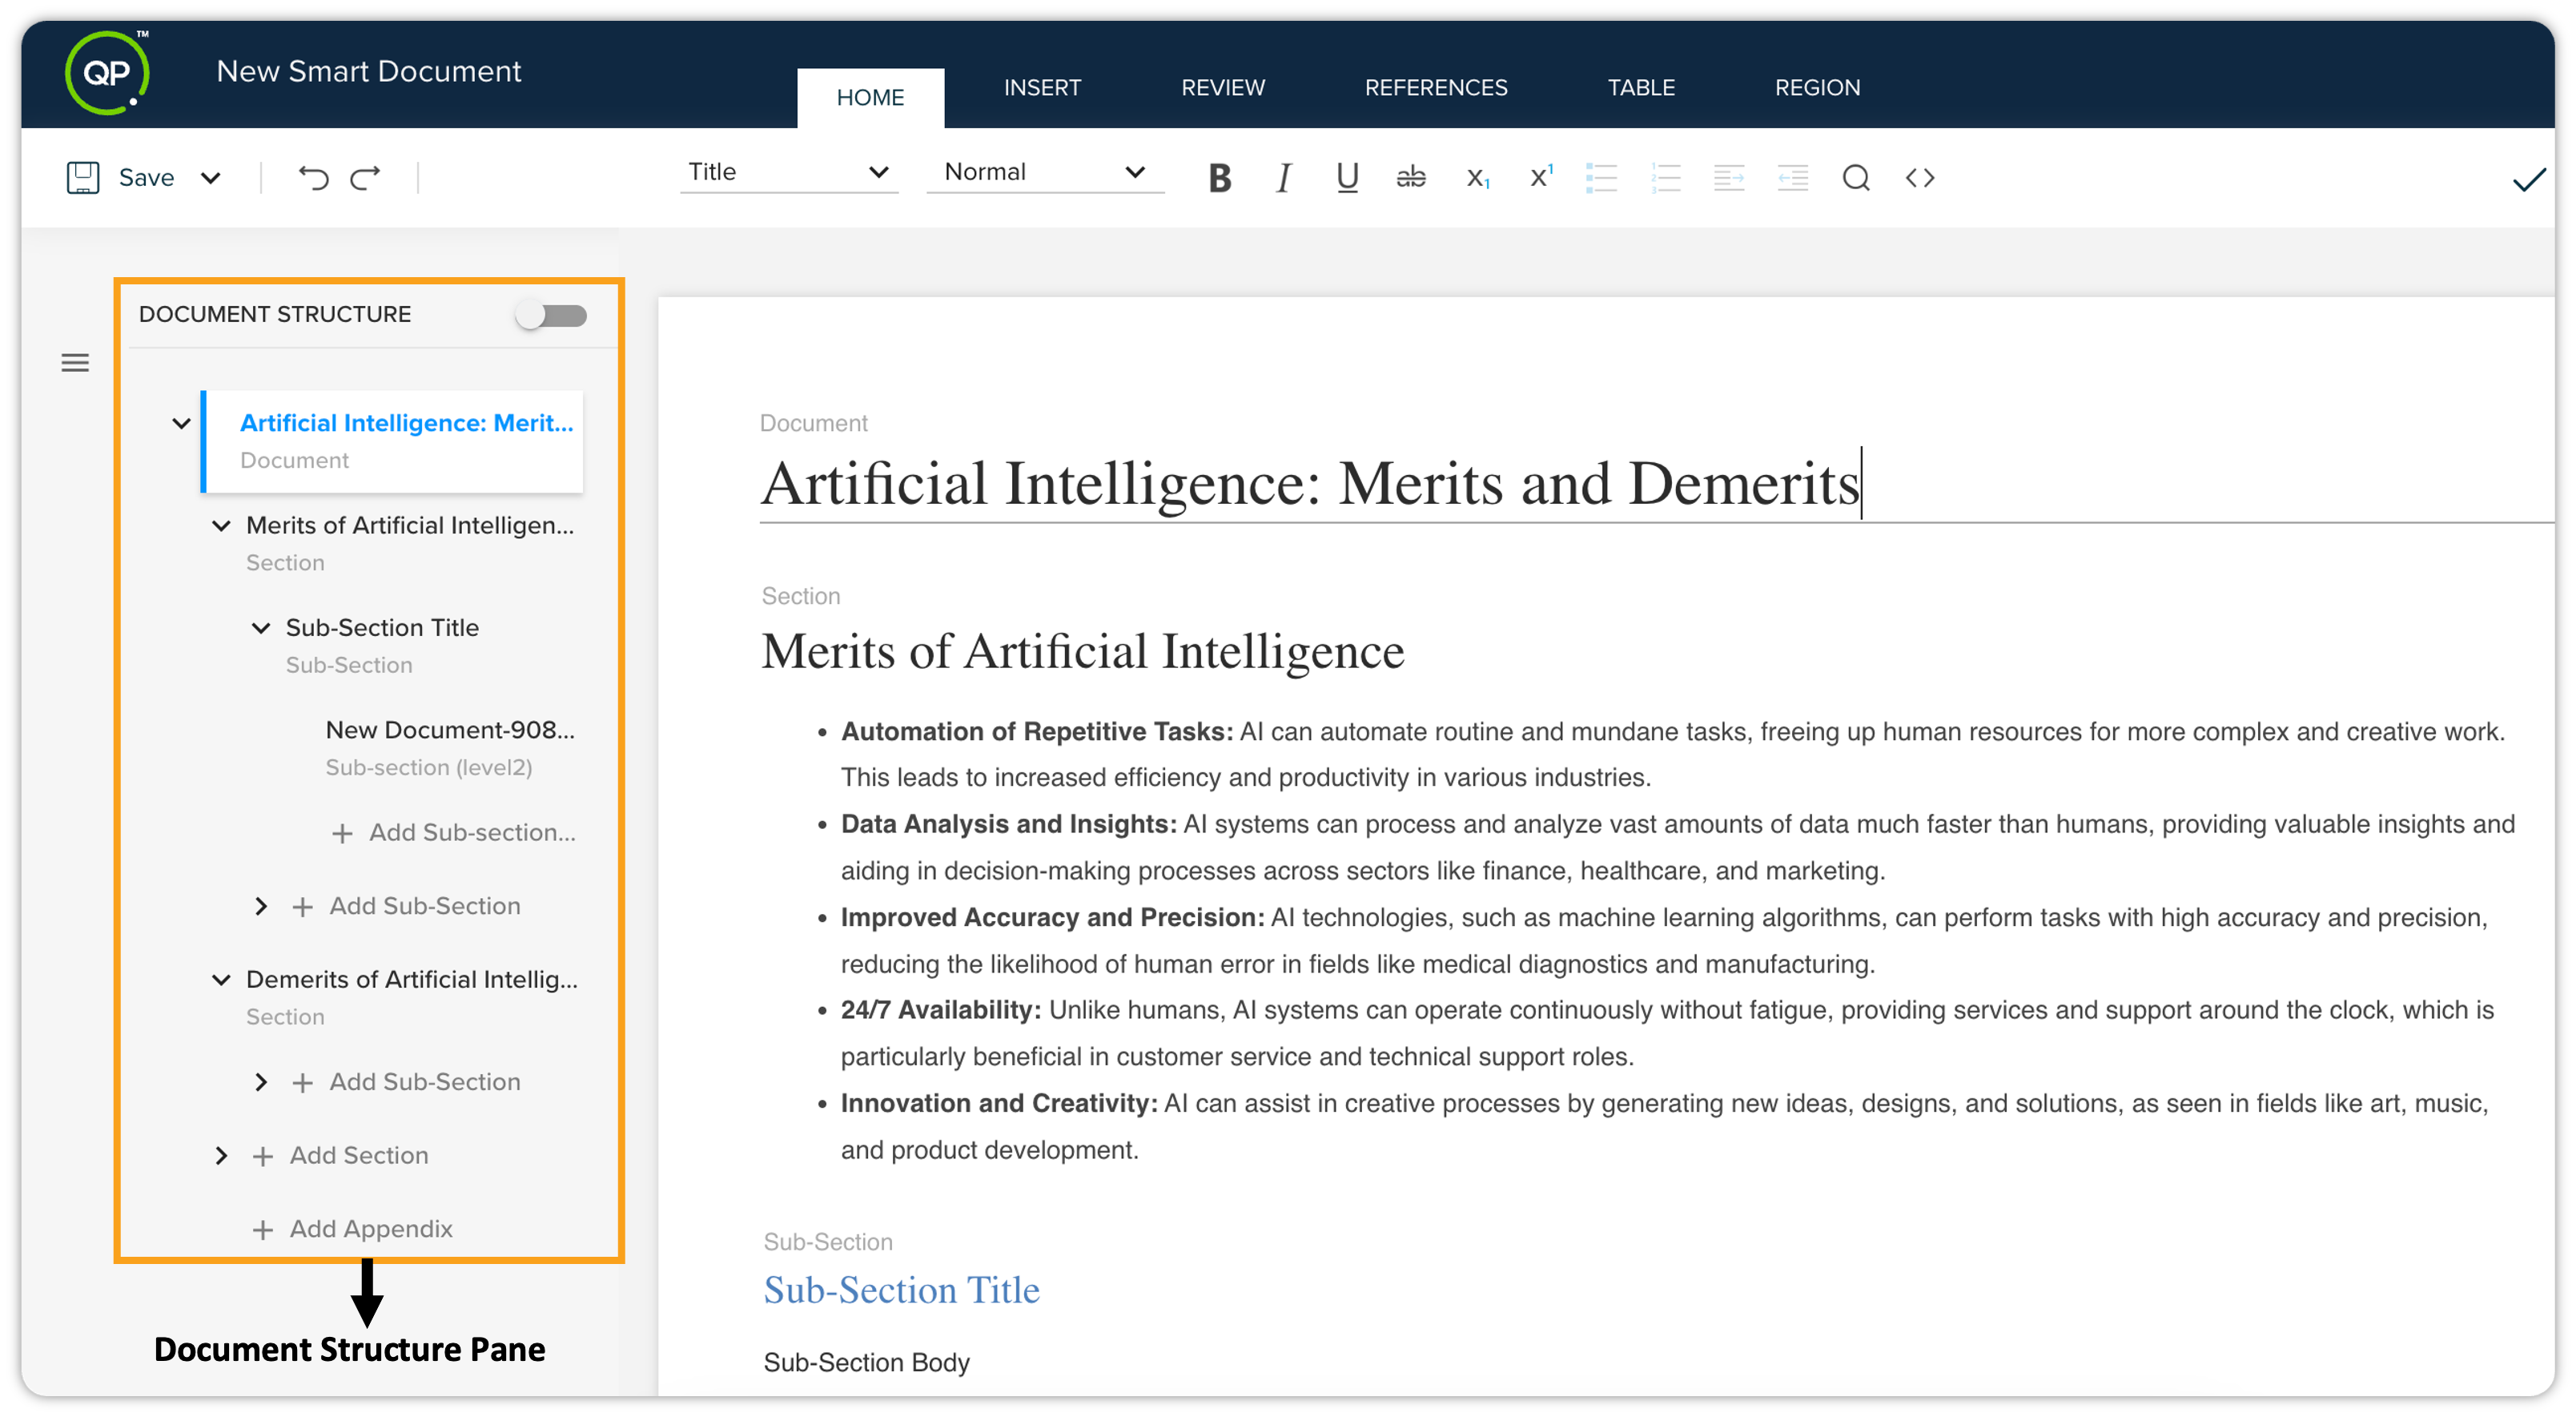
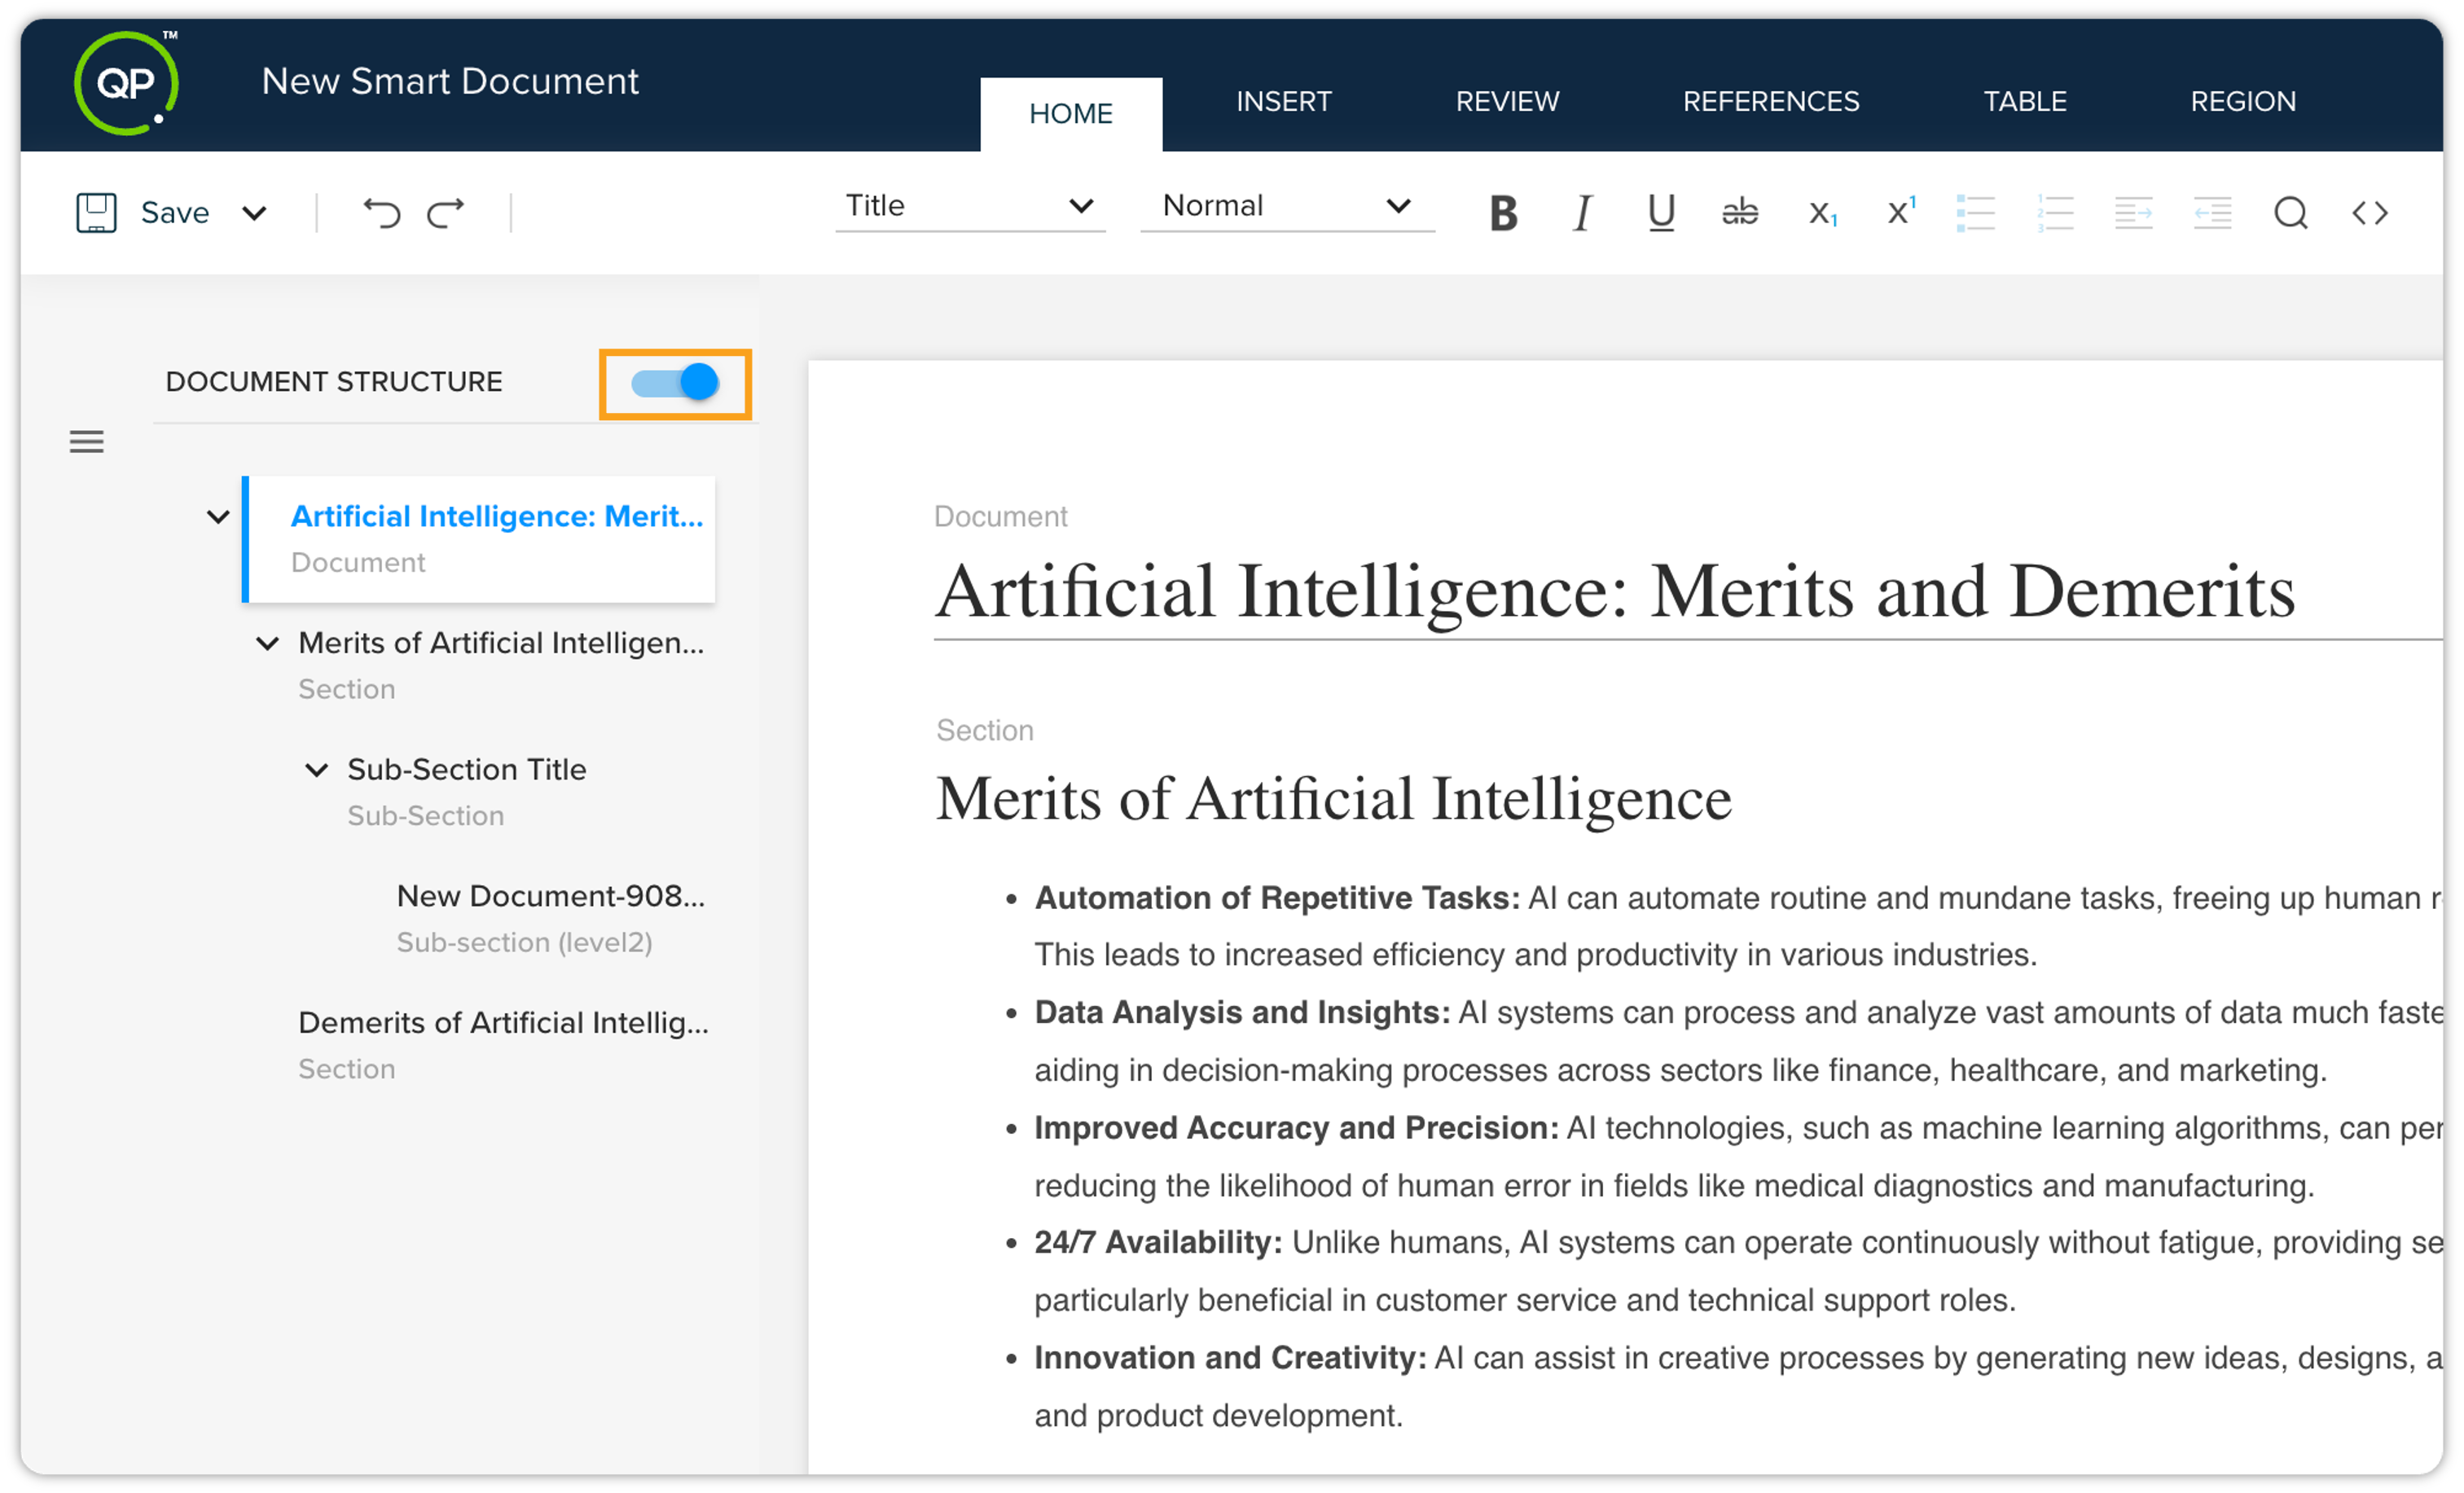
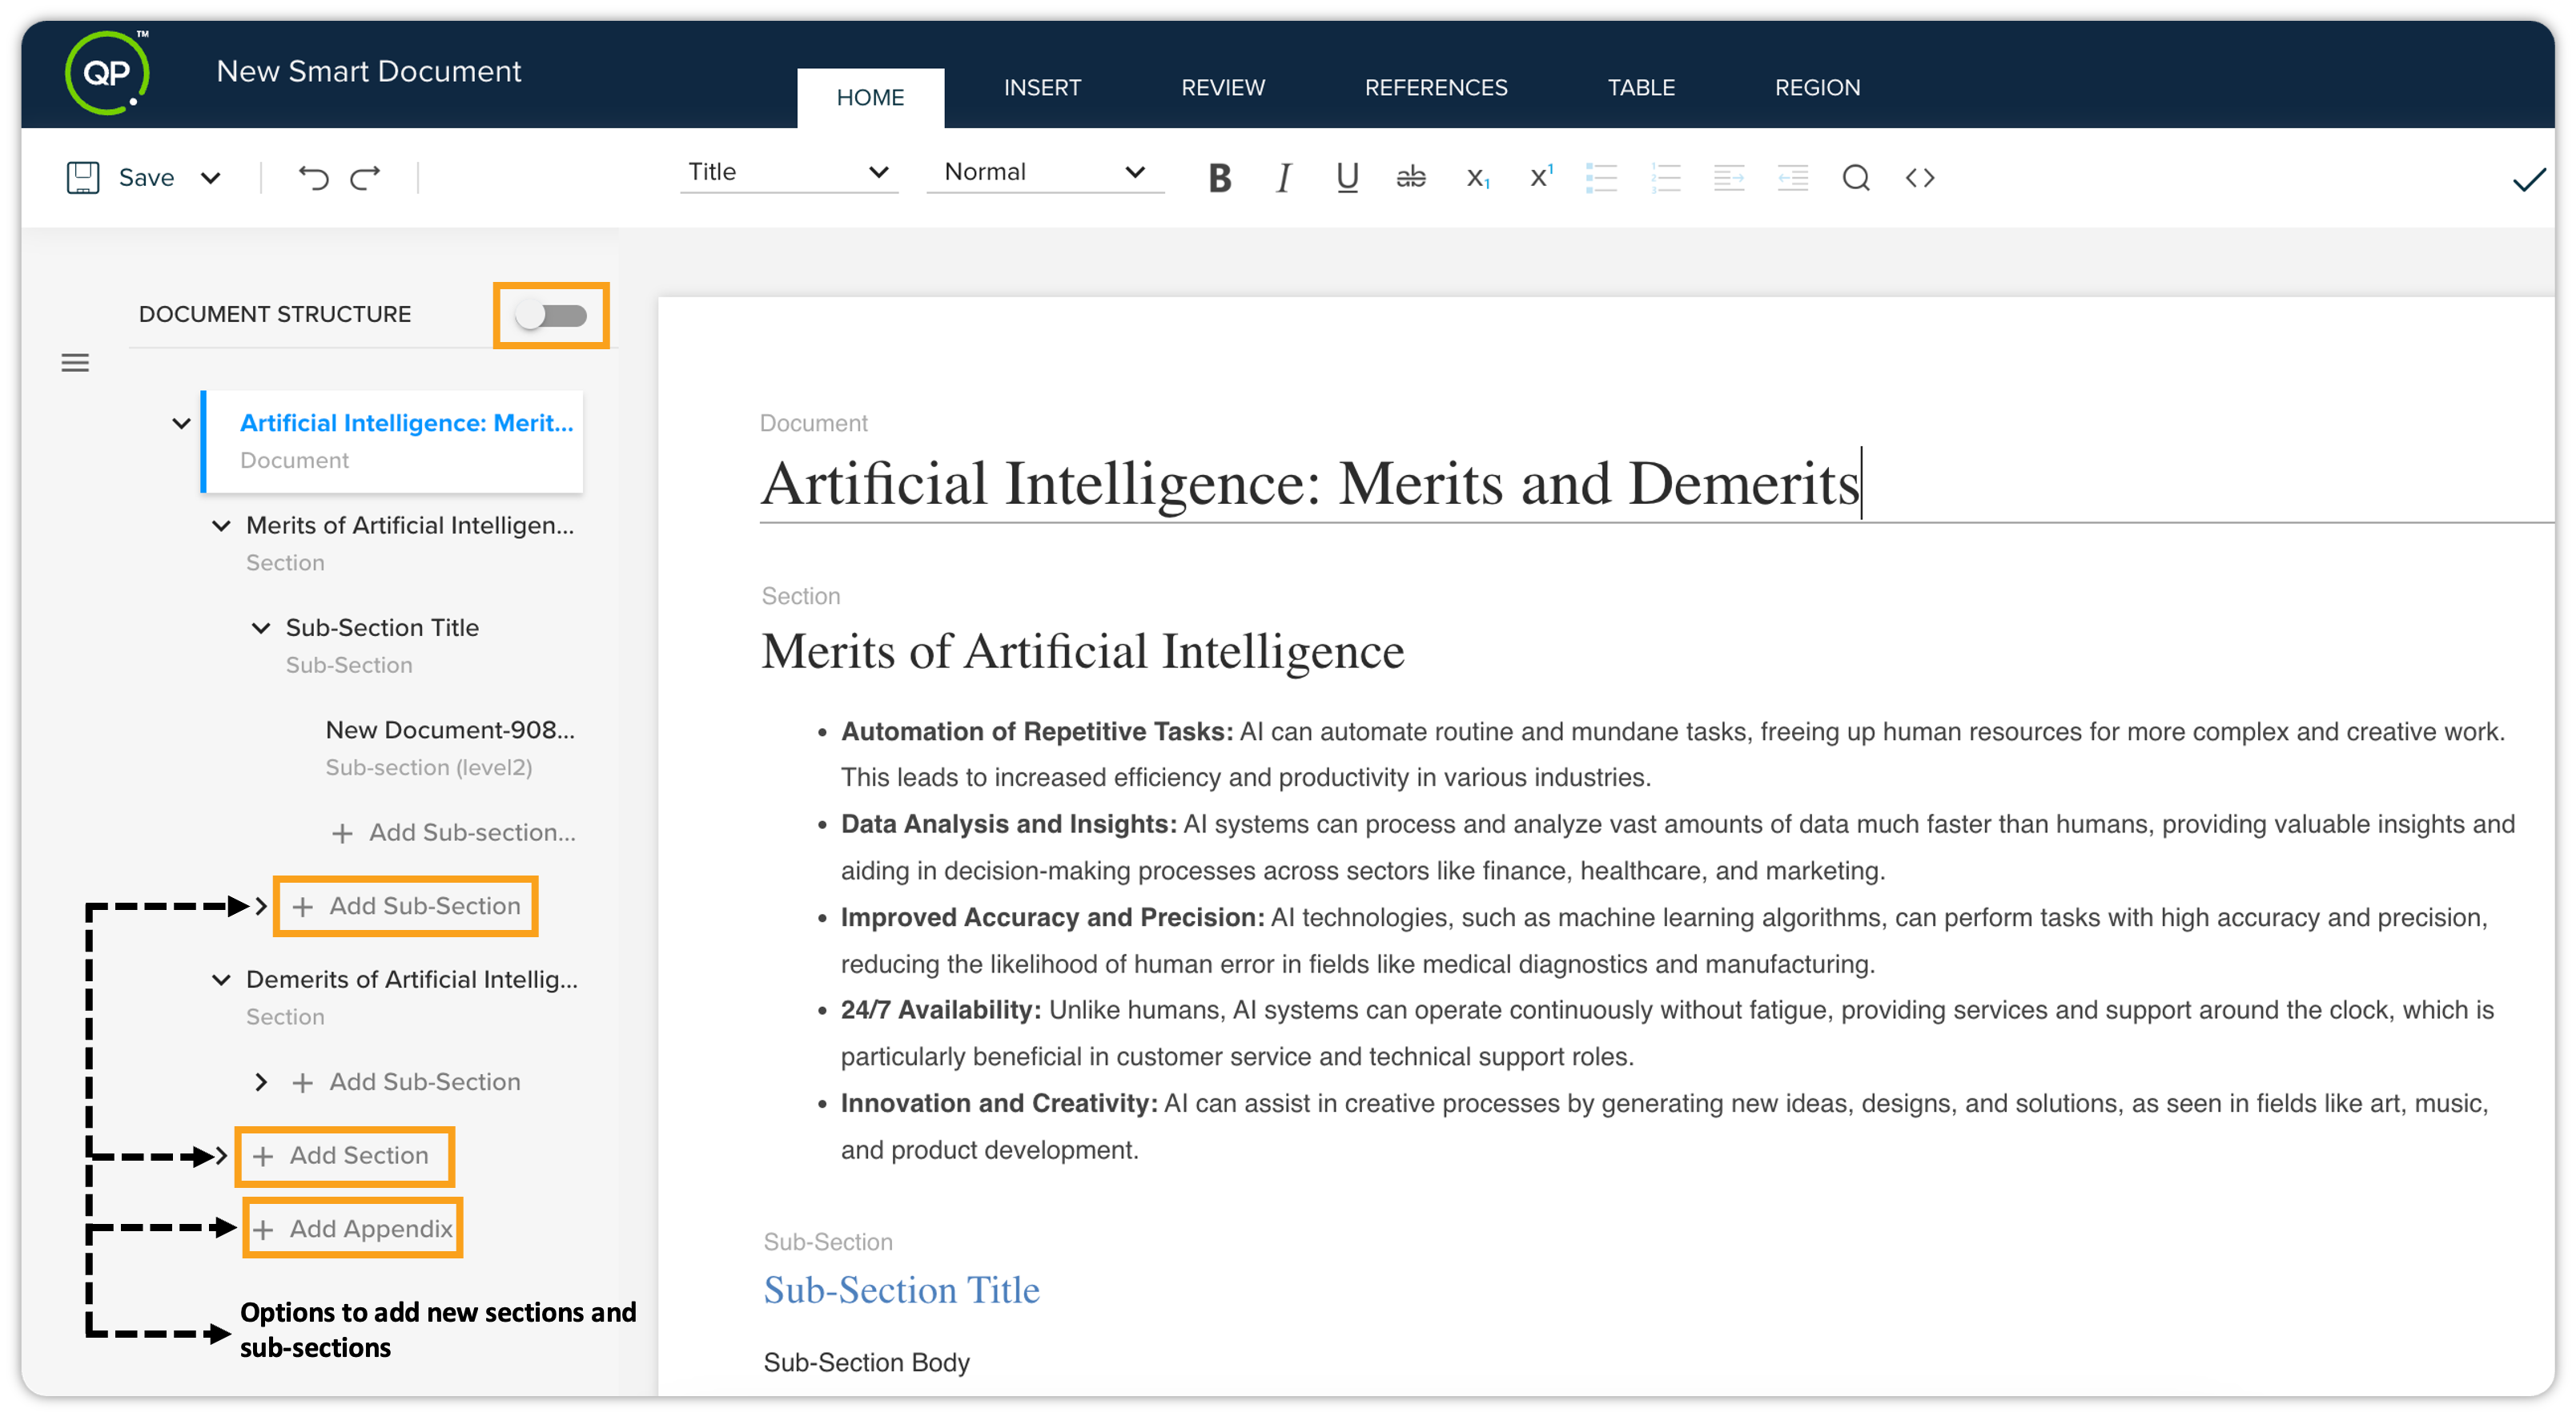
The Document Structure pane has a Show Outline Only mode, which you can switch On and Off through the slide button at the upper-right corner of the pane.
-
When On, QPP only displays the structure of the document, which you can expand and collapse through the icons and respectively.
-
When Off, QPP provides you the options to add sections and sub-sections in-between the already available sections in the document.
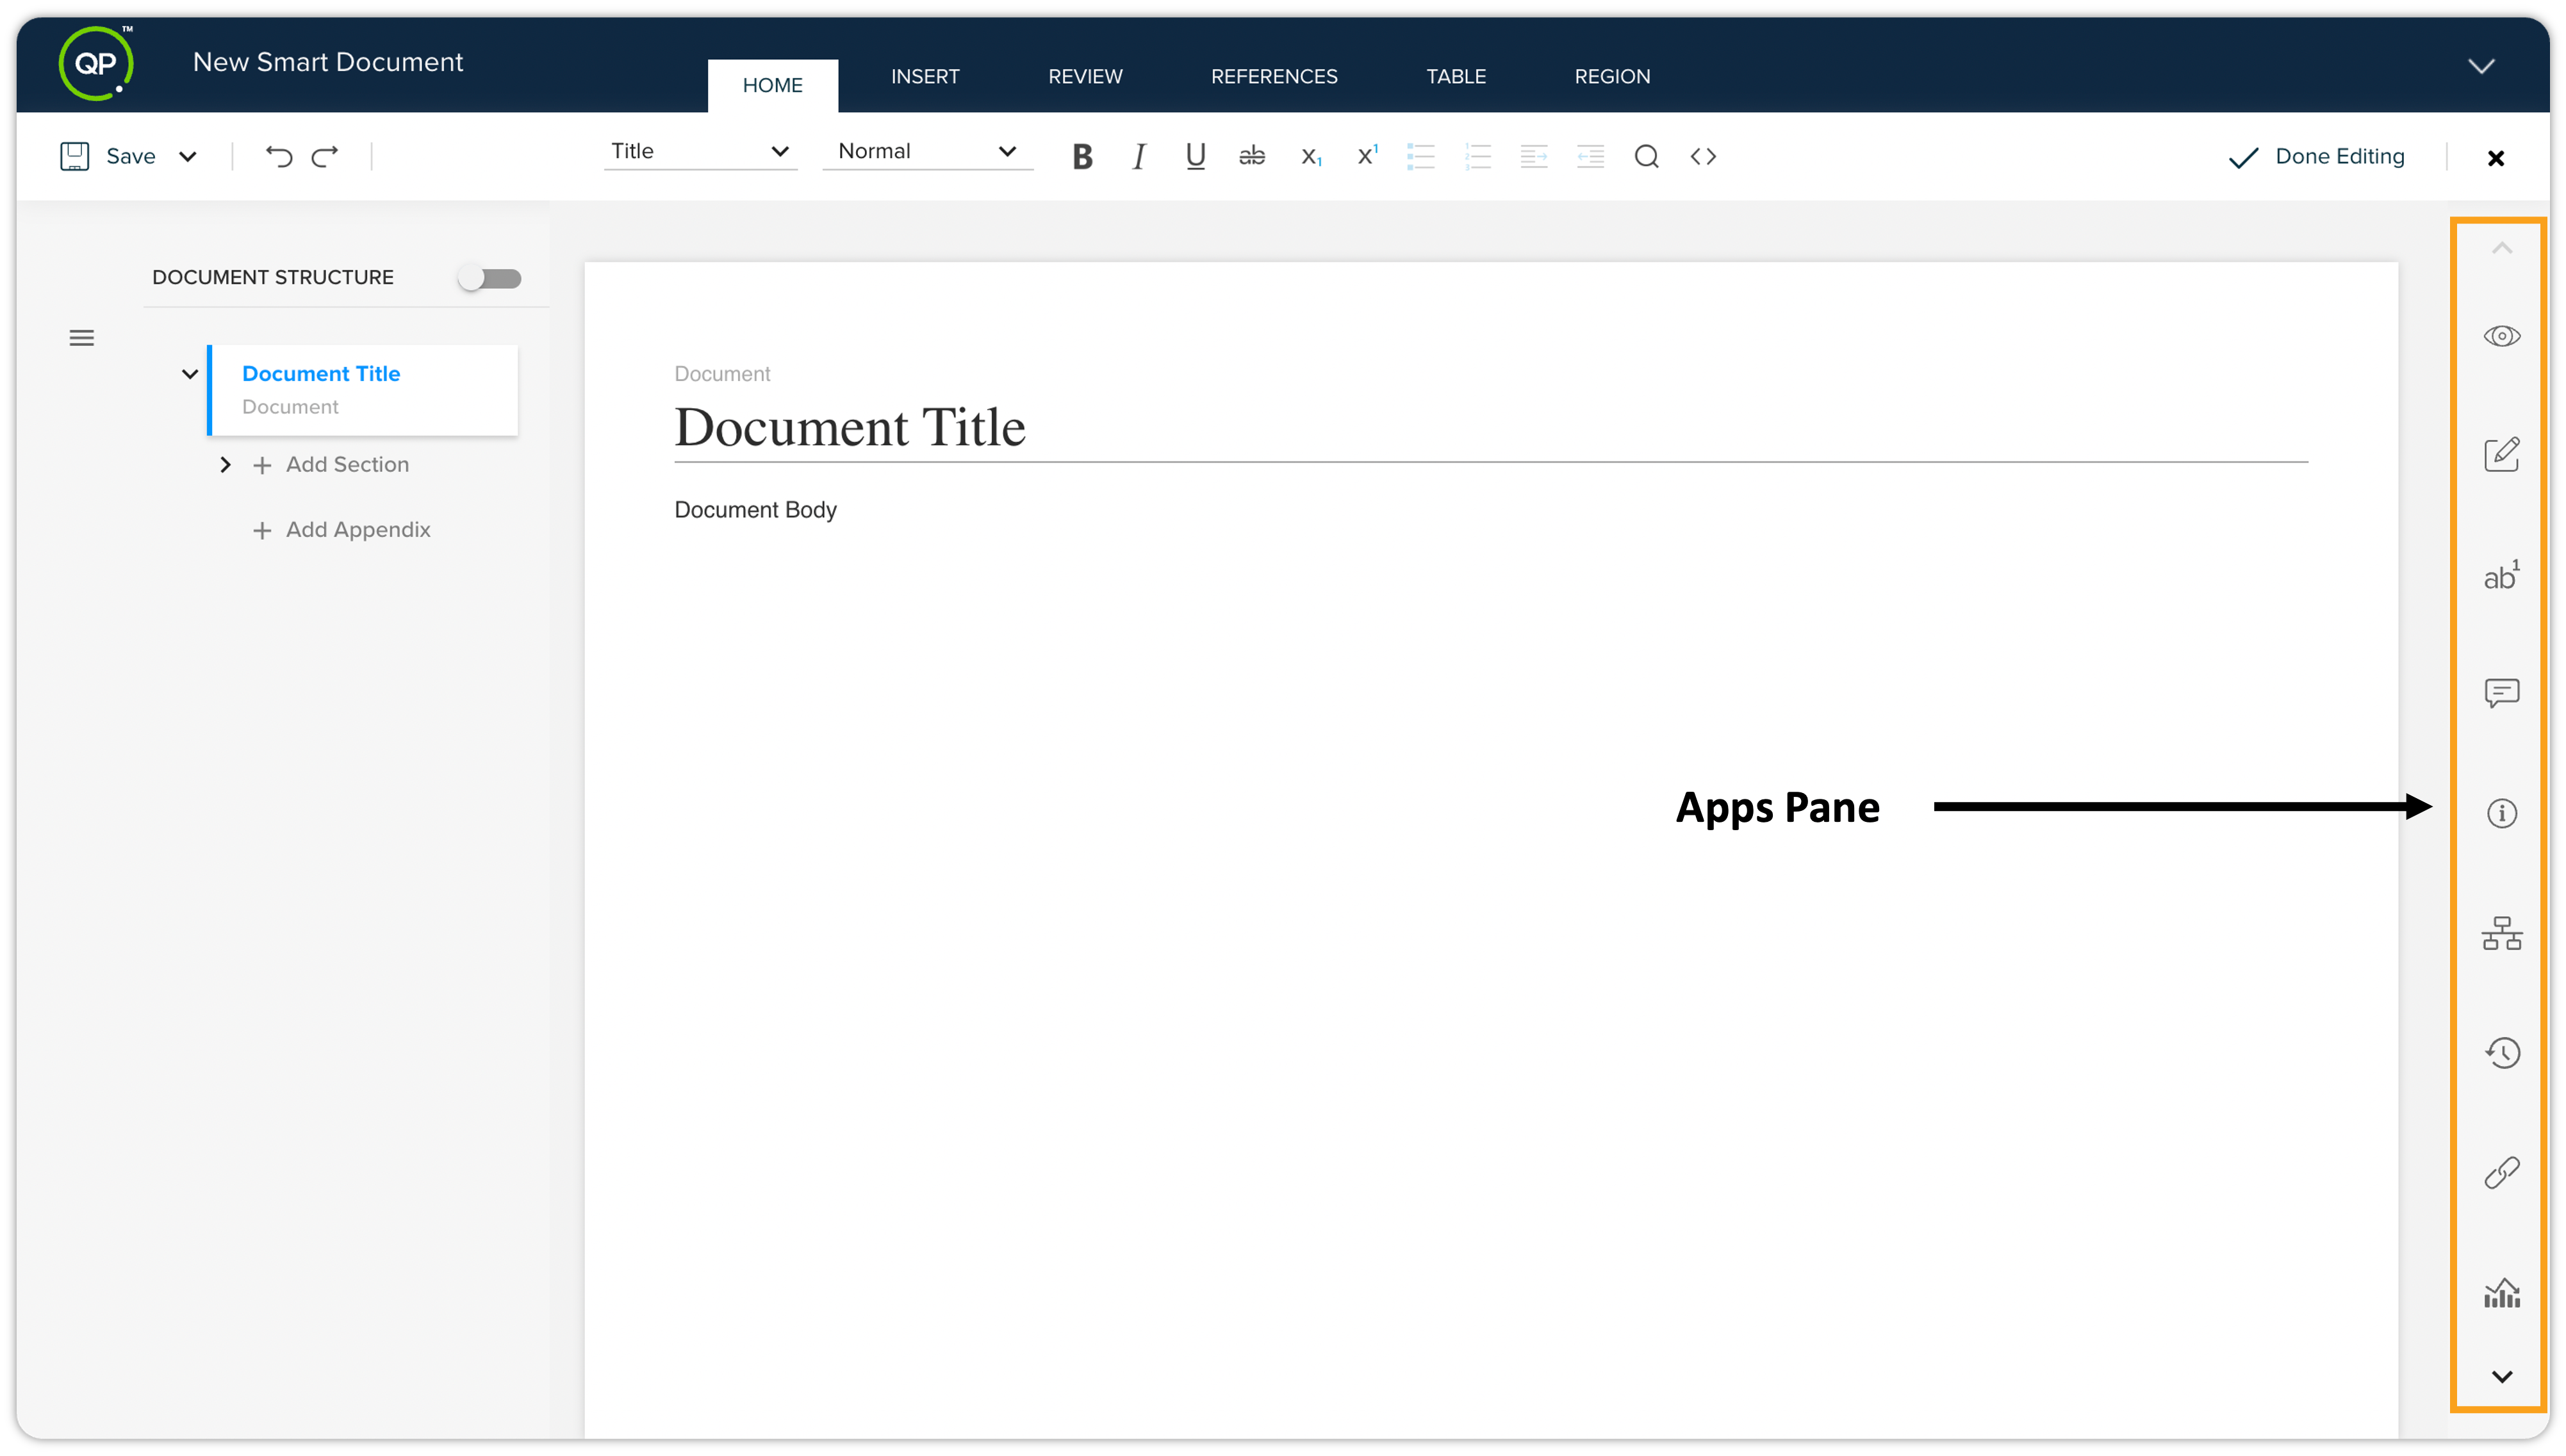
Apps Pane
The applications pane or apps pane in the content editor tool provide several options to view, update, and preview a document and its elements.
These apps are as follows:
Preview
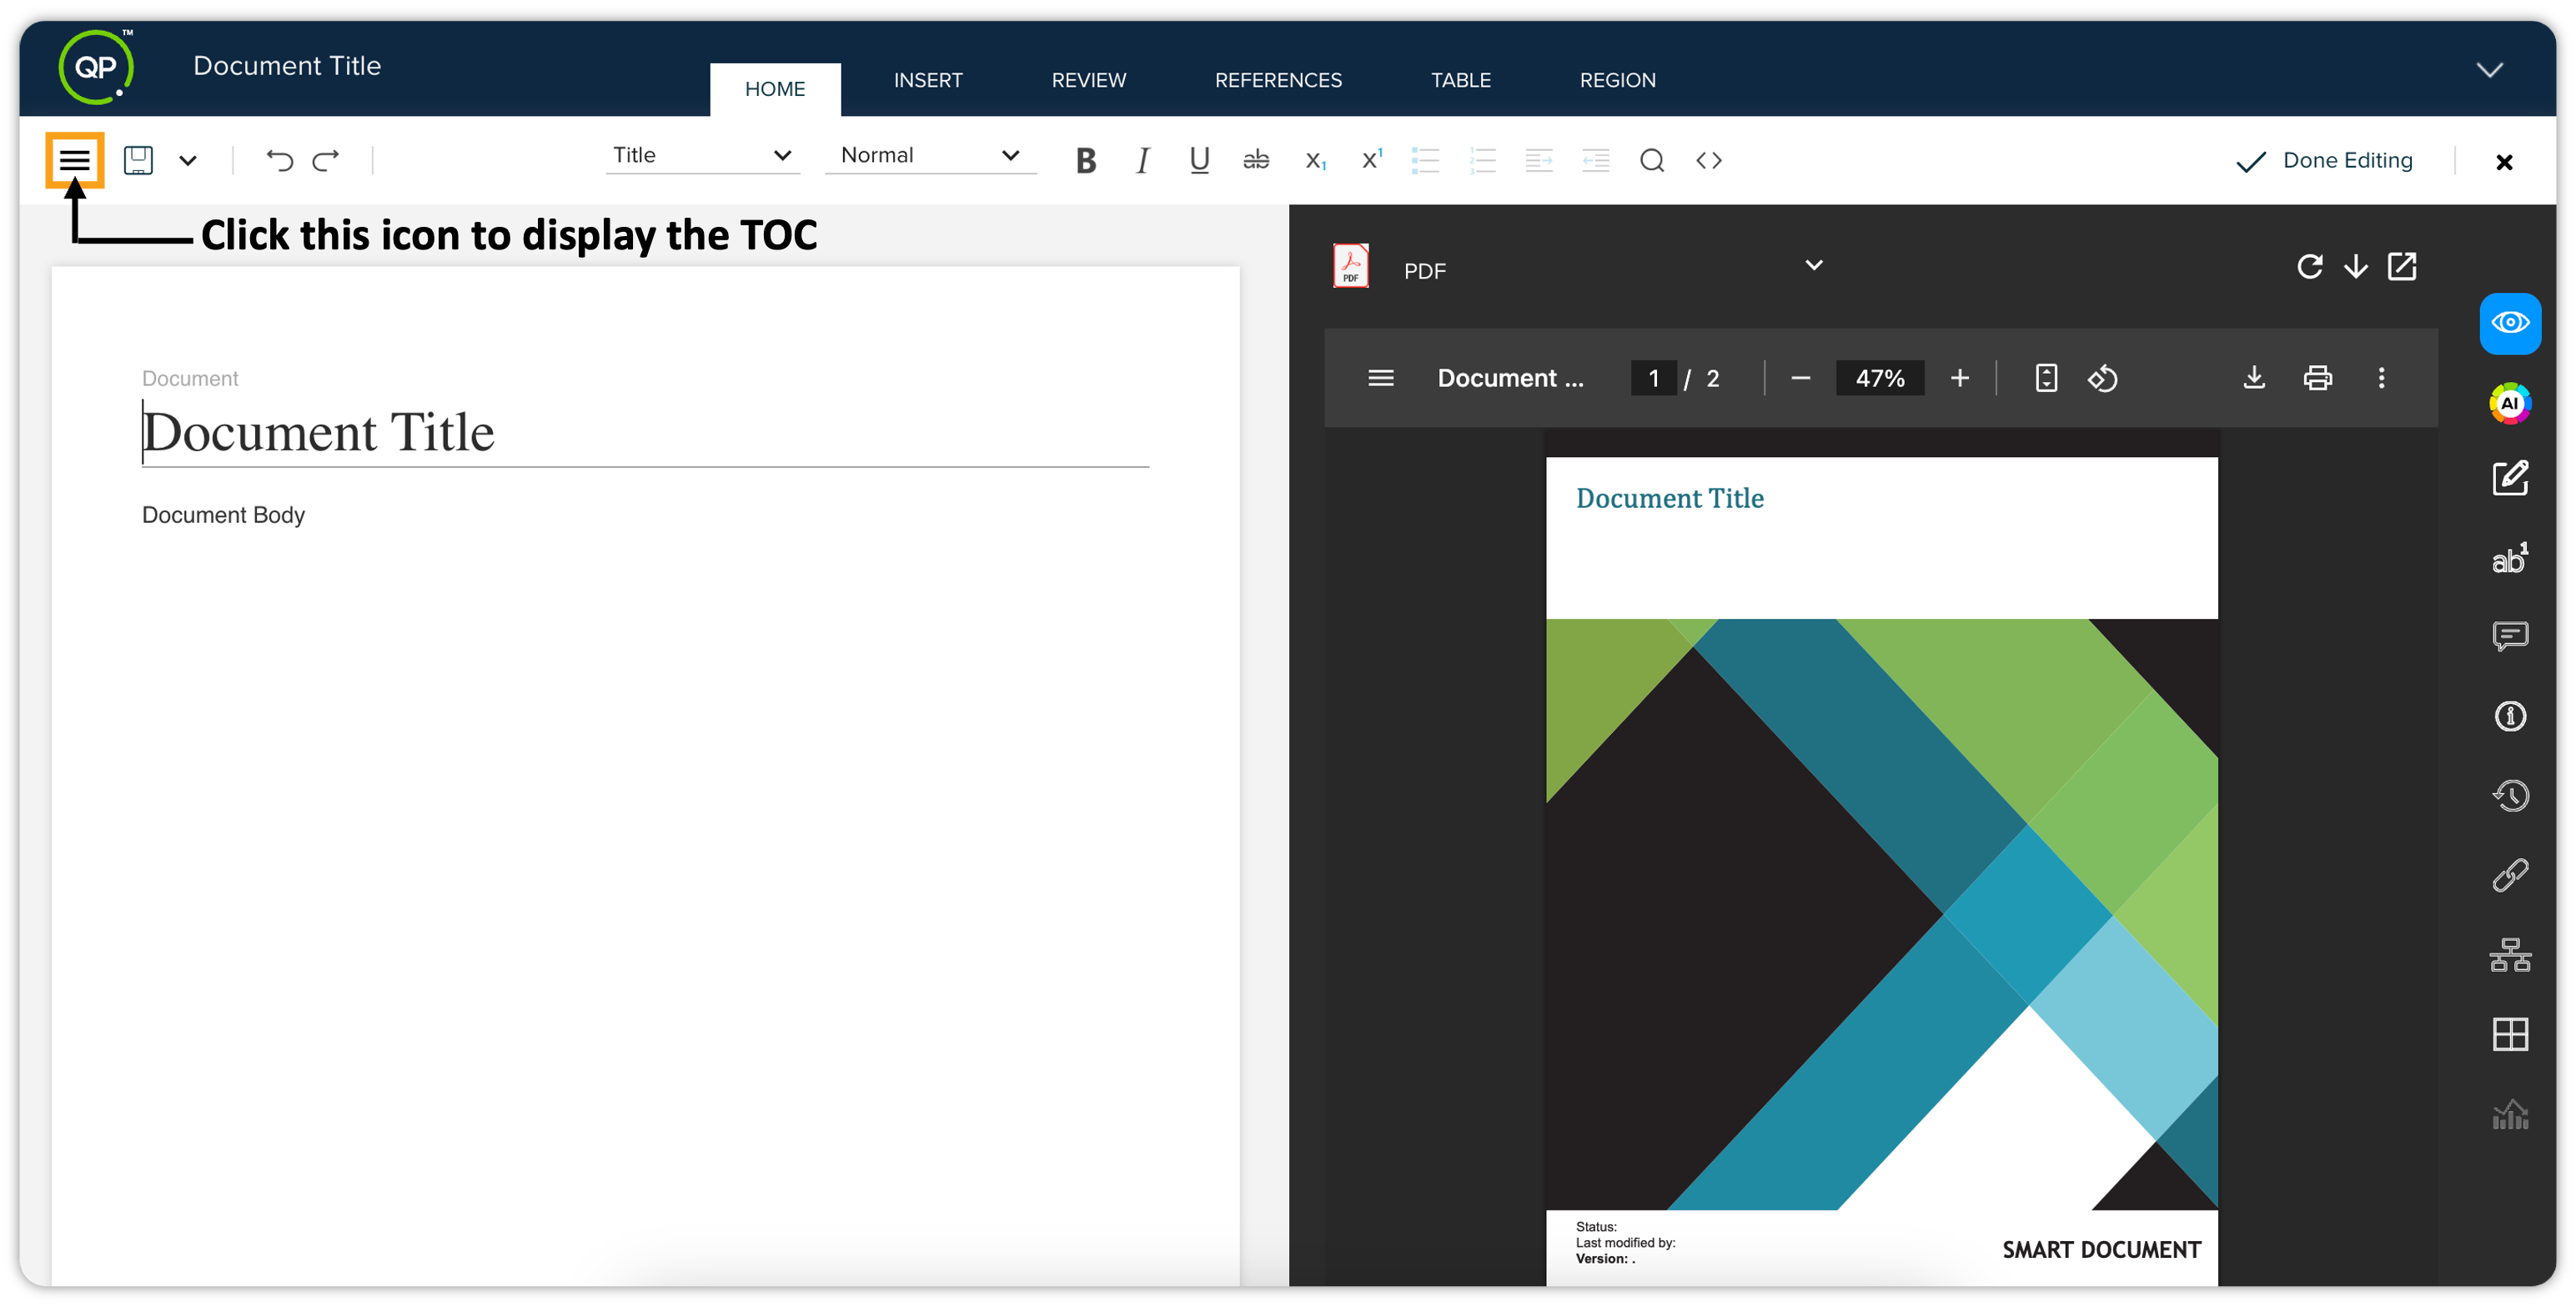
The Preview pane allows you to preview a document in several formats (output channels) and also provides a few related options such as downloading a preview, refreshing the preview, and so on.
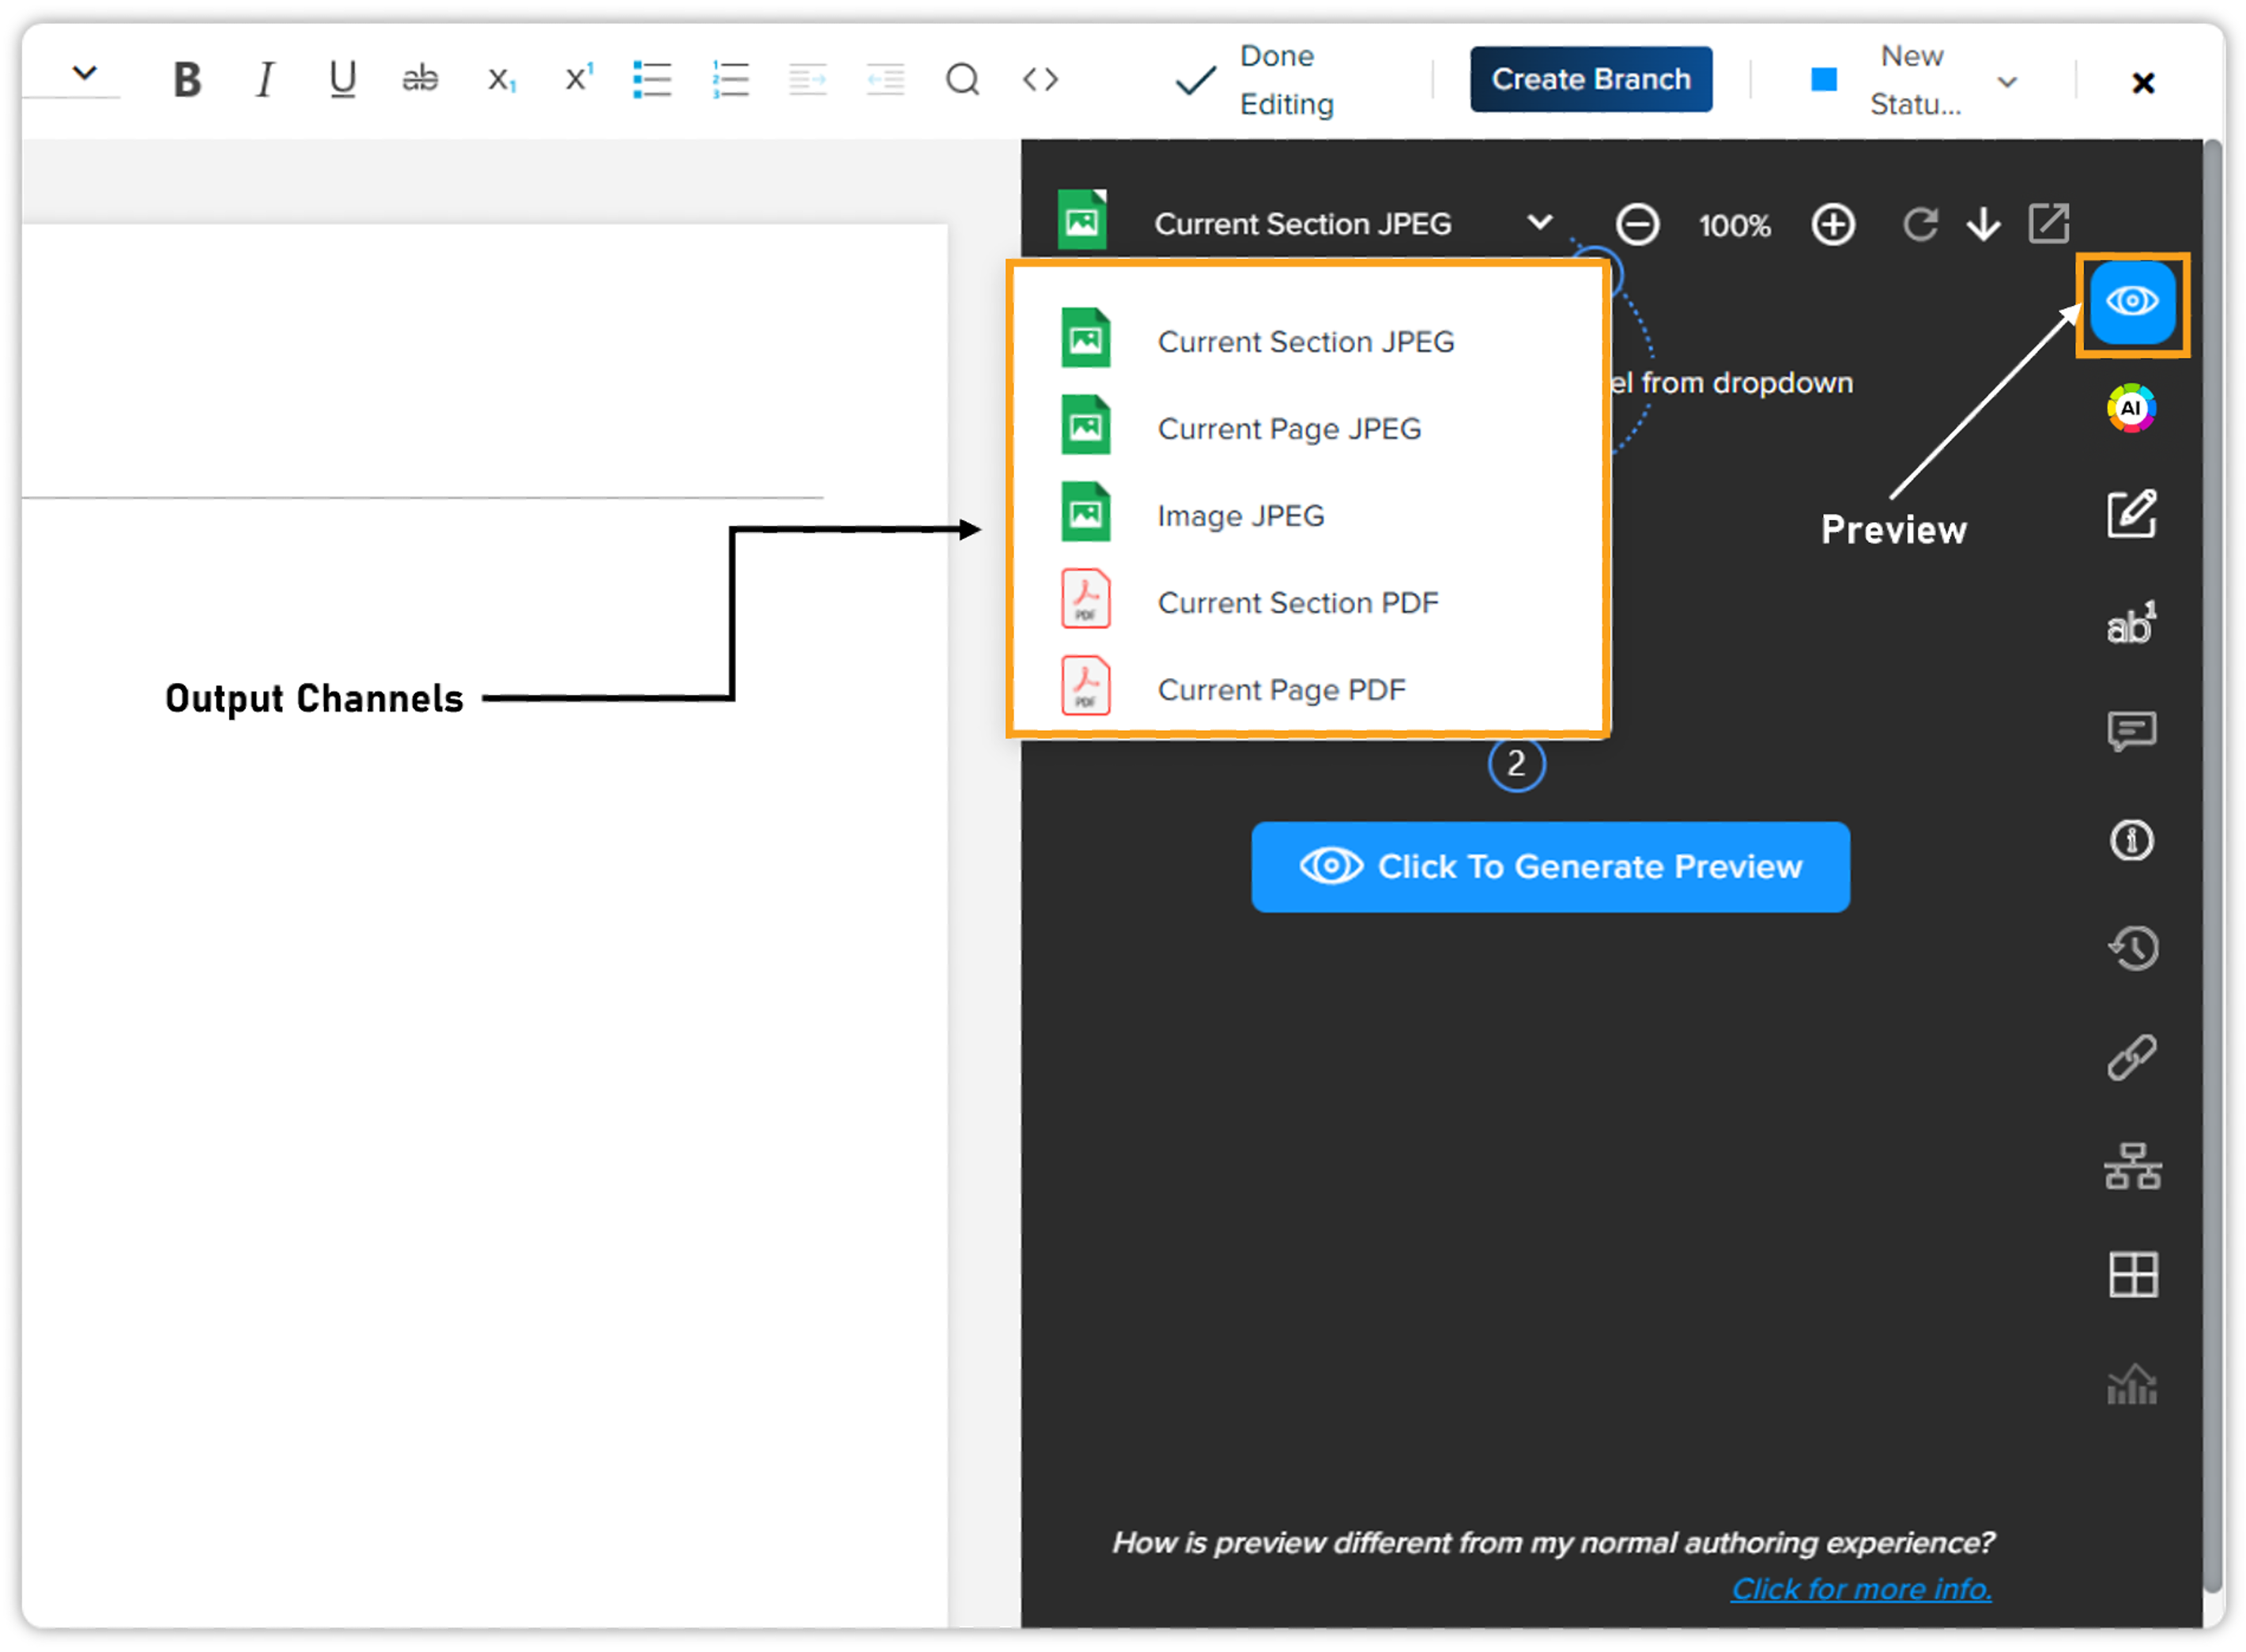
Primarily, the Preview pane previews a document in one of the following formats through several output channels:
-
PDF
-
JPEG
-
HTML
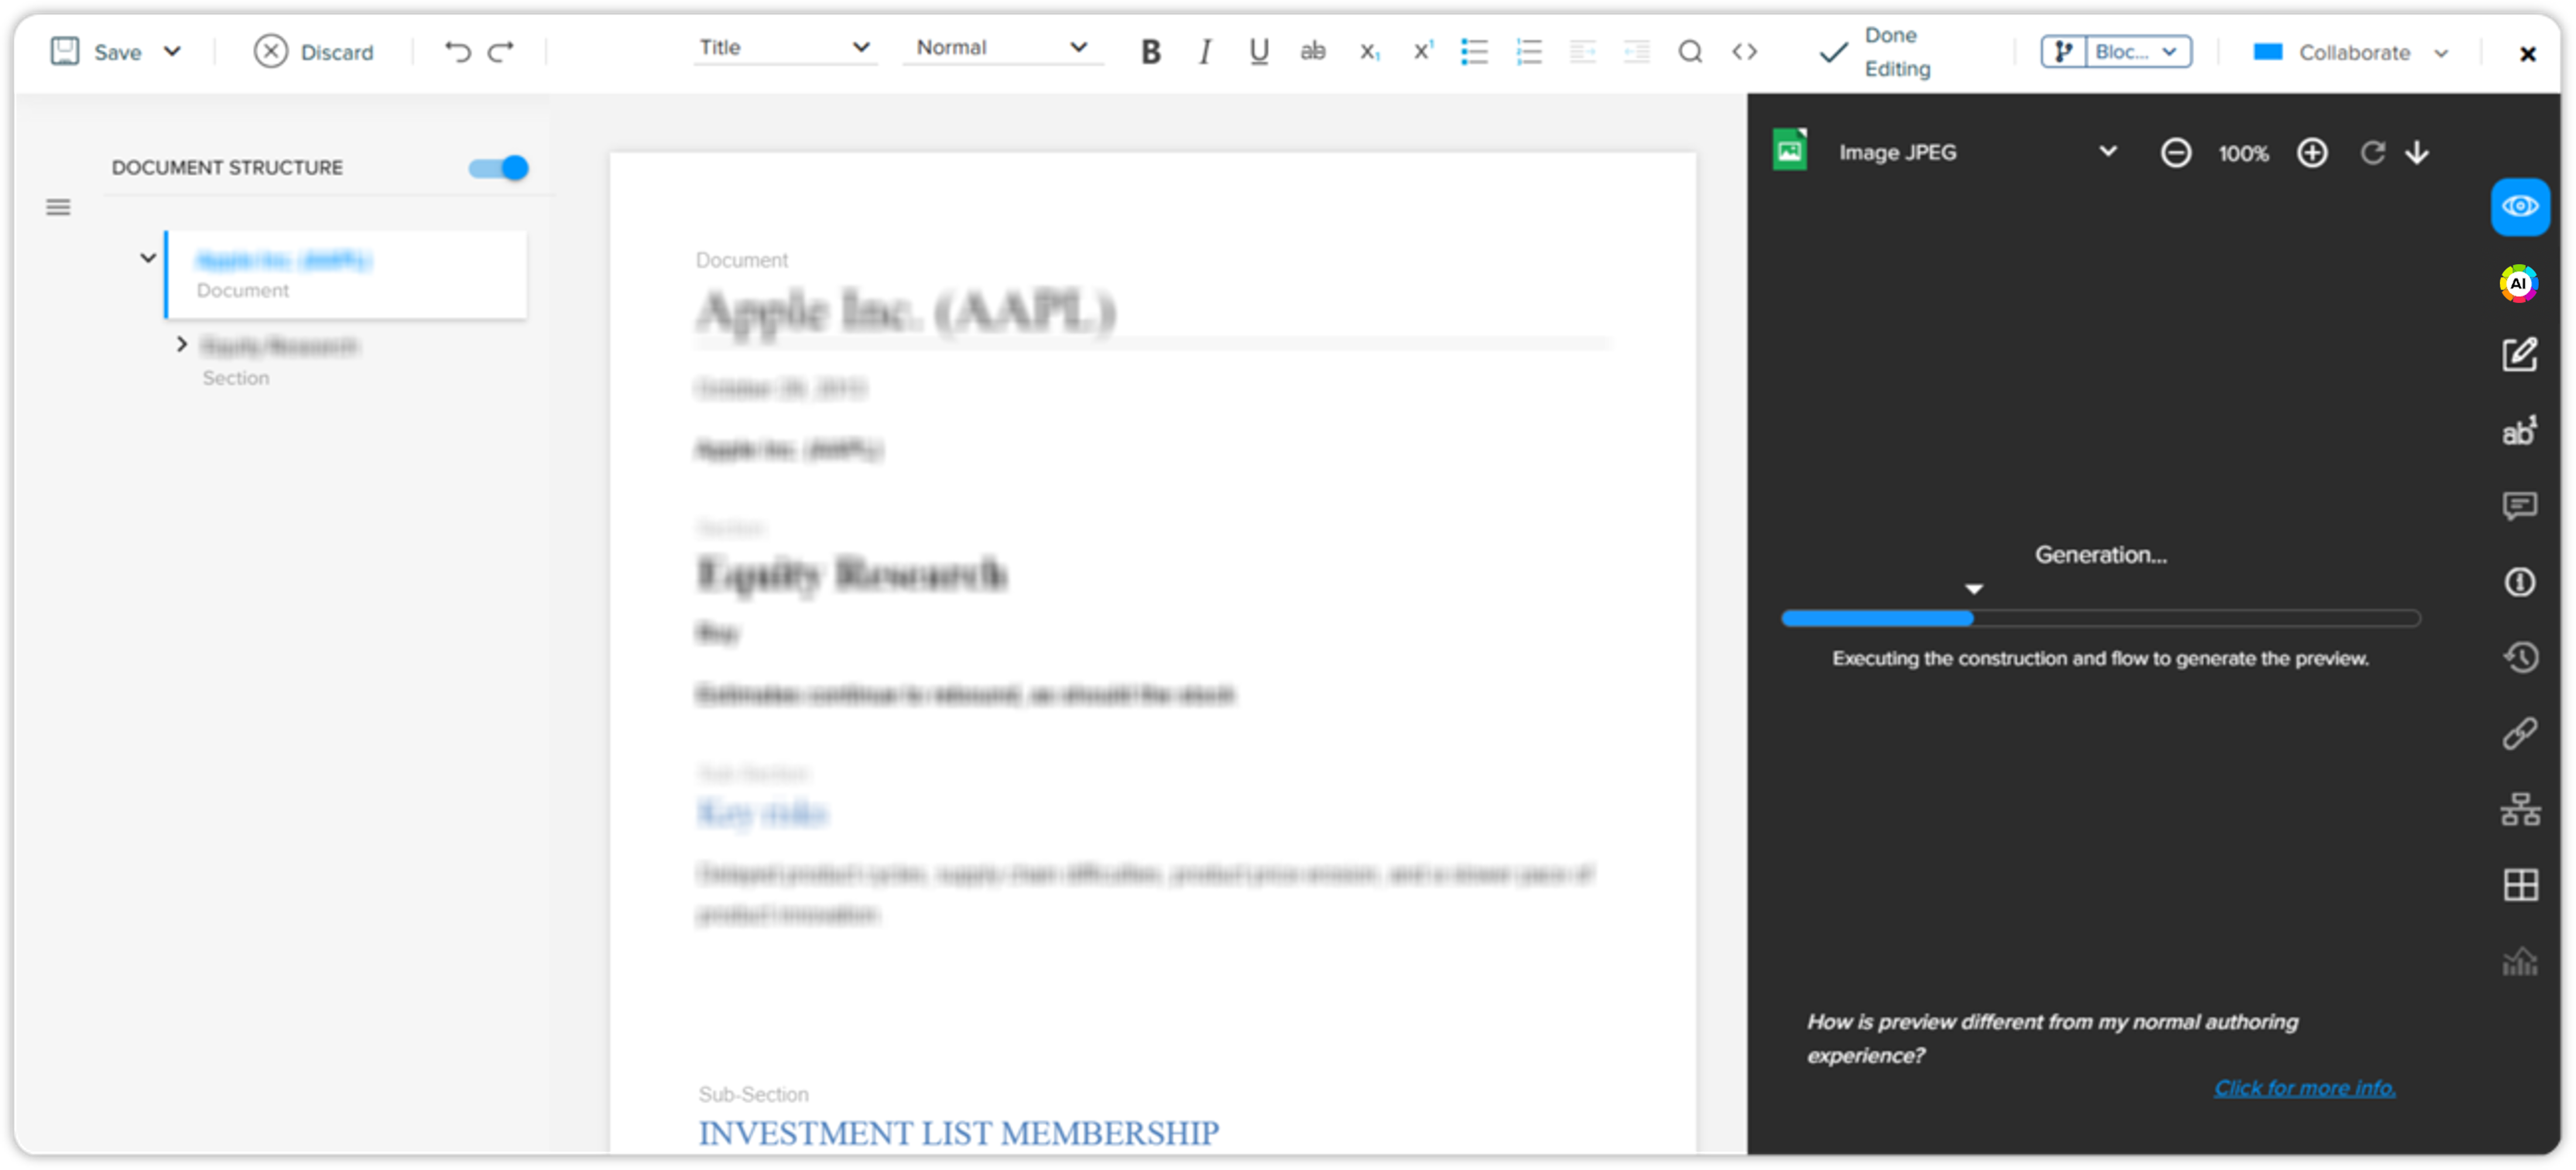
Click on the Click to Generate Preview button to generate the preview of the document. You’ll see a progress bar that displays the completion percentage and the current stage of the preview process.
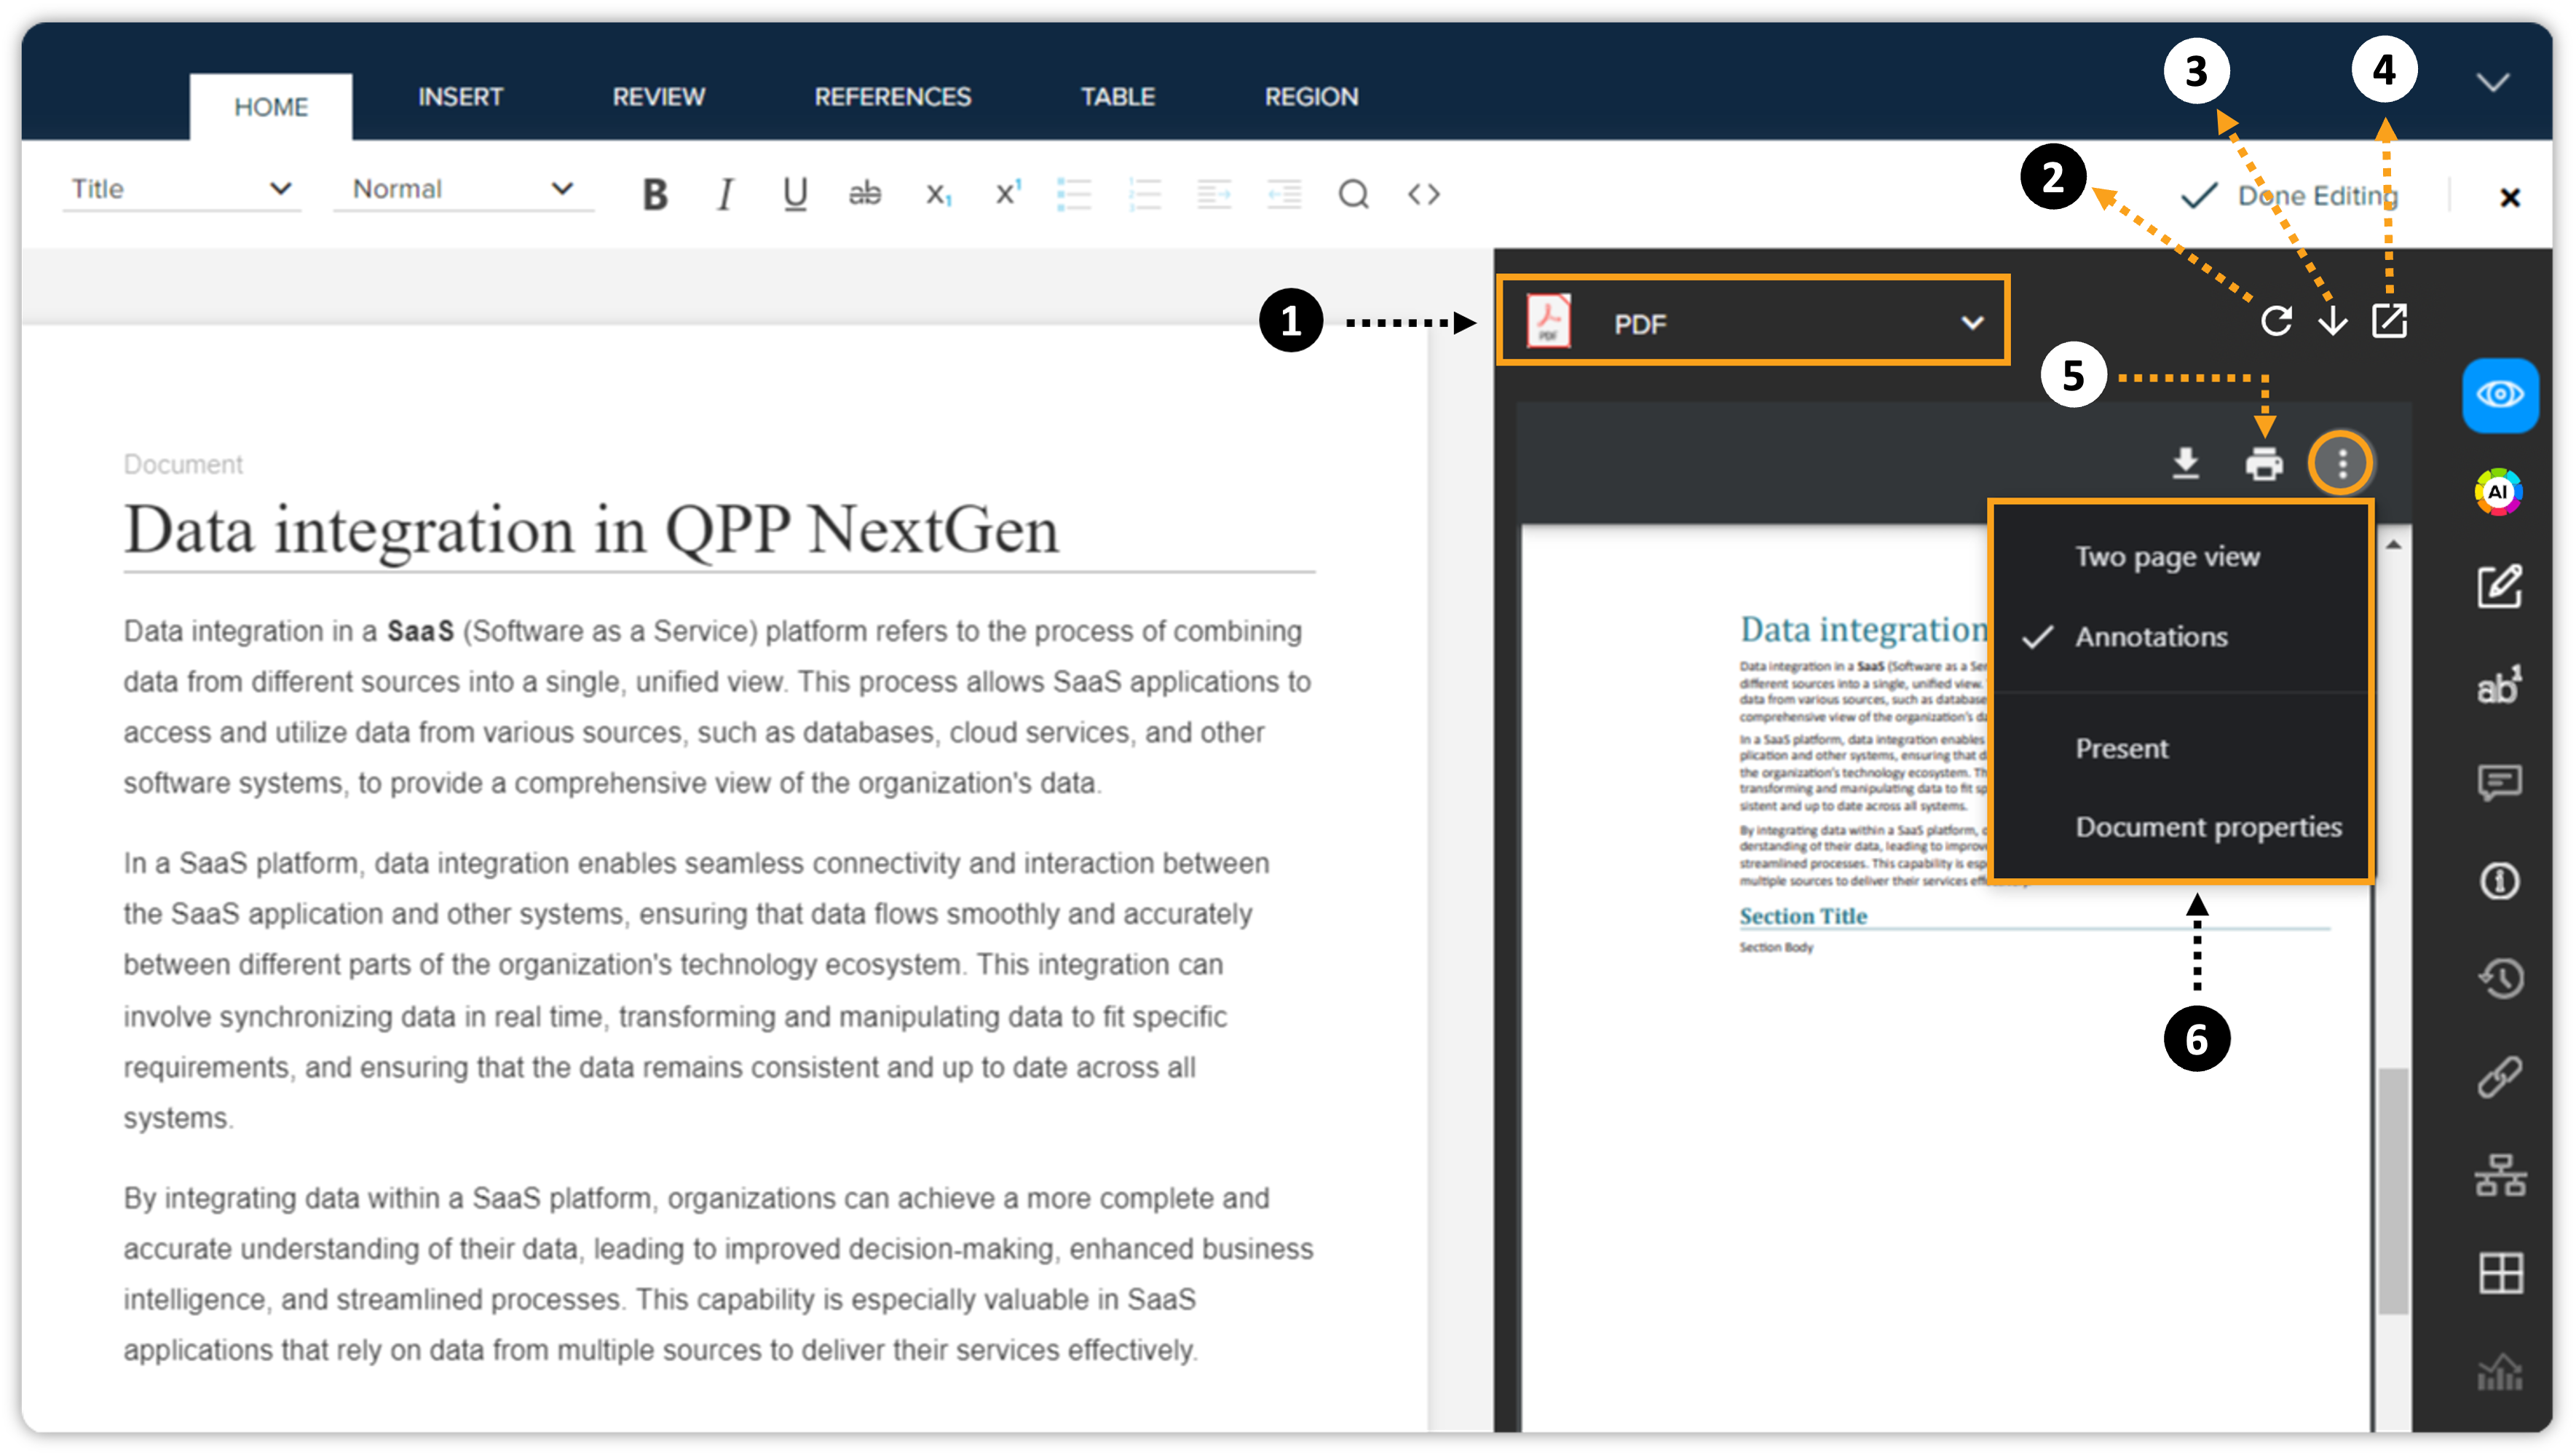
The Preview pane provides the following additional options:
-
Select an output channel
-
Refresh the review
-
Download the preview
-
Open in a new tab (this option will open the document preview in a new tab)
-
Print the preview
-
Additional options through the kebab menu icon, which allows you to change the display settings and view the document properties.
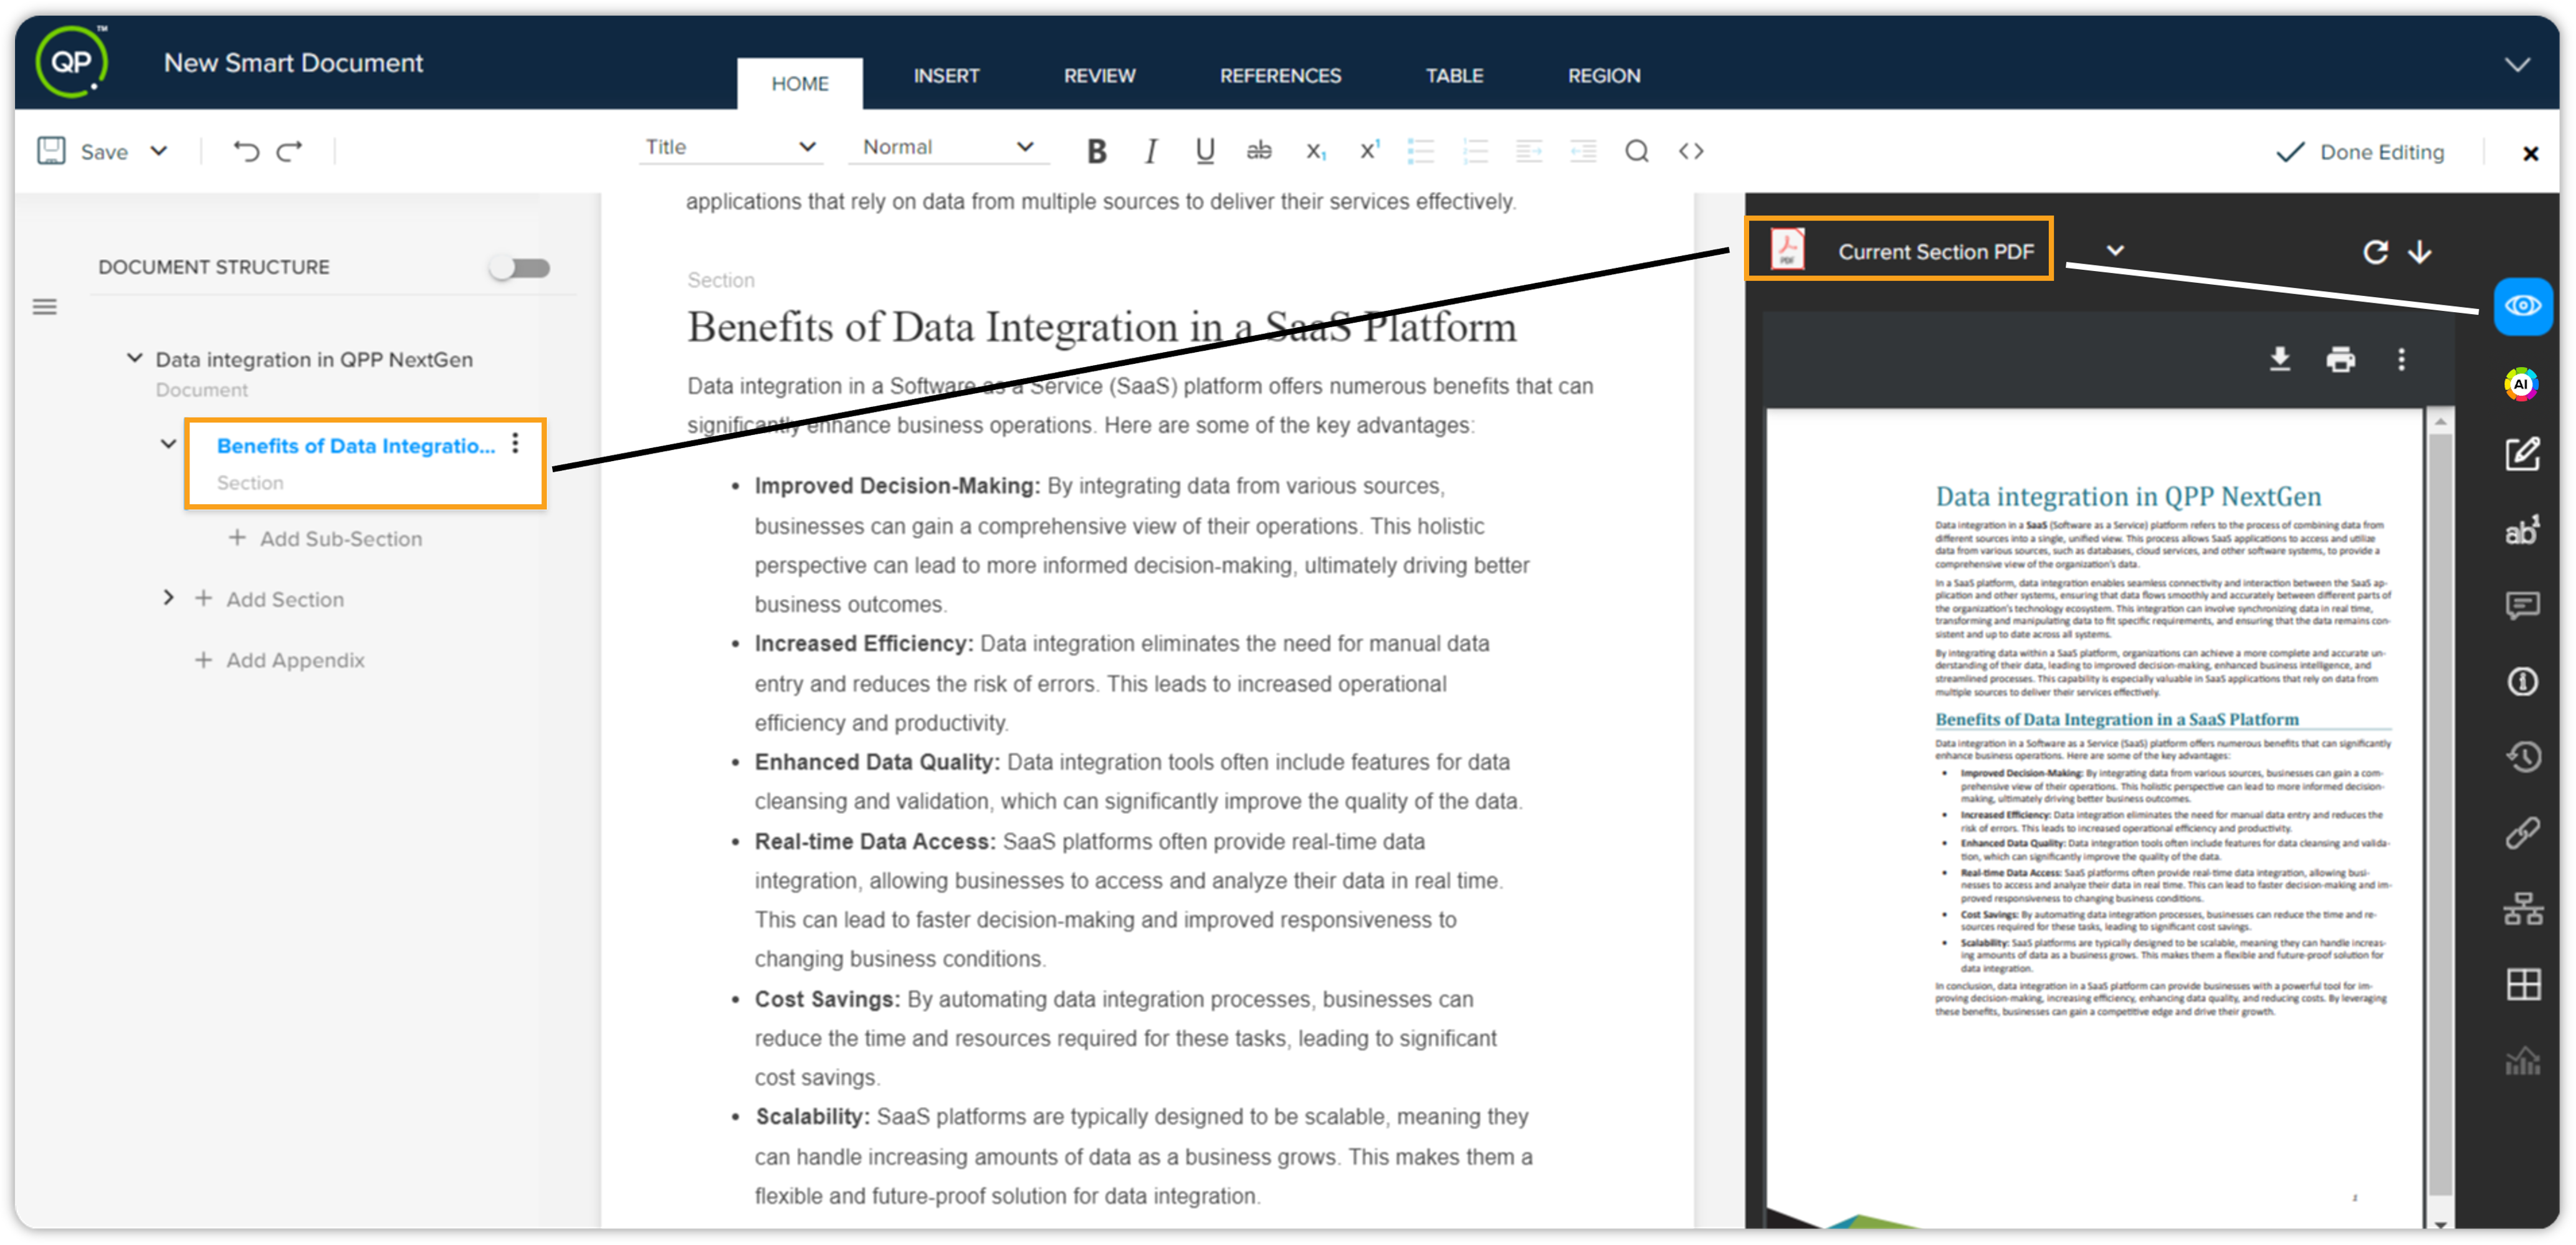
You can also preview a specific section instead of the entire document. To preview a section:
-
Select the section in the navigation menu or place the cursor in the section in the document body.
-
Select one of these output channels Current Section PDF.
-
Click the Preview icon.
AI Assistant
For detailed information about AI Assistant, previously known as Quarky Copilot, and how to use that, refer to this user guide — AI Assistant User Guide.
Changes
The Changes pane displays the most recent changes made in a document by any of the authors that are currently working on that document.
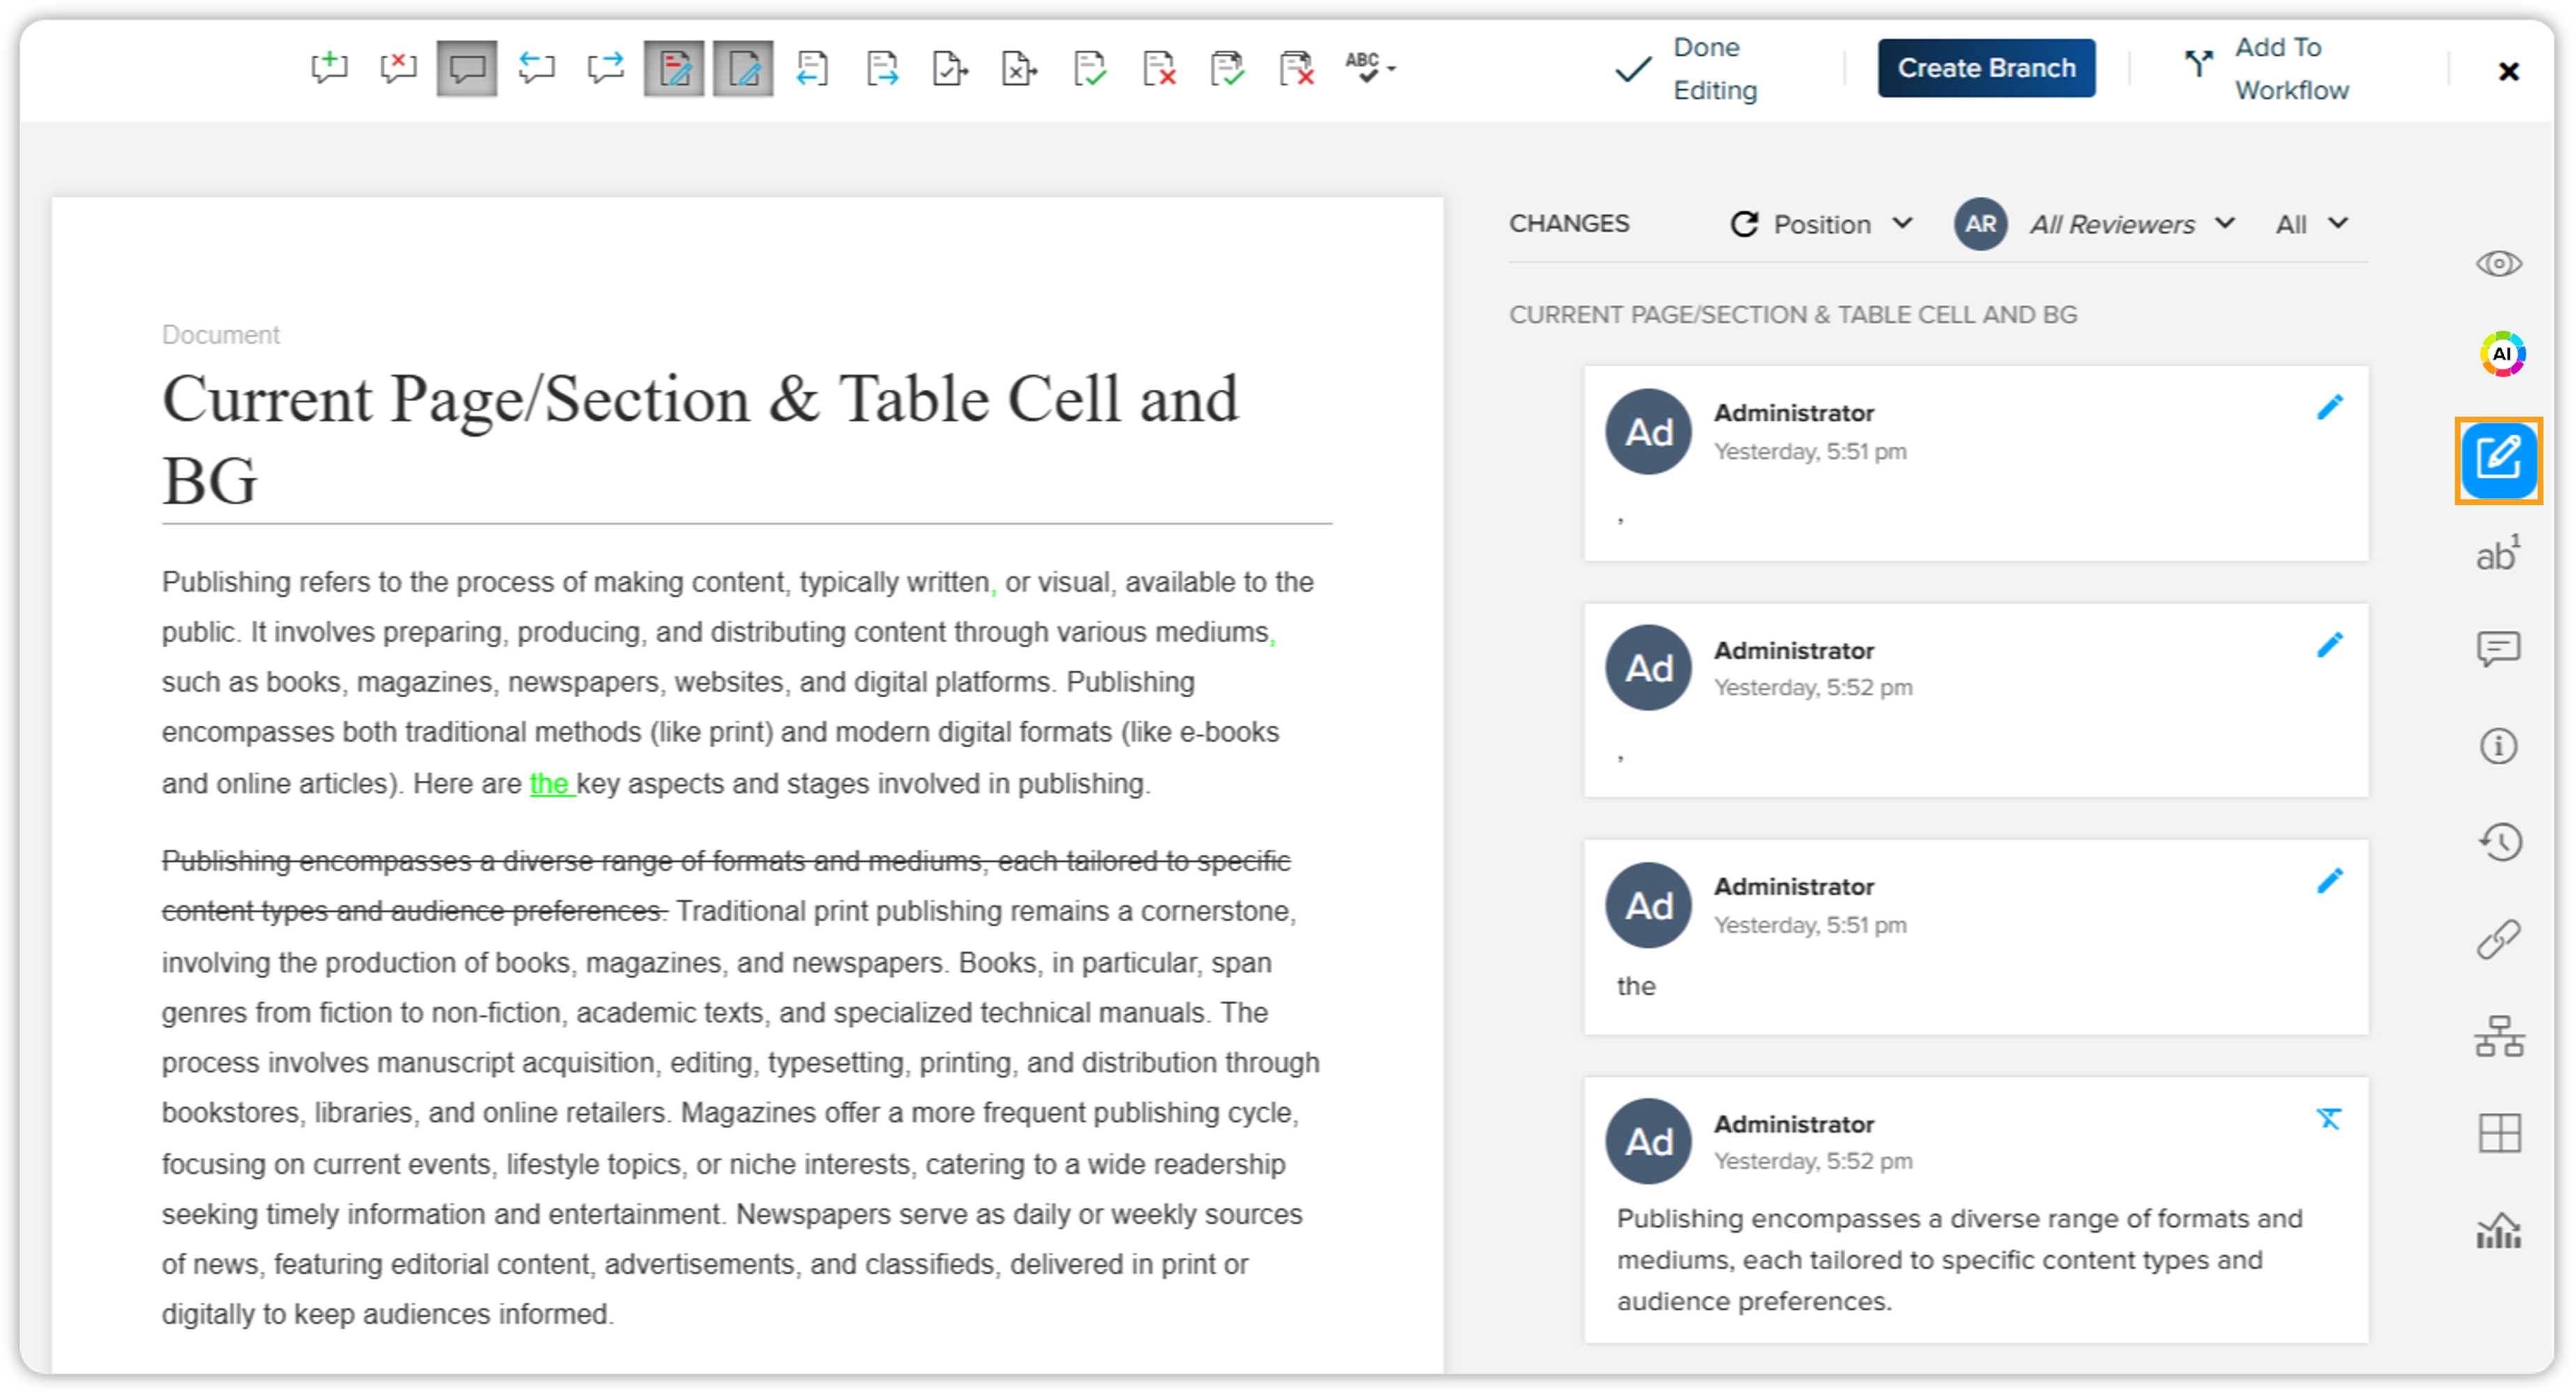
There are 3 drop-down menus to sort and filter the list of changes. These menus are as follows:
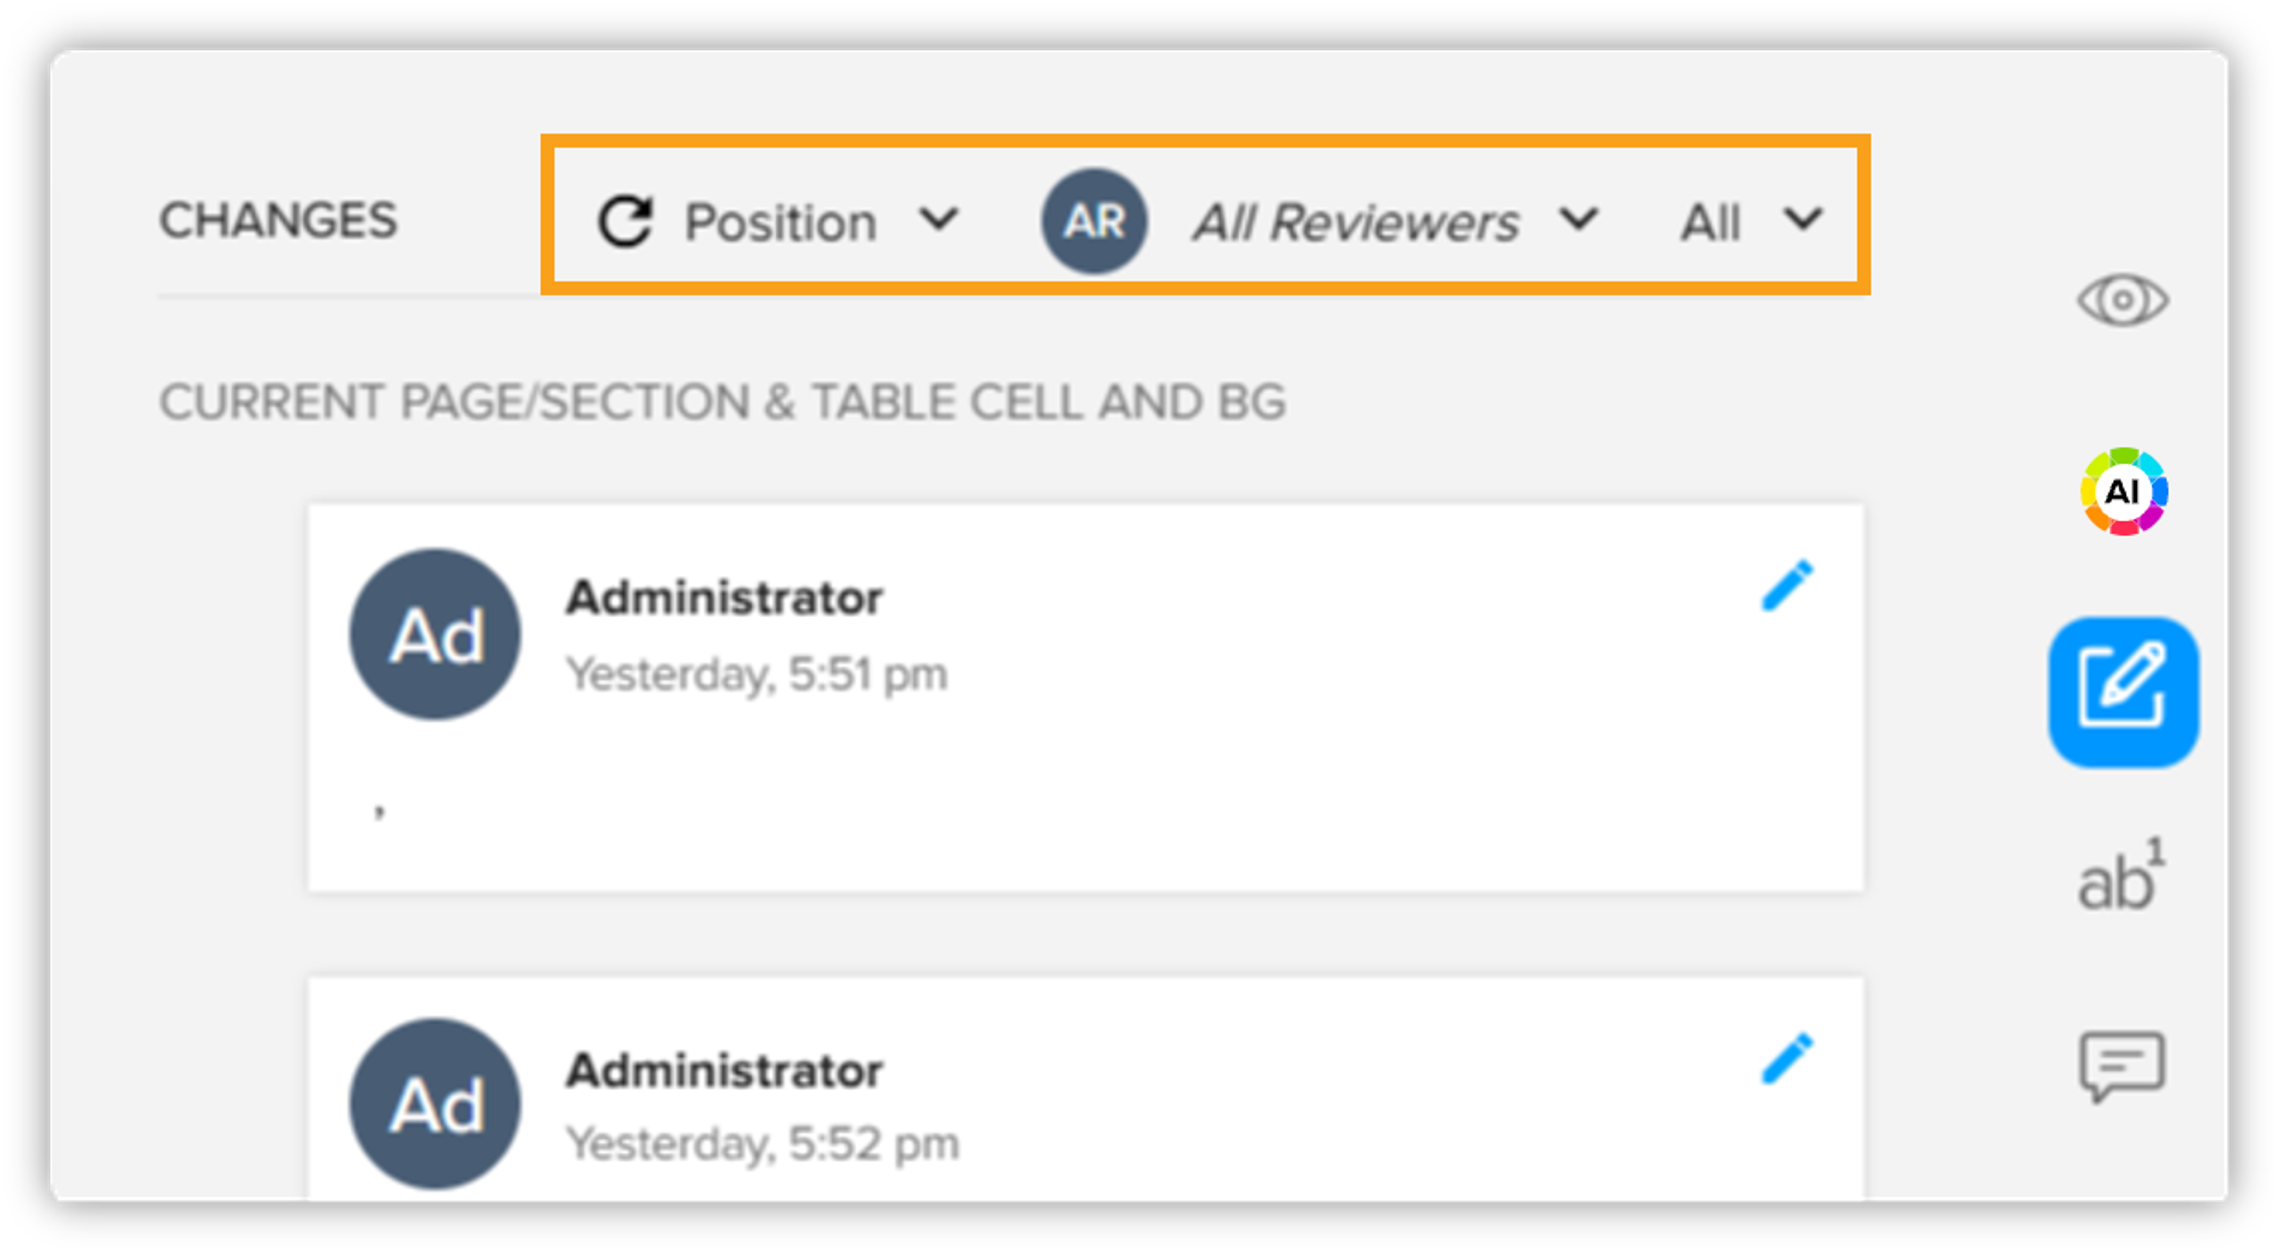
-
Sort by position (in the document) or date
-
Filter by users/reviewers
-
Filter by type of change (insertion, deletion, or all)
In the authoring canvas, reviewers can make changes to the document. As the document owner, authors and editors can view the list of changes made by reviewers and take actions to accept or reject these changes. There are three ways to manage the changes:
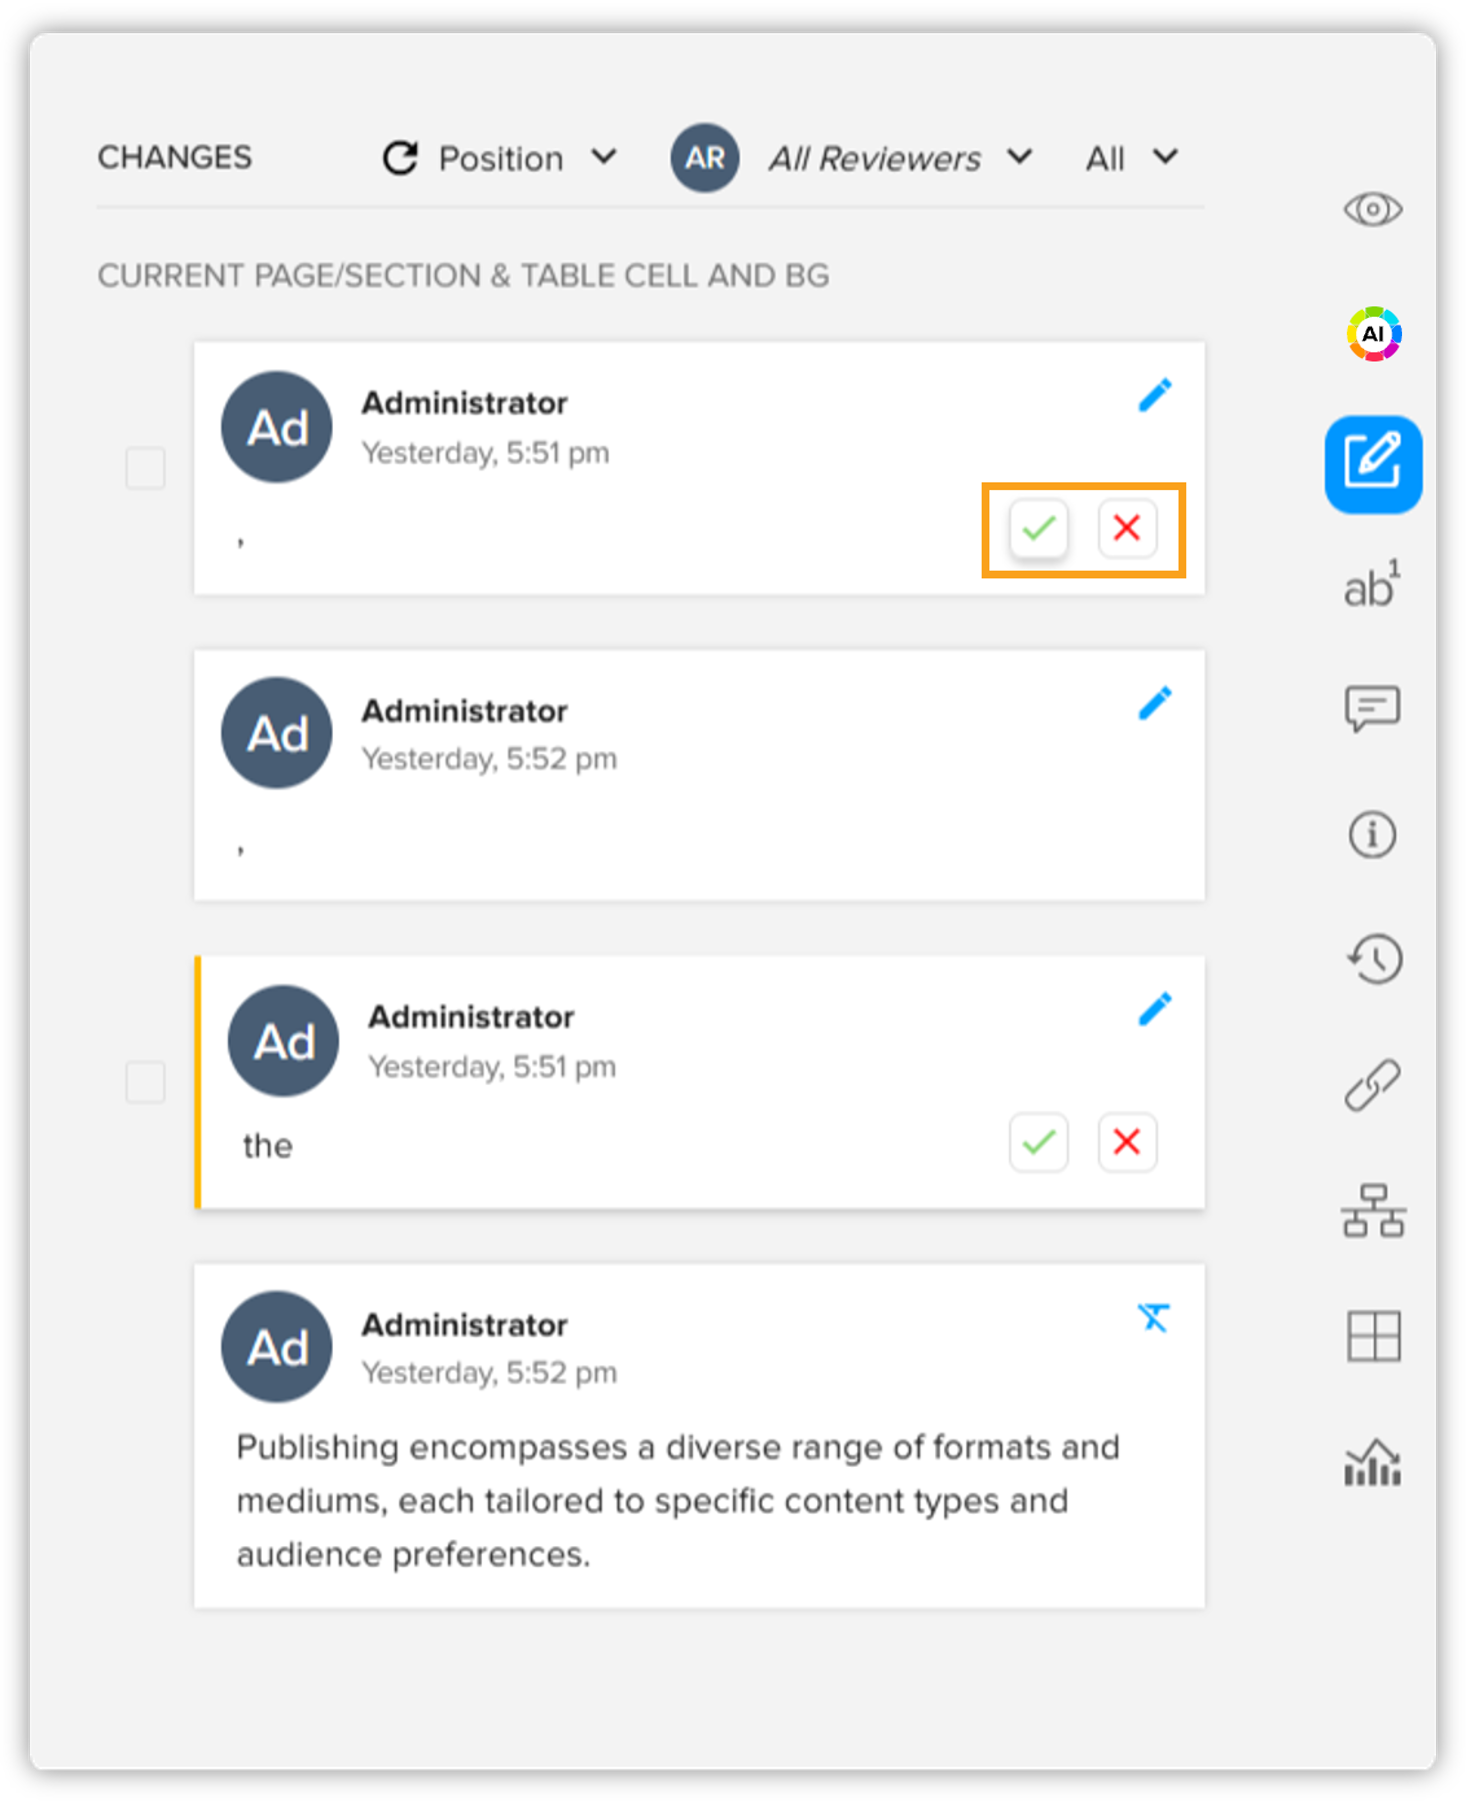
Accepting or Rejecting Individual Changes
You can accept or reject individual changes directly. Follow the steps given below:
-
View the list of changes in the document.
-
For each change, click the Green Tick icon to accept the change or the Red Cross icon to reject the change.
Accepting or Rejecting Multiple Changes
If you want to accept or reject multiple changes at once, you can use the check boxes next to each change. Follow the steps given below:
-
View the list of changes in the document.
-
Click the check boxes next to the changes you want to accept or reject.
-
Click the Accept button to accept the selected changes or the Reject button to reject the selected changes.
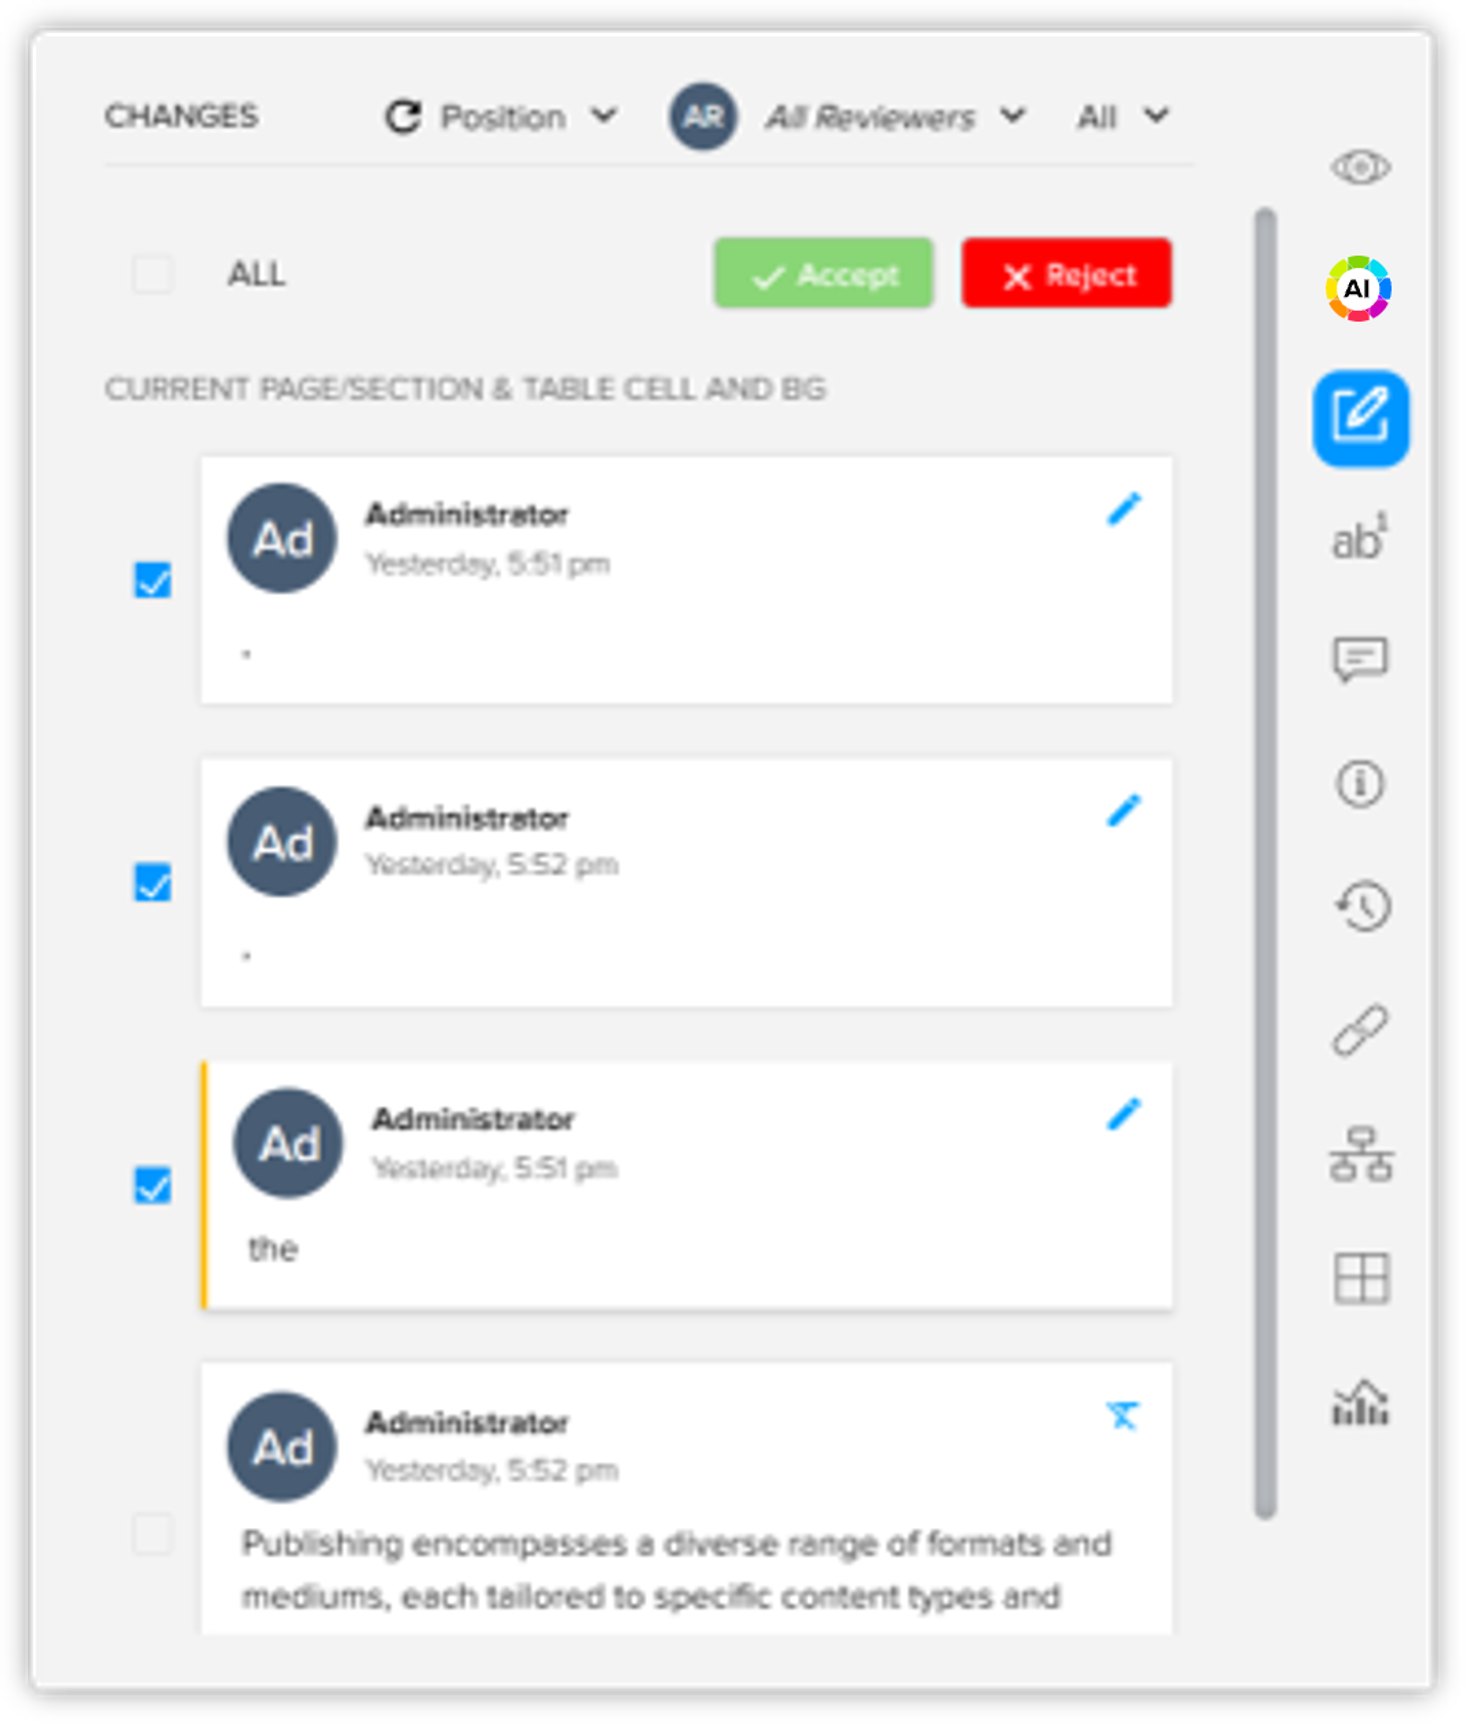
Accepting or Rejecting All Changes
You can also accept or reject all changes in the document simultaneously. Follow the steps given below:
-
View the list of changes in the document.
-
Click the All check box to select all changes.
-
Click the Accept button to accept all changes or the Reject button to reject all changes.
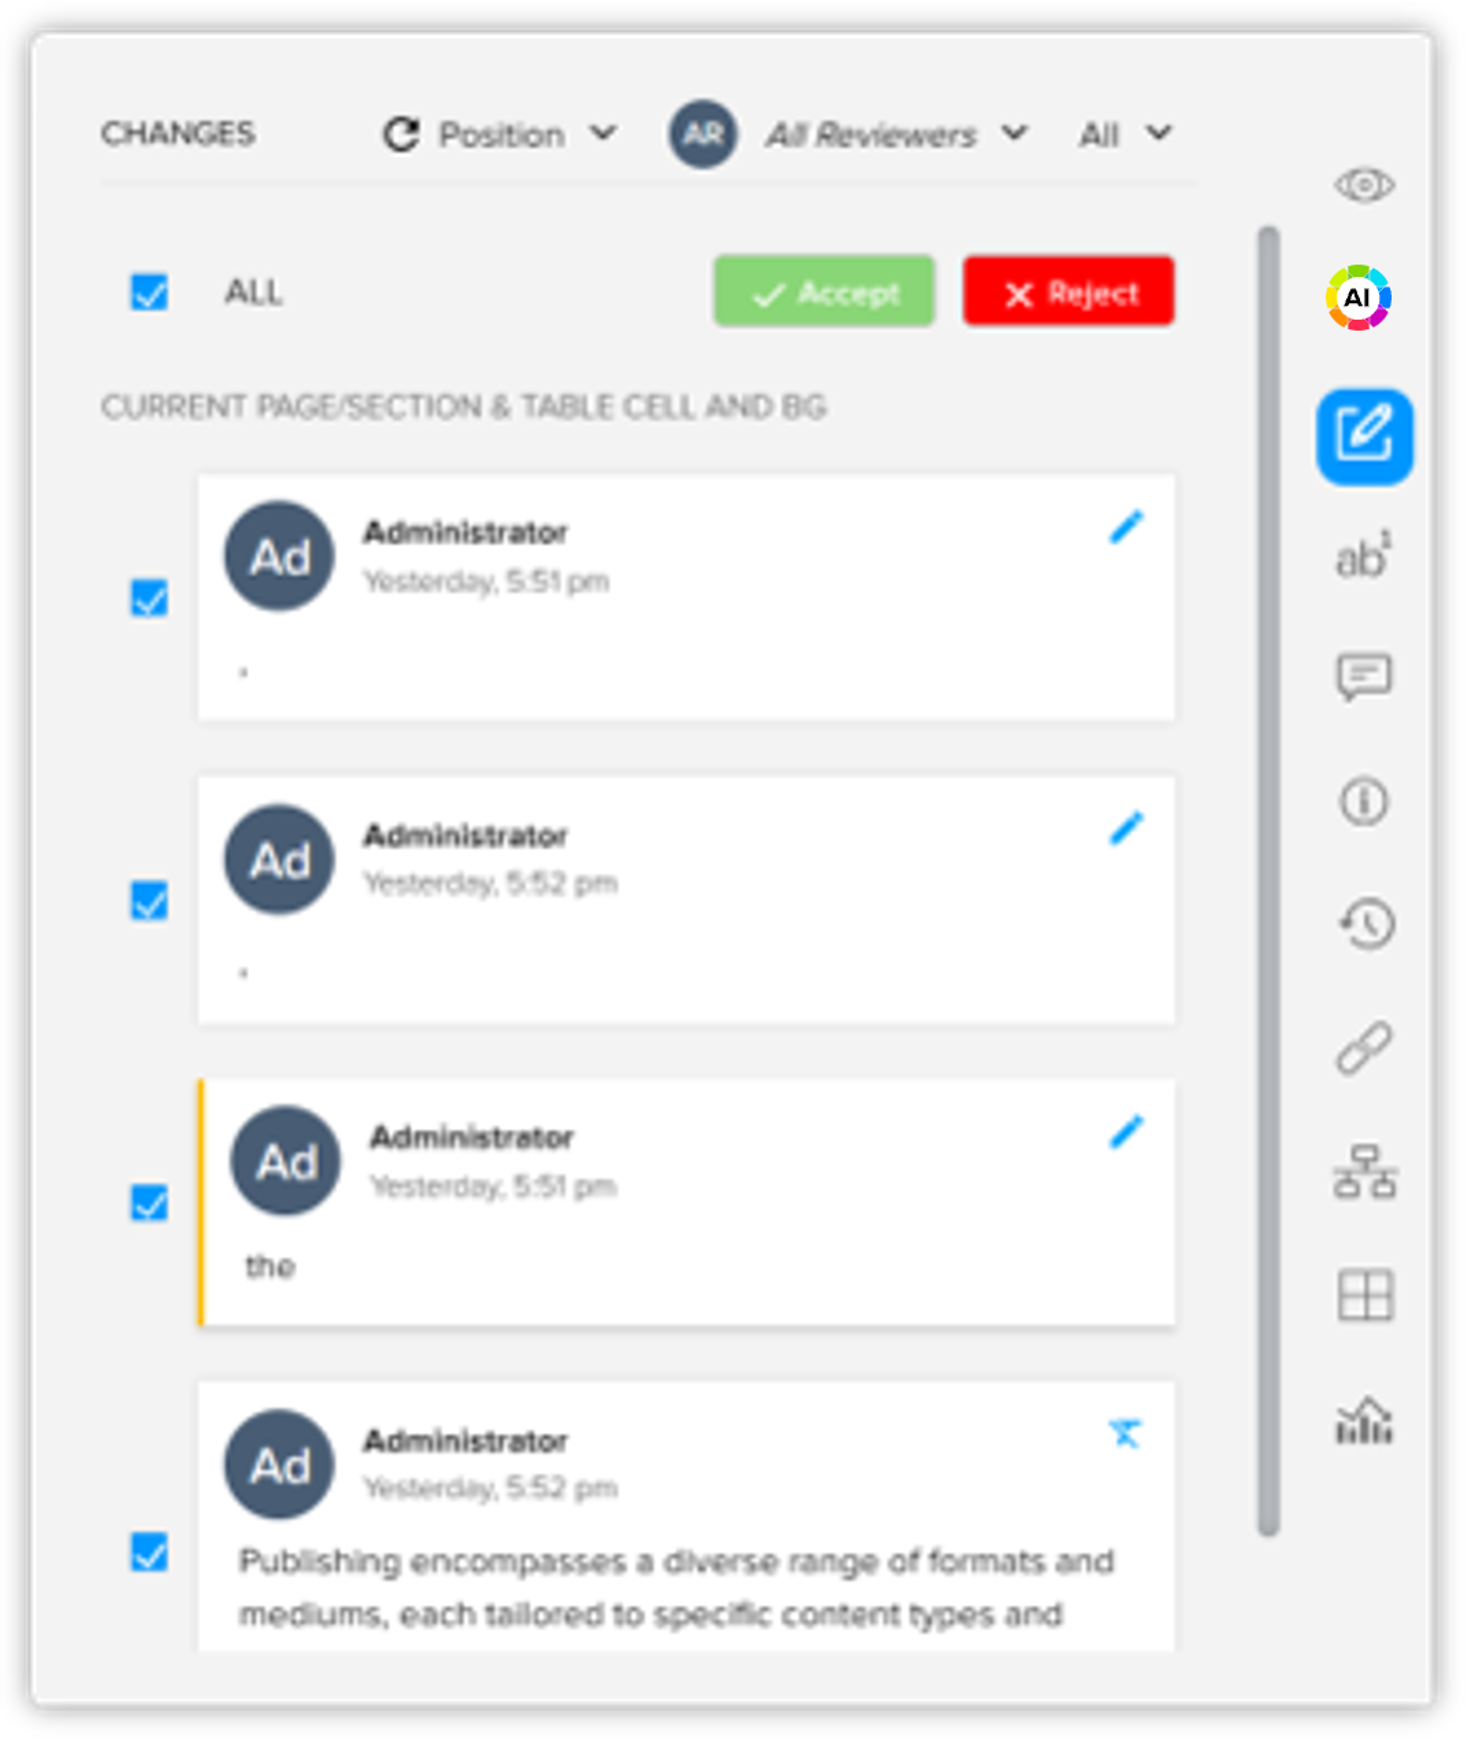
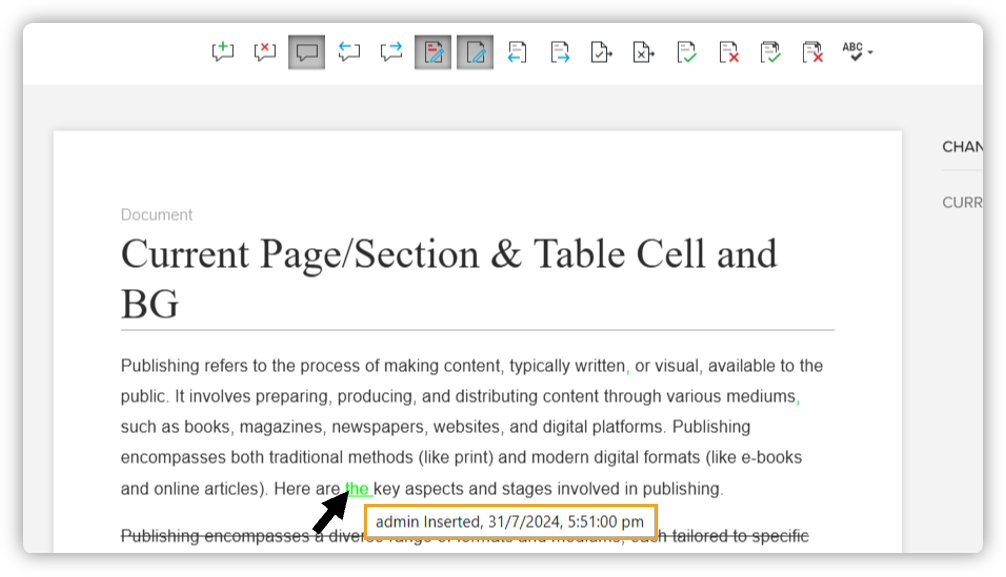
Additionally, you can also see the timestamp and author of a change by hovering the cursor over the change in the authoring canvas.
Content Automation Rules
Content Automation Rules lets you automate the population of inline sections in your documents using predefined, search-based rules. With this feature, you can automatically fetch and insert the most relevant components into a document based on metadata and saved search criteria—reducing manual effort and ensuring content consistency.
This feature helps you:
-
Automatically build documents with accurate, up-to-date content.
-
Save time by defining rules once in templates or documents.
-
Maintain flexibility with options for both automated and manual replacement.
Using Content Automation Rules
Follow the steps below to define and run automation rules for inline sections:
-
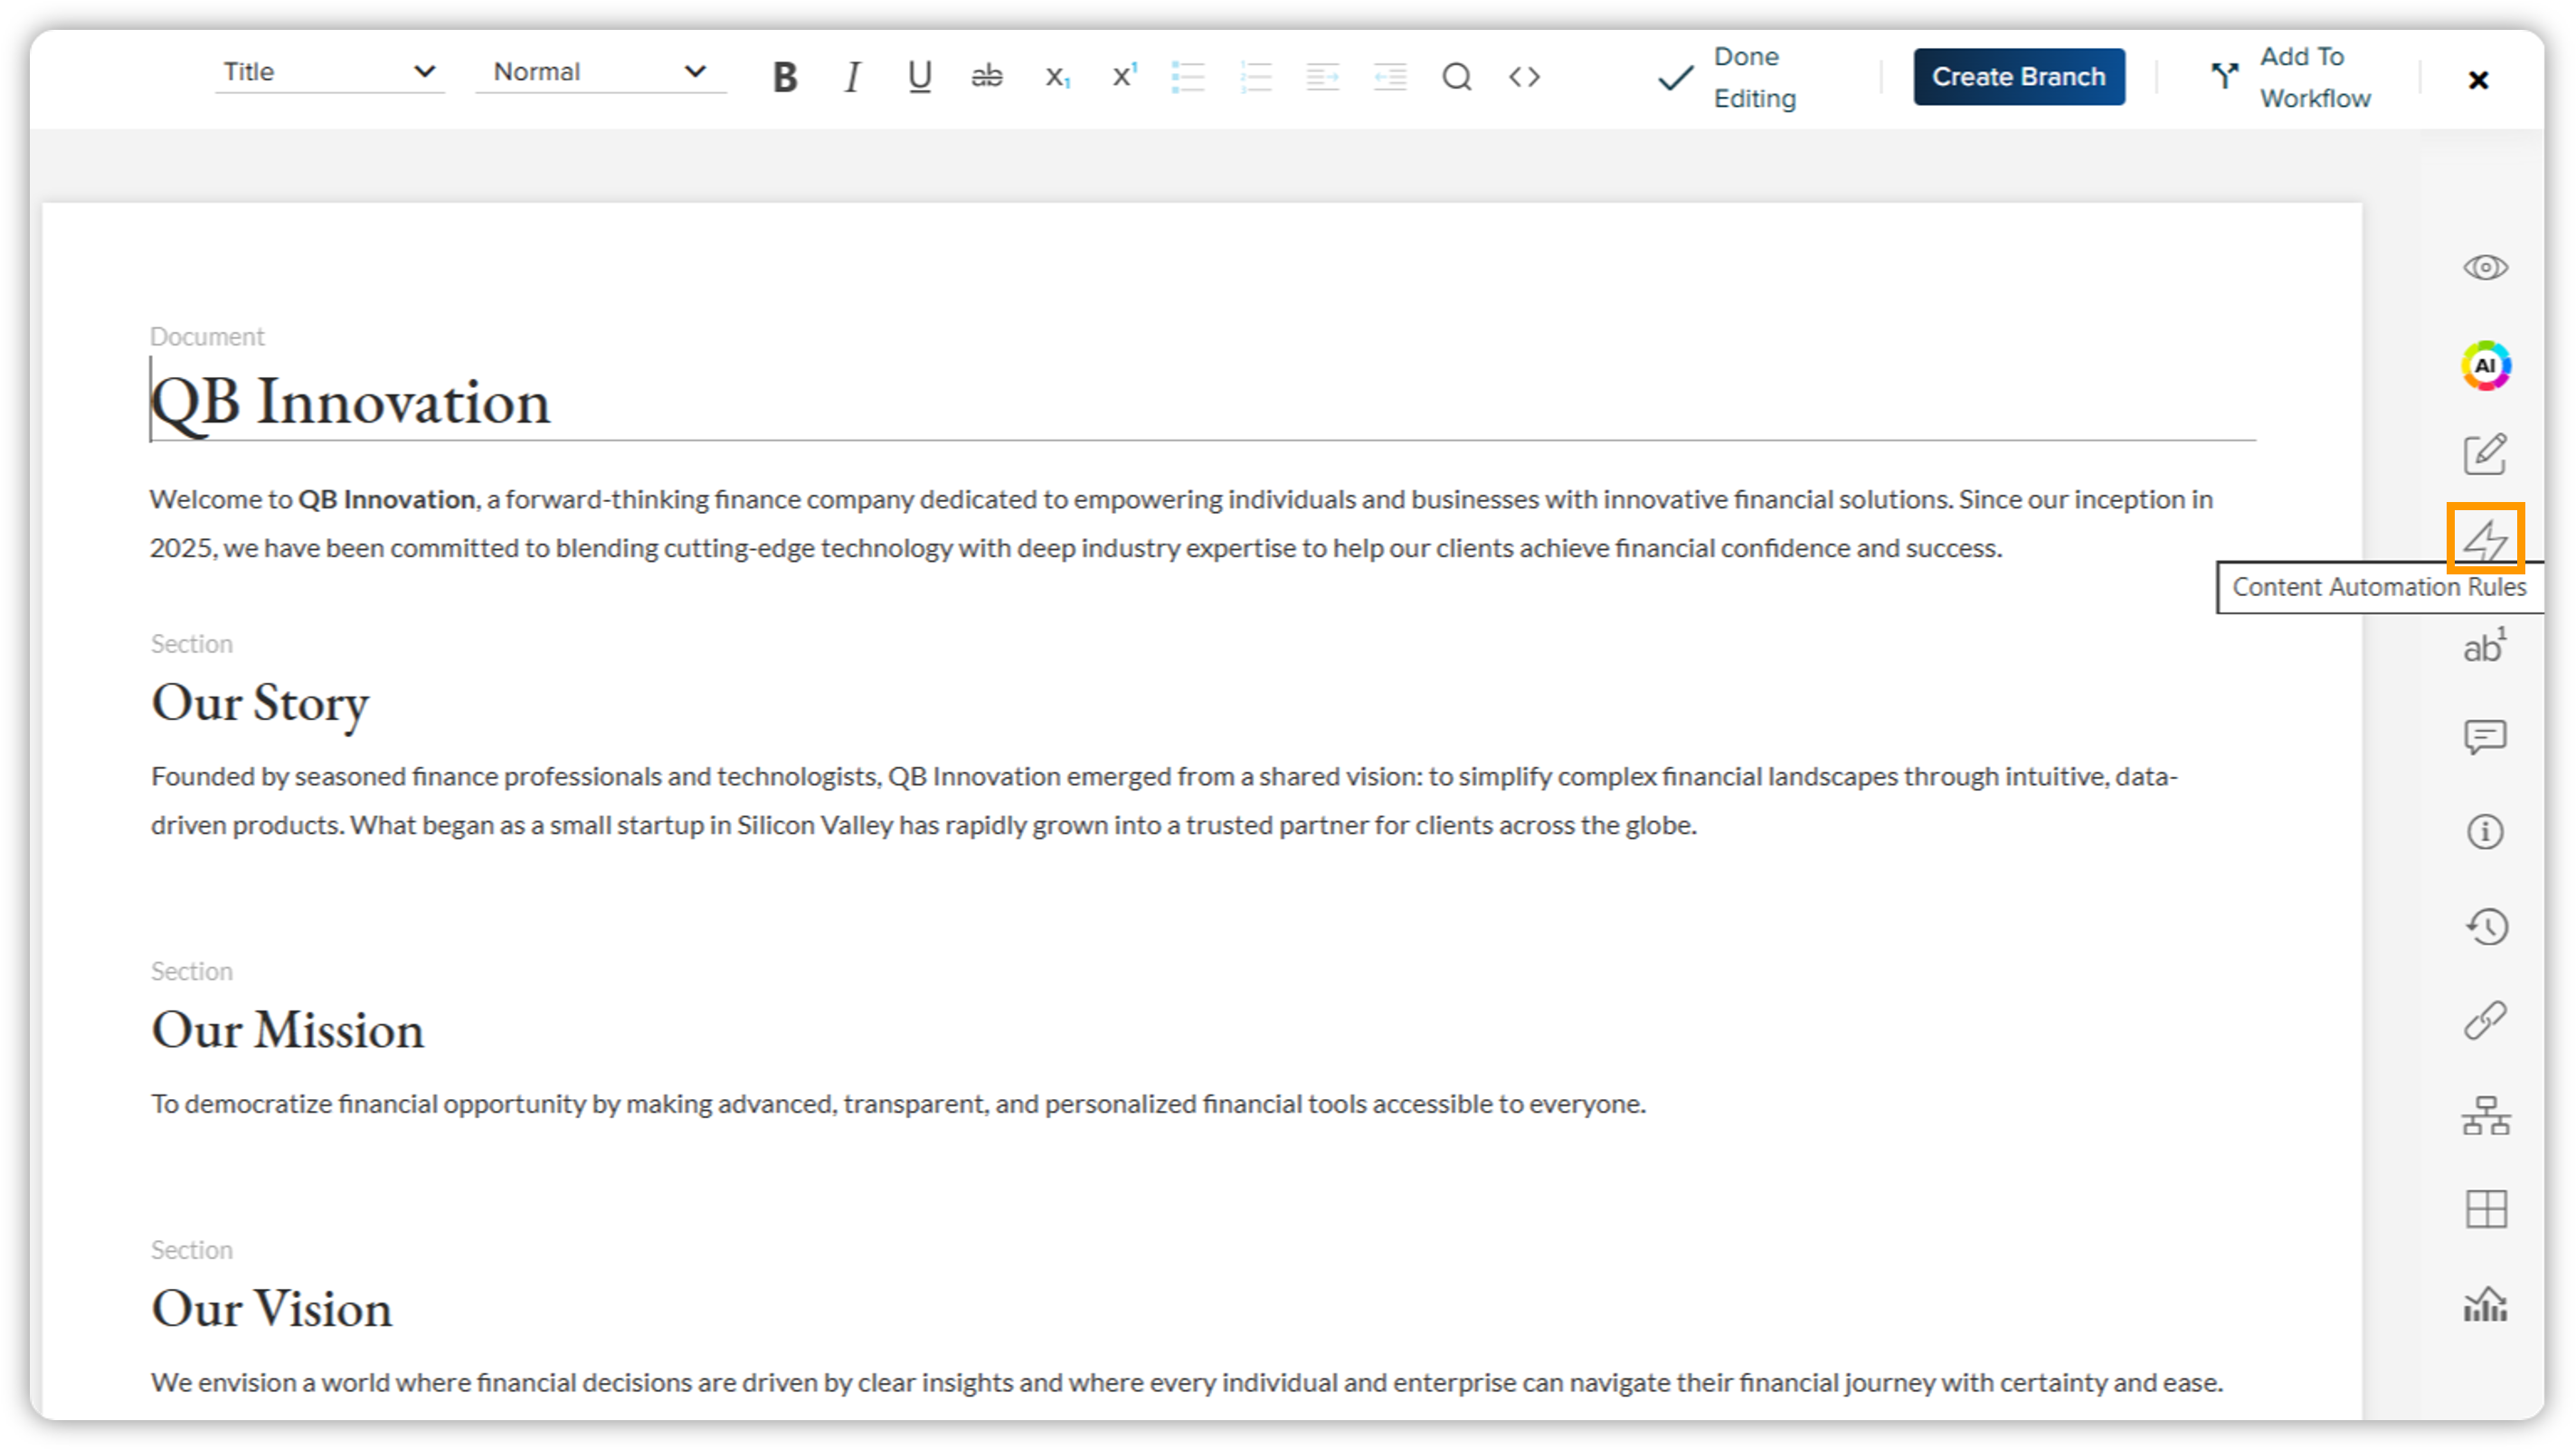
Go to the Apps pane in Quark Author and click Content Automation Rules.
-
In the document editor, click the section you want to replace.
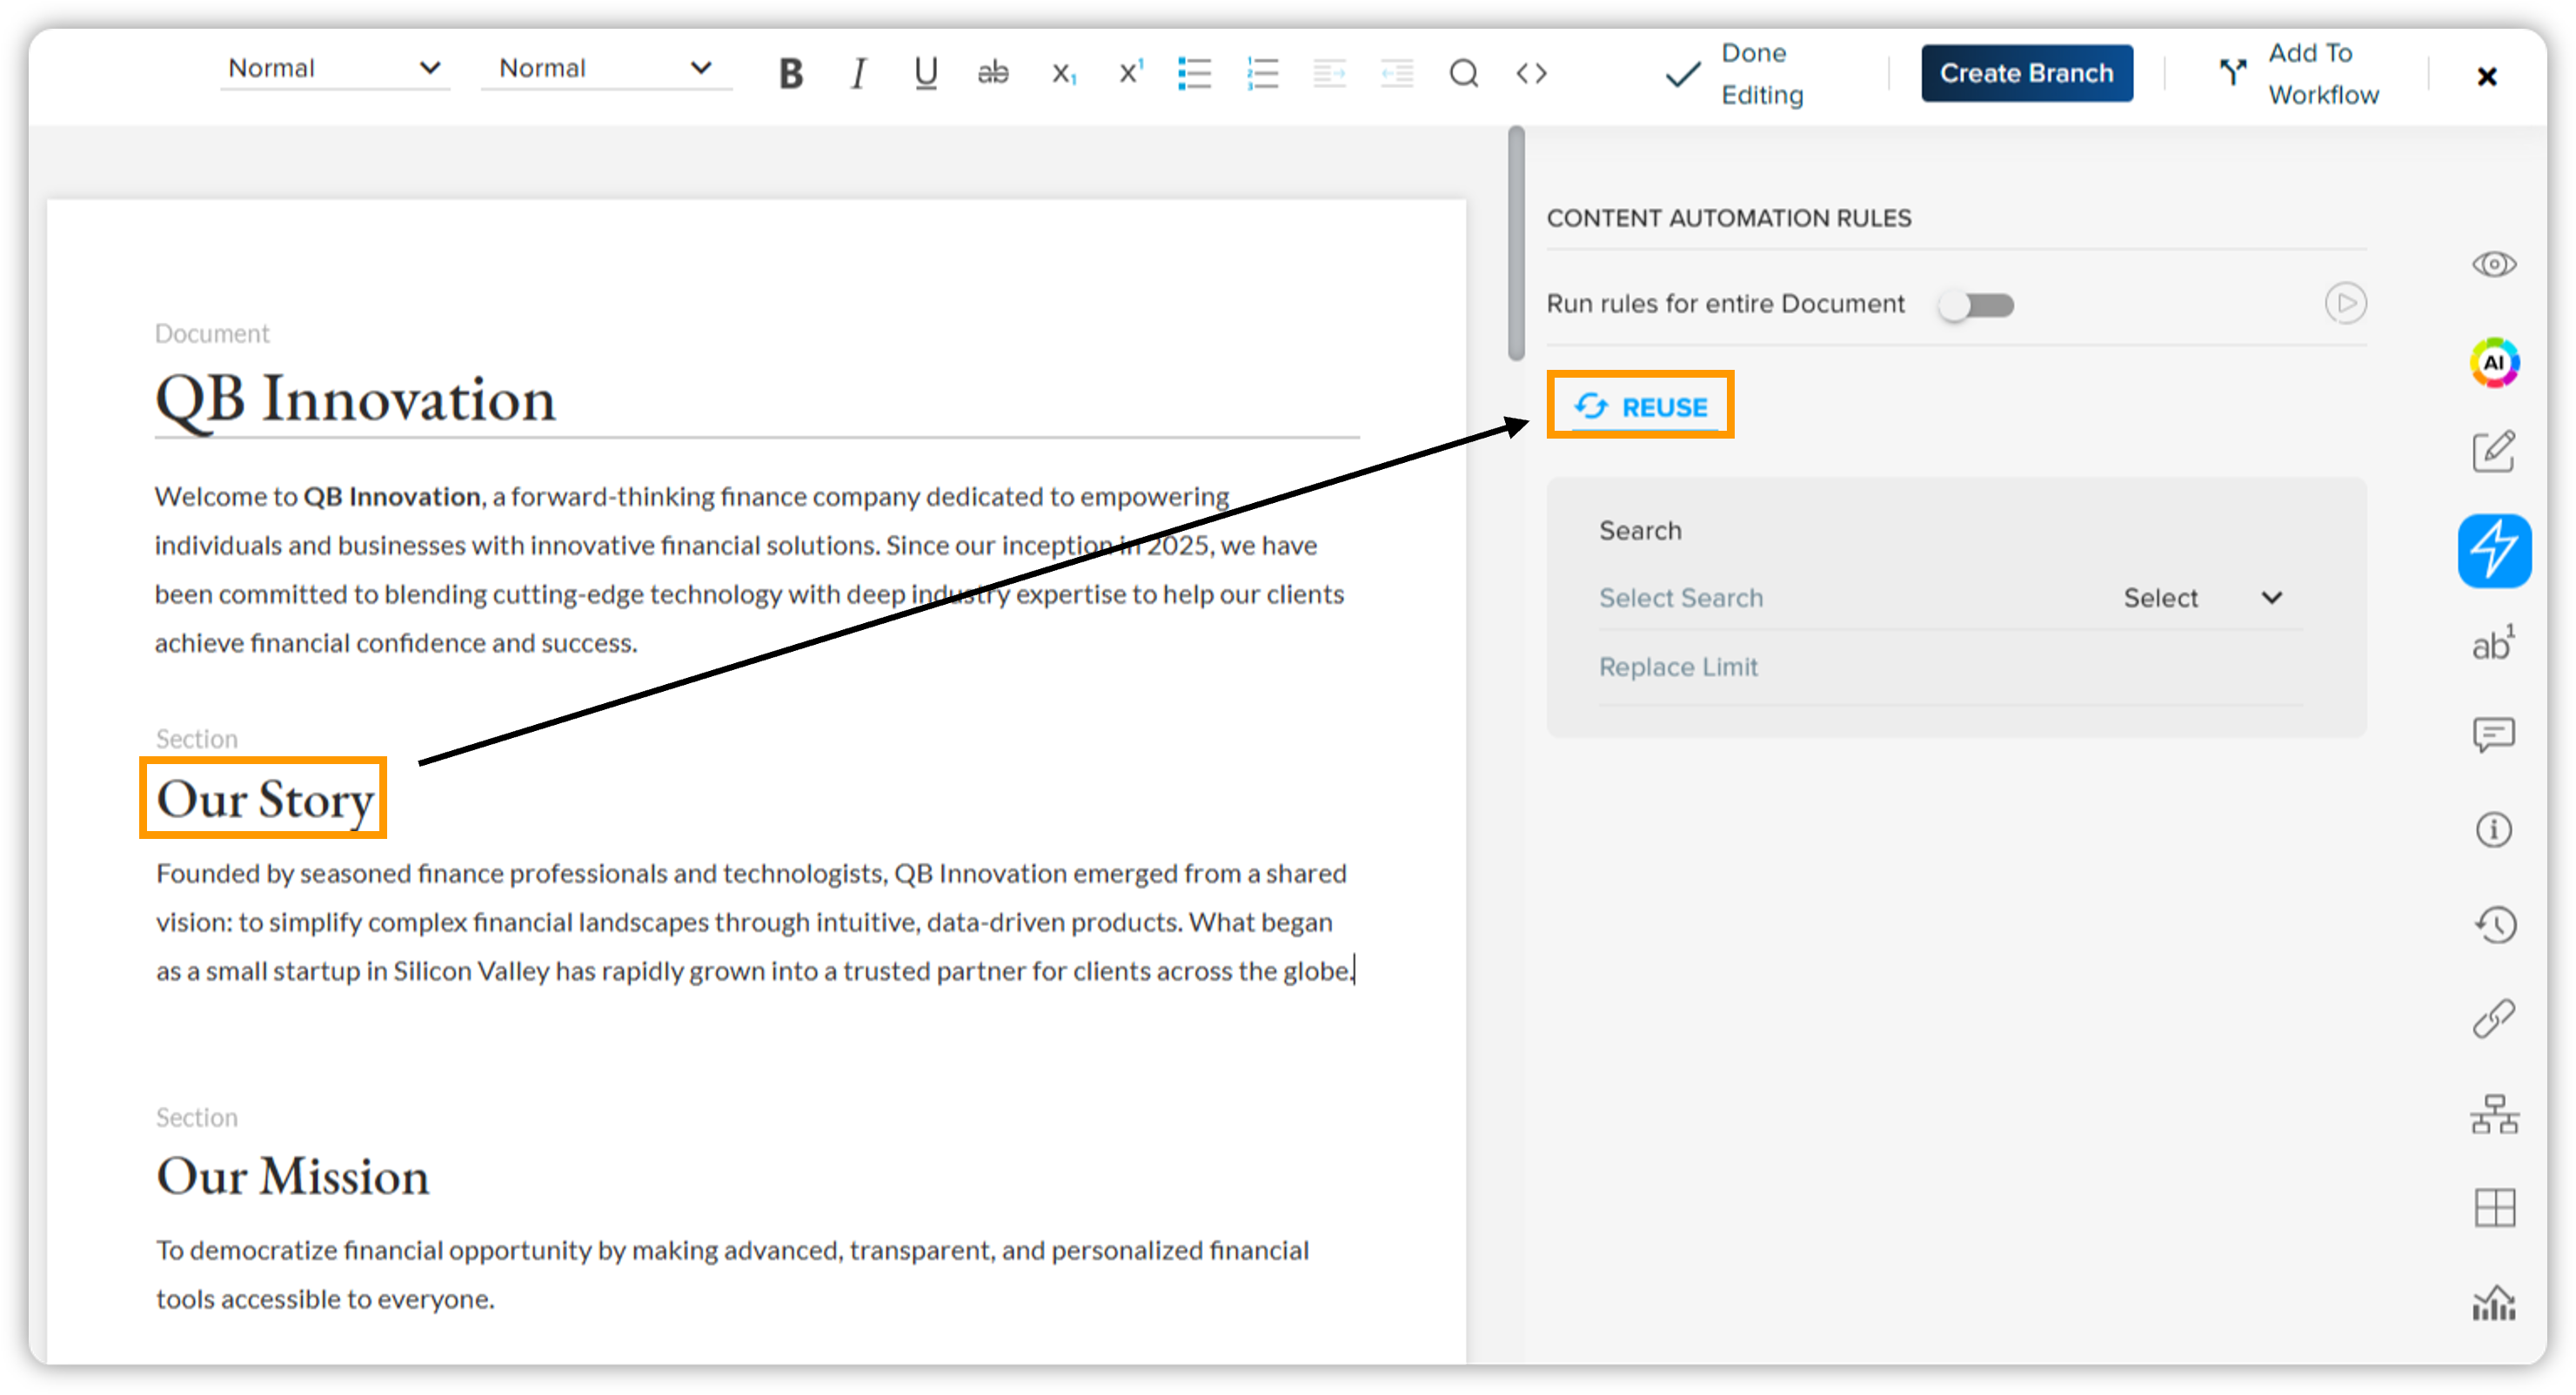 The Reusetab in the Content Automation Rules pane appears only when a section is selected. This feature is available for inline sections only.
-
Configure the Rule
-
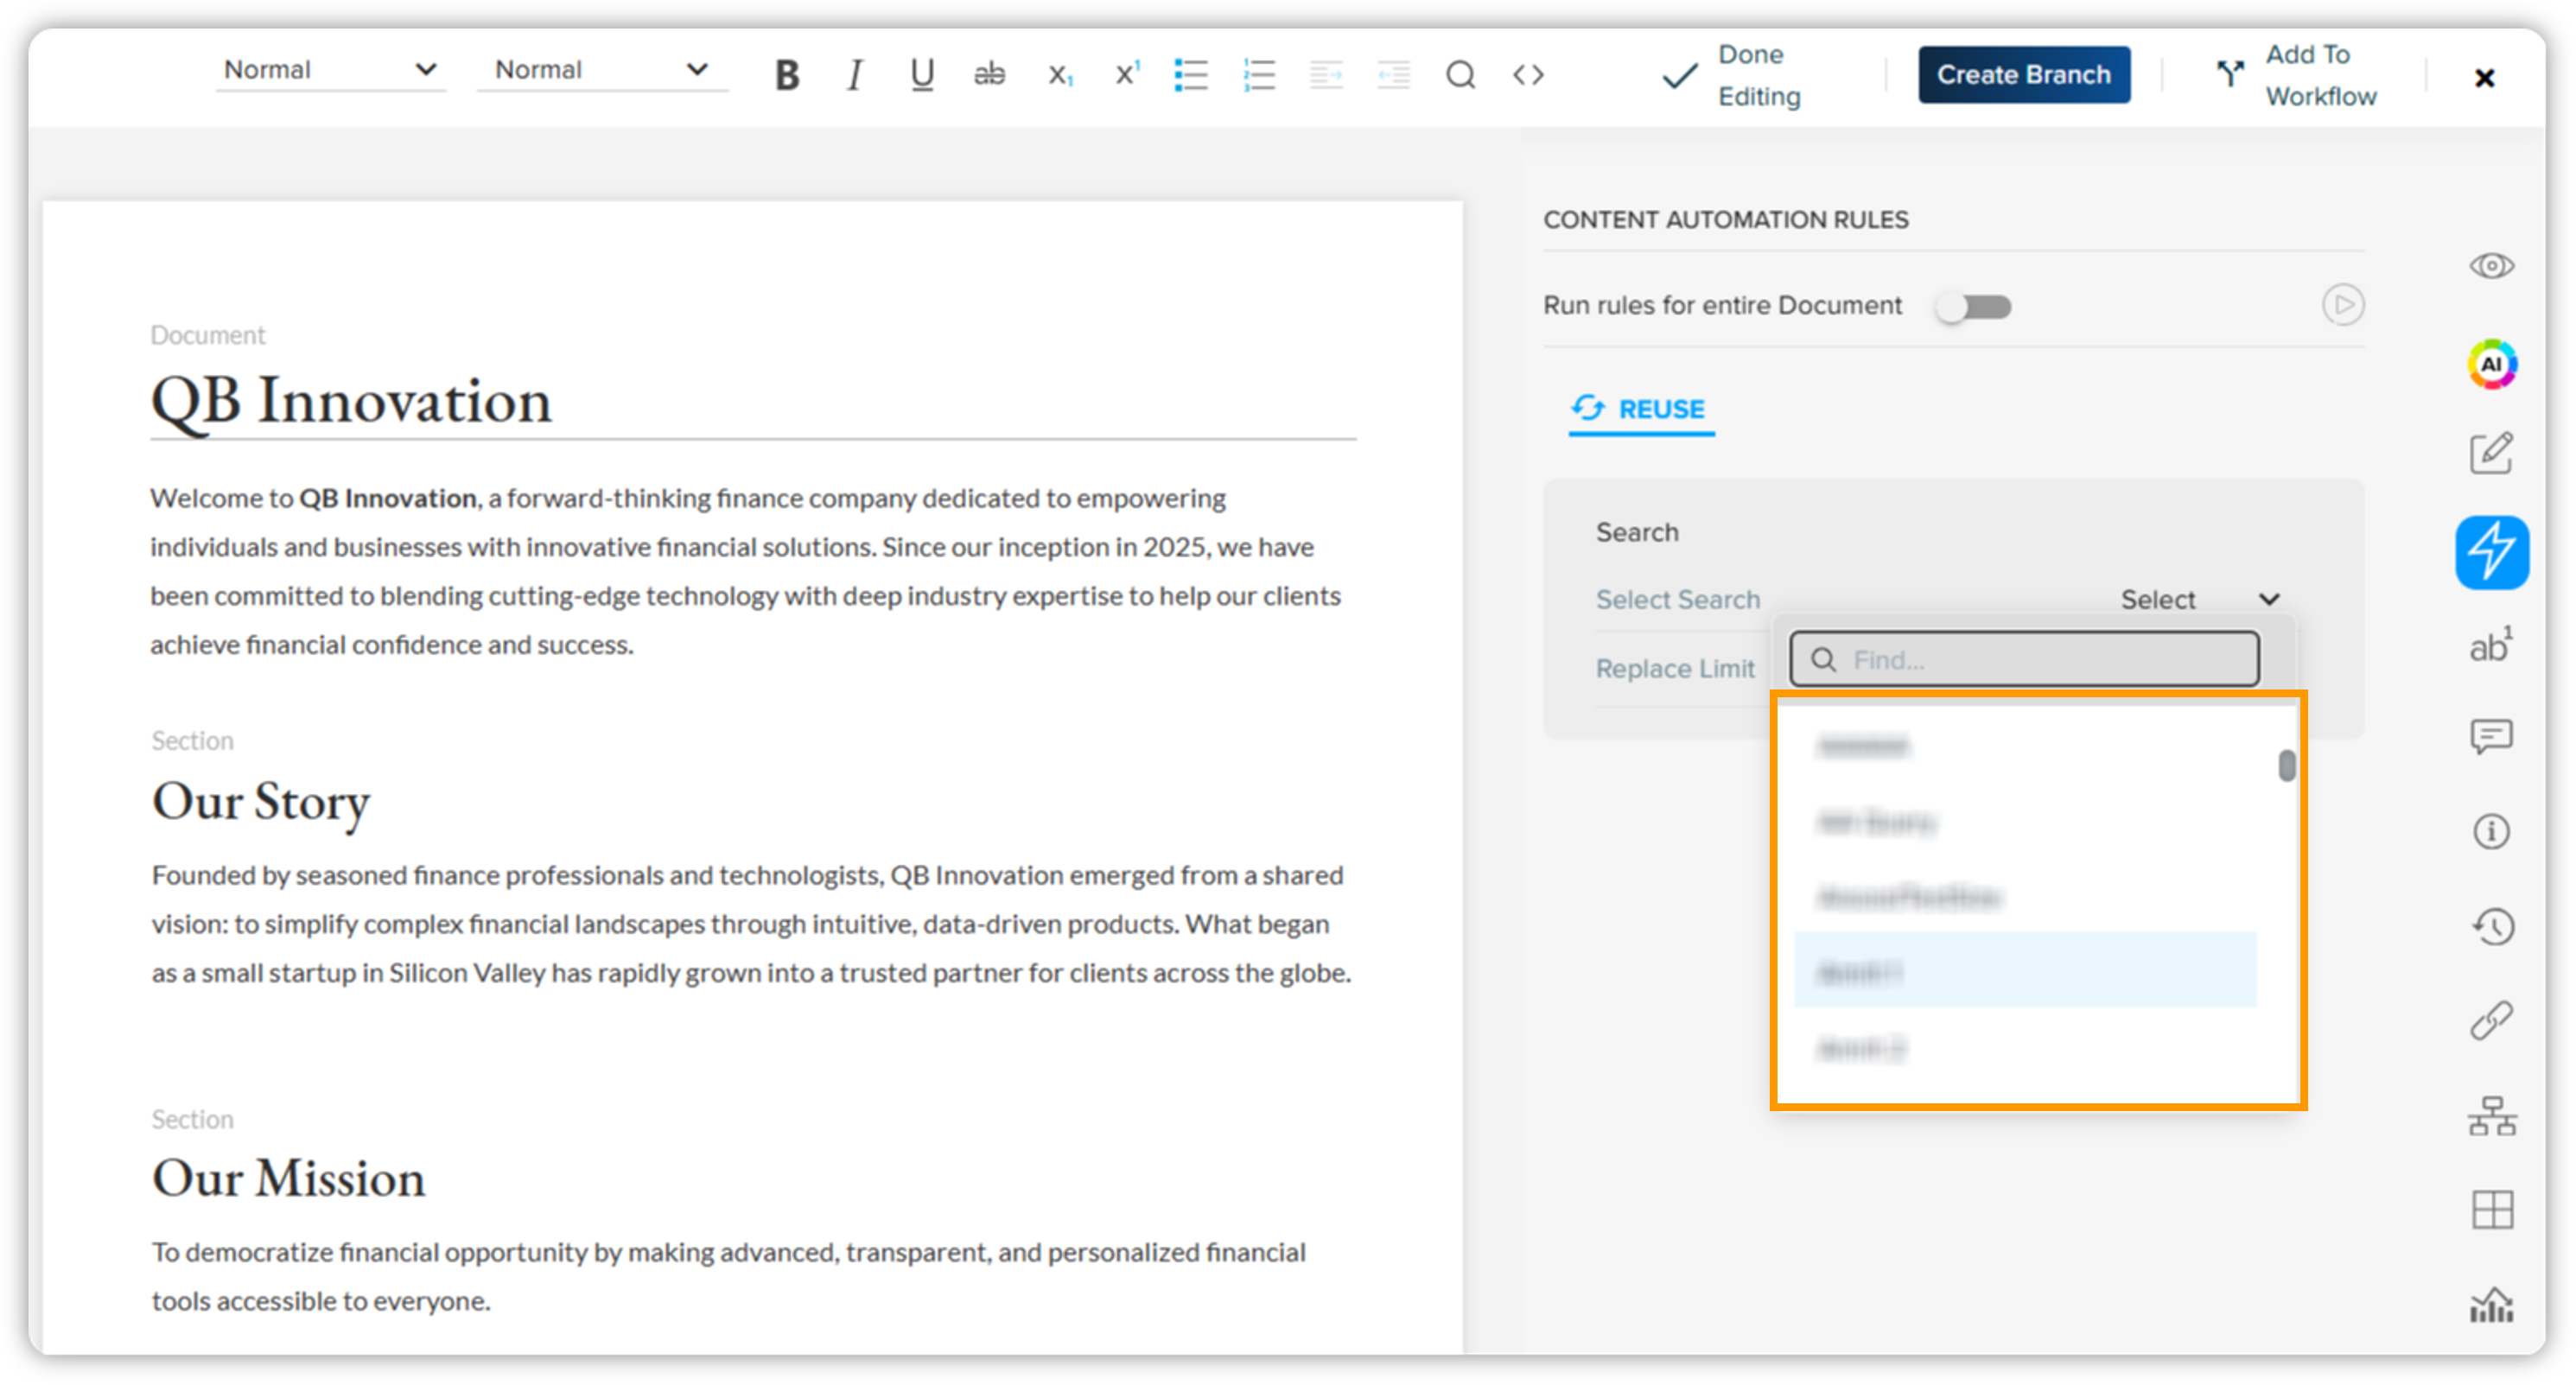
Select the desired search query from the dropdown list.
-
Define a Replace Limit (for example, replace with top 1 or top 3 components).
-
-
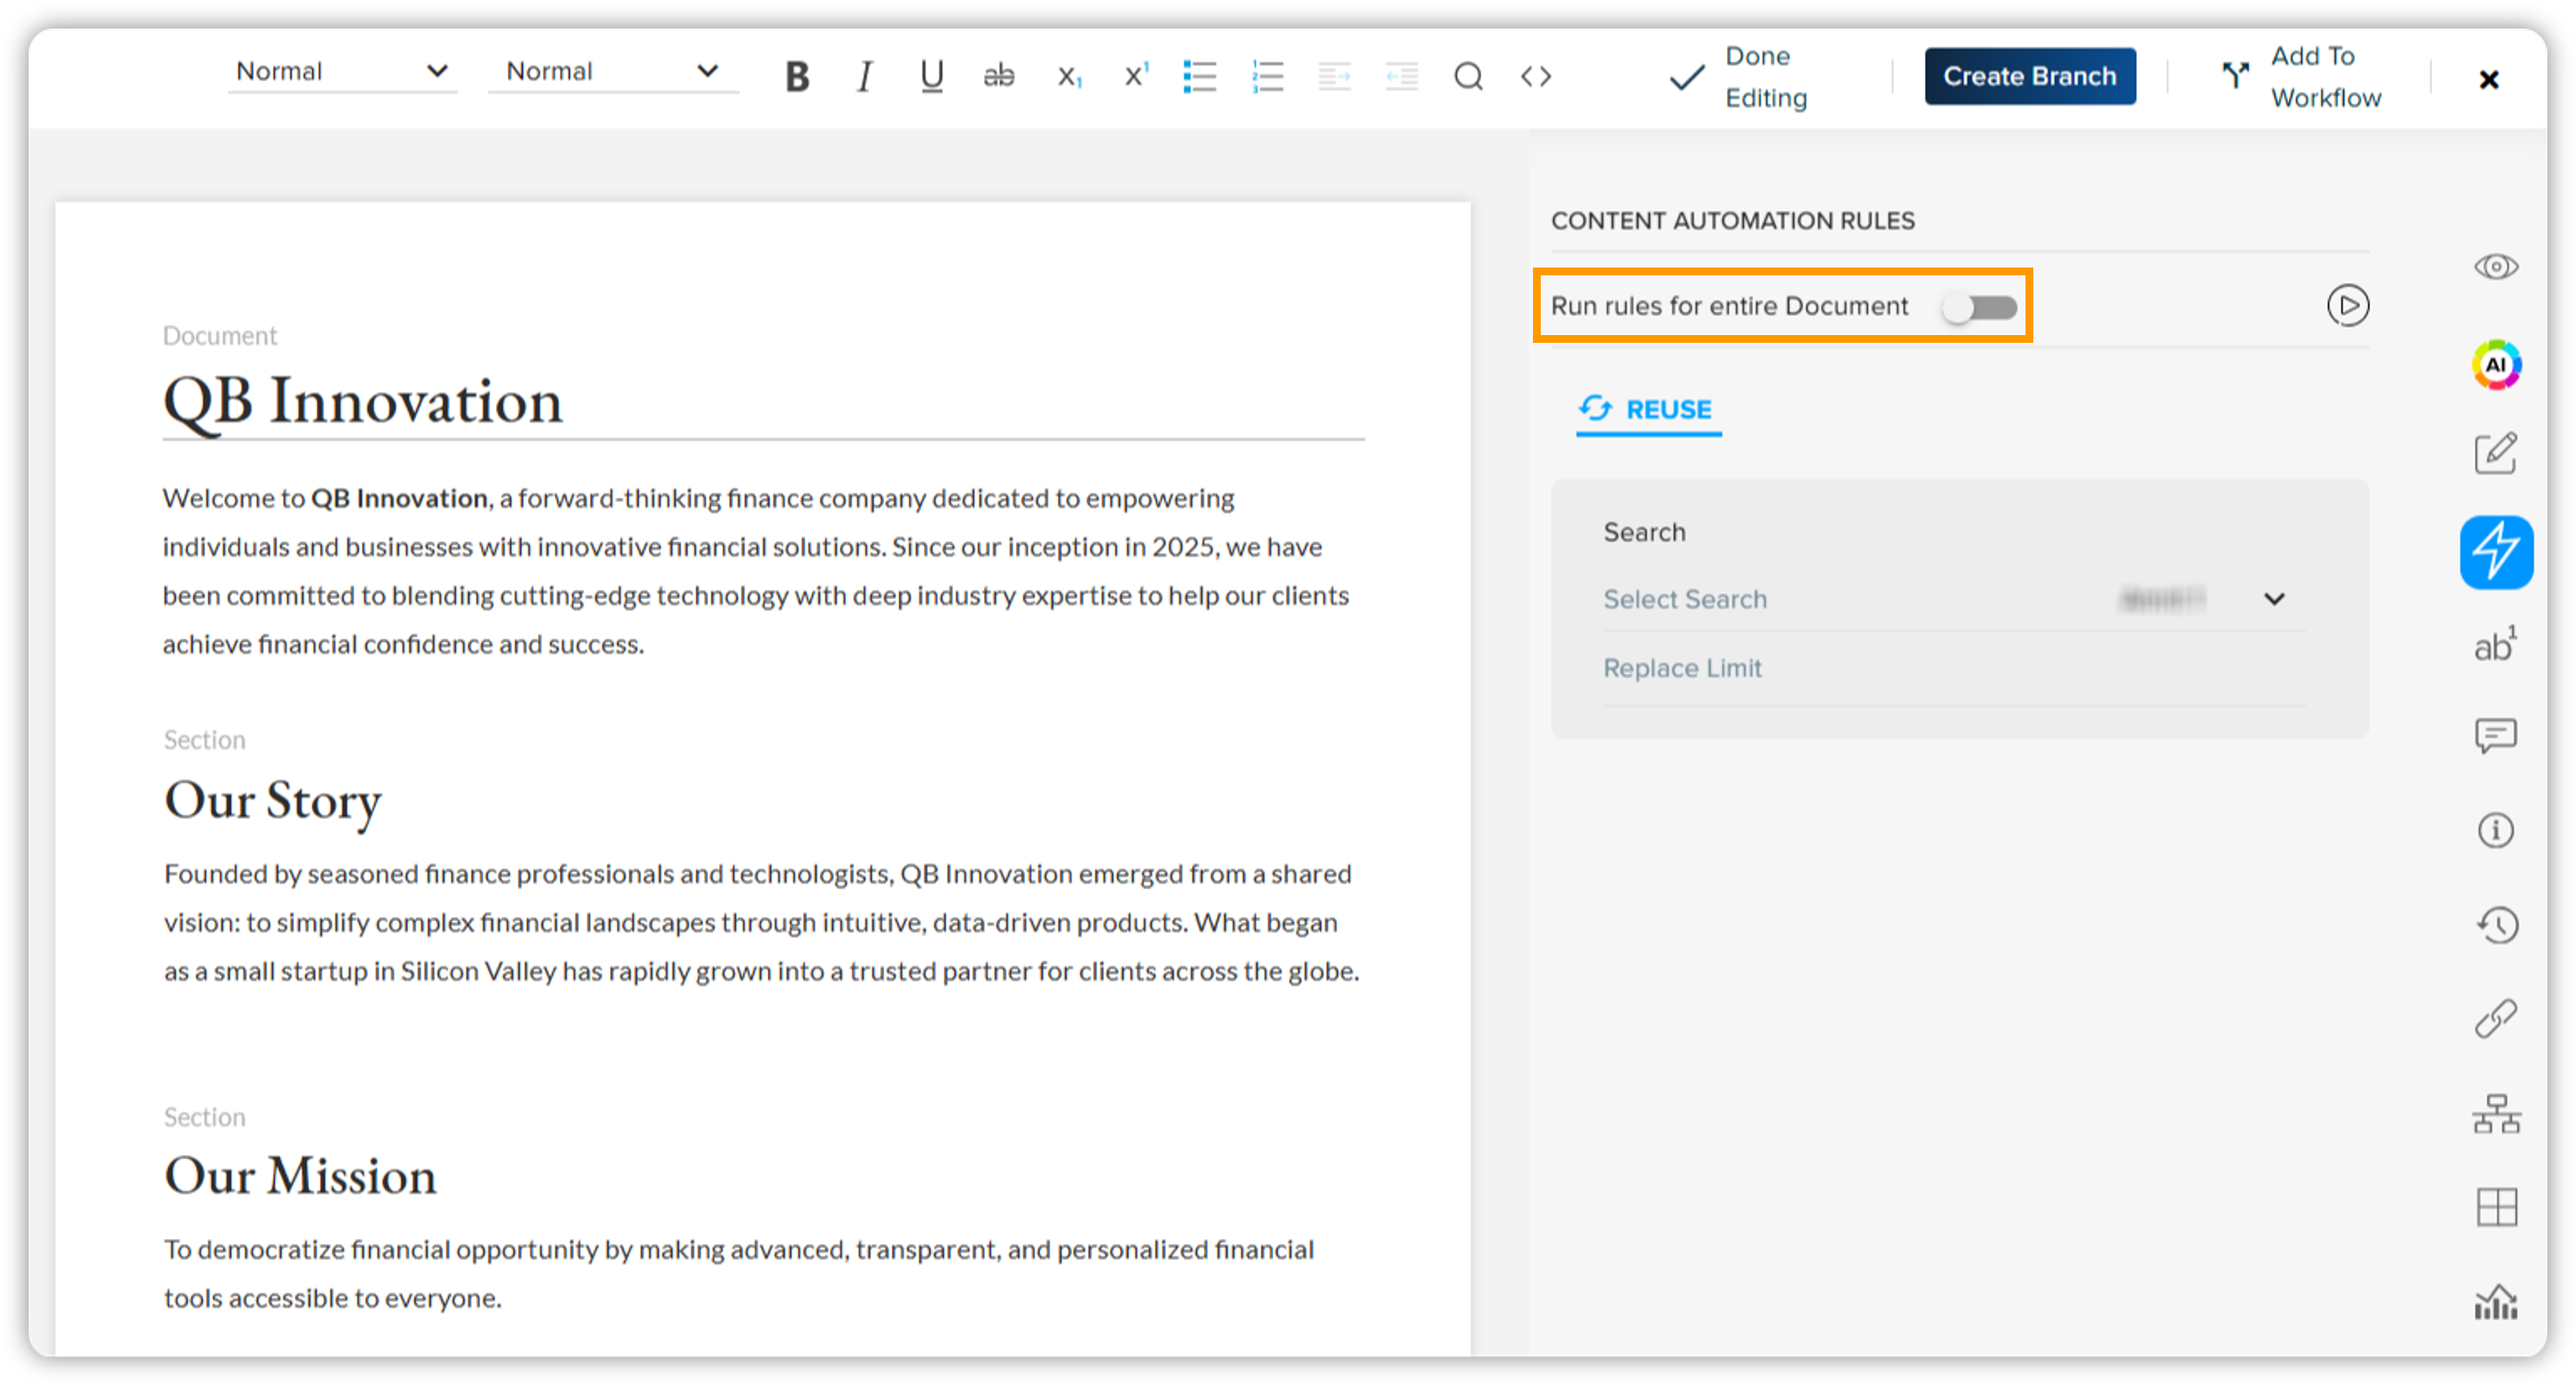
Use the toggle Run rules for entire document if you want to execute the content automation rules for all eligible sections in the document. This is optional.
-
Click Runto execute the rule for the selected section.
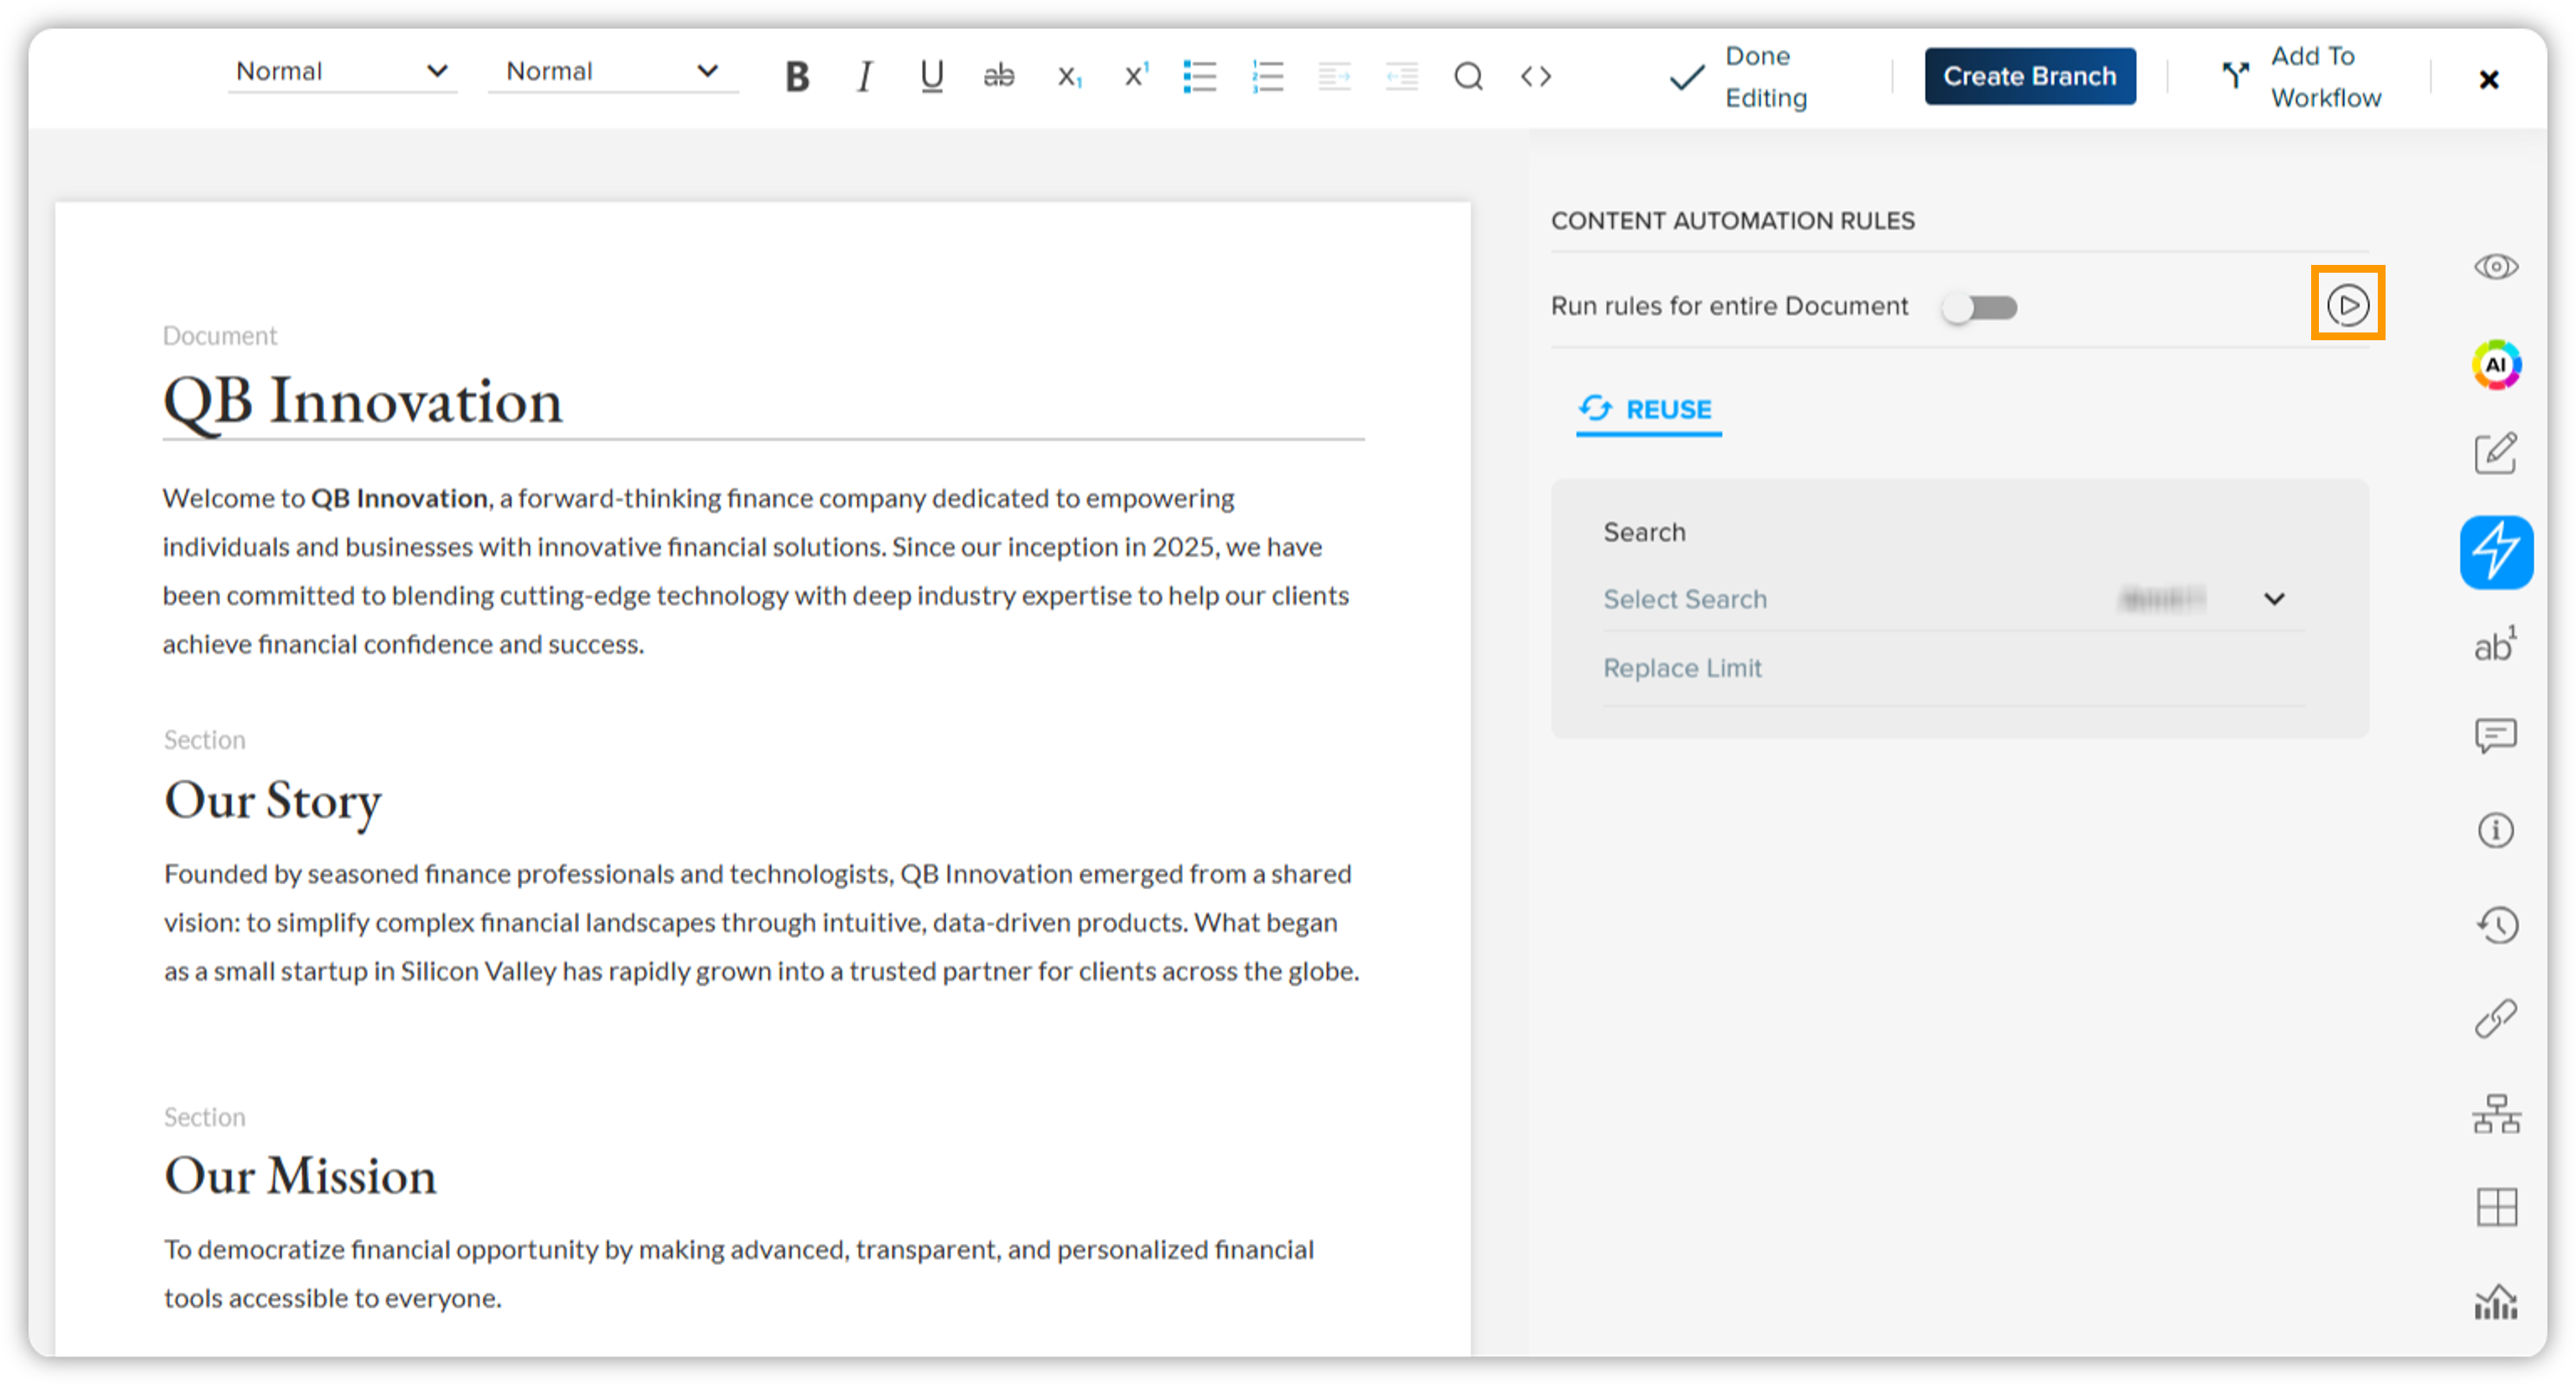
Within a few seconds, the rule will complete and automatically replace the section with the most relevant component(s) based on your defined criteria.
This is a fully automated process—just define your search query and run the rule; no manual replacement is needed.
Manually Replacing Components
If you prefer manual control or need to adjust specific sections, you can use the Replace Component feature.
-
Go to the Document Structure pane and select the component you want to replace.
-
Click the kebab menu and choose Replace Components.
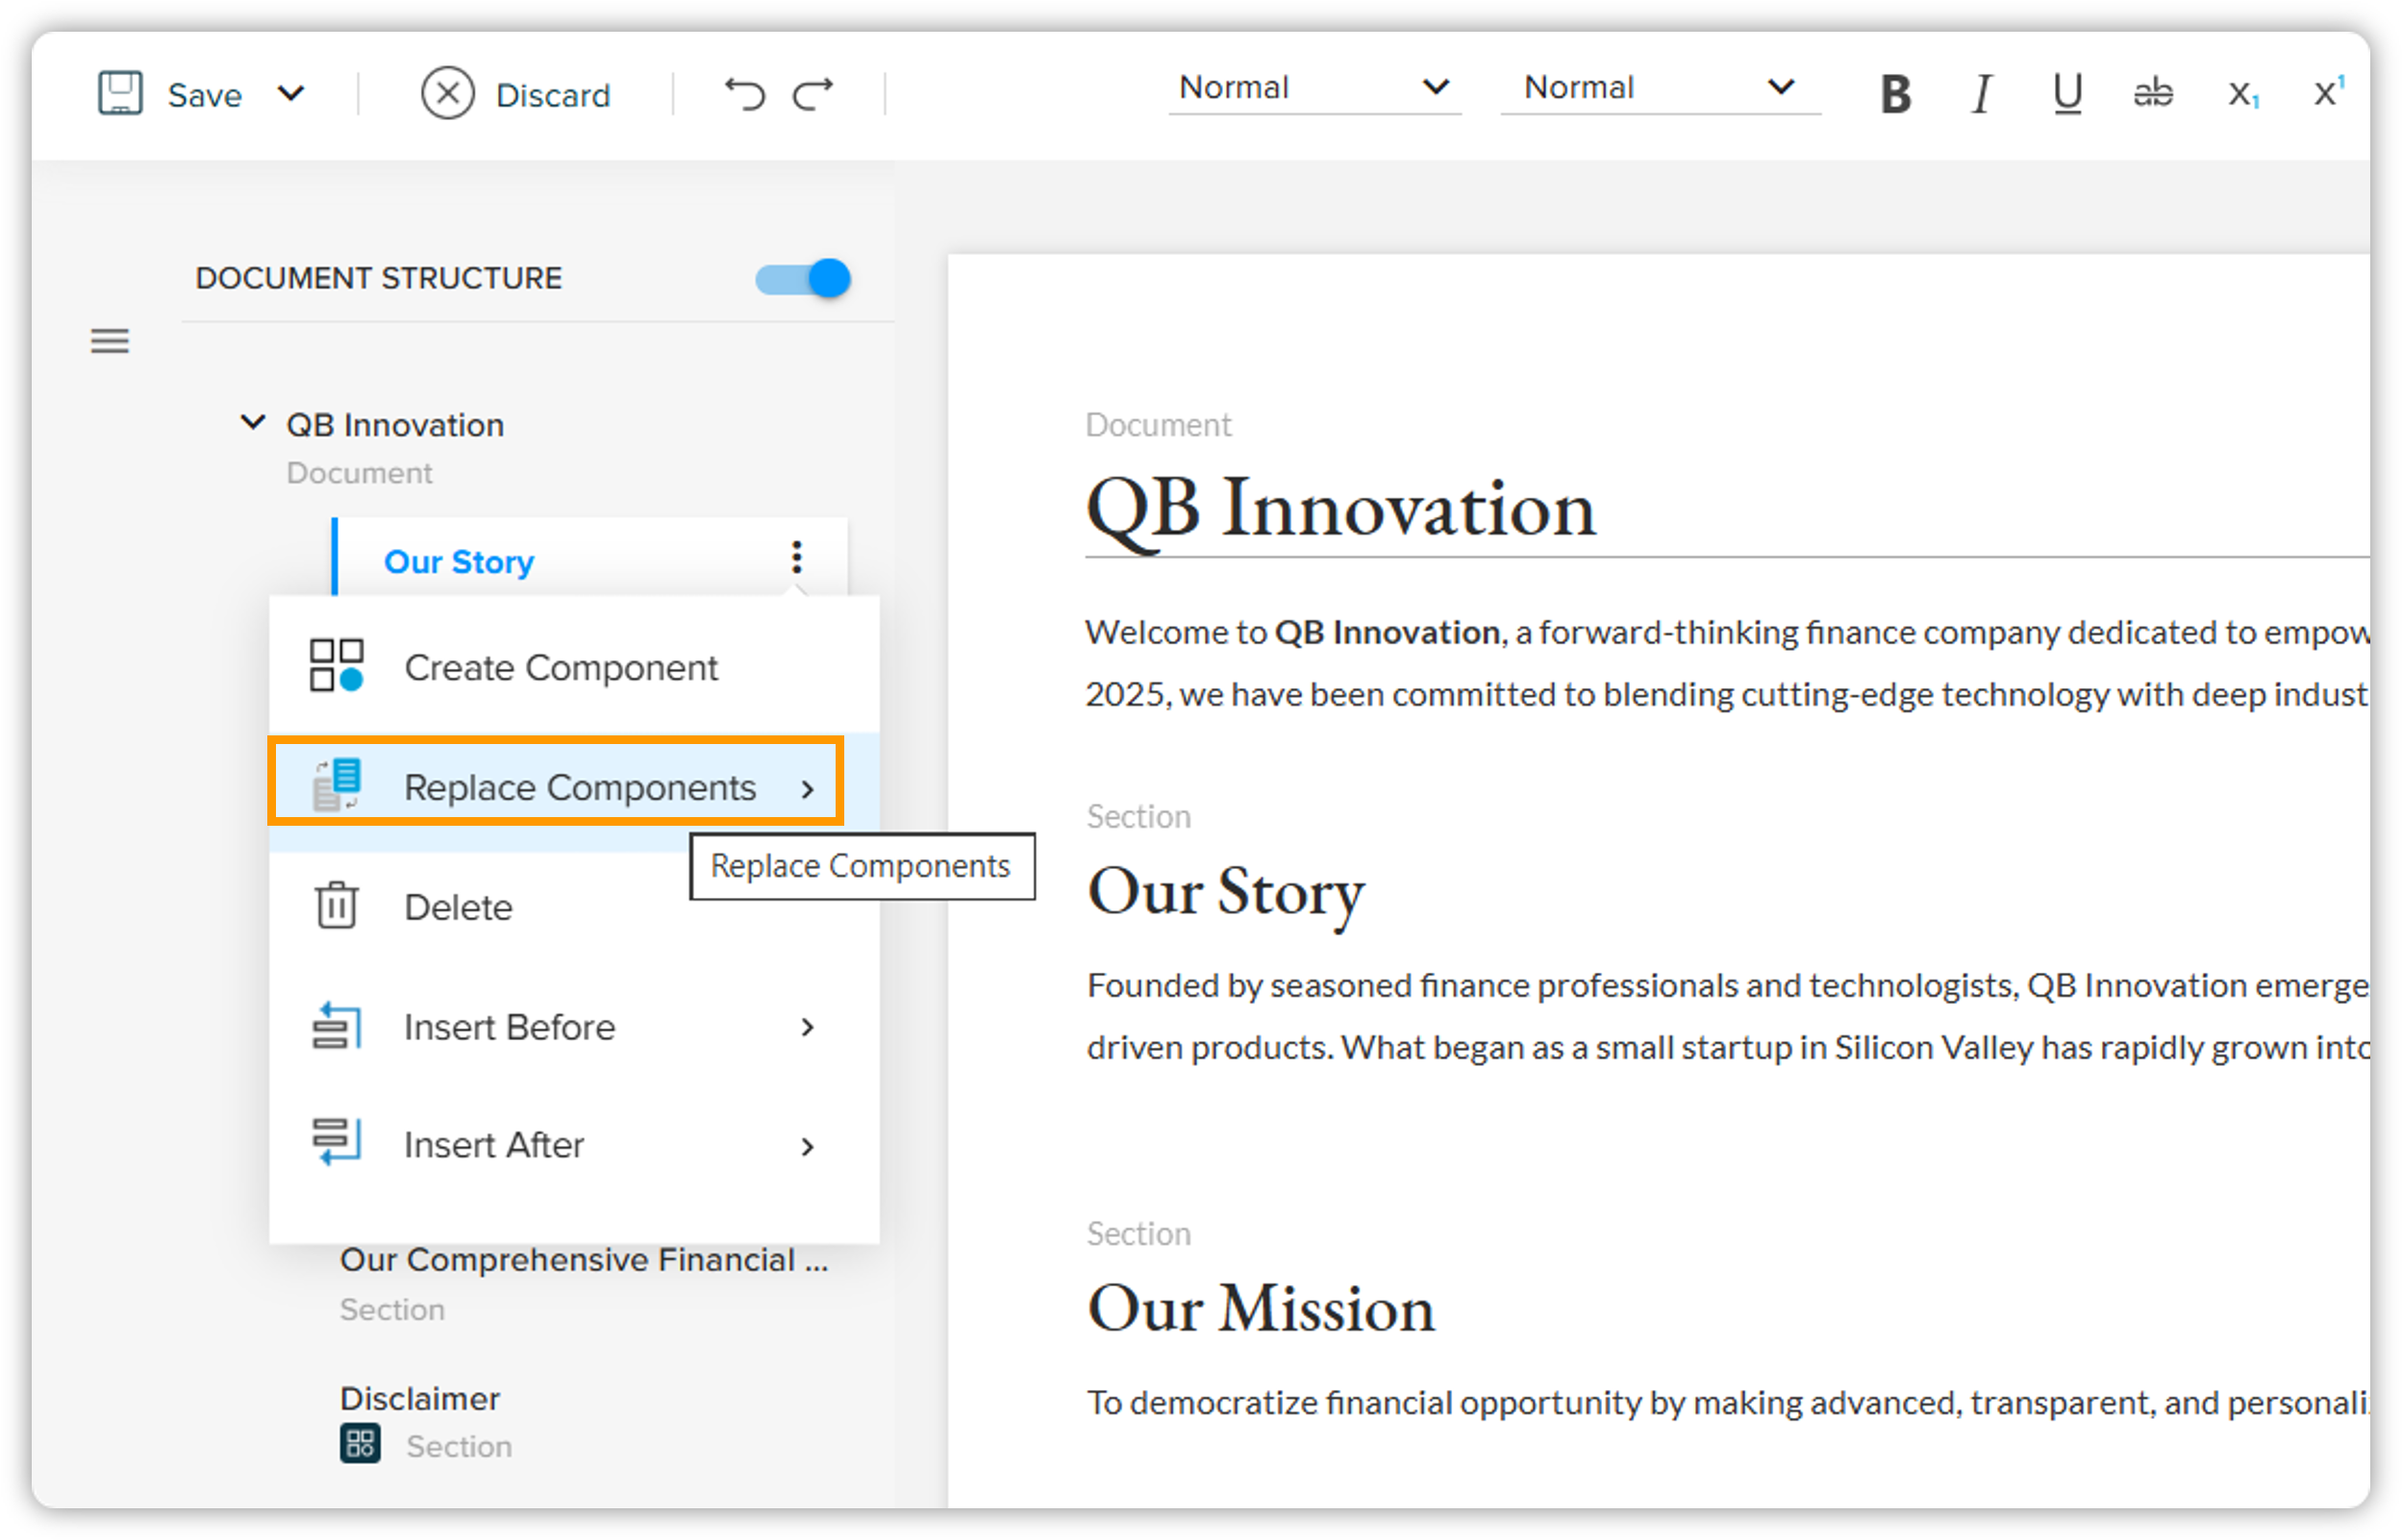
-
In the popup window, select the replacement component(s).
-
You can now select one or multiple components at once. (Previously, only a single component could be replaced at a time.)
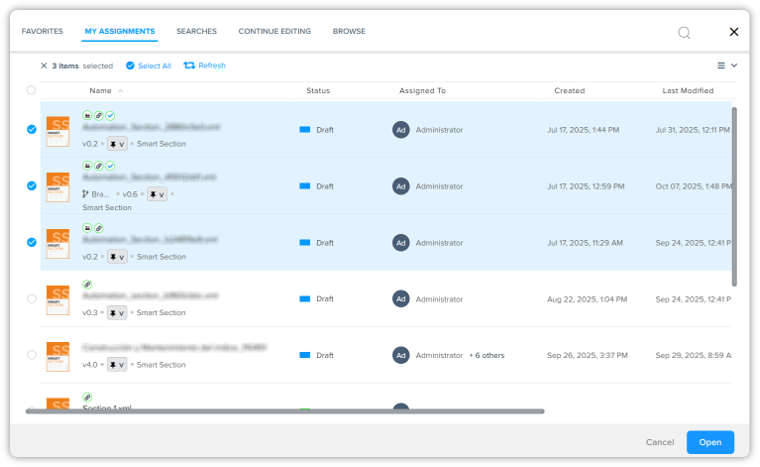
This enhancement provides greater flexibility when manually updating or refining document content.
Creating Templates with Predefined Rules
If you frequently use the same automation rules, you can save time by creating a document template:
-
Set up your desired Content Automation Rules in the document.
-
Save the document as an Authoring Template.
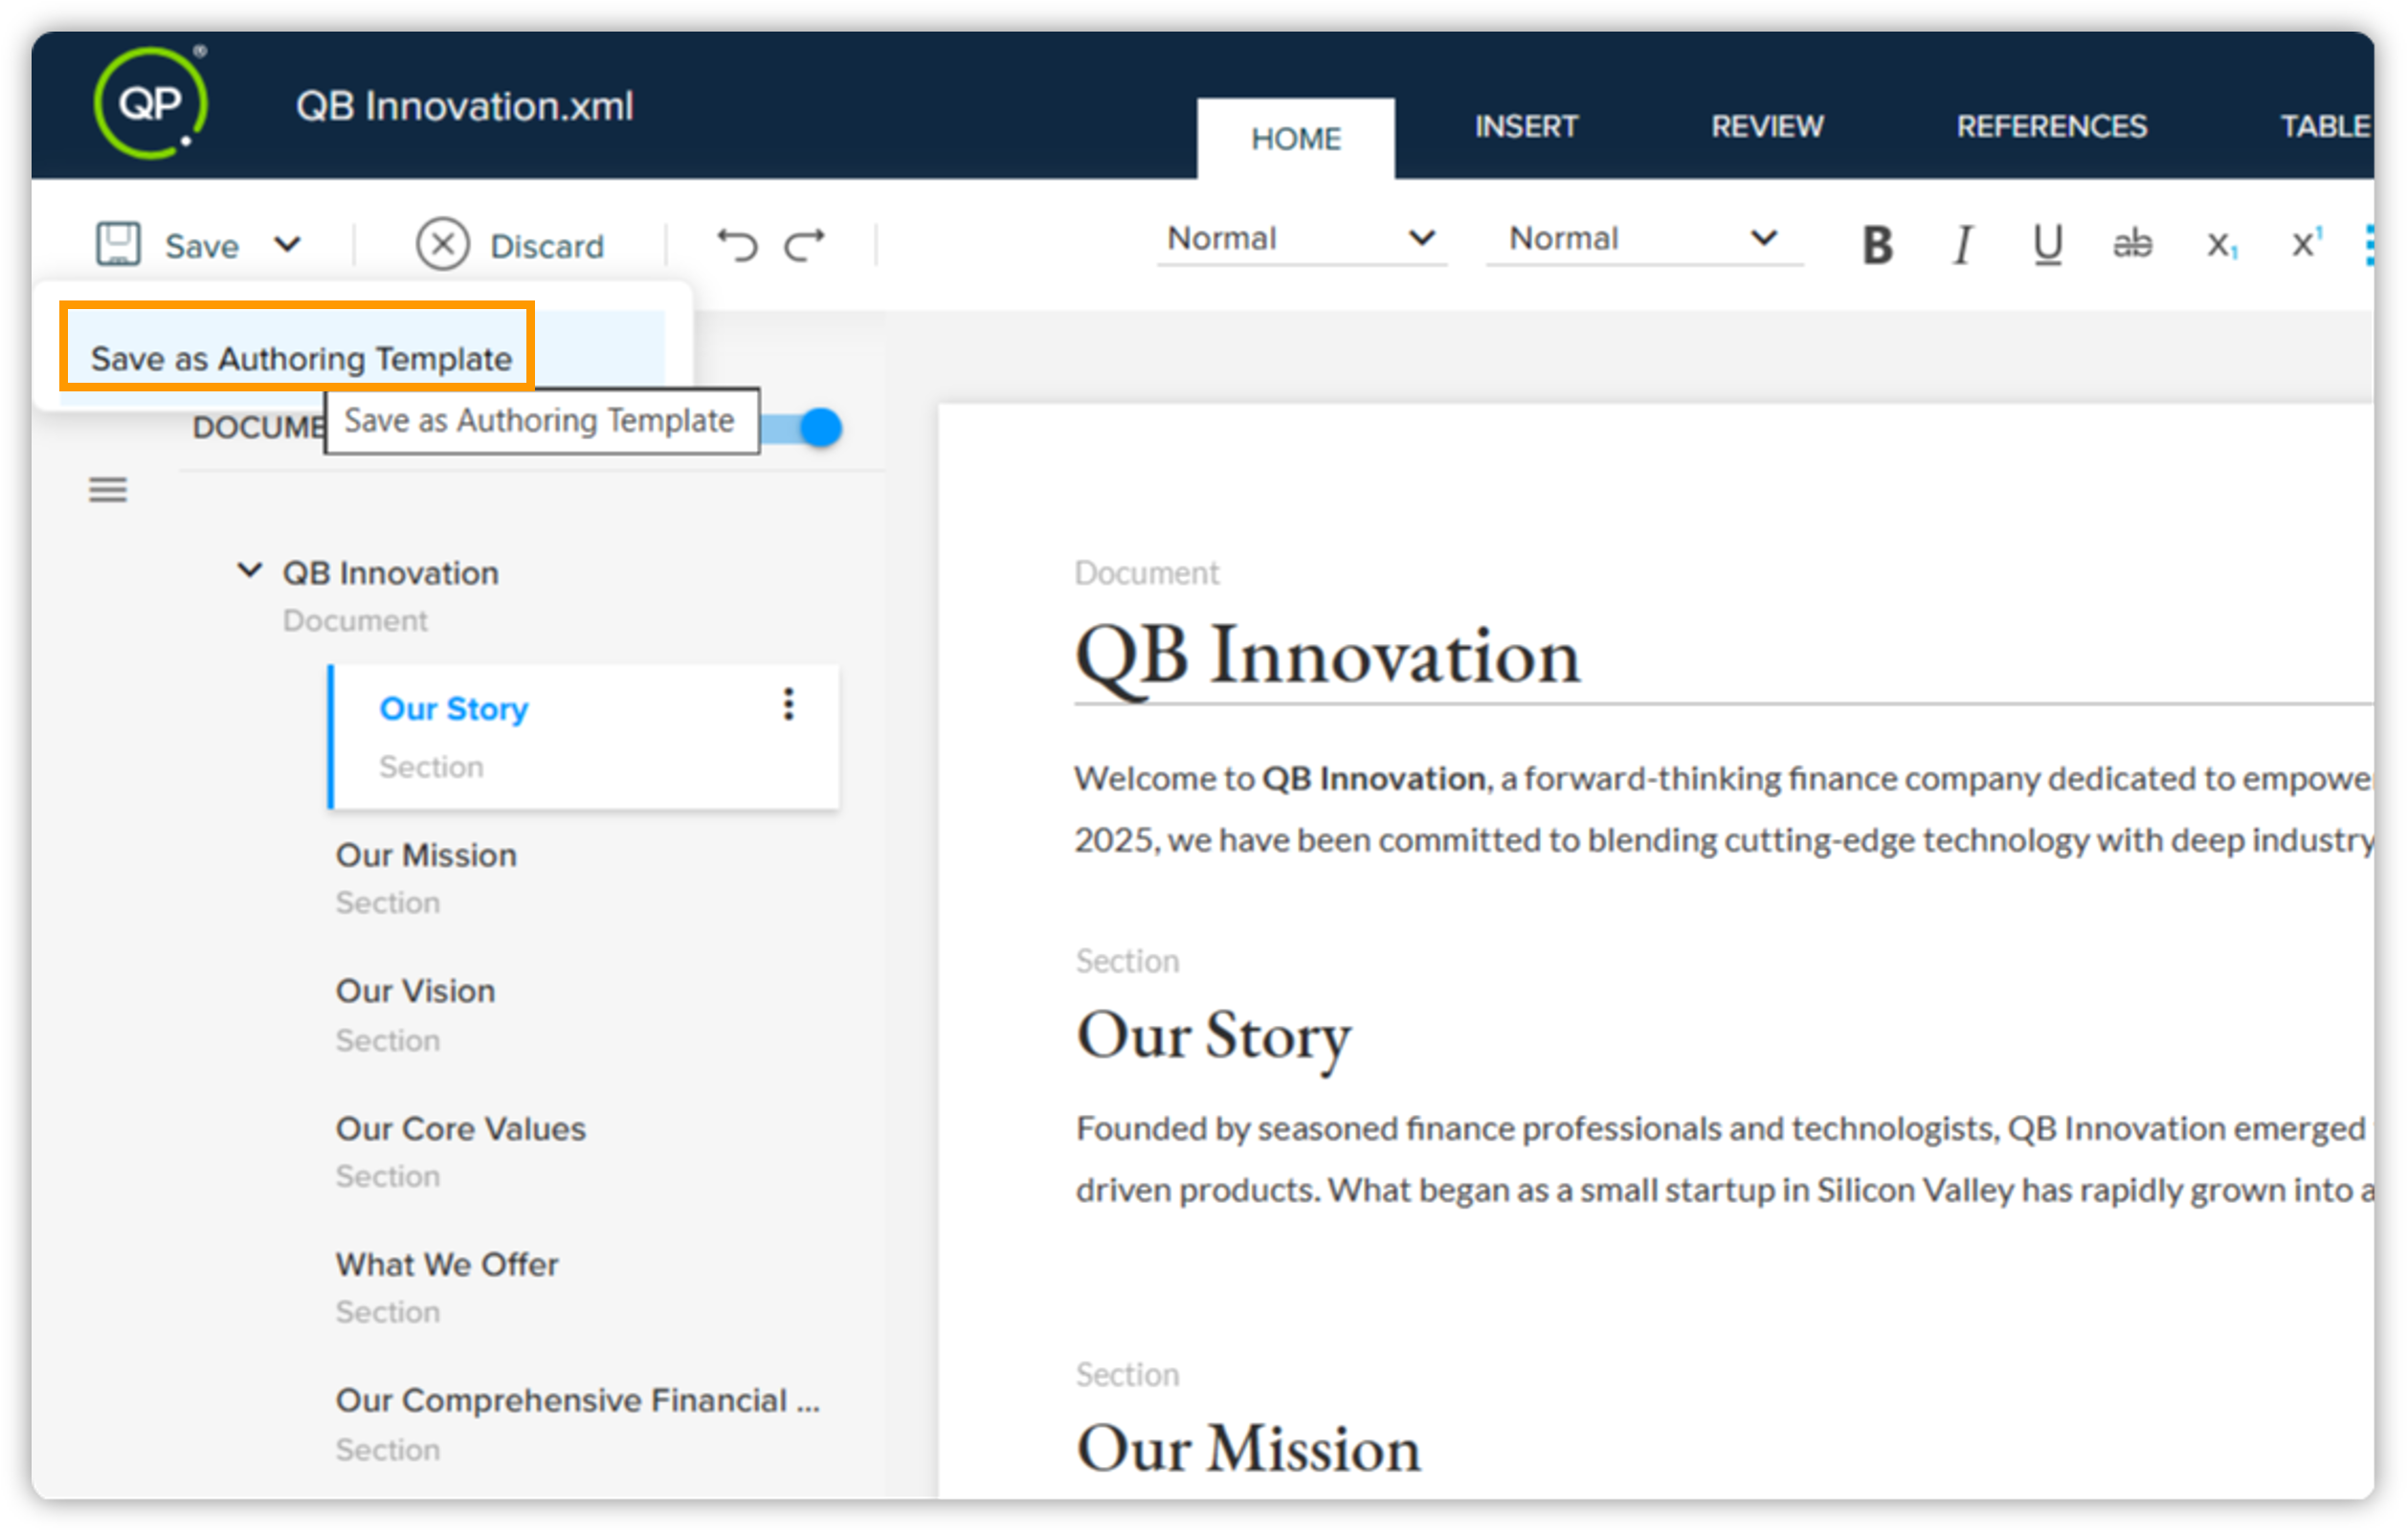
Templates retain the defined rules so you don’t need to configure or execute them manually for future documents.
Notes
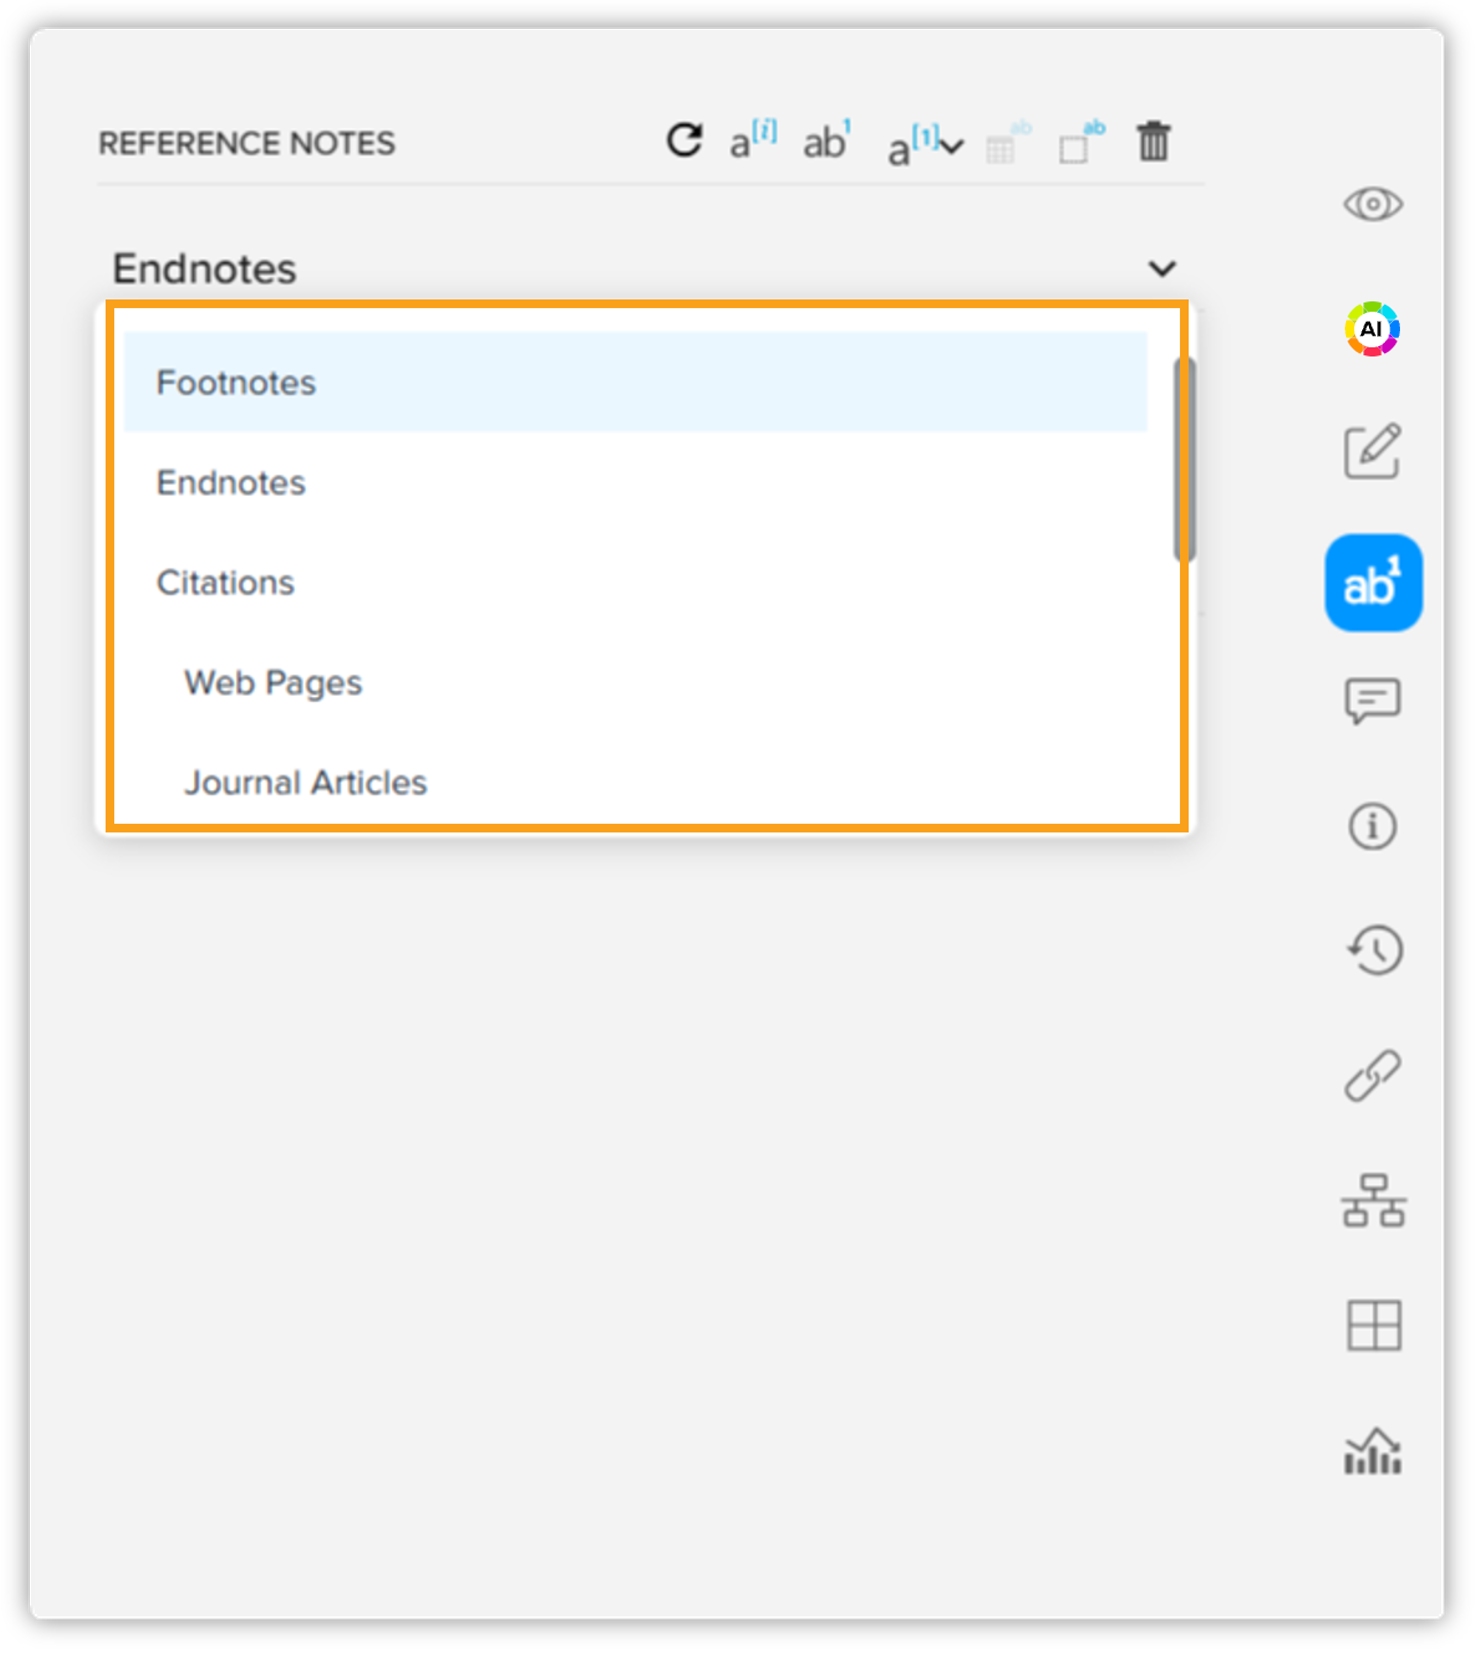
The Notes pane keeps a track of all the footnotes, endnotes, citations, table notes, and section notes that one or more authors have added to a document. The Notes pane also has a toolbar to add a note or delete a selected note. You can also refresh the pane to see the latest notes that have been added after you have opened the Notes pane.
The Notes pane displays only one type of notes at a time, which you can select through a drop down menu at the top of the pane.
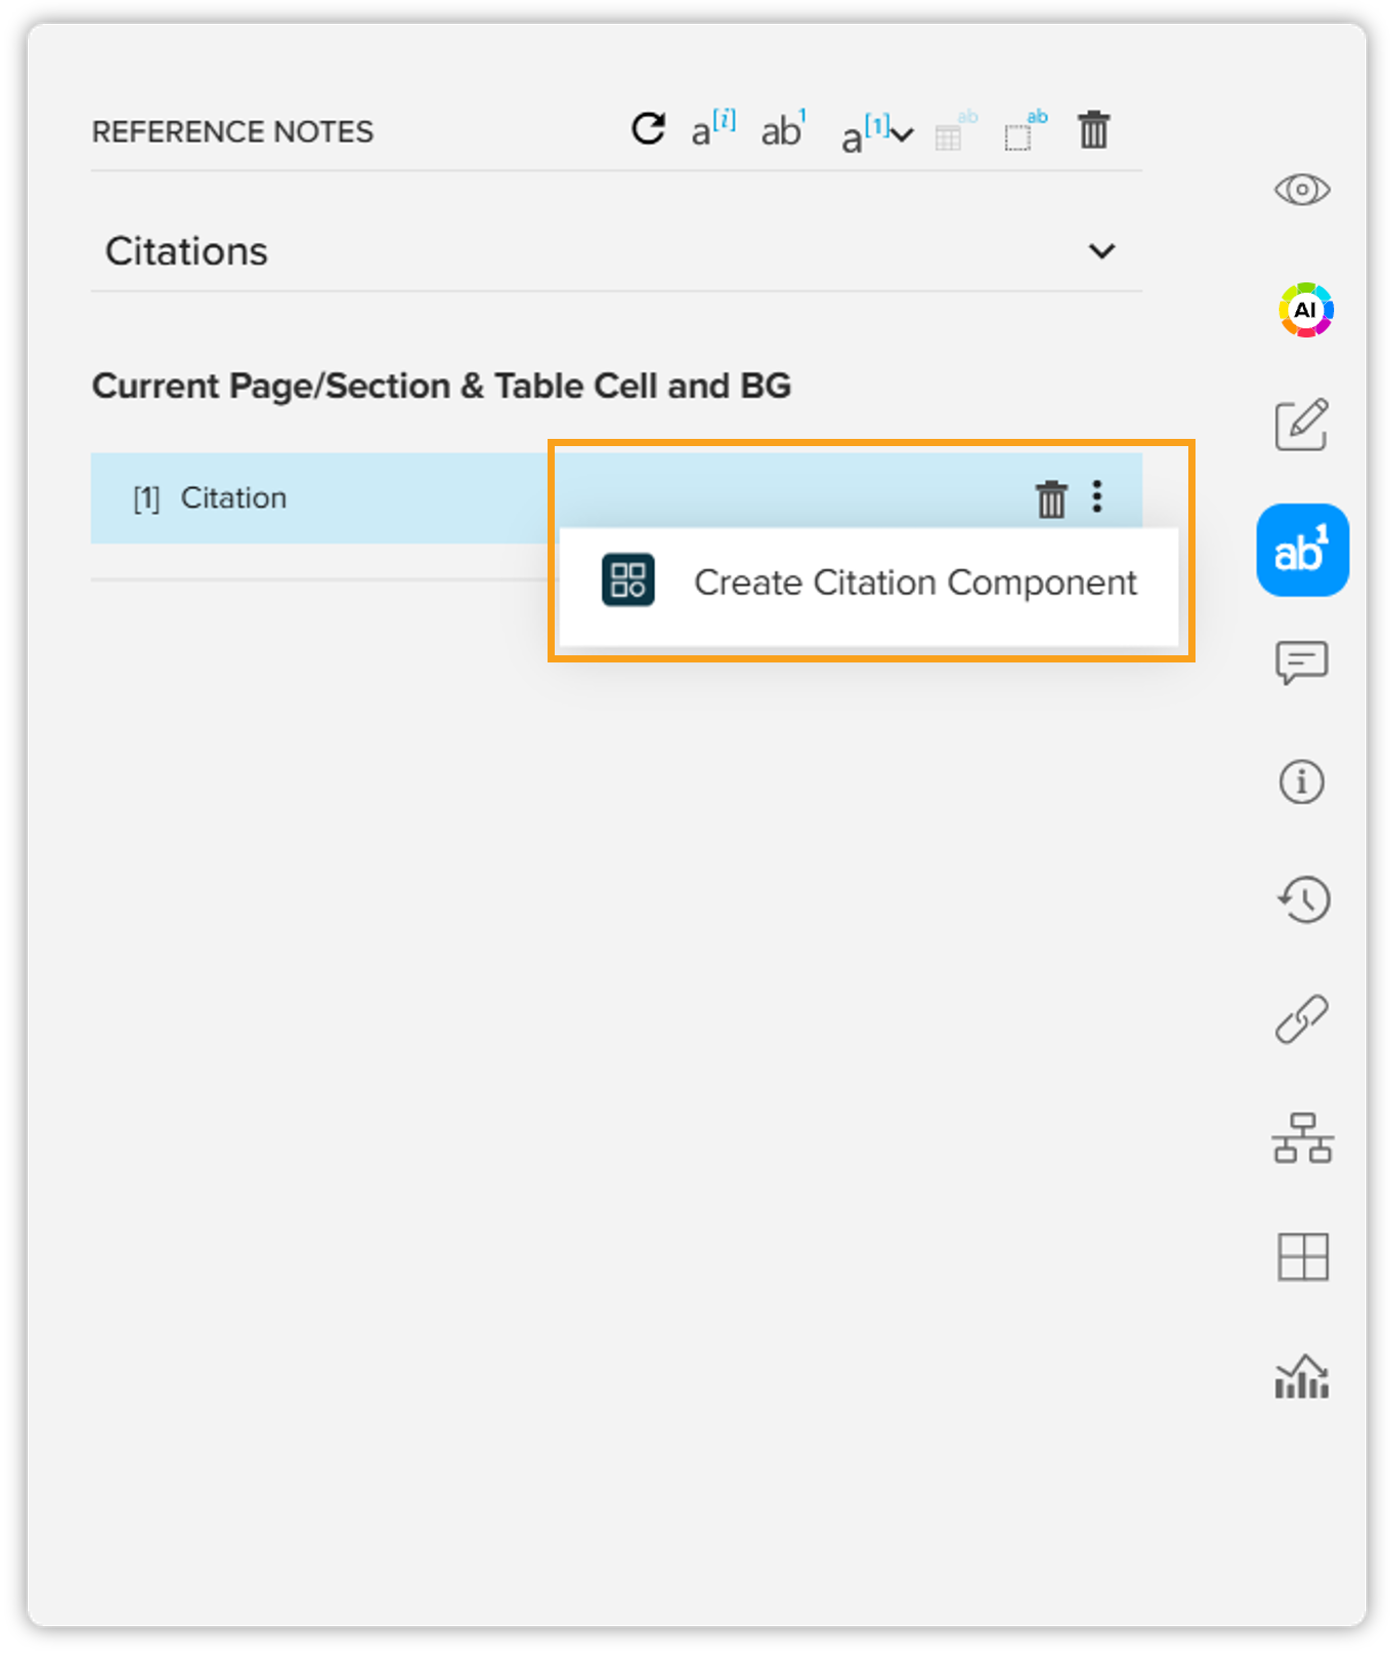
Unlike other notes, which are always inline, you can add a citation from the server
as well. Additionally, you can also convert an inline citation to a server component
and vice versa through the kebab menu icon next to citations listed in the Notes pane.
Edit a Note
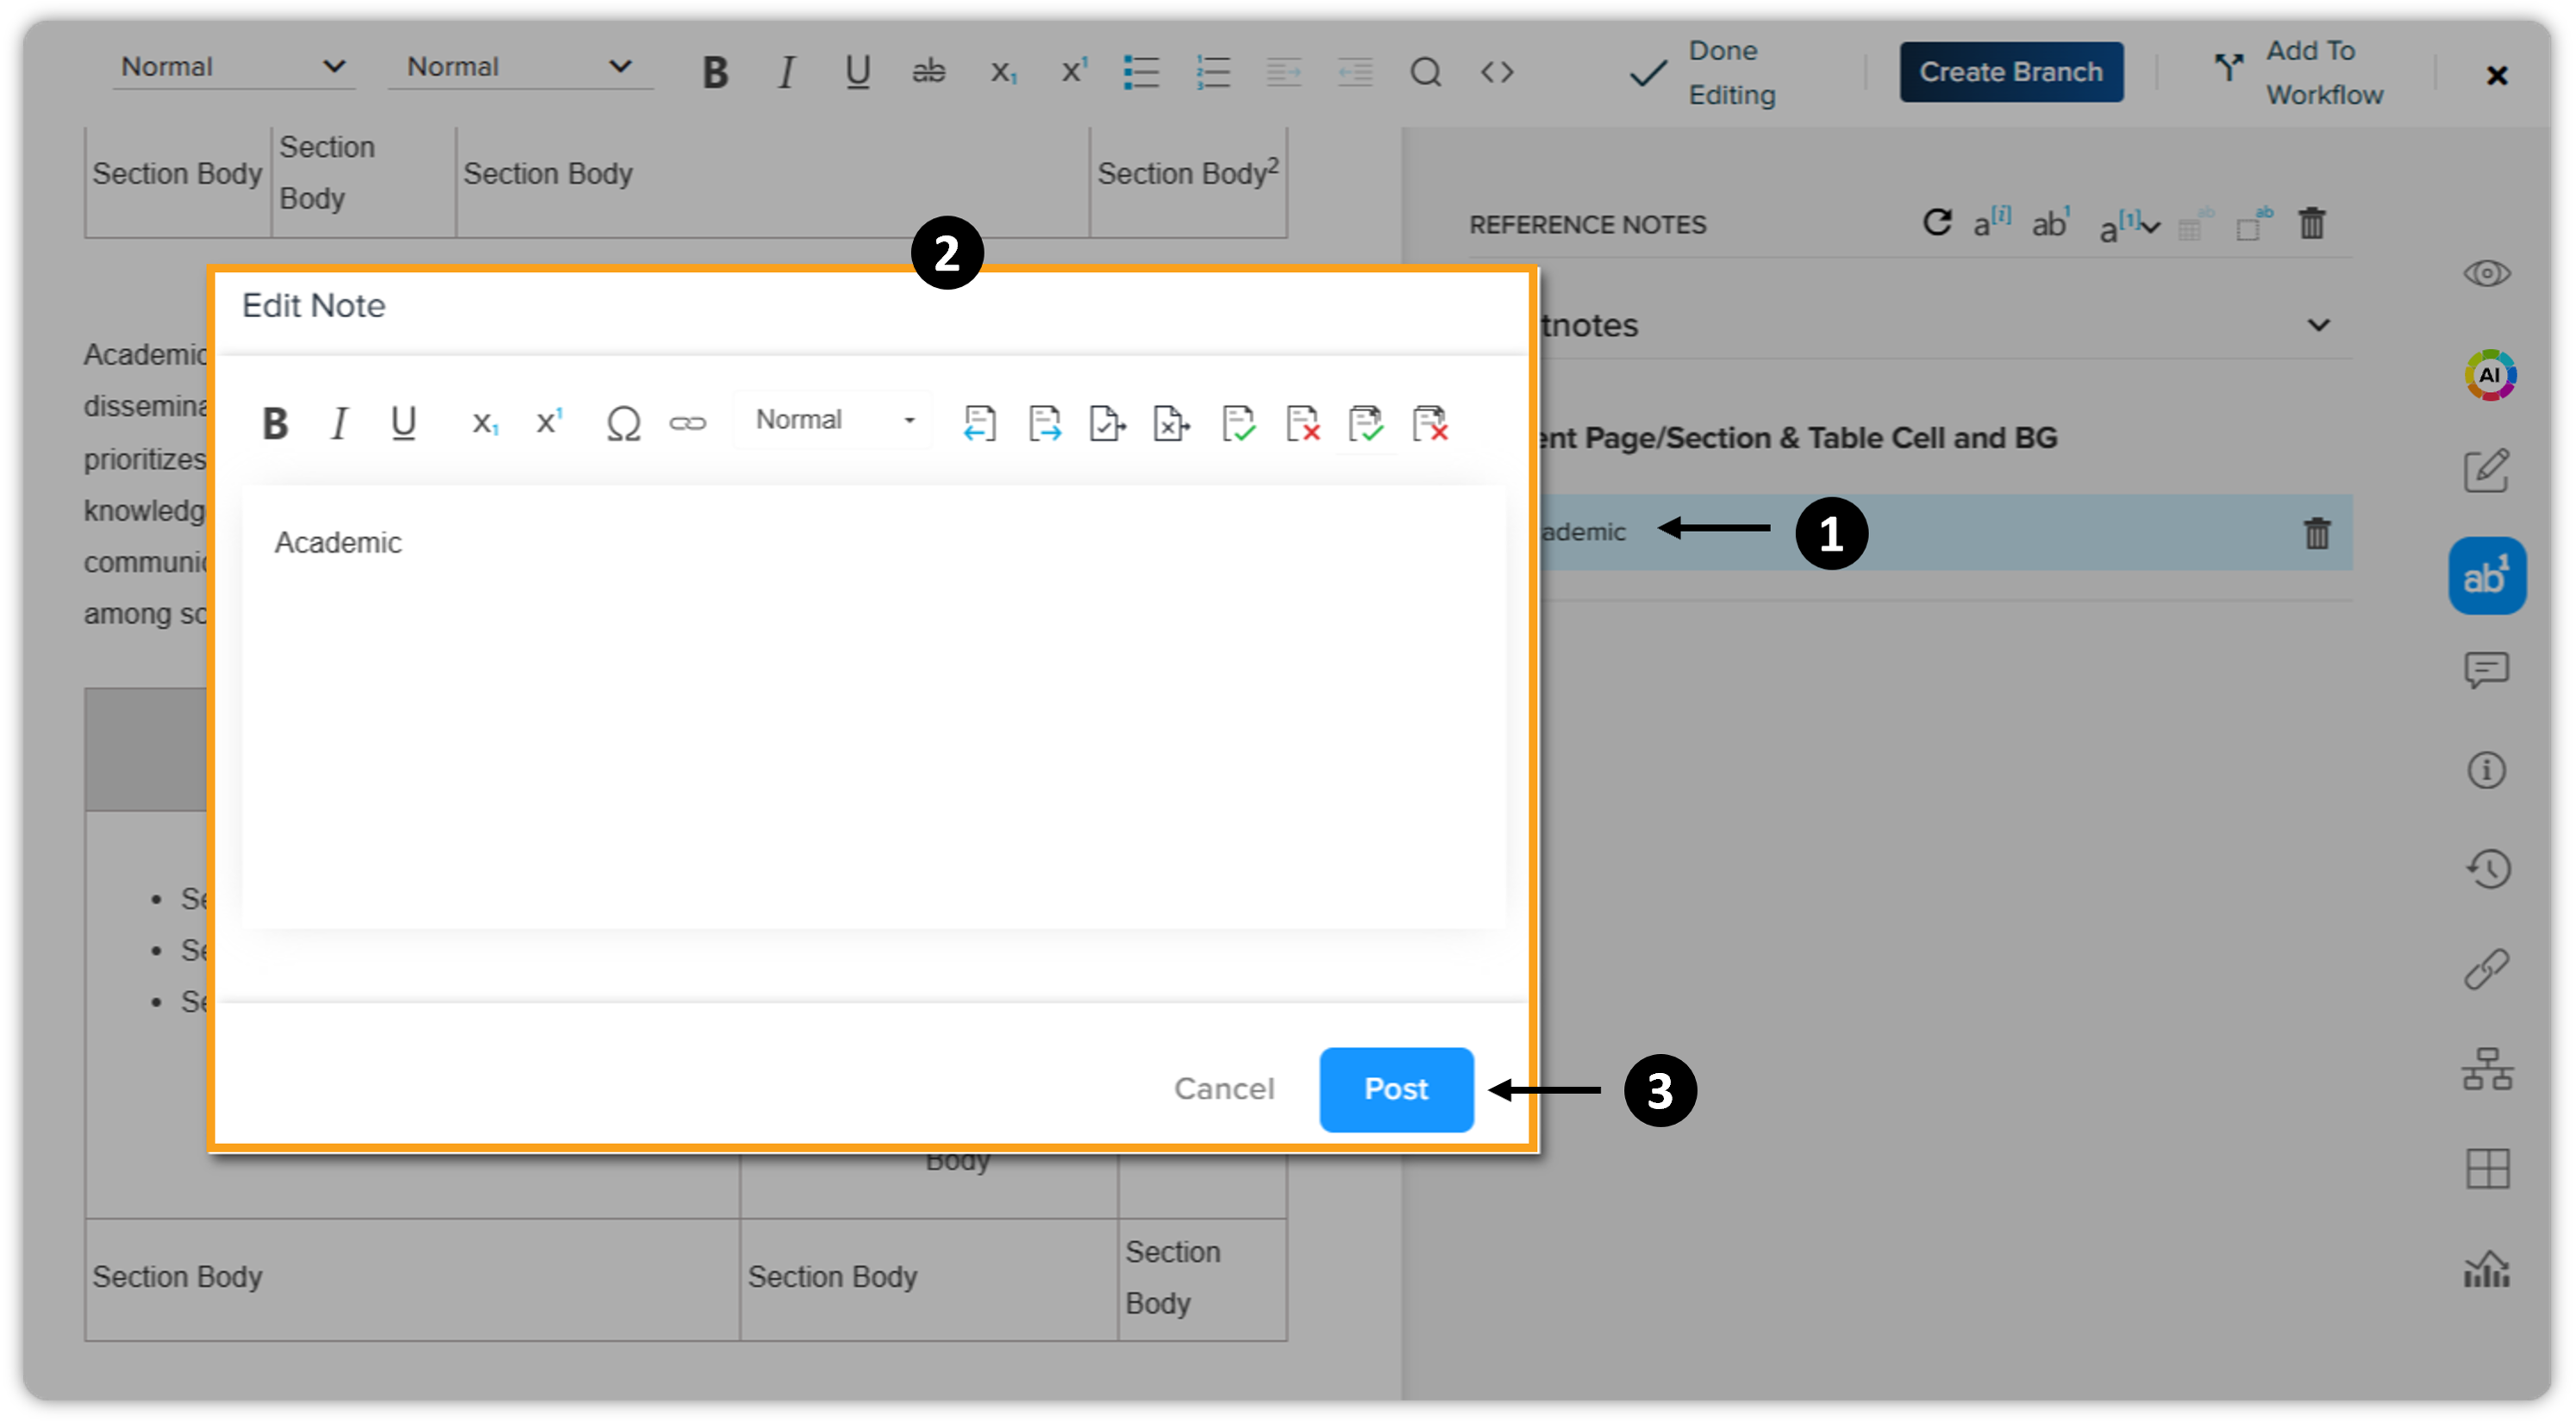
To edit a note:
-
Double click on the note you want to edit to open the Edit Note window.
-
Edit the note and then click on the button Post.
Comments
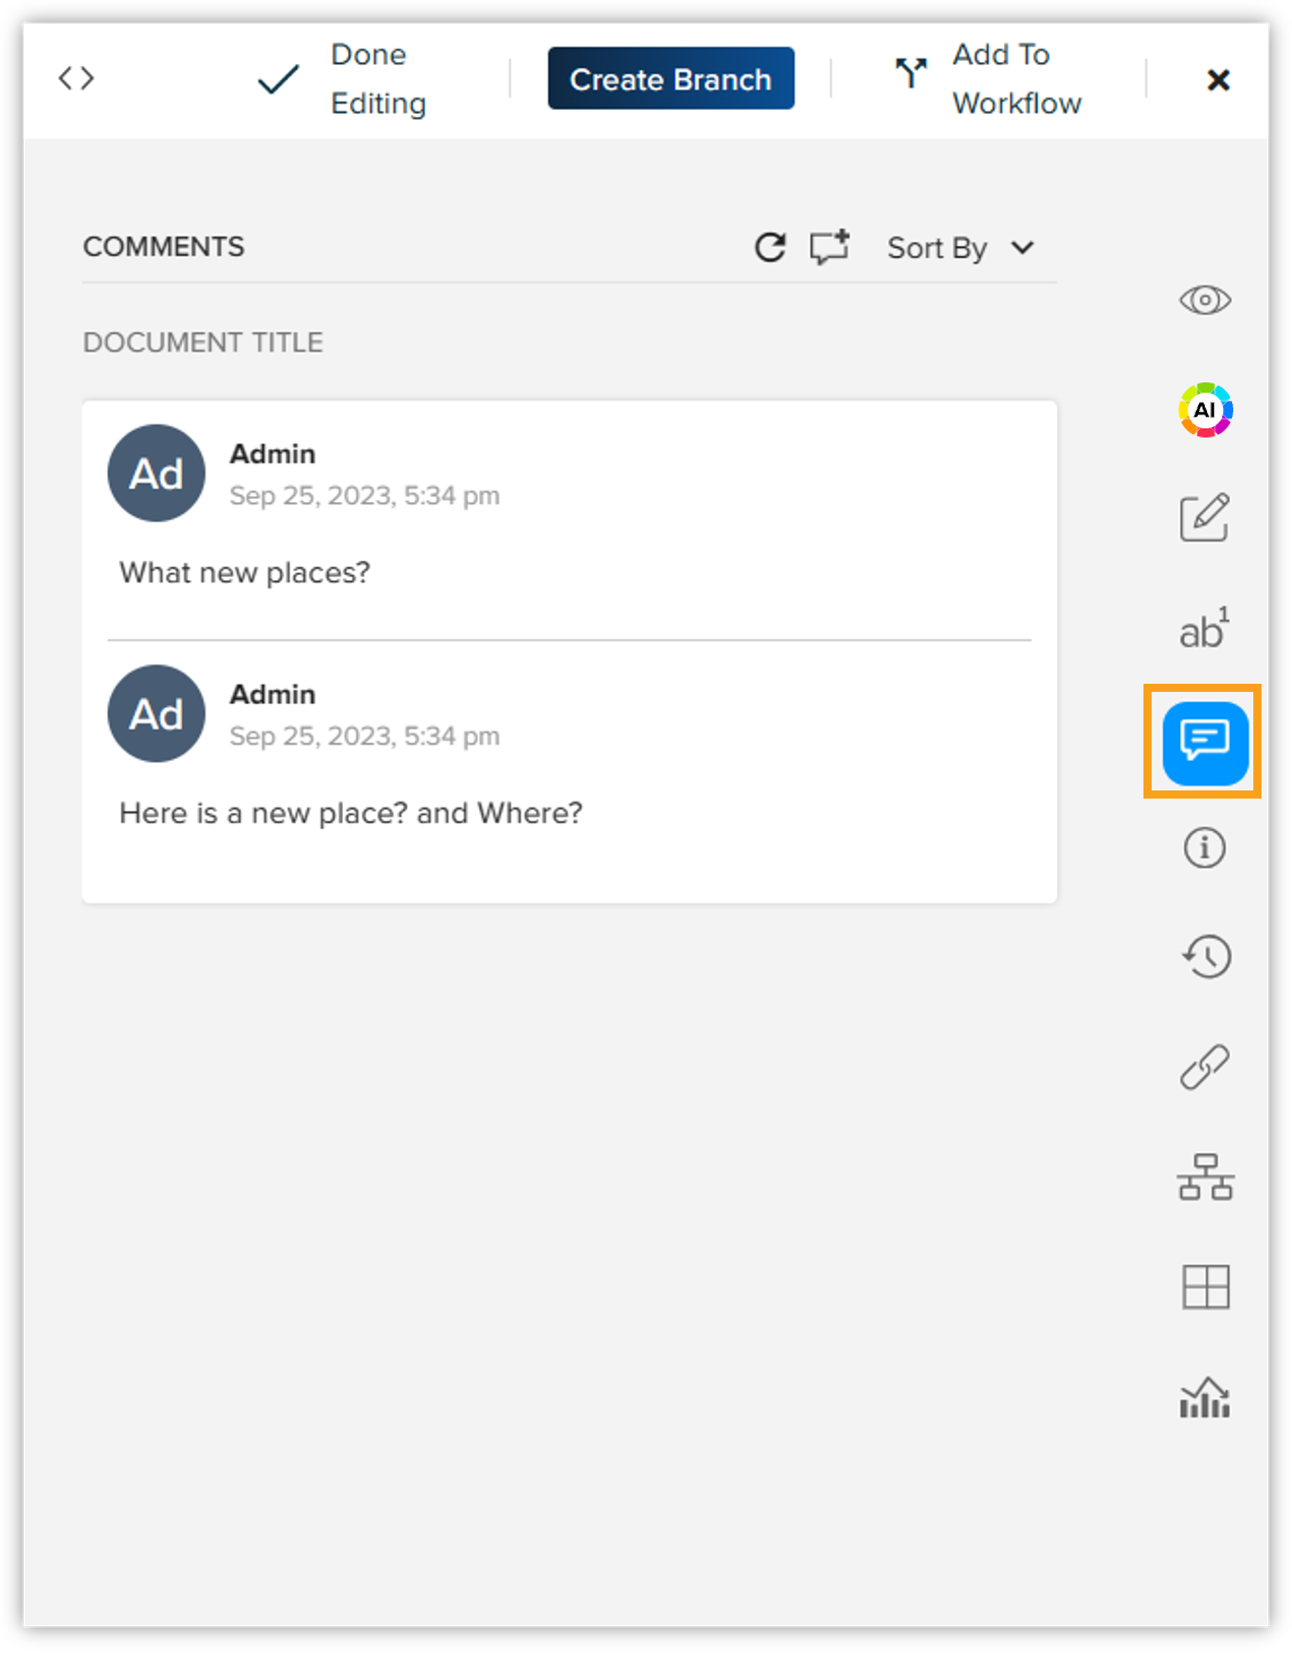
The Comments pane keeps a track of all the comments that one or more authors have added to a document.
The Comments pane also has a toolbar to add a comment by selecting text in the authoring canvas or delete a selected comment, and to sort the list of comments by position and date. You can also refresh the pane to see the latest comments that have been added after you have opened the Comments pane.
Metadata
The Metadata section consists of three tabs: Properties, Layout Options, and Variables.
Properties
The Properties pane displays several types of properties of a document or an element/section within a document.
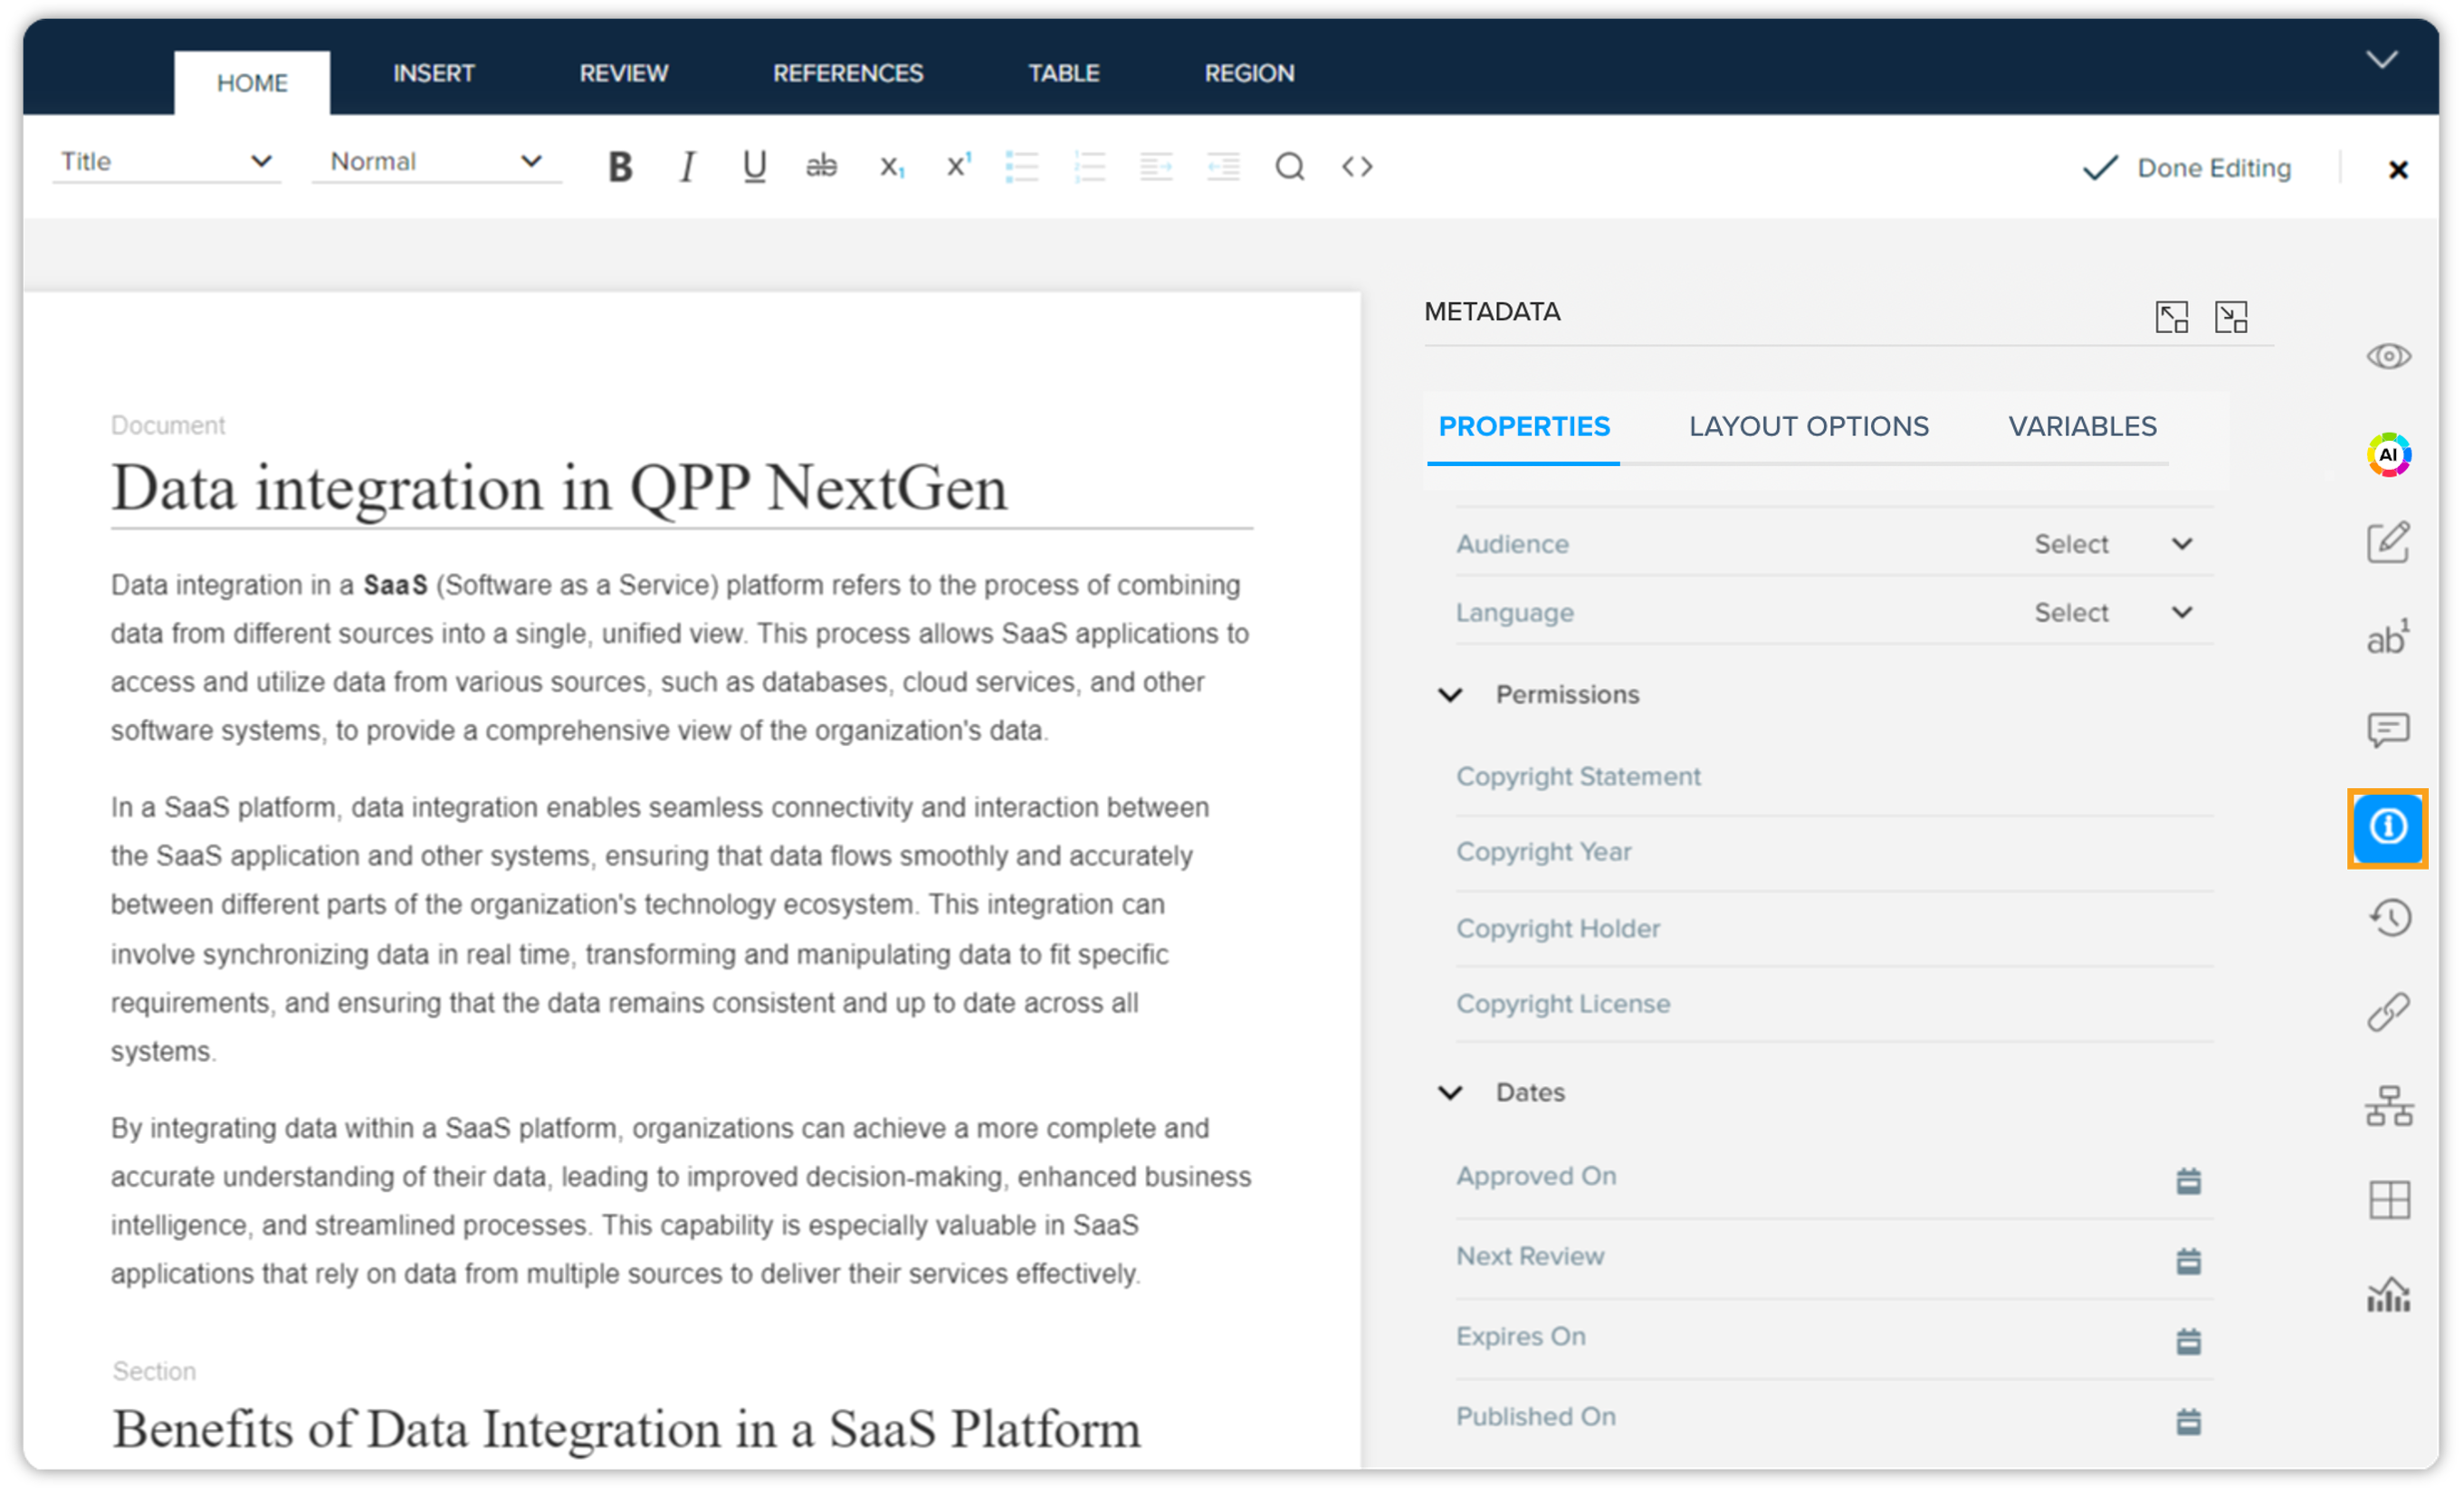
You can switch between properties of the entire document and of a specific section through the Increase Scope/Decrease Scope buttons at the upper-right corner of the Properties pane. For a section (decreased scope), the Properties pane only displays Keywords.
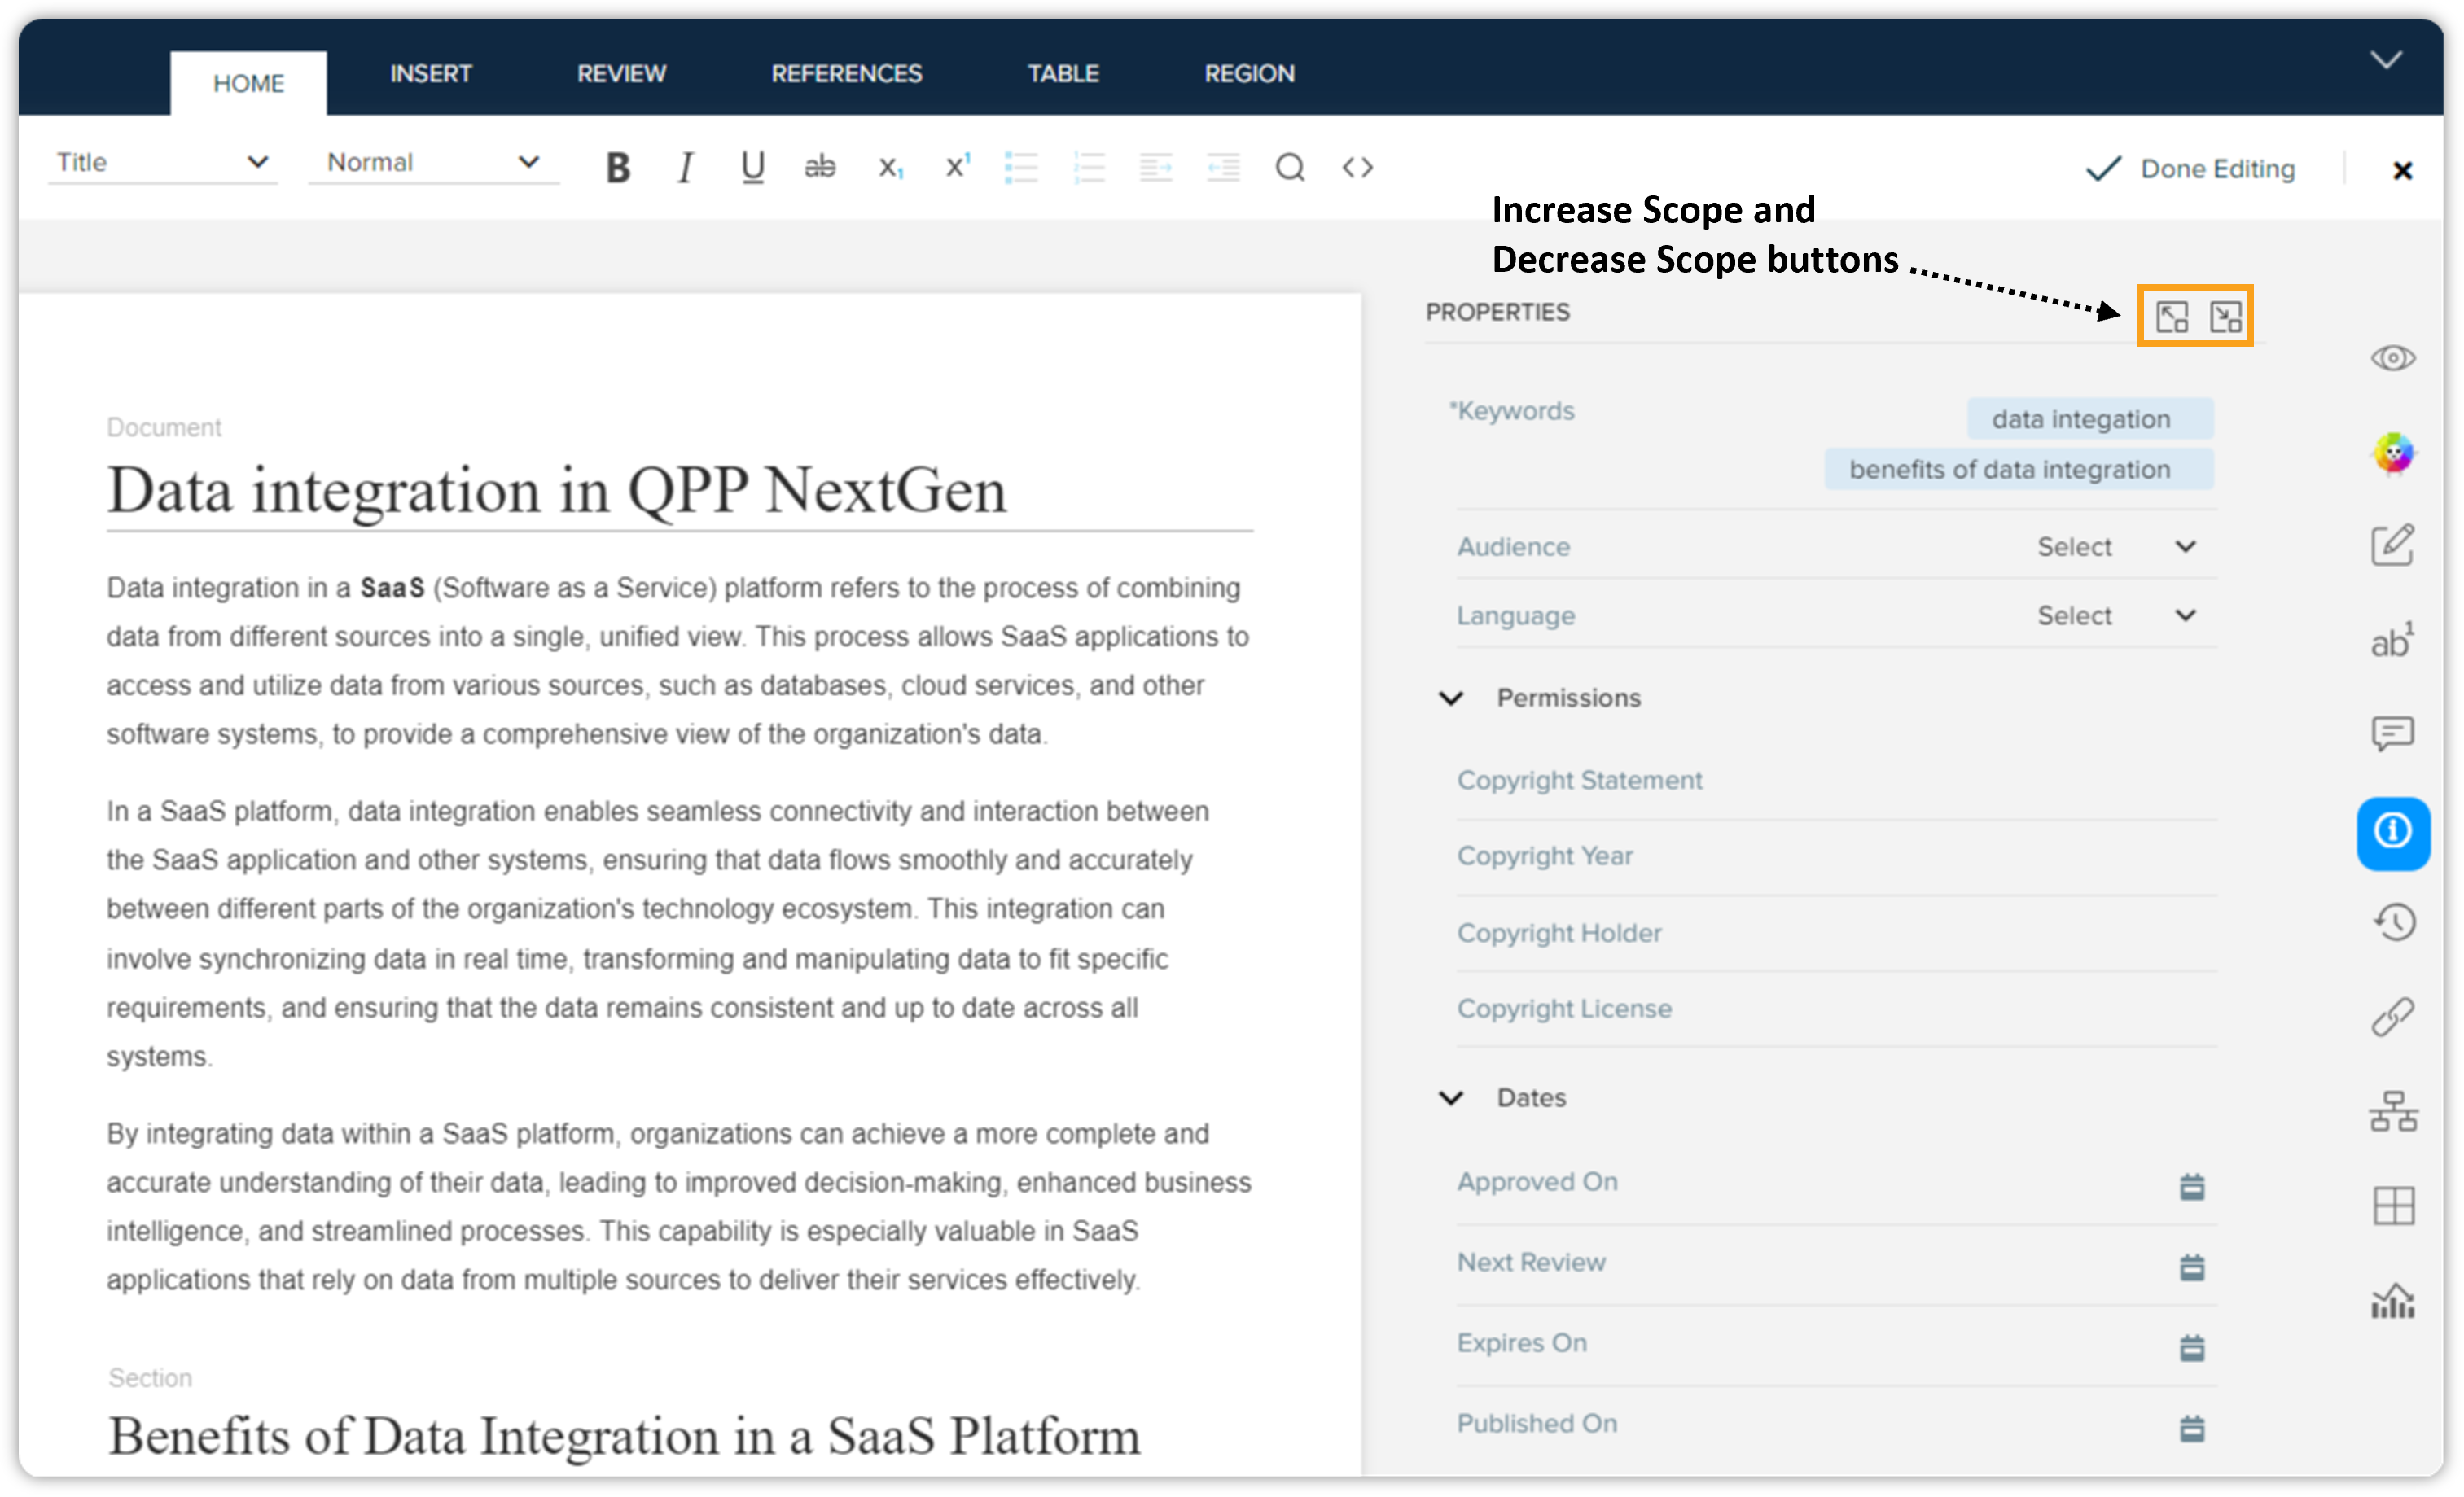
The options in the Properties pane are as follows:
The general properties define the following three attributes:
-
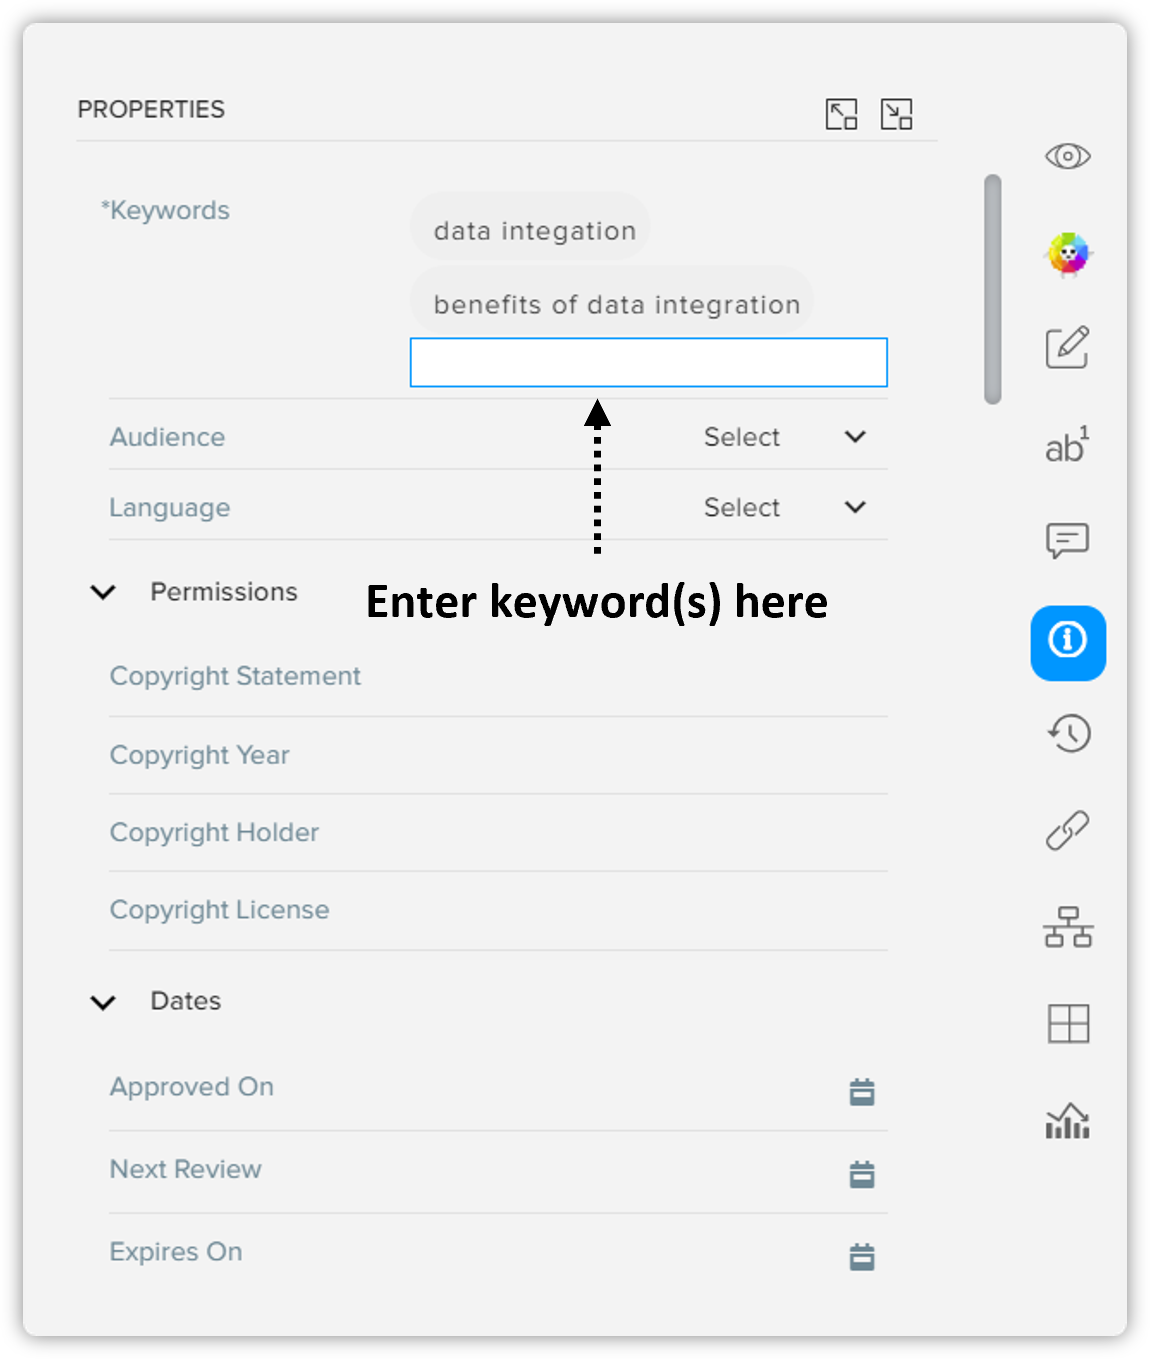
Keywords: Allows you to define keywords for your document which are essentially tags to categorize the document.
-
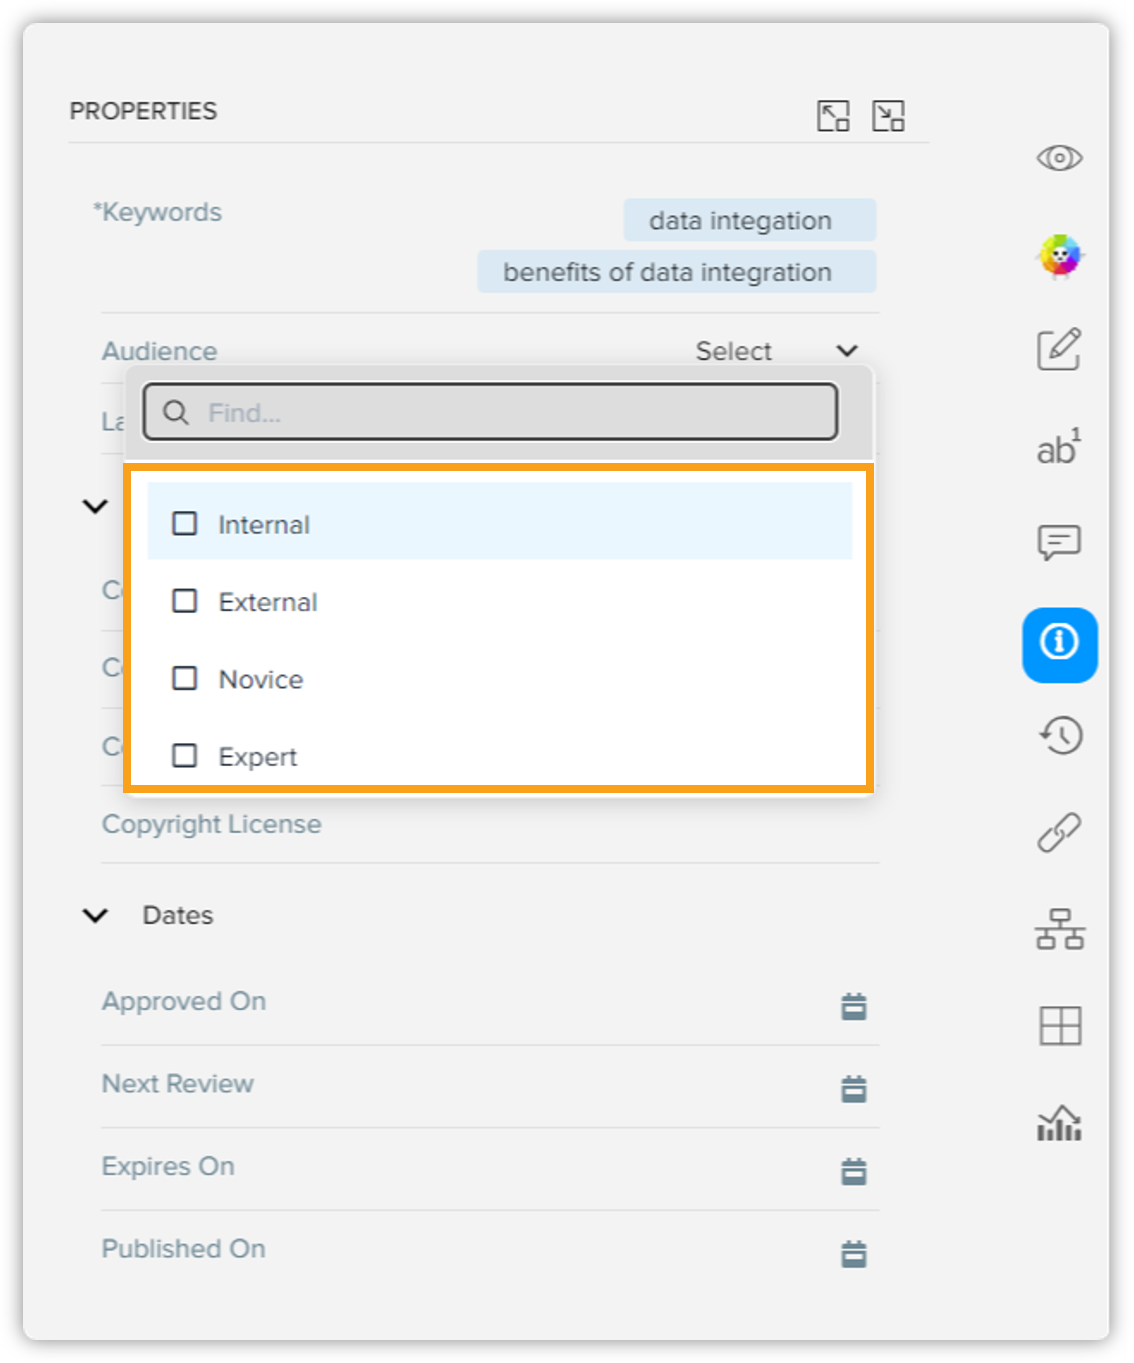
Audience: Allows you to select an audience for your document, which can be internal, external, novice, or expert.
-
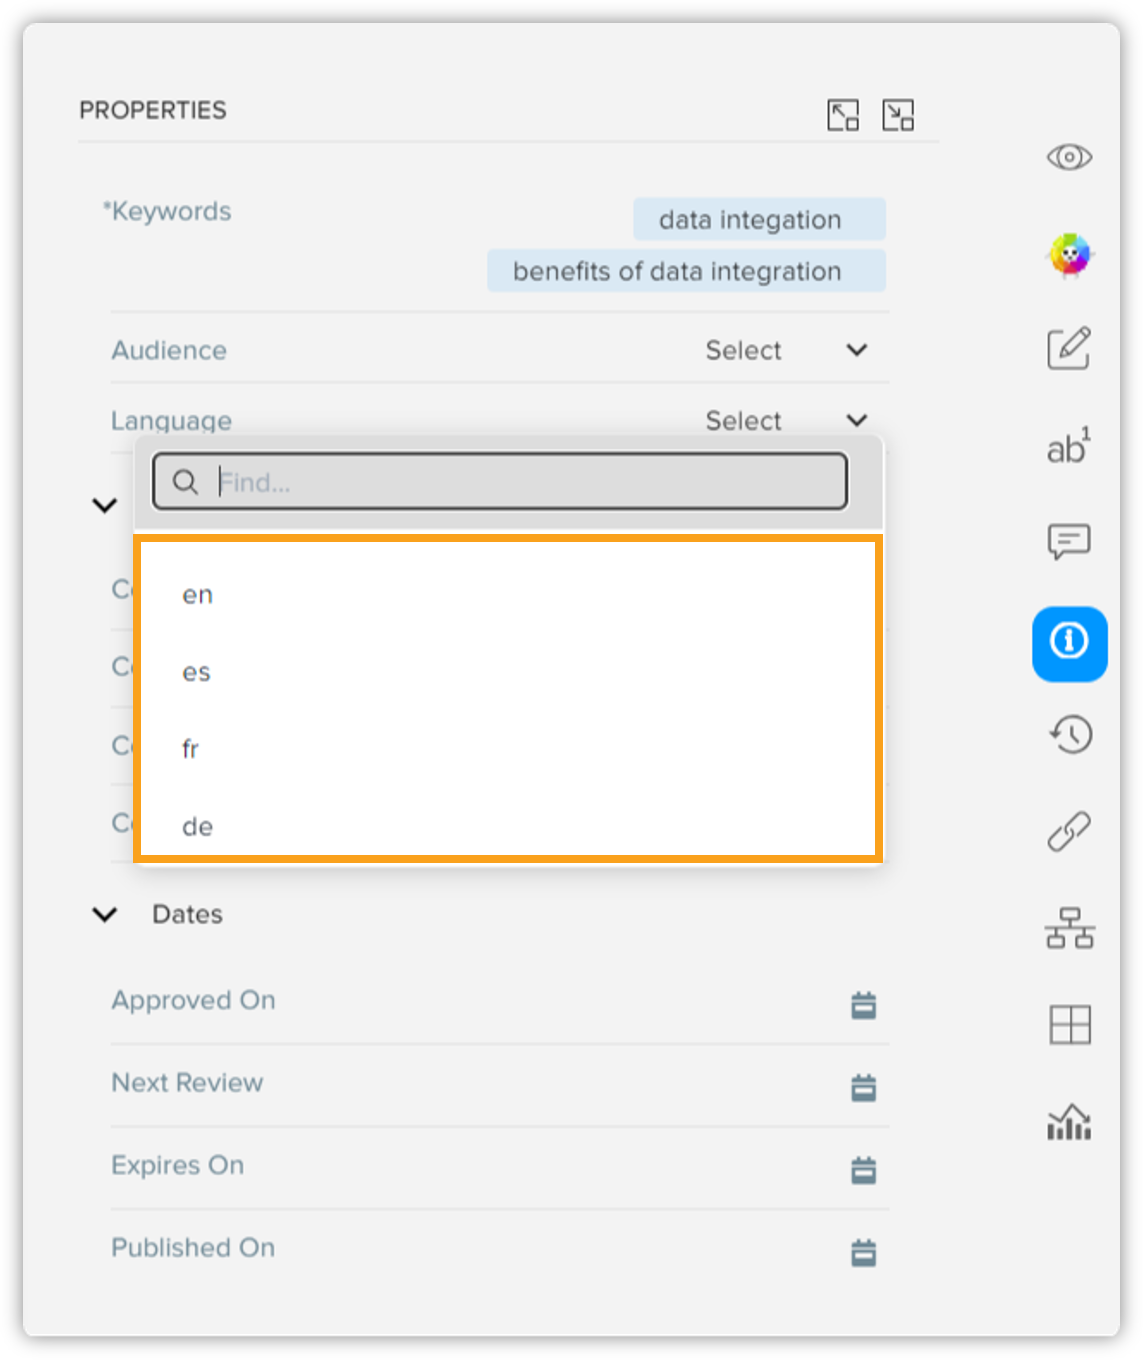
Language: Allows you to select a language for your document. English, French, German, and Spanish are available in QPP by default.
The Date properties consist of a list of key dates related to a document which authors/reviewers can add and edit. These date properties are as follows:
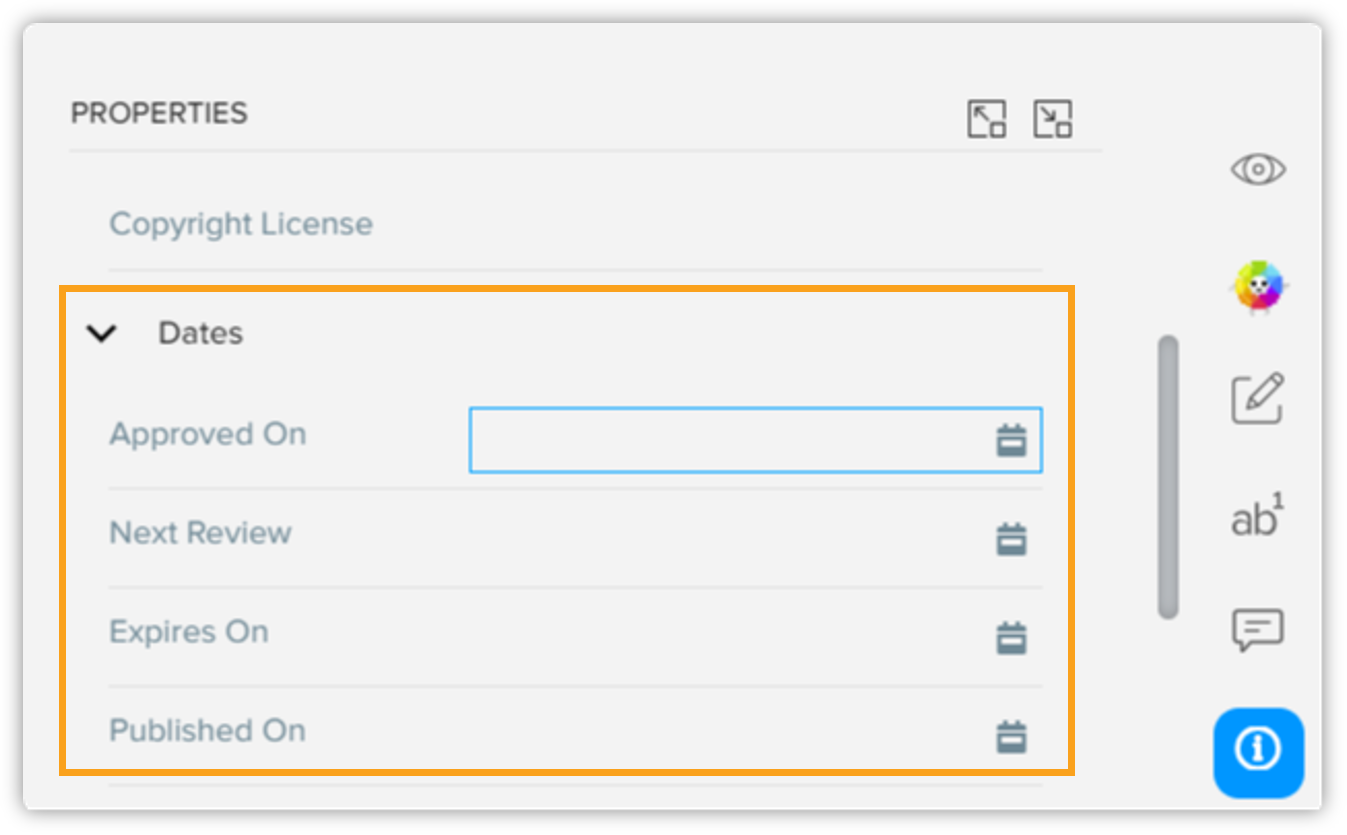
-
Approved On
-
Next Review
-
Expires On
-
Published On
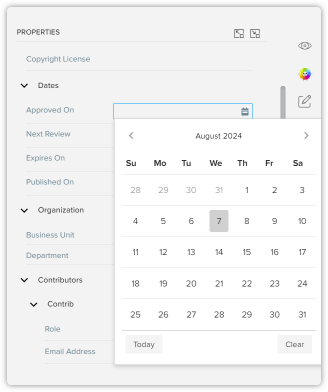
To set/edit a date:
-
Select the calendar icon
 against a date attribute to open a calendar dialog.
-
In the calendar dialog, select a date or clear an already selected date to select a new date.
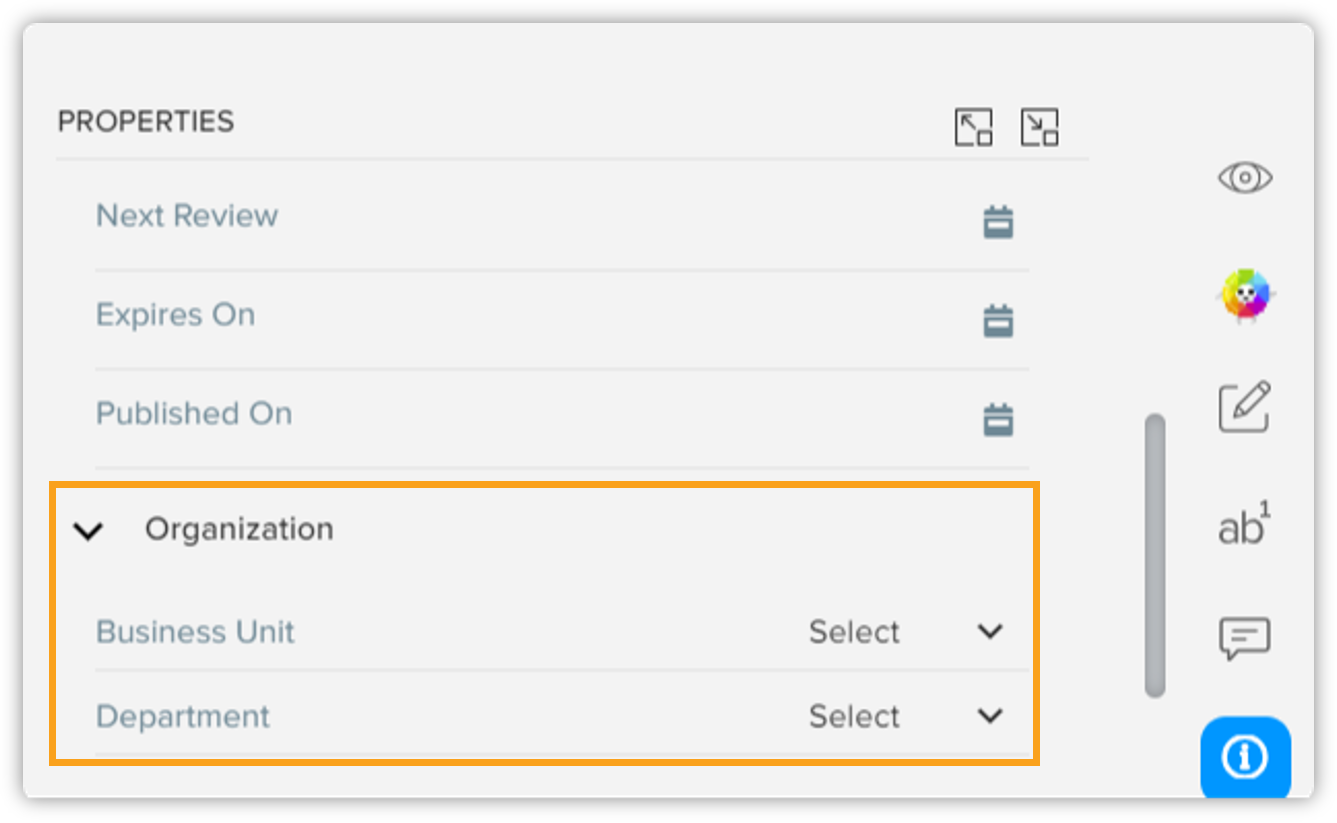
The Organization properties allow you to add tags related to the business unit and department to categorize a document.
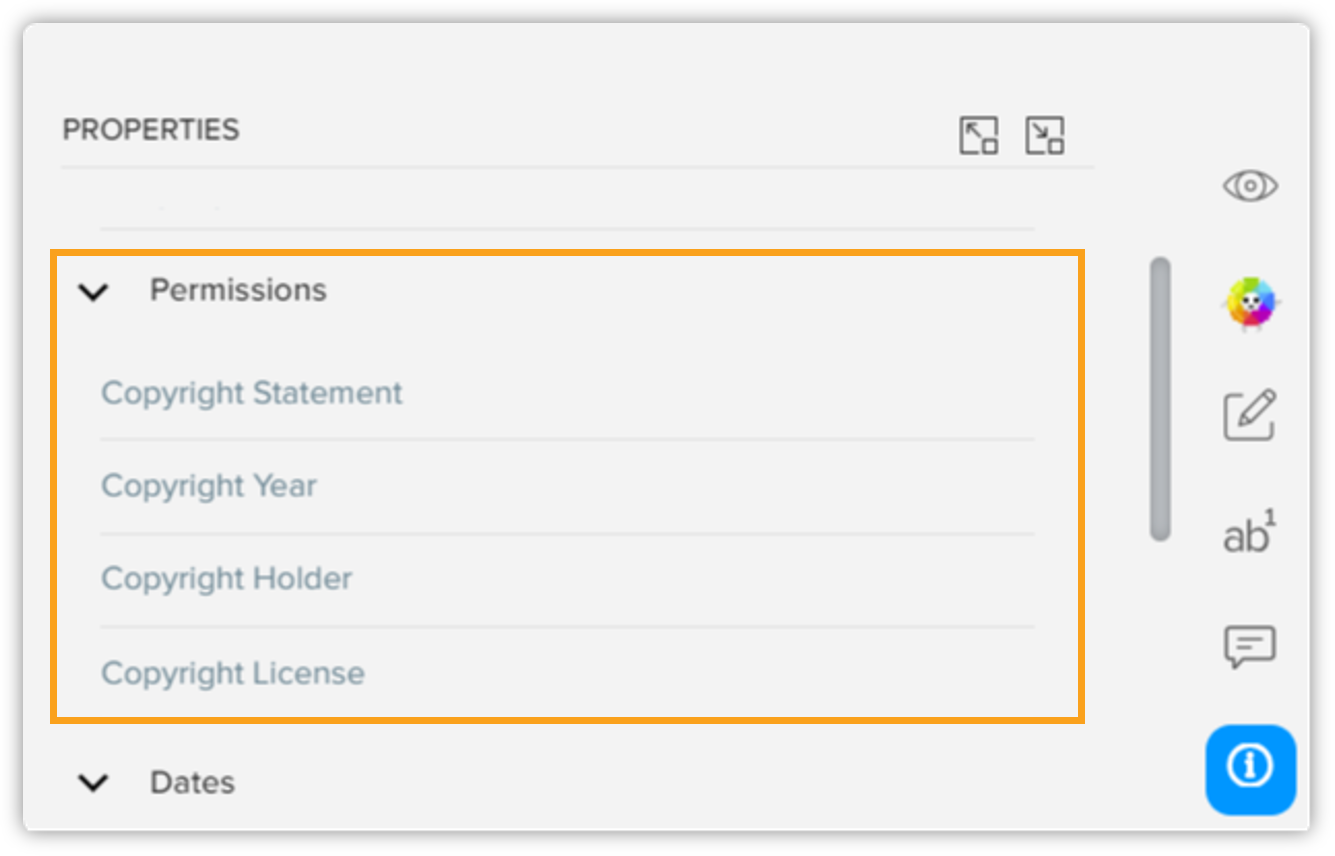
The Permissions properties allow you to define all the copyright-related information for a document, such as copyright year, license information, and so on. You can add/edit a copyright information field by clicking on the blank area next to the field name.
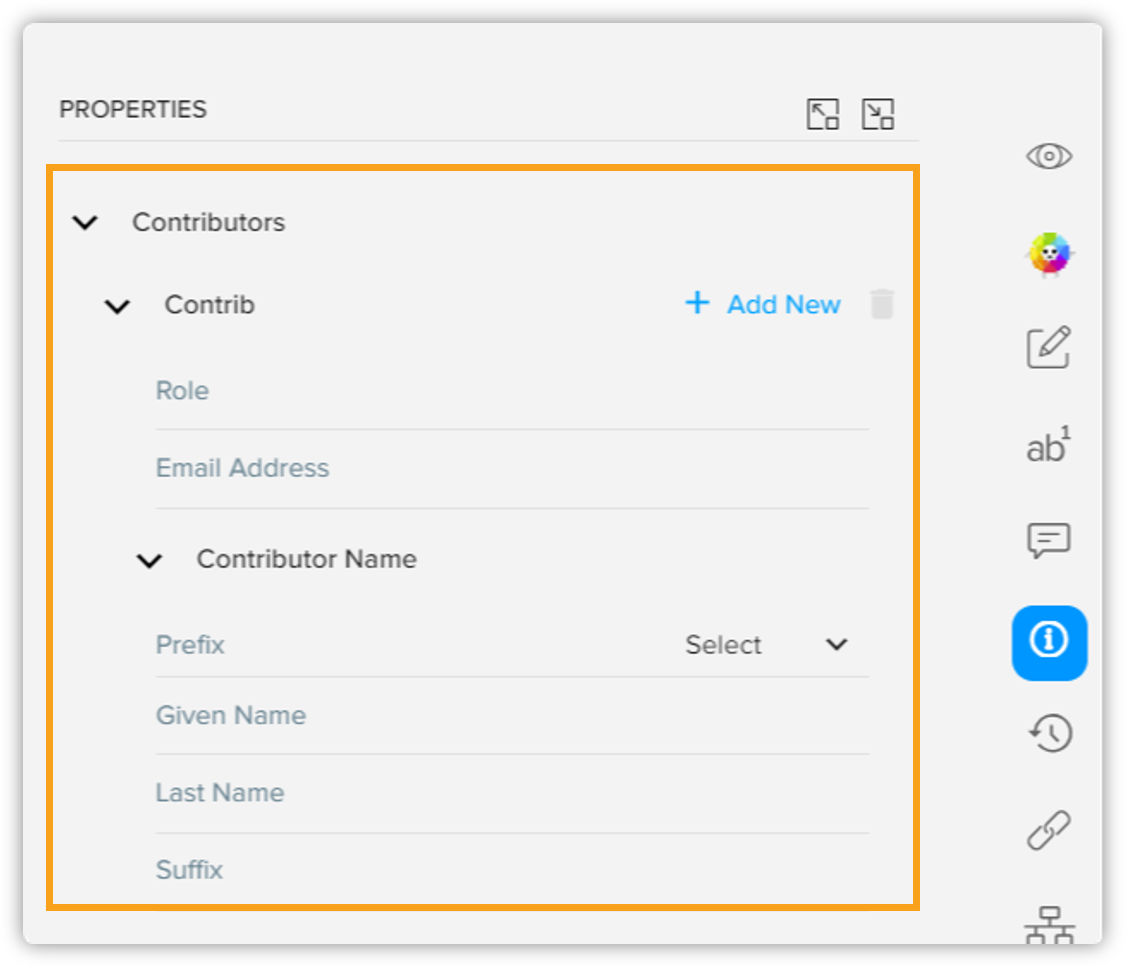
The Contributors property allows you to add or remove a contributor (peer author or reviewer) to a document. While adding a contributor, you have to fill certain fields about the contributor such as role, email, and name.
Layout Options
The Layout Options feature is designed to empower authors and writers with versatile tools to customize the presentation of their documents during the authoring process. This feature encompasses eight distinct levels of layout options:
-
Document-level
-
Section-level
-
Paragraph-level
-
Region-level
-
Table-level
-
Figure-level
-
Image-level
-
Tagging-level
Each of these levels offers specific layout options that cater to different aspects of document design.
While some options are common and available across all categories, providing you with a consistent experience, others are unique to particular levels, allowing for more tailored adjustments.
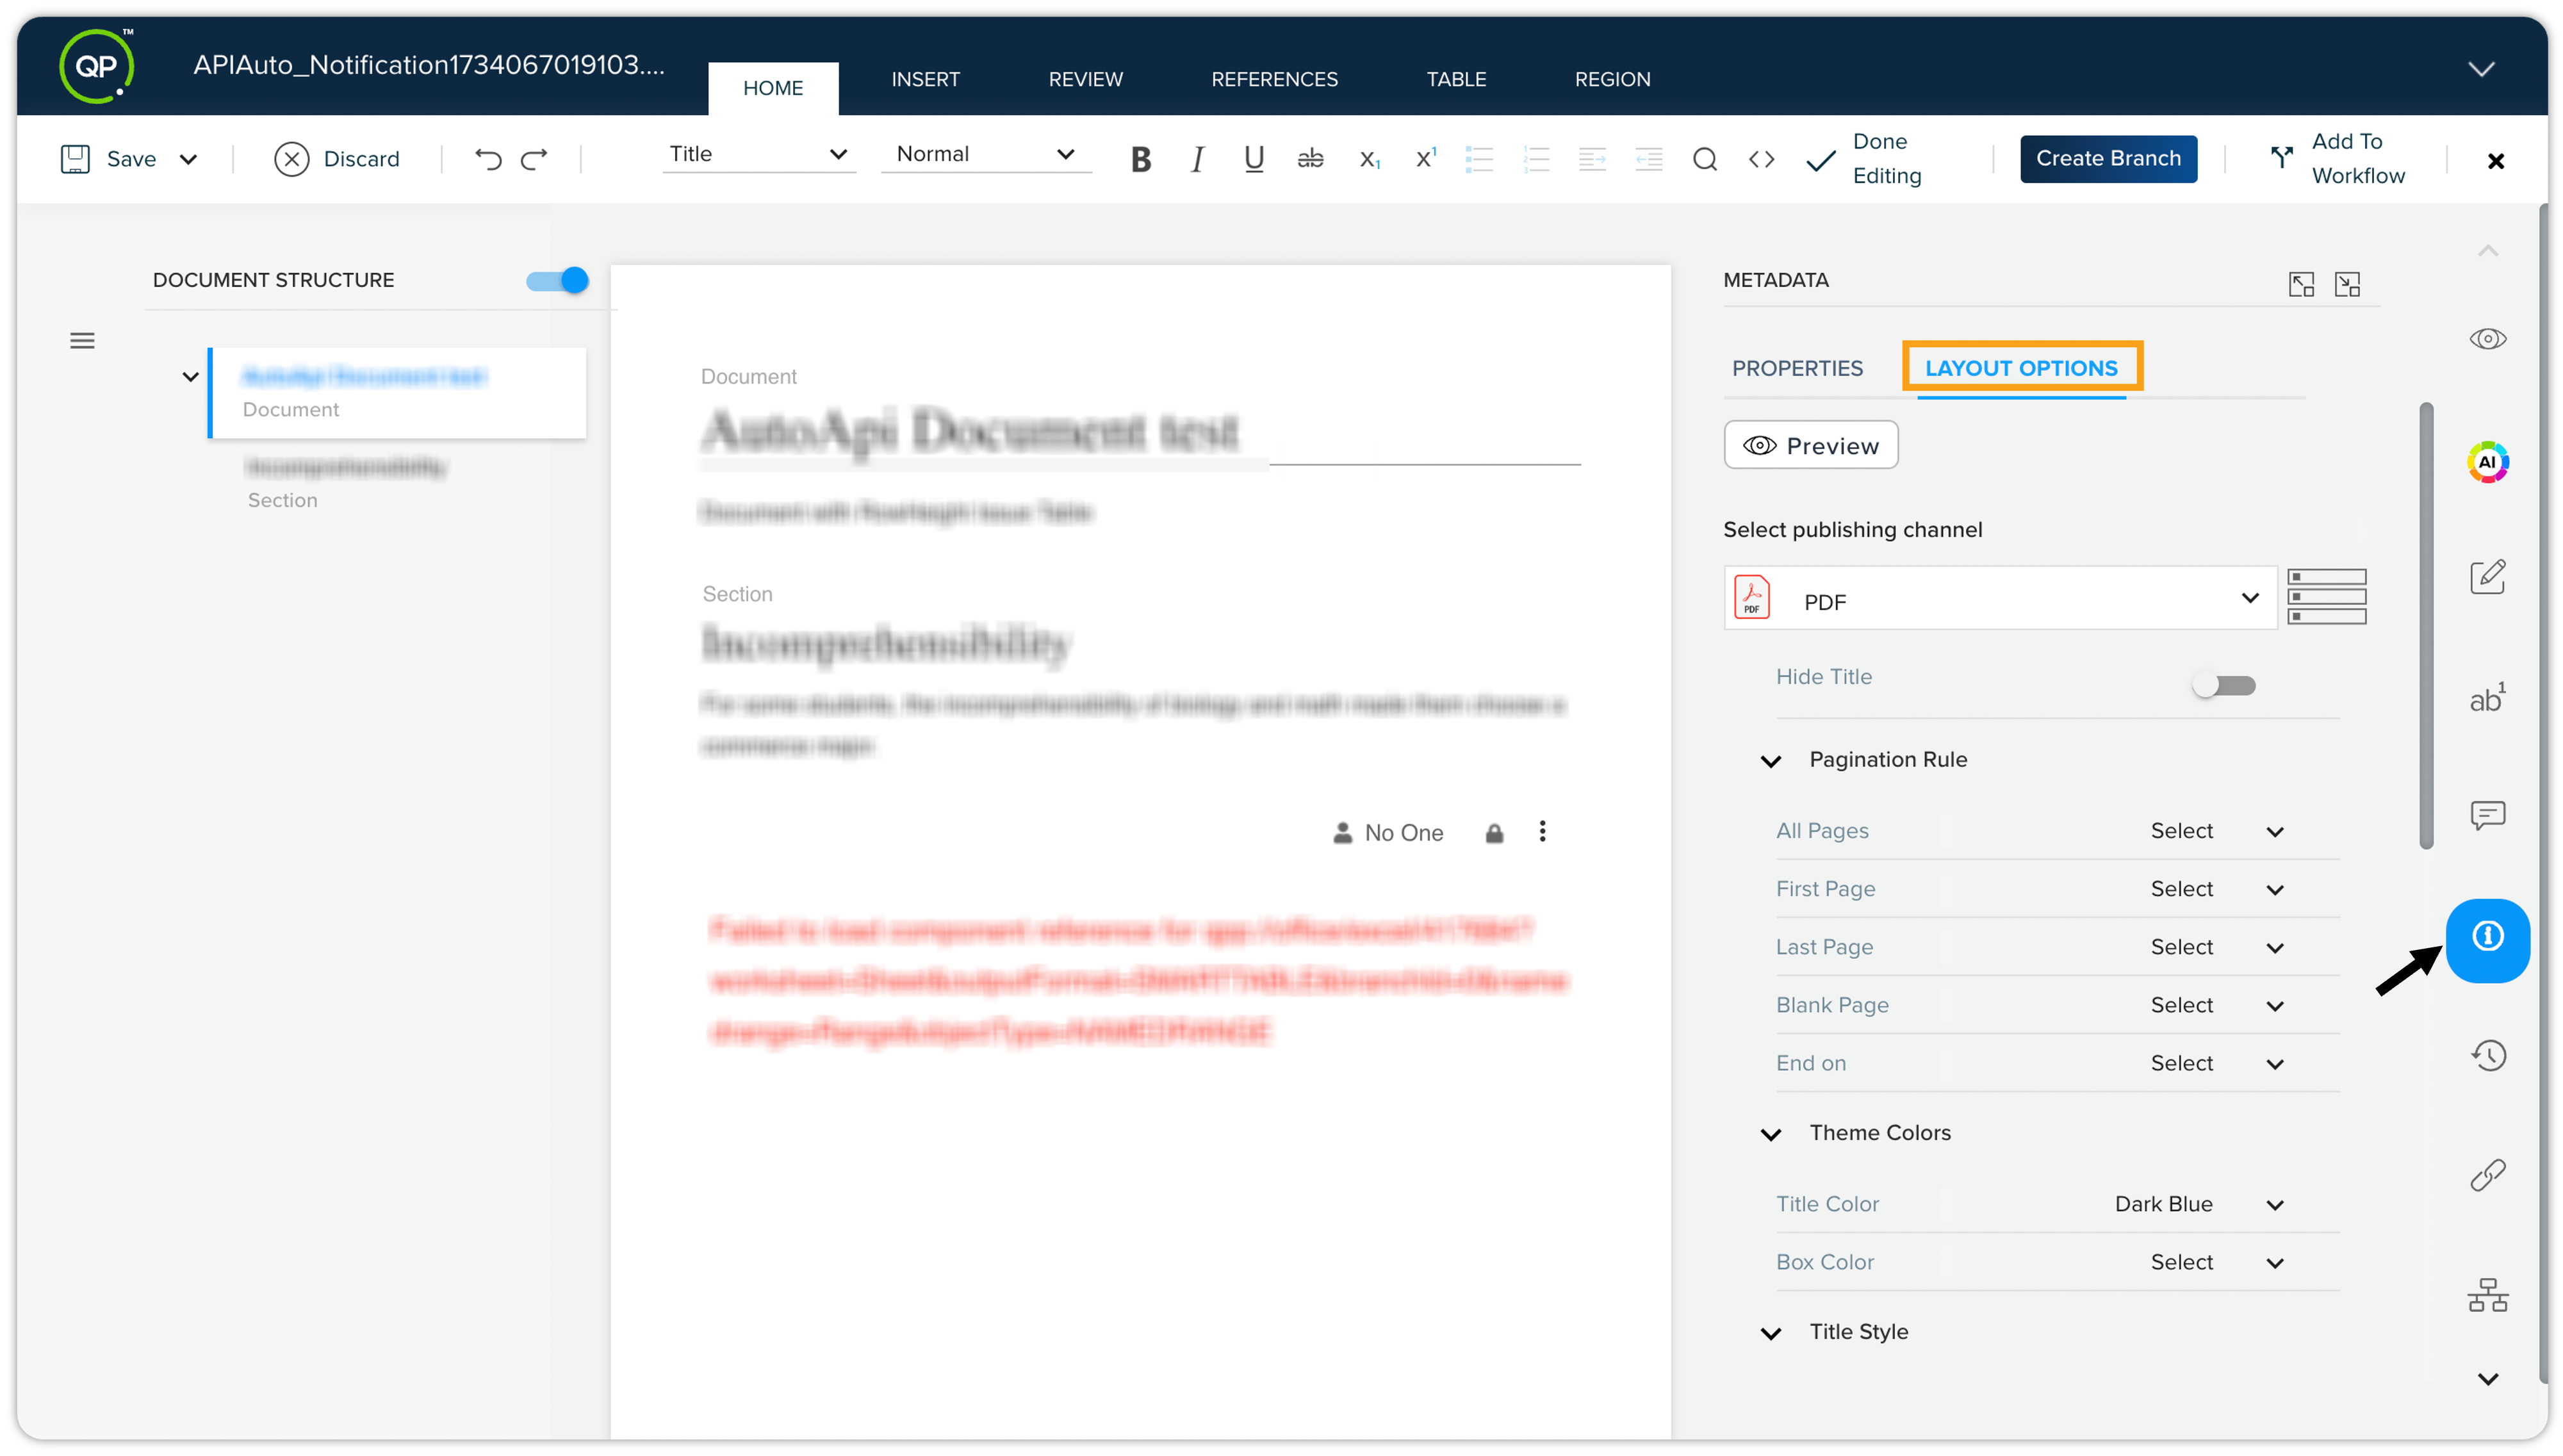
By equipping users with the ability to modify various elements, from pagination and title visibility to color themes and table formats, Layout Options enhances the document creation experience. Whether preparing a formal report, an engaging presentation, or a creative manuscript, you can efficiently align your documents with your intended audience, ensuring both aesthetic appeal and functional clarity.
For more comprehensive information regarding the prerequisites, configuration details, and specific use cases related to the Layout Options, please refer to our detailed user guide.
Content Variables
Content Variables in Quark Publishing Platform provide a powerful way to standardize, reuse, and ensure accuracy in your published content. This feature helps you define and manage variables centrally within the content model. You then have the flexibility to assign specific values to these variables at both document and section levels.
Follow these steps to insert and manage variables in your documents:
-
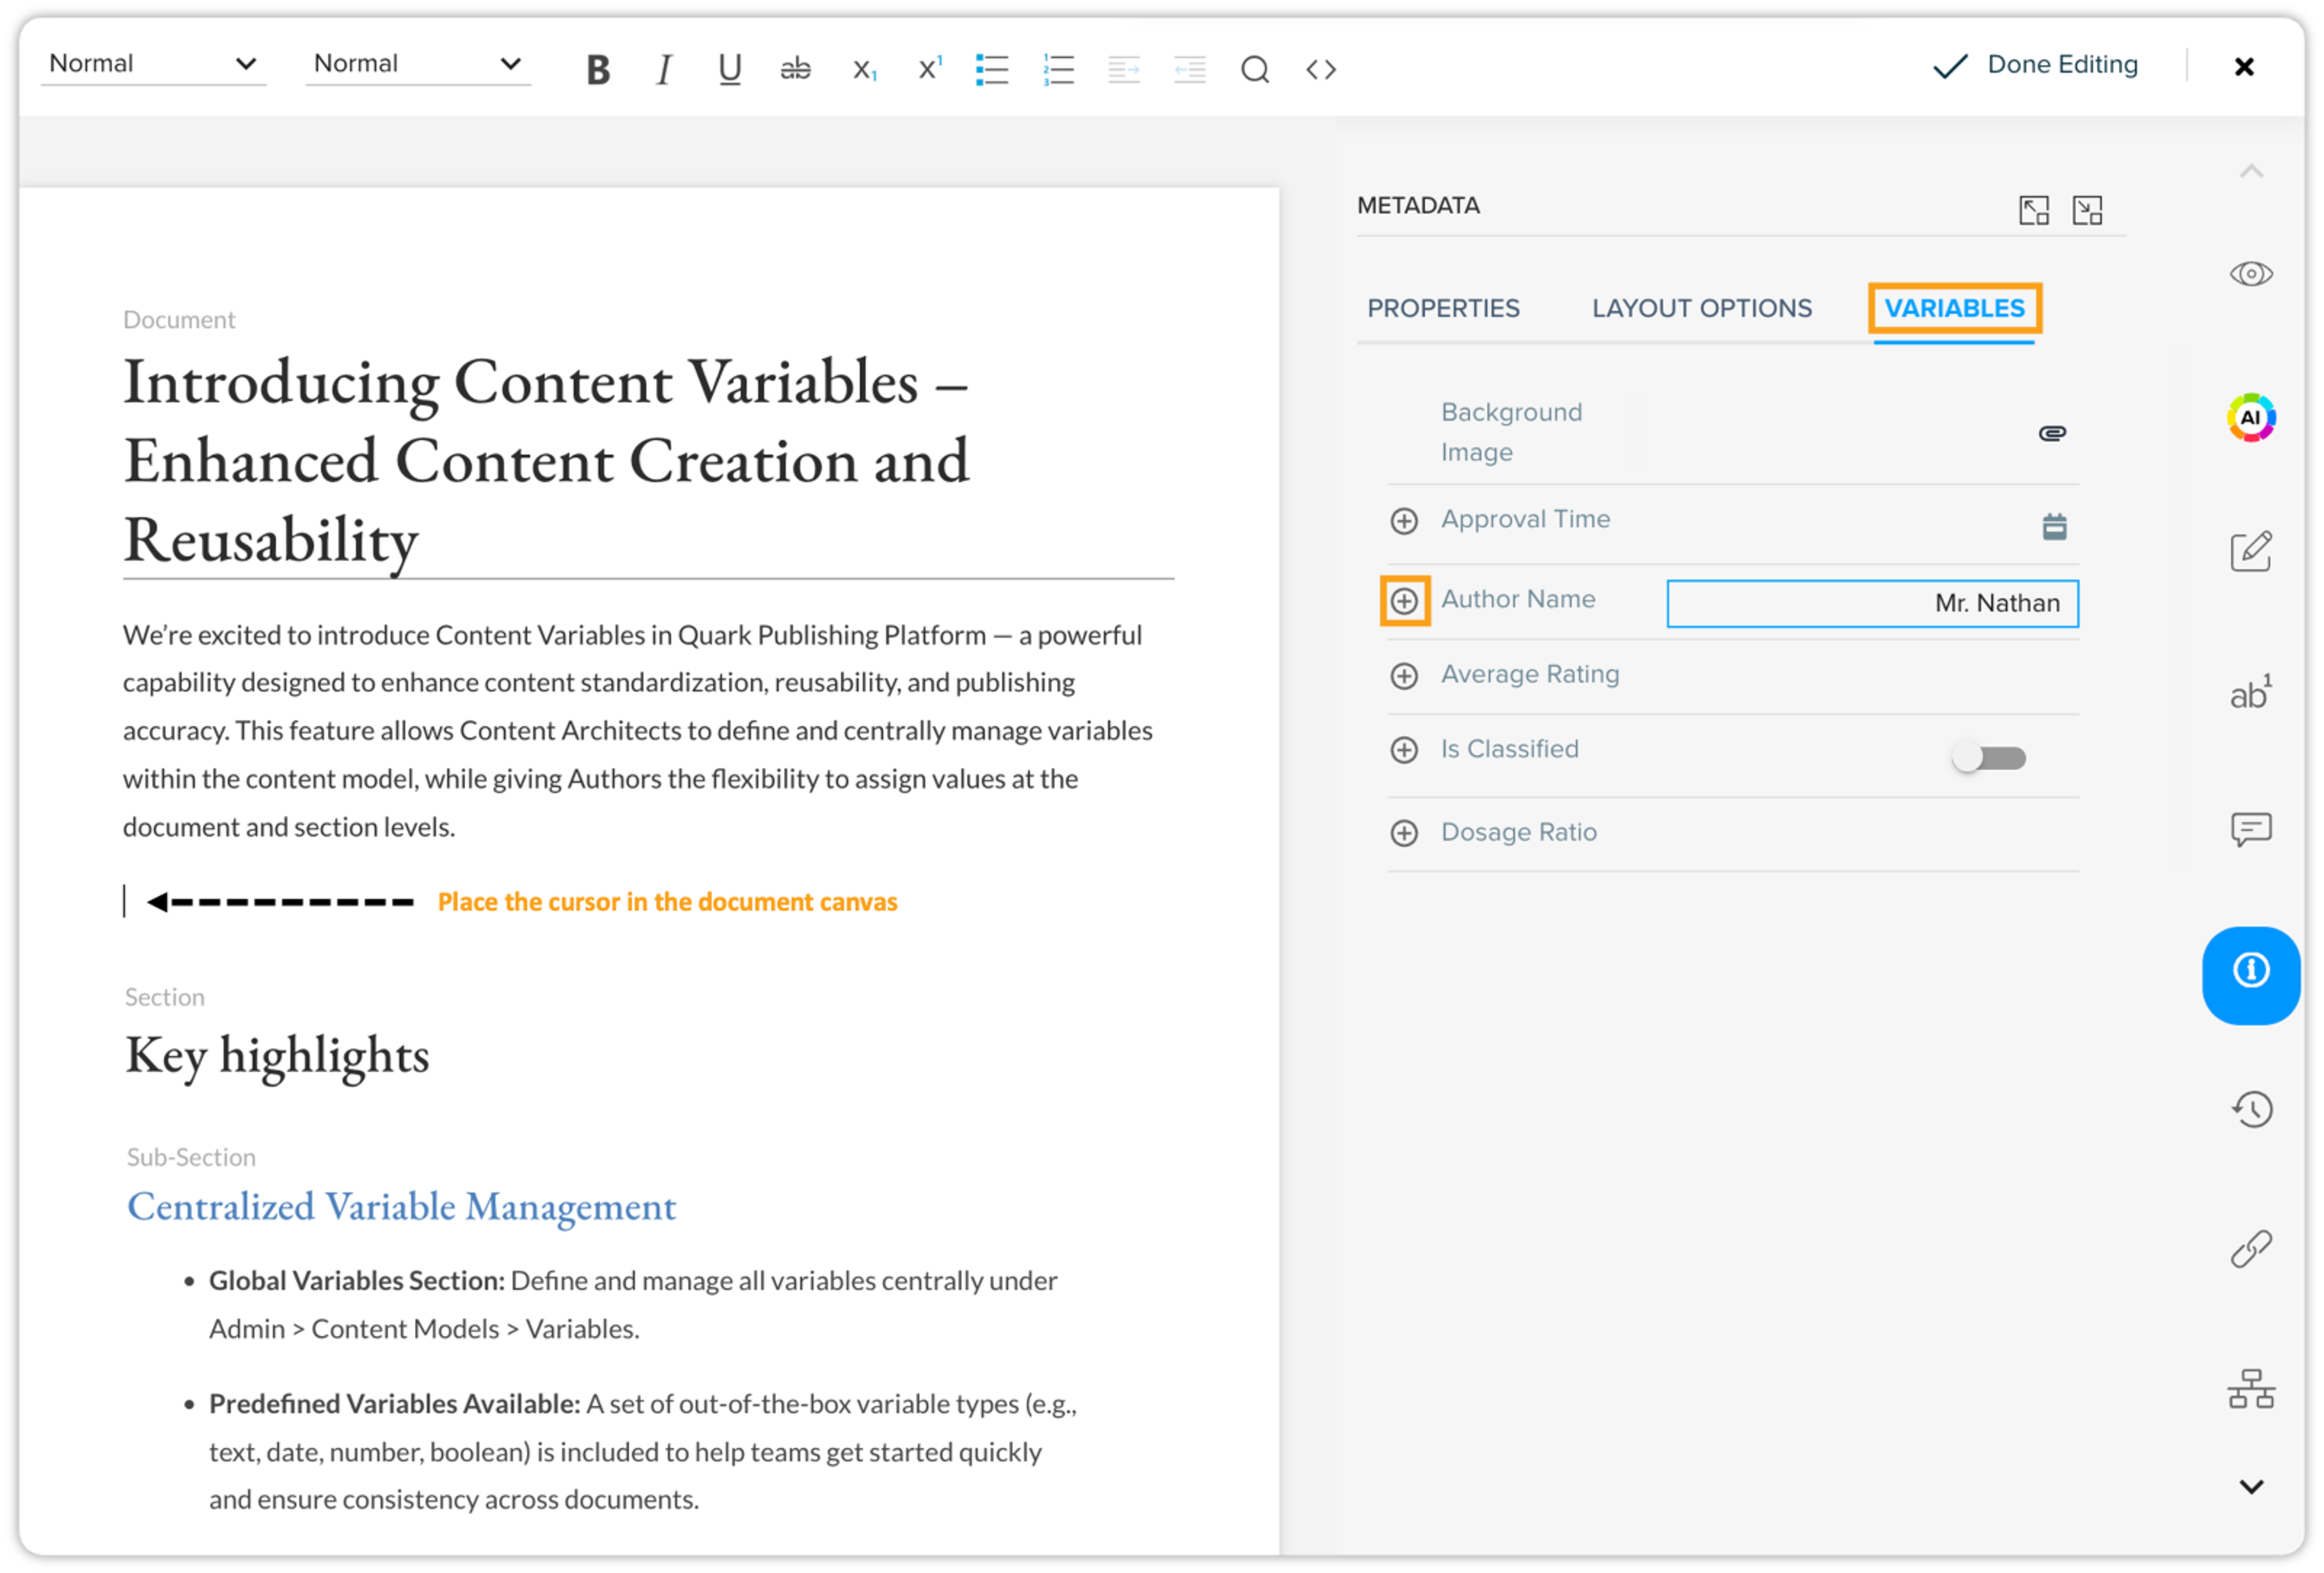
Place your cursor on the canvas where you want to insert the variable.
-
To insert at the document-level: Place your cursor in the canvas where you want the variable to appear, ensuring it is not within any specific section of the document.
-
To insert at the section-level: Place your cursor within a section in the canvas where you want the variable to appear.
-
-
On the right-side Apps pane, click the Metadata tab.
-
Within the Metadata section, click the Variables tab. This tab displays all variables that have been added to the content model associated with your document.
-
Double-click the field next to the variable you want to insert. Enter the value.
-
Then click the plus icon (+) next to the variable you wish to insert.
-
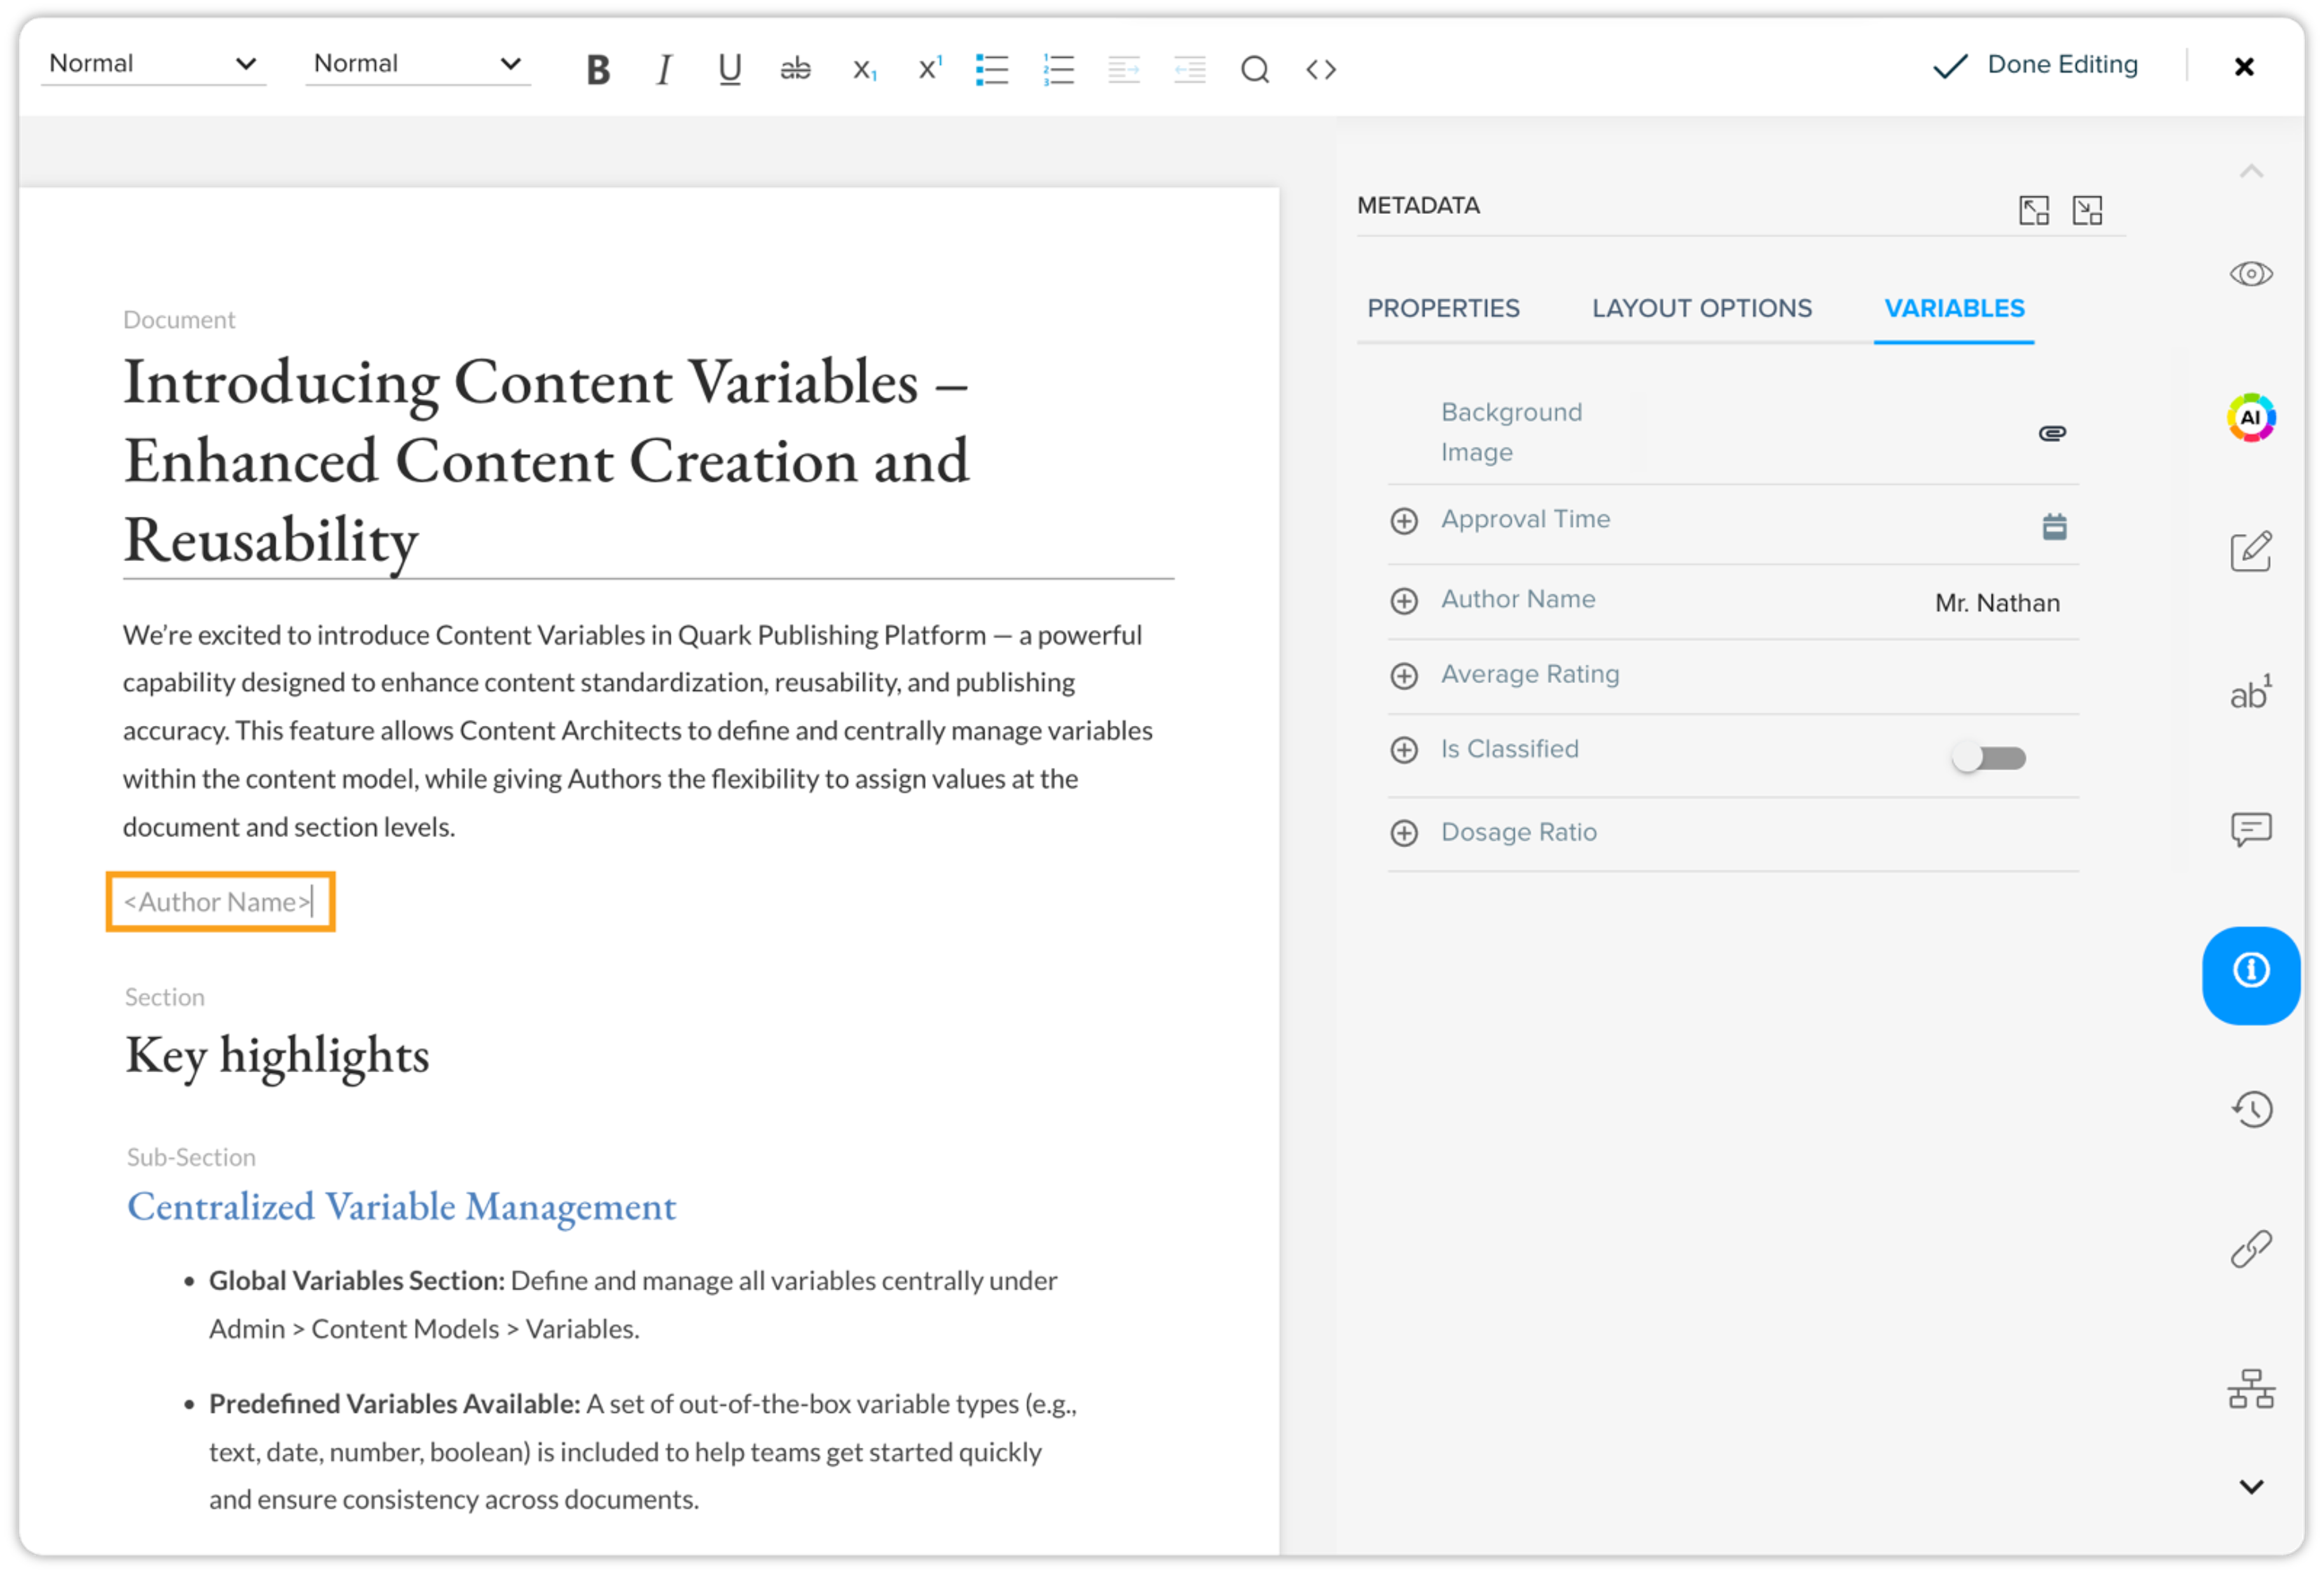
The variable will appear at the current cursor location as <variable name> in light Grey text.
 For variables that require an image, an attachment icon will be displayed instead of a plus icon.
You can add multiple variables in different parts of your document, whether it's for the whole document or just specific section(s). The process for adding these variables is the same in both cases. Just make sure your cursor is in the correct spot where you want to insert the variable. If you use the same variable name at both the document and section levels, you'll need to set its value separately for each level.
To see how your variable will appear in the published output, use the preview functionality:
-
Click the Preview tab in the Apps pane.
-
Select your desired publishing channel (e.g., PDF). Click the button Click to Generate Preview.
-
Within a few seconds, the preview will be generated, allowing you to review how your variable is resolving and appearing in the output.
You can also automate your file-naming conventions by embedding content variables directly into your document titles. This ensures that when a document is saved or exported, the file name reflects the specific metadata of that asset.
How it works:
-
Insert Variables: When naming your document, insert your desired content variables into the title field. Single or multiple variables can be inserted.
-
Automatic Resolution: Upon saving, QPP intelligently replaces the variable placeholders with their current values to generate the default file name.
Understanding how variables resolve when defined at different levels (document and section) is key to controlling their display. A section is generally considered a child of the document, influencing how variable values are inherited and prioritized. Here are common scenarios:
-
Behavior: Different values at document and section Levels
-
Scenario: The same variable is inserted at both document and section levels, with different values defined for each.
-
Result in Preview: Both values will appear. The document-level value shows at the document level, and the section-level value shows within its section. Specific definitions at a granular level take precedence for that scope.
-
-
Behavior: Value defined at document level, not at section level
-
Scenario: A variable is inserted at the document level with a defined value, and the same variable is inserted in a section without a defined value.
-
Result in Preview: The document-level value will appear in both locations. The section inherits the value from its parent document.
-
-
Behavior: Value defined at section level, not at document level
-
Scenario: A variable is inserted at the document level without a defined value, and the same variable is inserted in a section with a defined value.
-
Result in Preview: The section-level value will appear in the section. Nothing will appear at the document level as no value was defined there and no value was inherited from the section.
-
-
Behavior: Variable persistence while document cloning
-
Scenario: A user clones an existing document or section that contains configured Content Variables.
-
Result: The new document retains all variable values from the source. These are brought in as local values, ensuring data remains intact even if there is no inheritance from the Template or Content Model.
-
When working with smart sections within your document, it's important to understand how variables interact with them. If you add smart sections to your document, variables won't be displayed for those smart sections in the Quark Author editor unless you have specifically added the variables to the smart section's content model on the Content Models page.
To ensure that variables are available and displayed correctly in both smart documents and smart sections, make sure to add them to the respective content models for both the smart document and the smart sections on the Content Models page.
Additionally, Content variables follow a clear precedence when publishing:
-
Scoped Value: It uses the value defined in an ancestor section with a matching scope (topmost match wins).
-
Local Value: In case of no relevant scope, it uses the value set in the current section.
-
Inherited Value: If neither exists, it inherits from the closet ancestor.
History
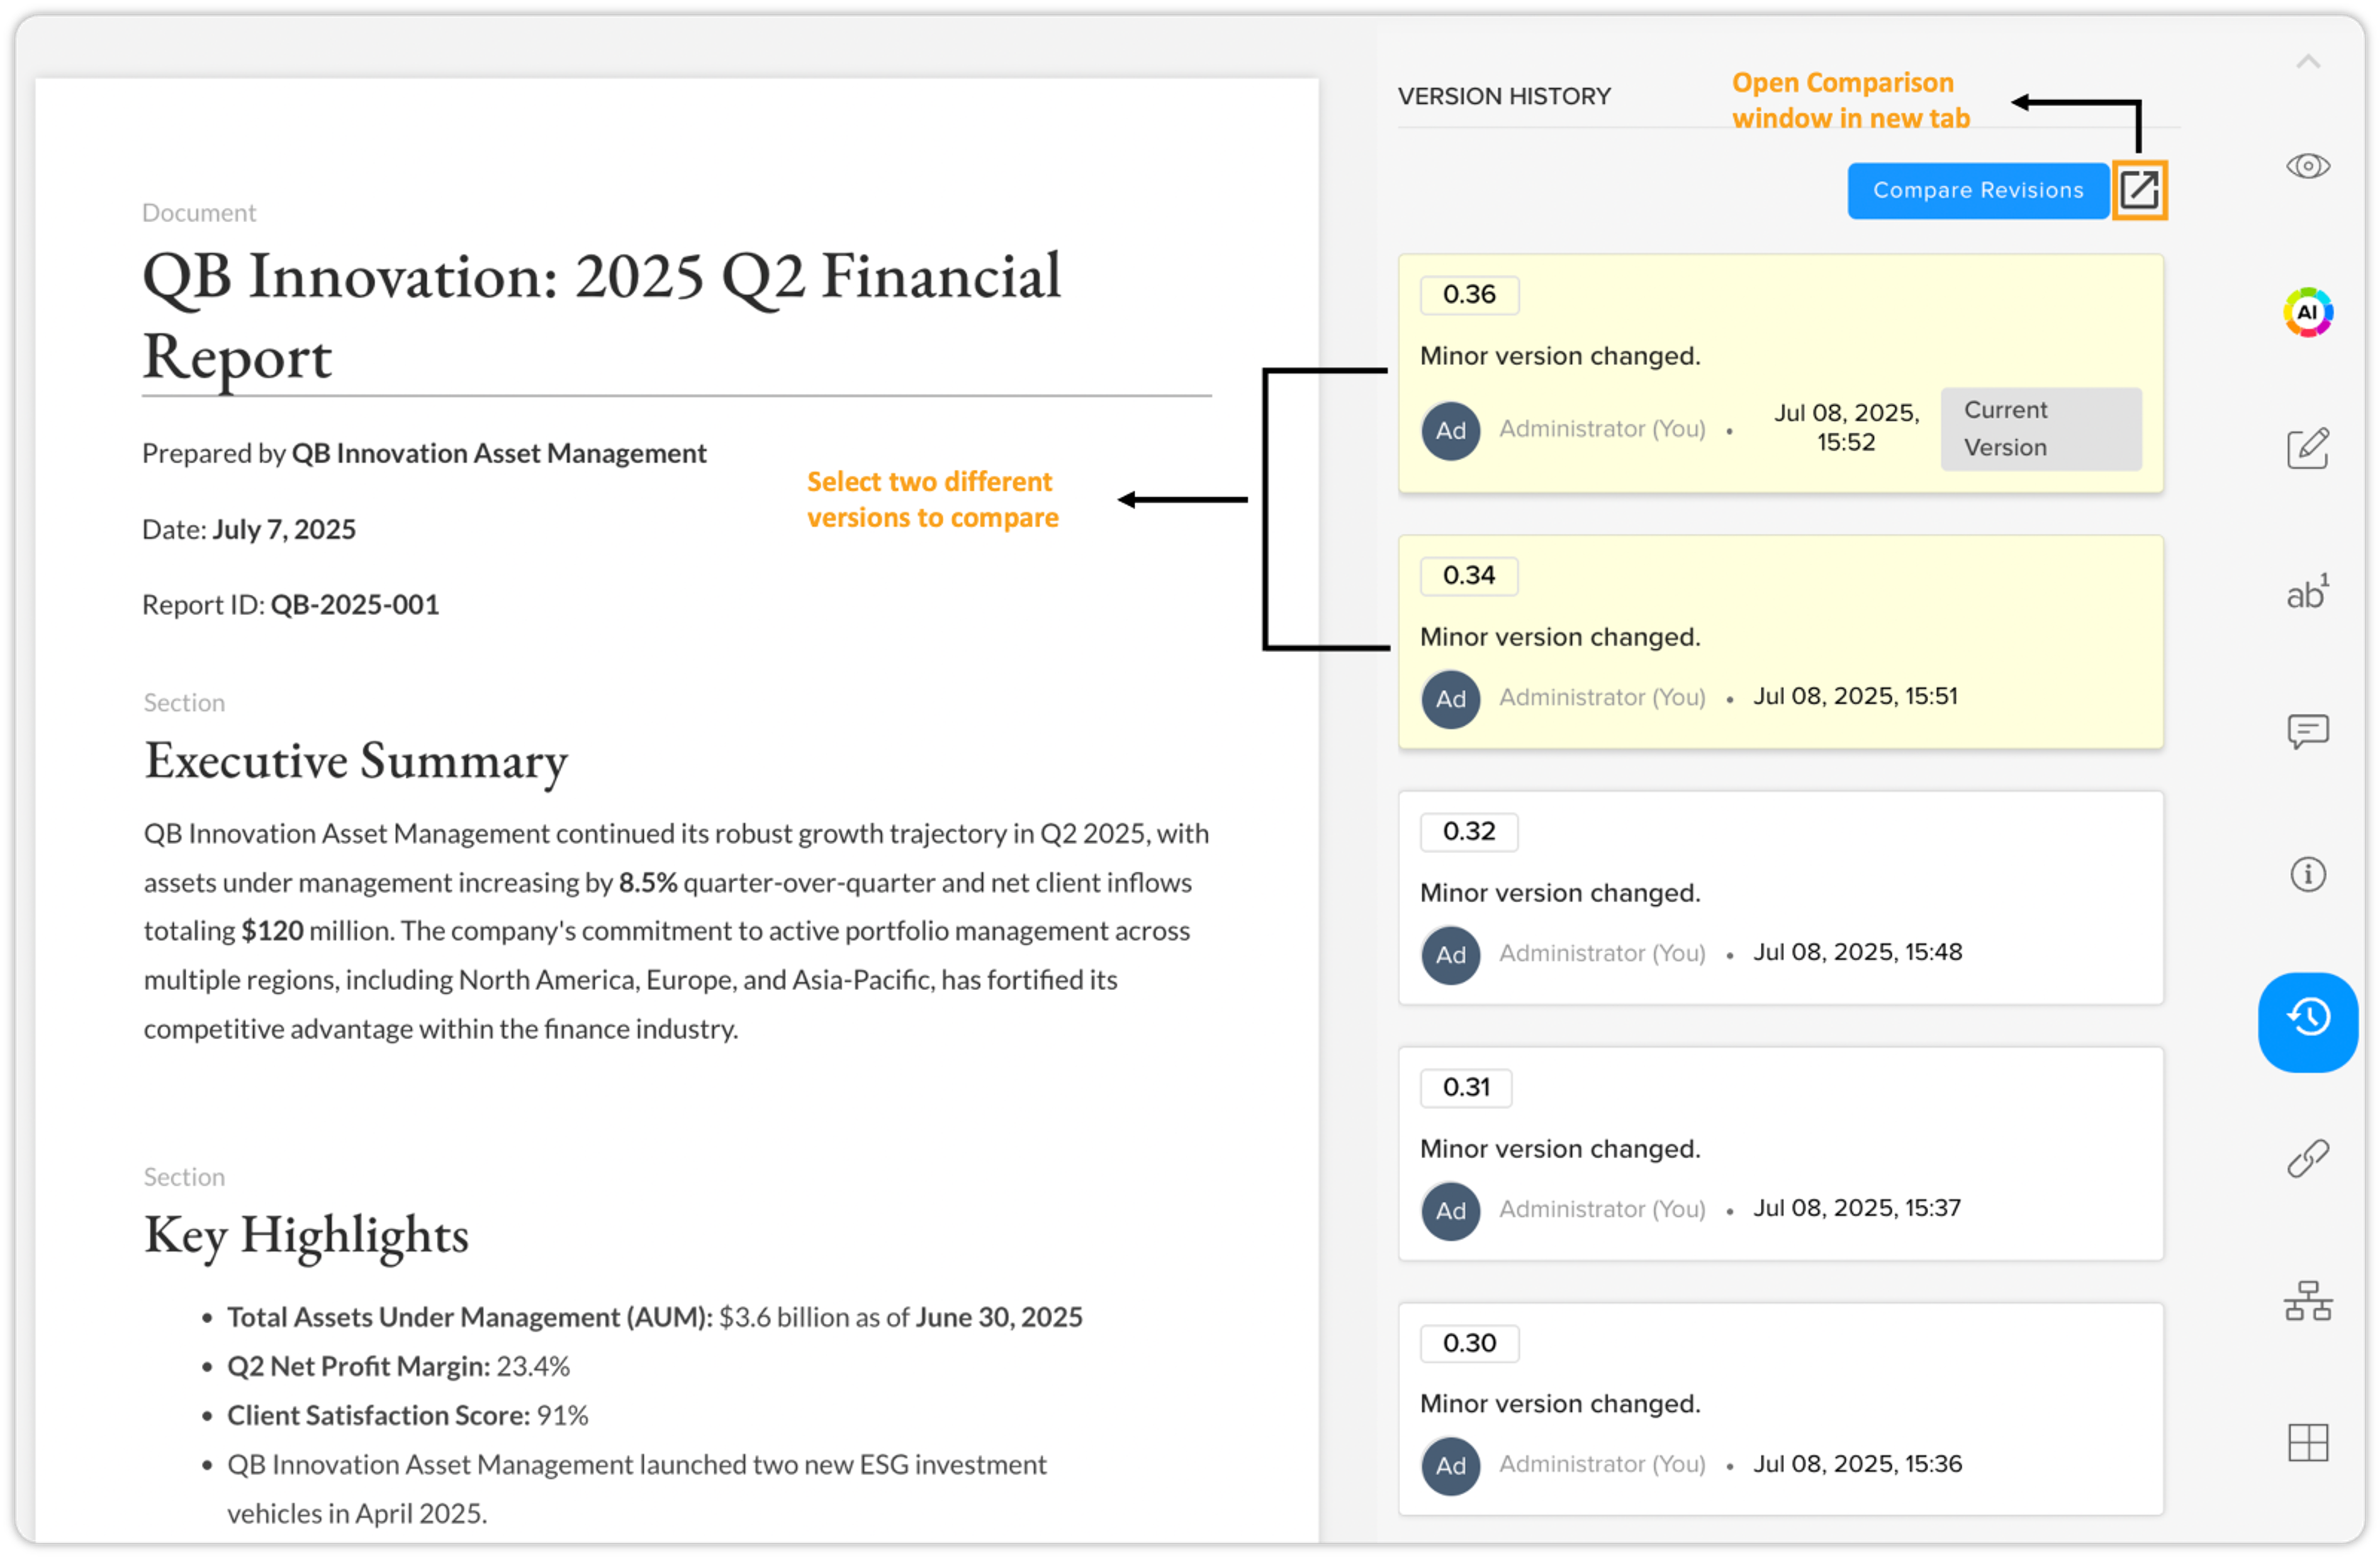
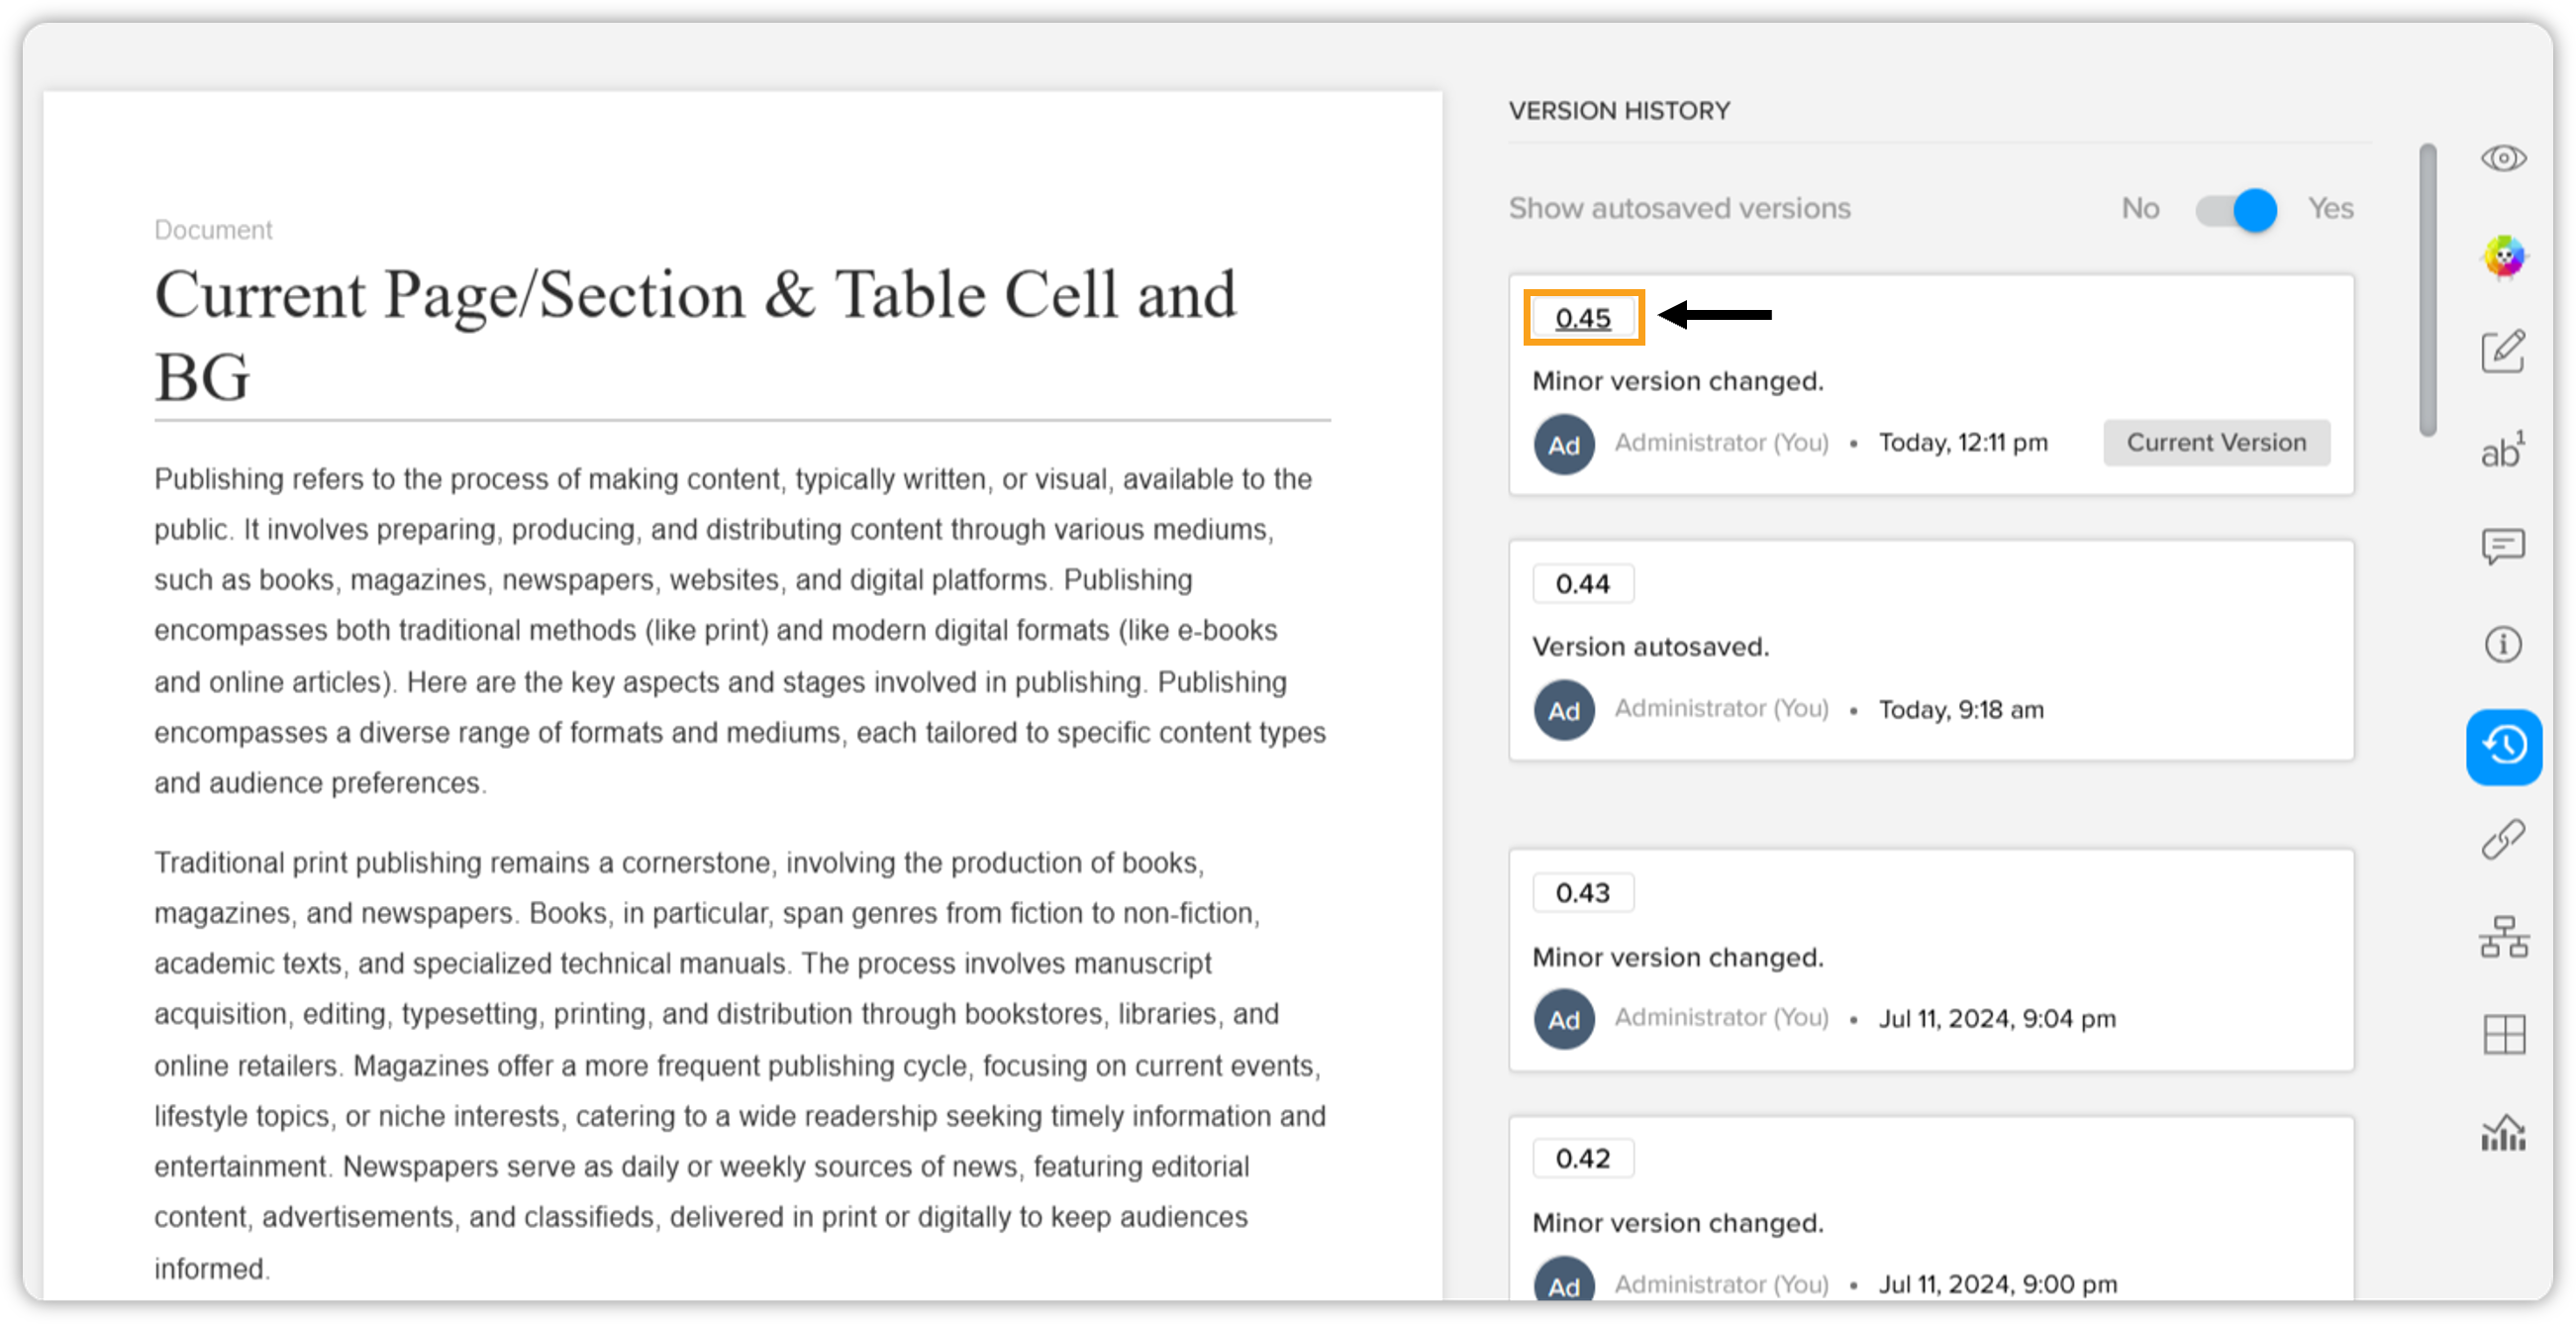
The History pane provides access to a document's version history, enabling you to compare different versions and revert to earlier ones. By default, the Show autosaved versions option is disabled, displaying only manually saved versions. To view automatically saved versions alongside manual saves, toggle this option to the 'on' position.
The latest version has a tag of Current Version on its card. You can also choose to see all the versions (including the ones auto-saved by the server) or to only see the versions that you have manually saved.
Comparing Document Revisions
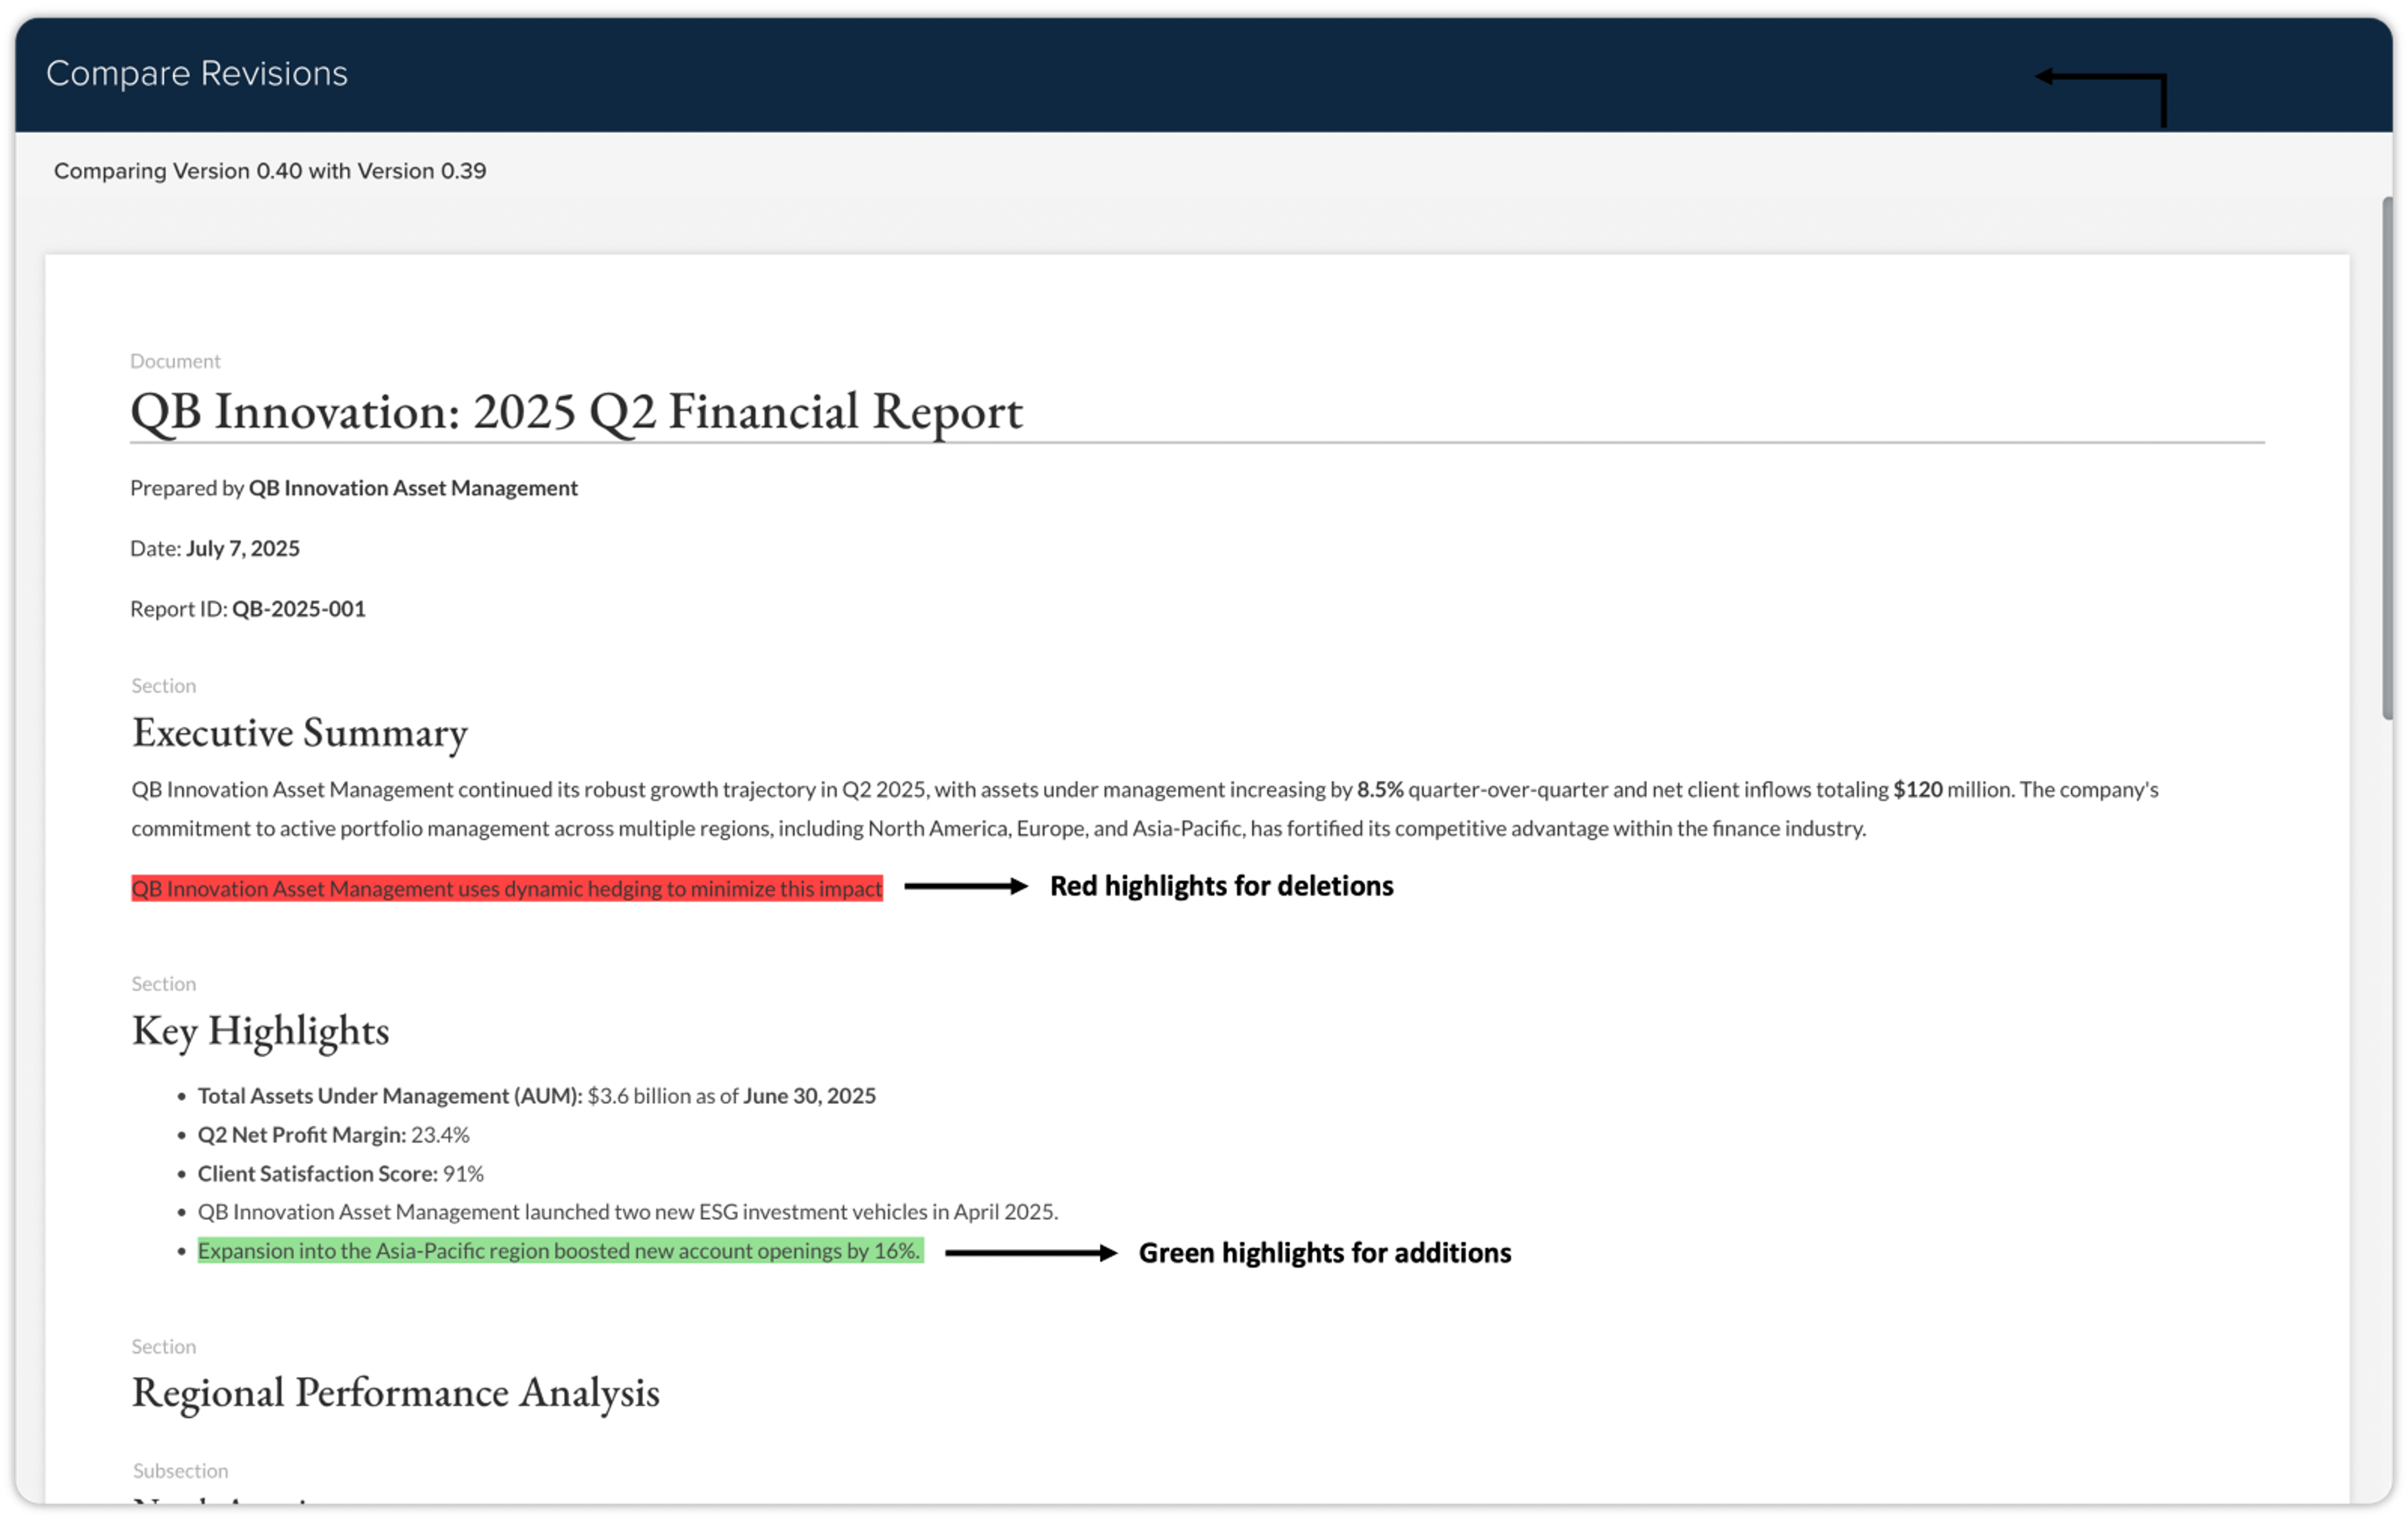
You can compare two revisions of a document directly from the History section. There are two options for viewing revision comparisons:
-
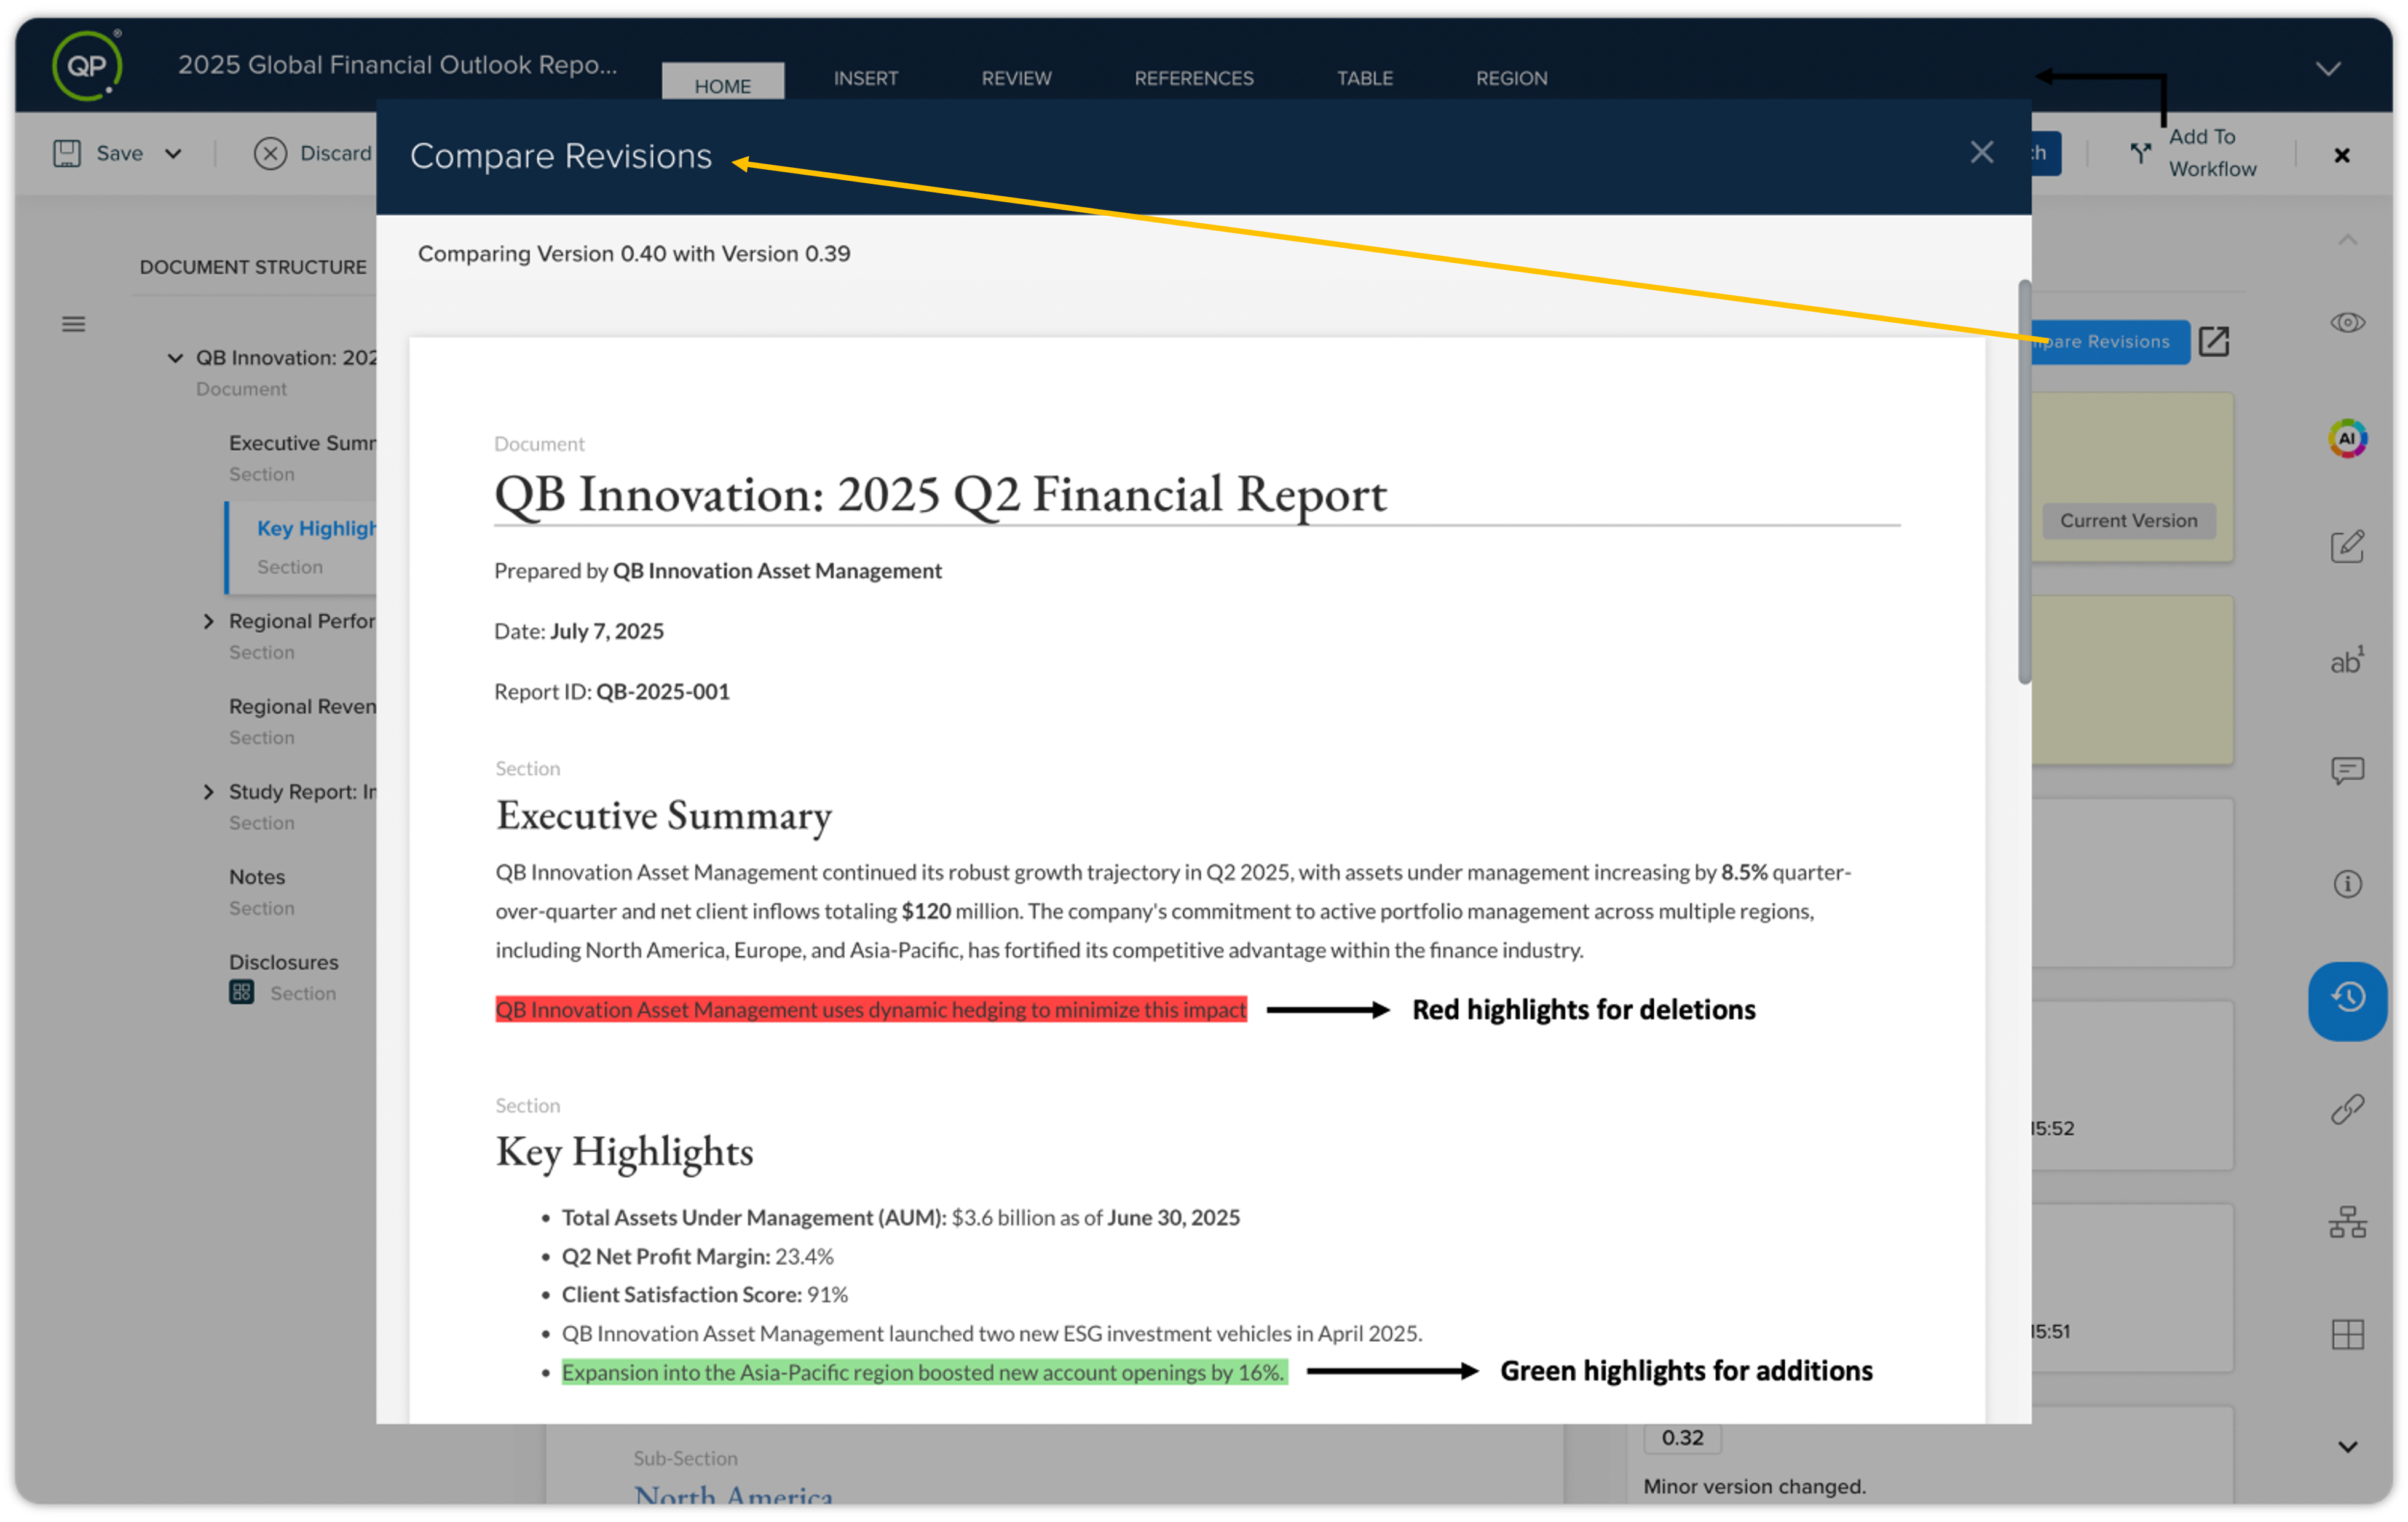
Overlay Mode
-
Opens the comparison window as an overlay in the same window. The editor is temporarily blocked when this mode is used.
-
-
Separate Window Mode
-
Opens the comparison window independently in a new window.
-
You can continue editing your document in the main editor while referencing the comparison side-by-side in the separate window.
-
This provides more flexibility and comfort, especially for users who want to review differences and make changes simultaneously.
-
-
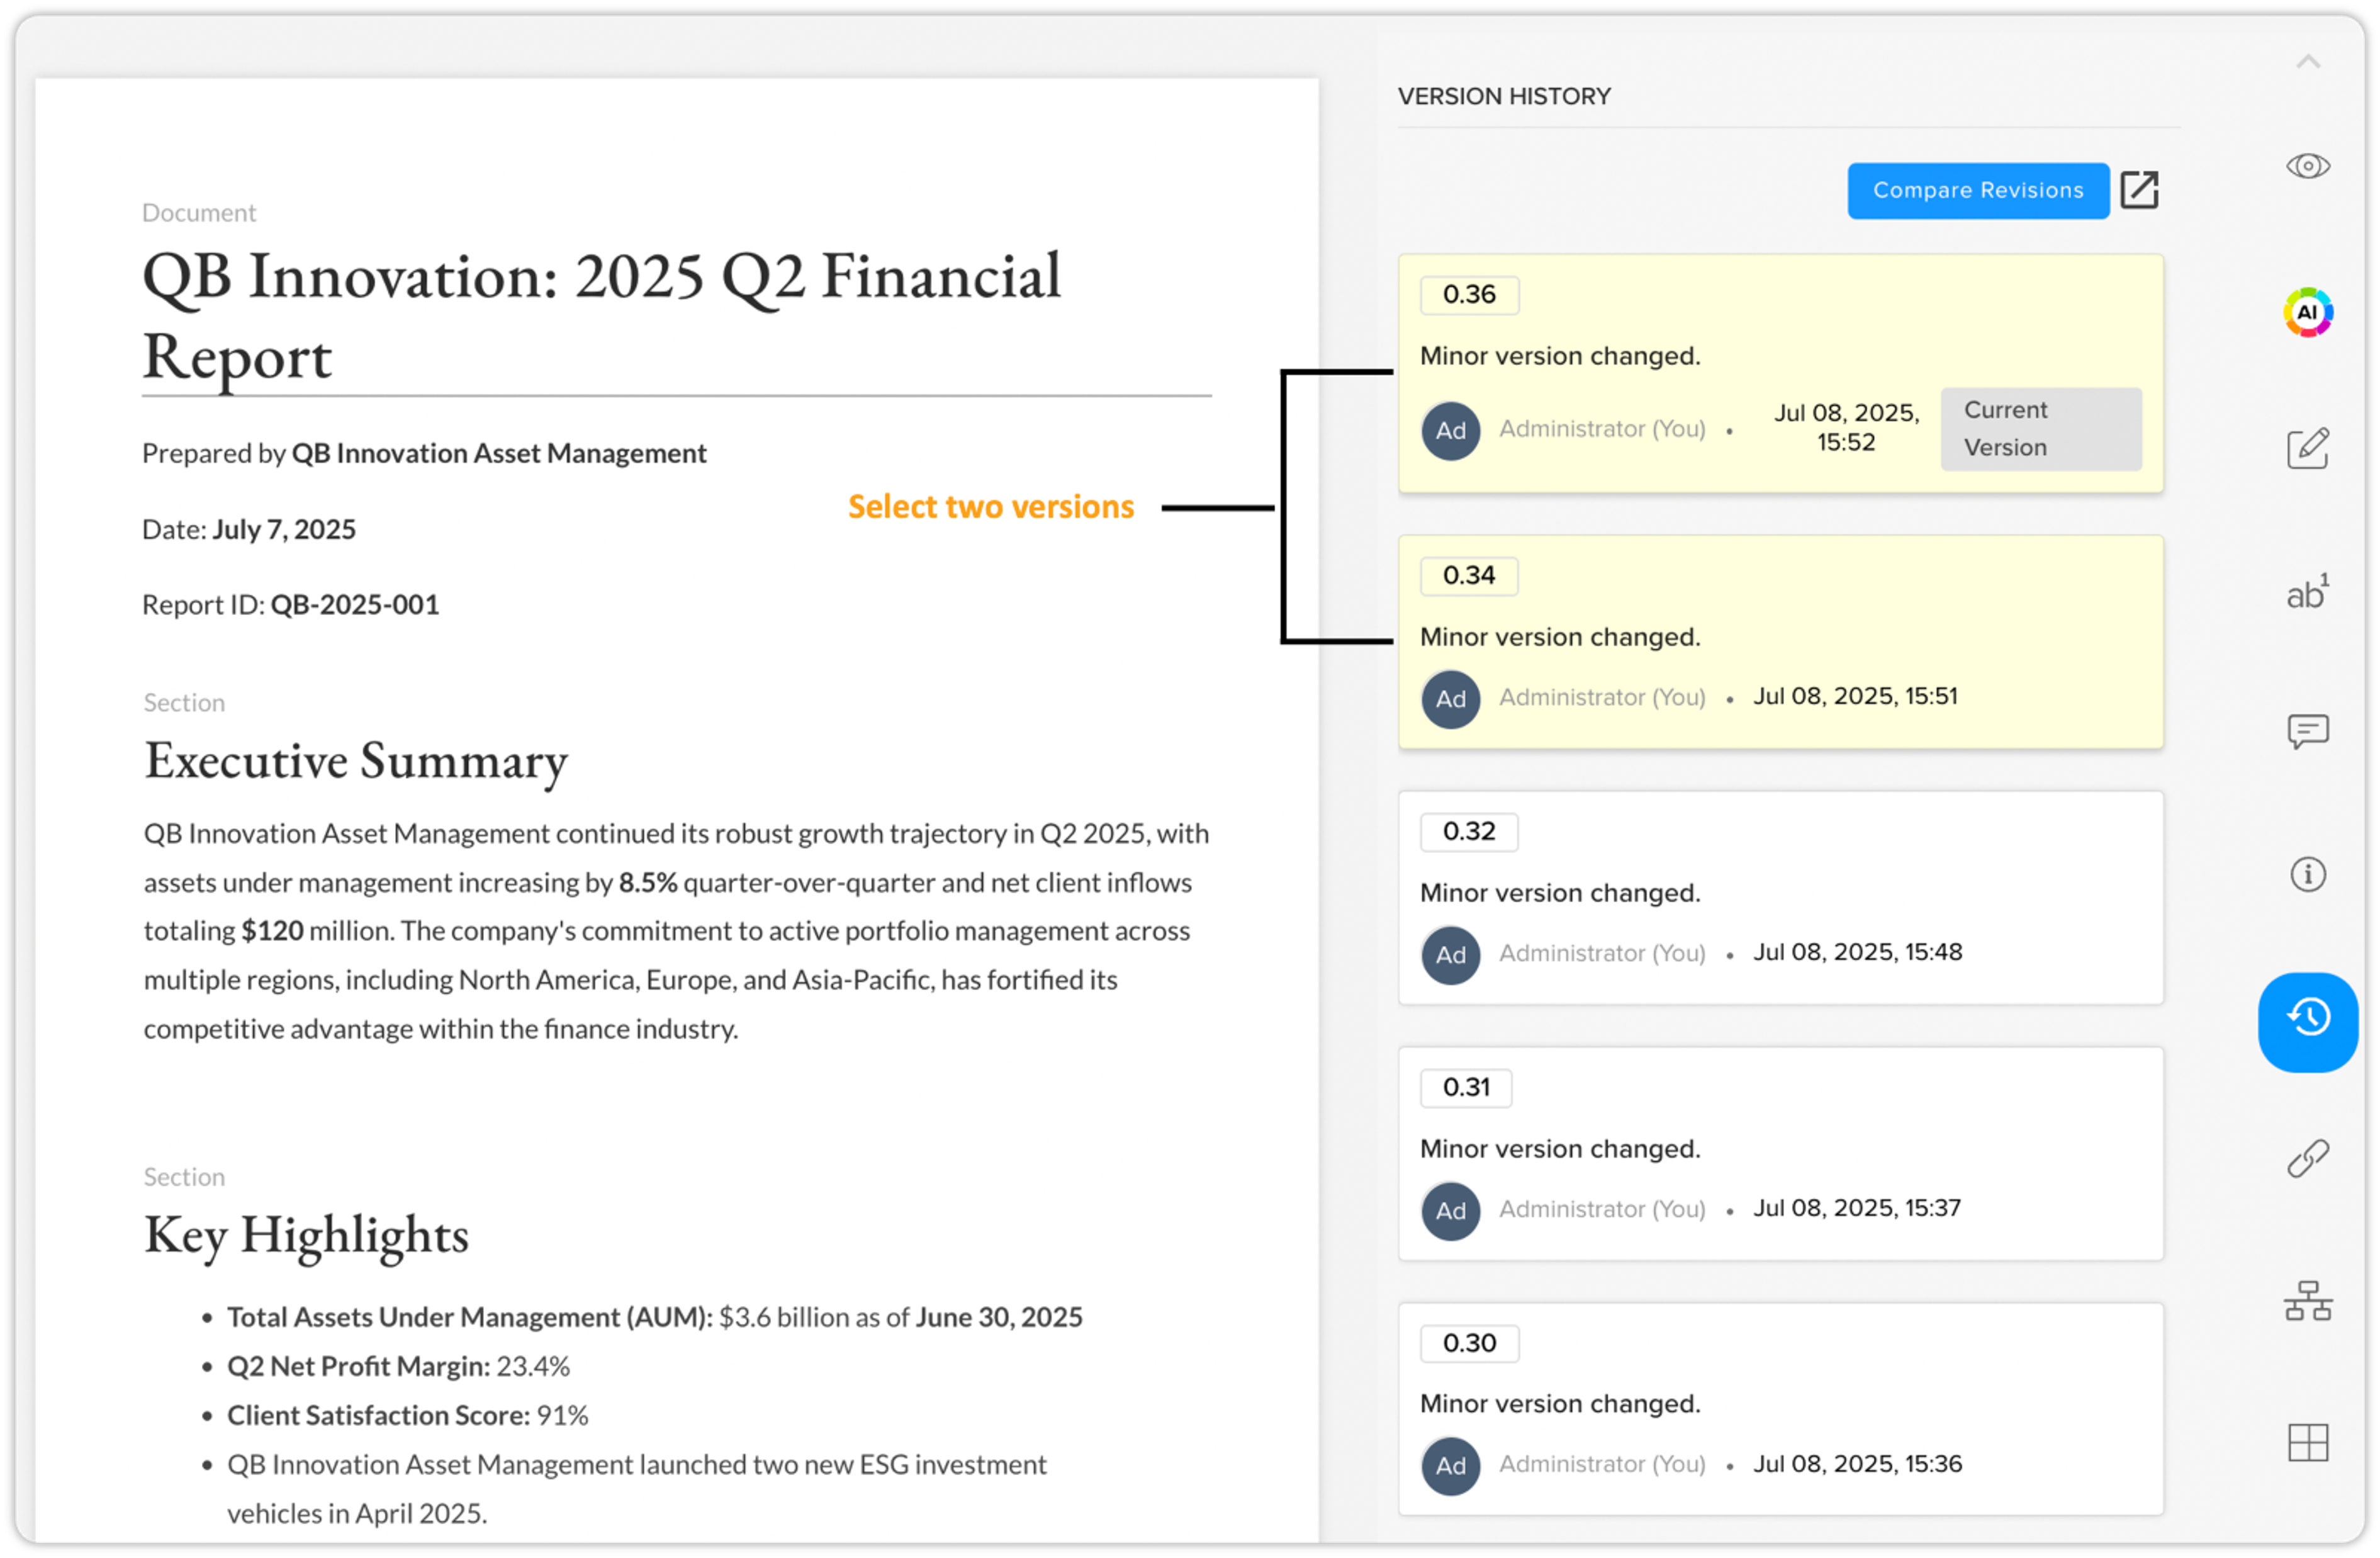
Navigate to the History section in the Apps Pane.
-
Select the two revisions you wish to compare.
-
Choose your preferred comparison mode:
-
For the overlay, use the Compare Revisions button that will open the comparison window as an overlay in the same window.
-
To open the comparison in a new window, click the Open in New Window
 icon that will open the comparison in a new window.
-
Revert to Earlier Version
To revert to an earlier version:
-
Select the version number on the version card.
-
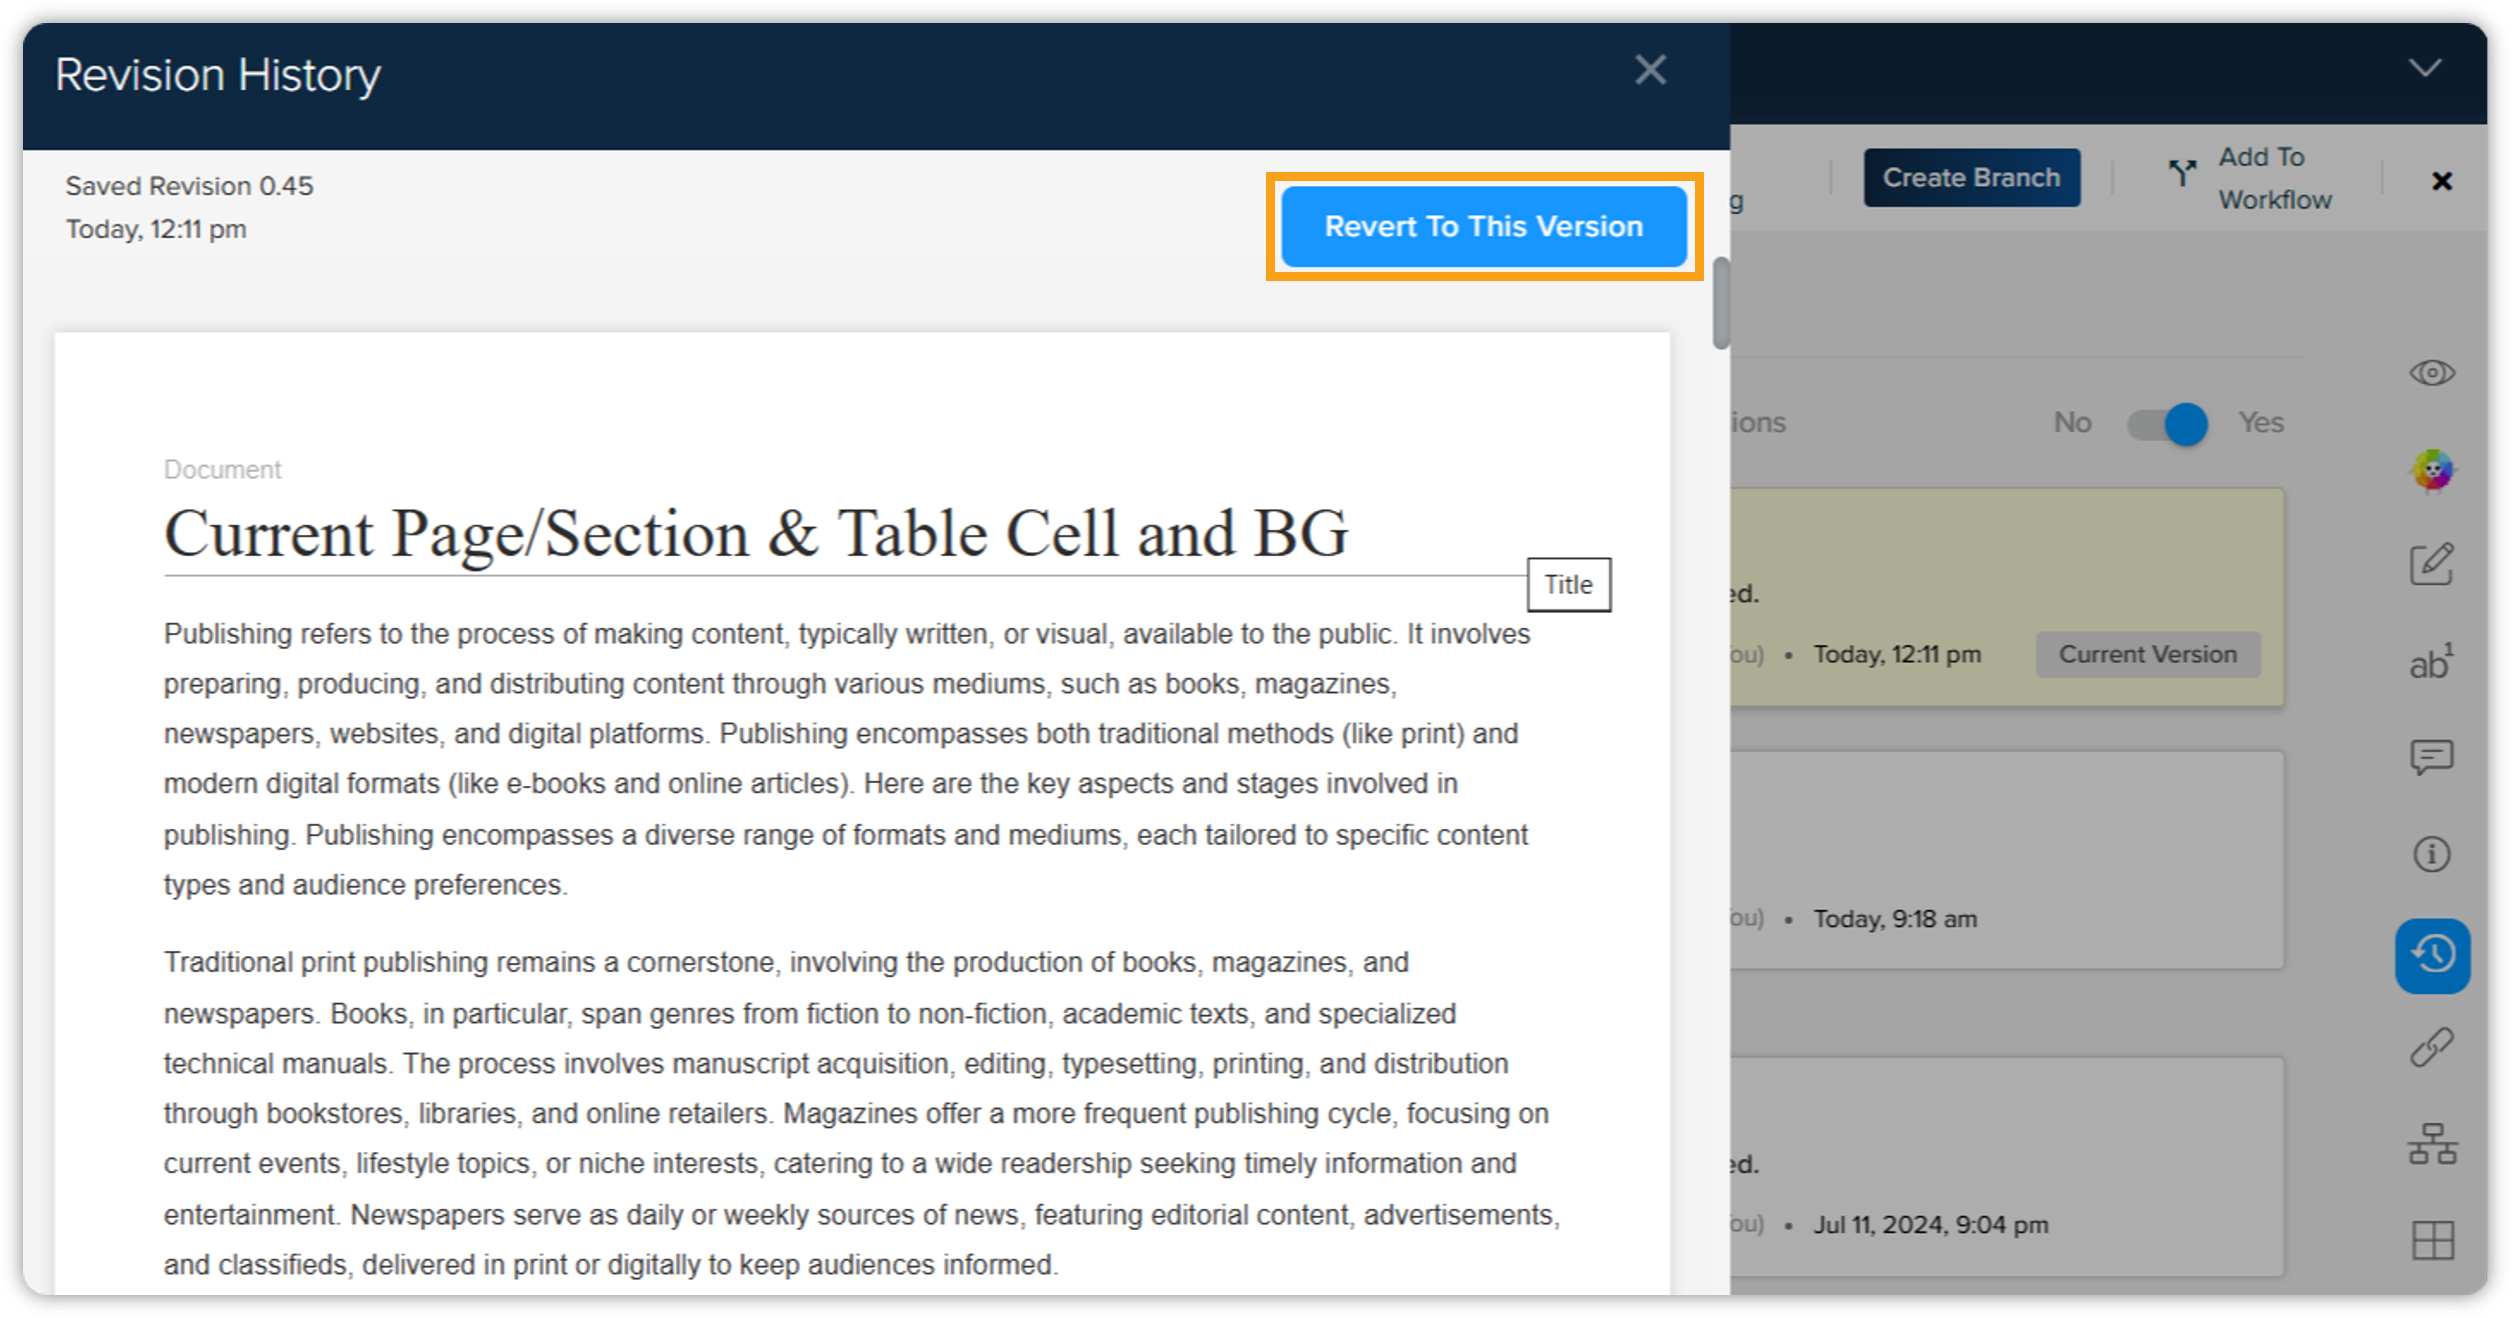
QPP opens in the Revision History overlay window.
-
Select the button Revert to This Version.
-
QPP prompts a dialog to confirm if you want to revert to this version. Click OK.
Link
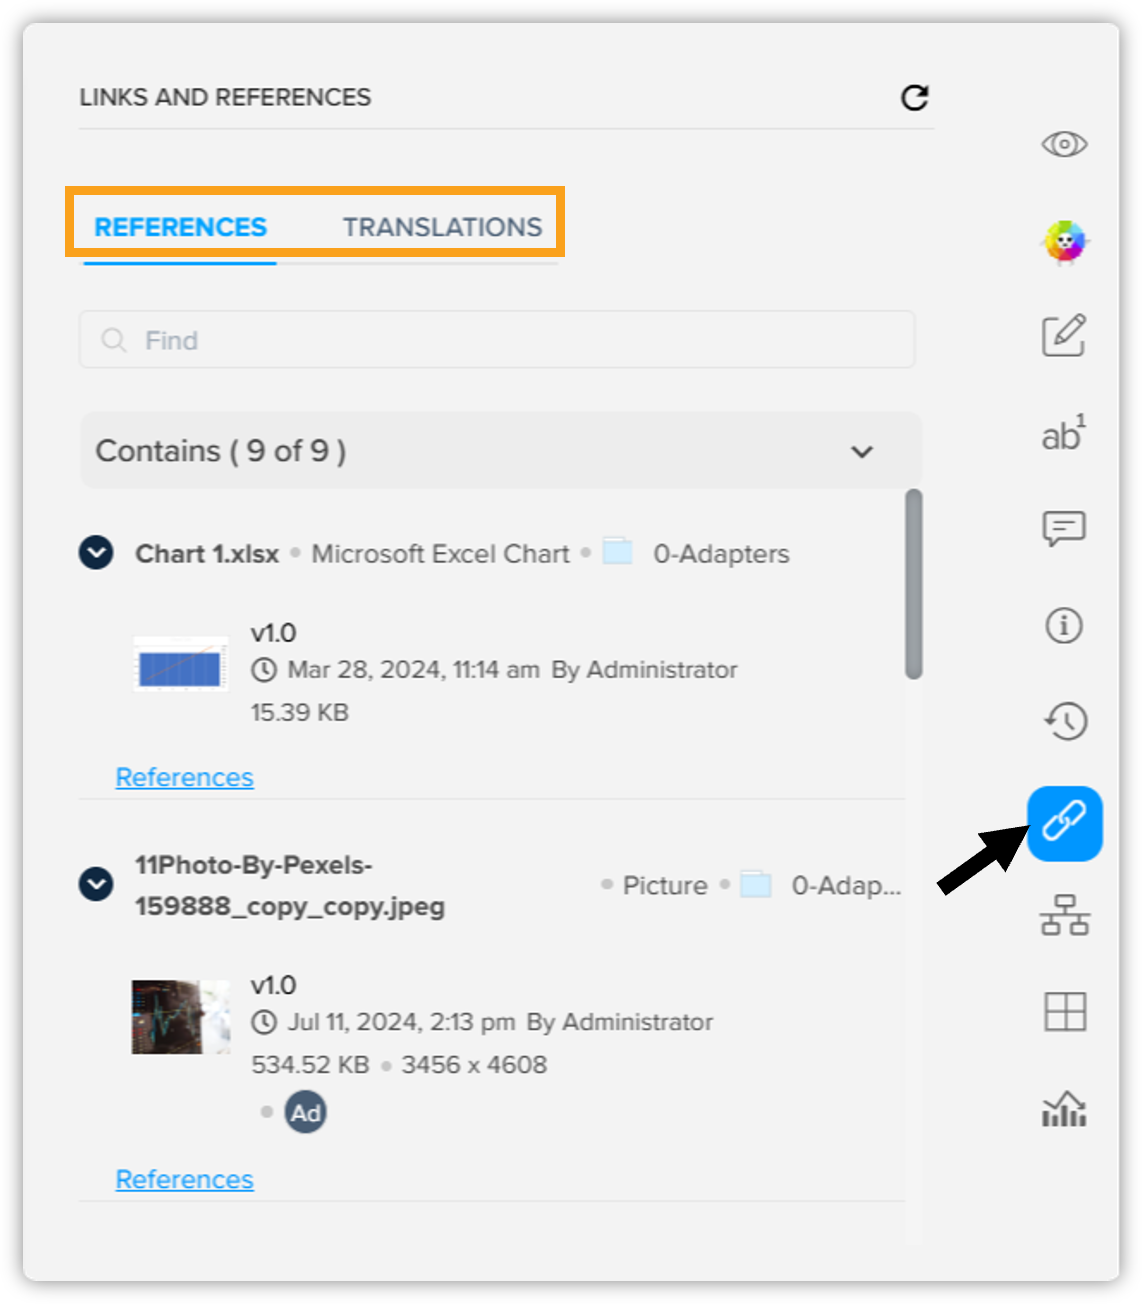
The Link pane contains two paginated tabs: References and Translations.
-
The References tab displays all the referenced elements from the server in a document and elements within the document that are referenced in other documents. You can view these items segregated as Contains and Used In.
-
The Translations tab displays all the translations available for the document.
For translated documents, the Translations tab displays the source documents.
In the Link pane, you can perform the following actions:
-
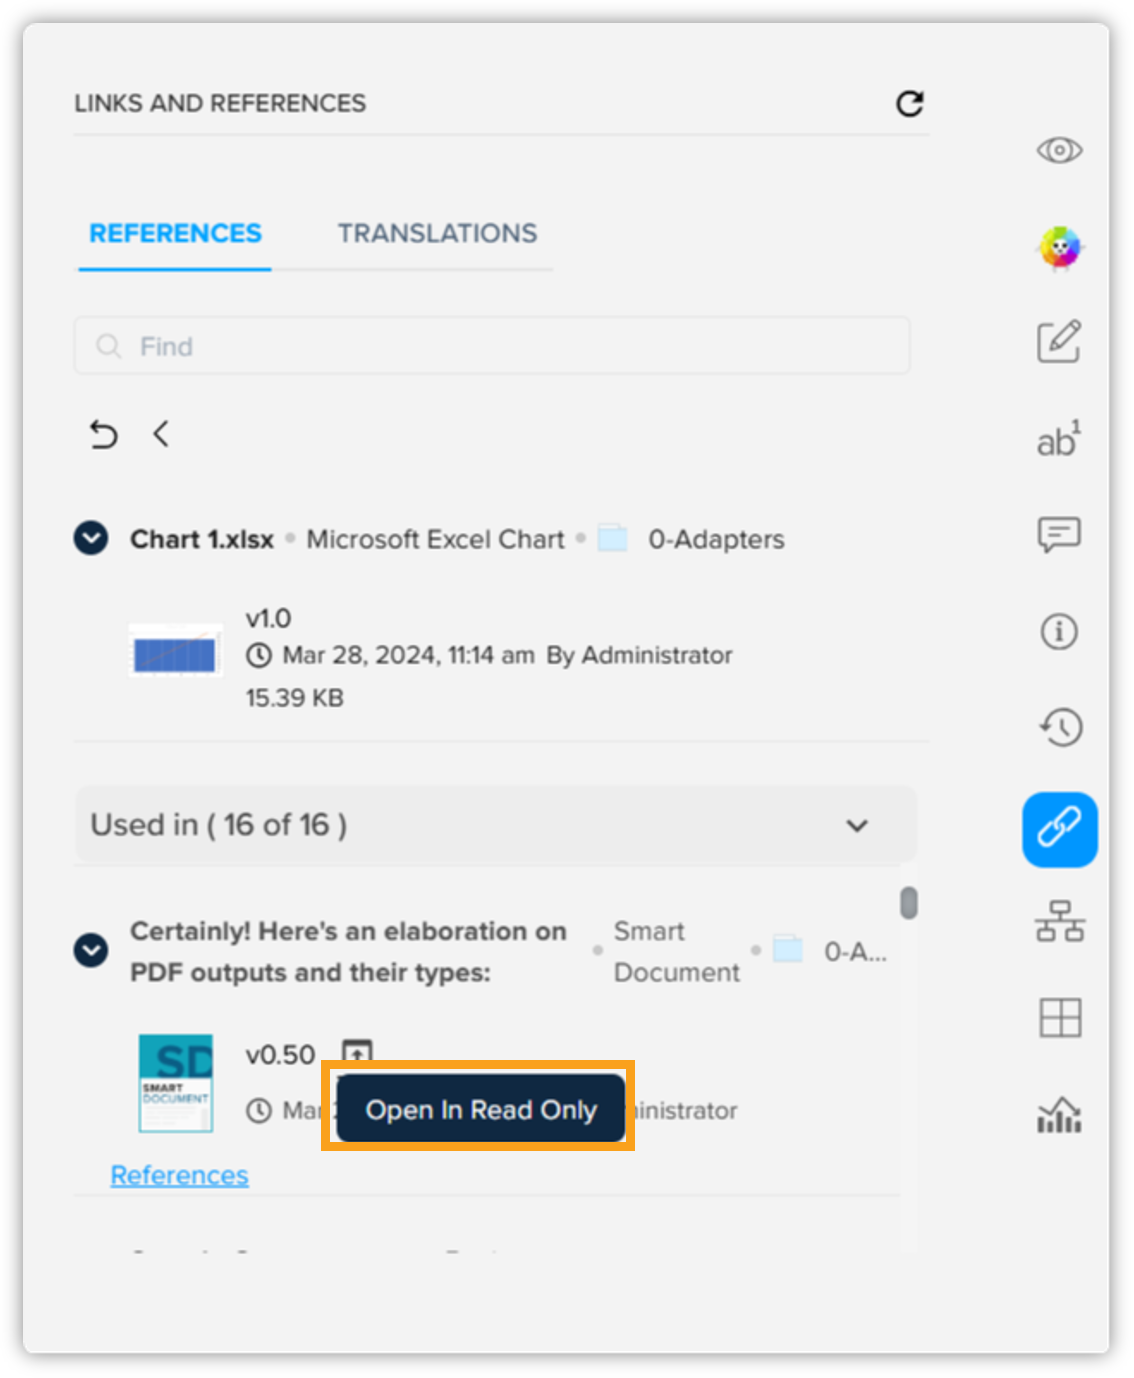
Search for a reference or translation by name.
-
View a linked asset in the read-only mode through the icon button next to the name and version of the asset.
Workflow
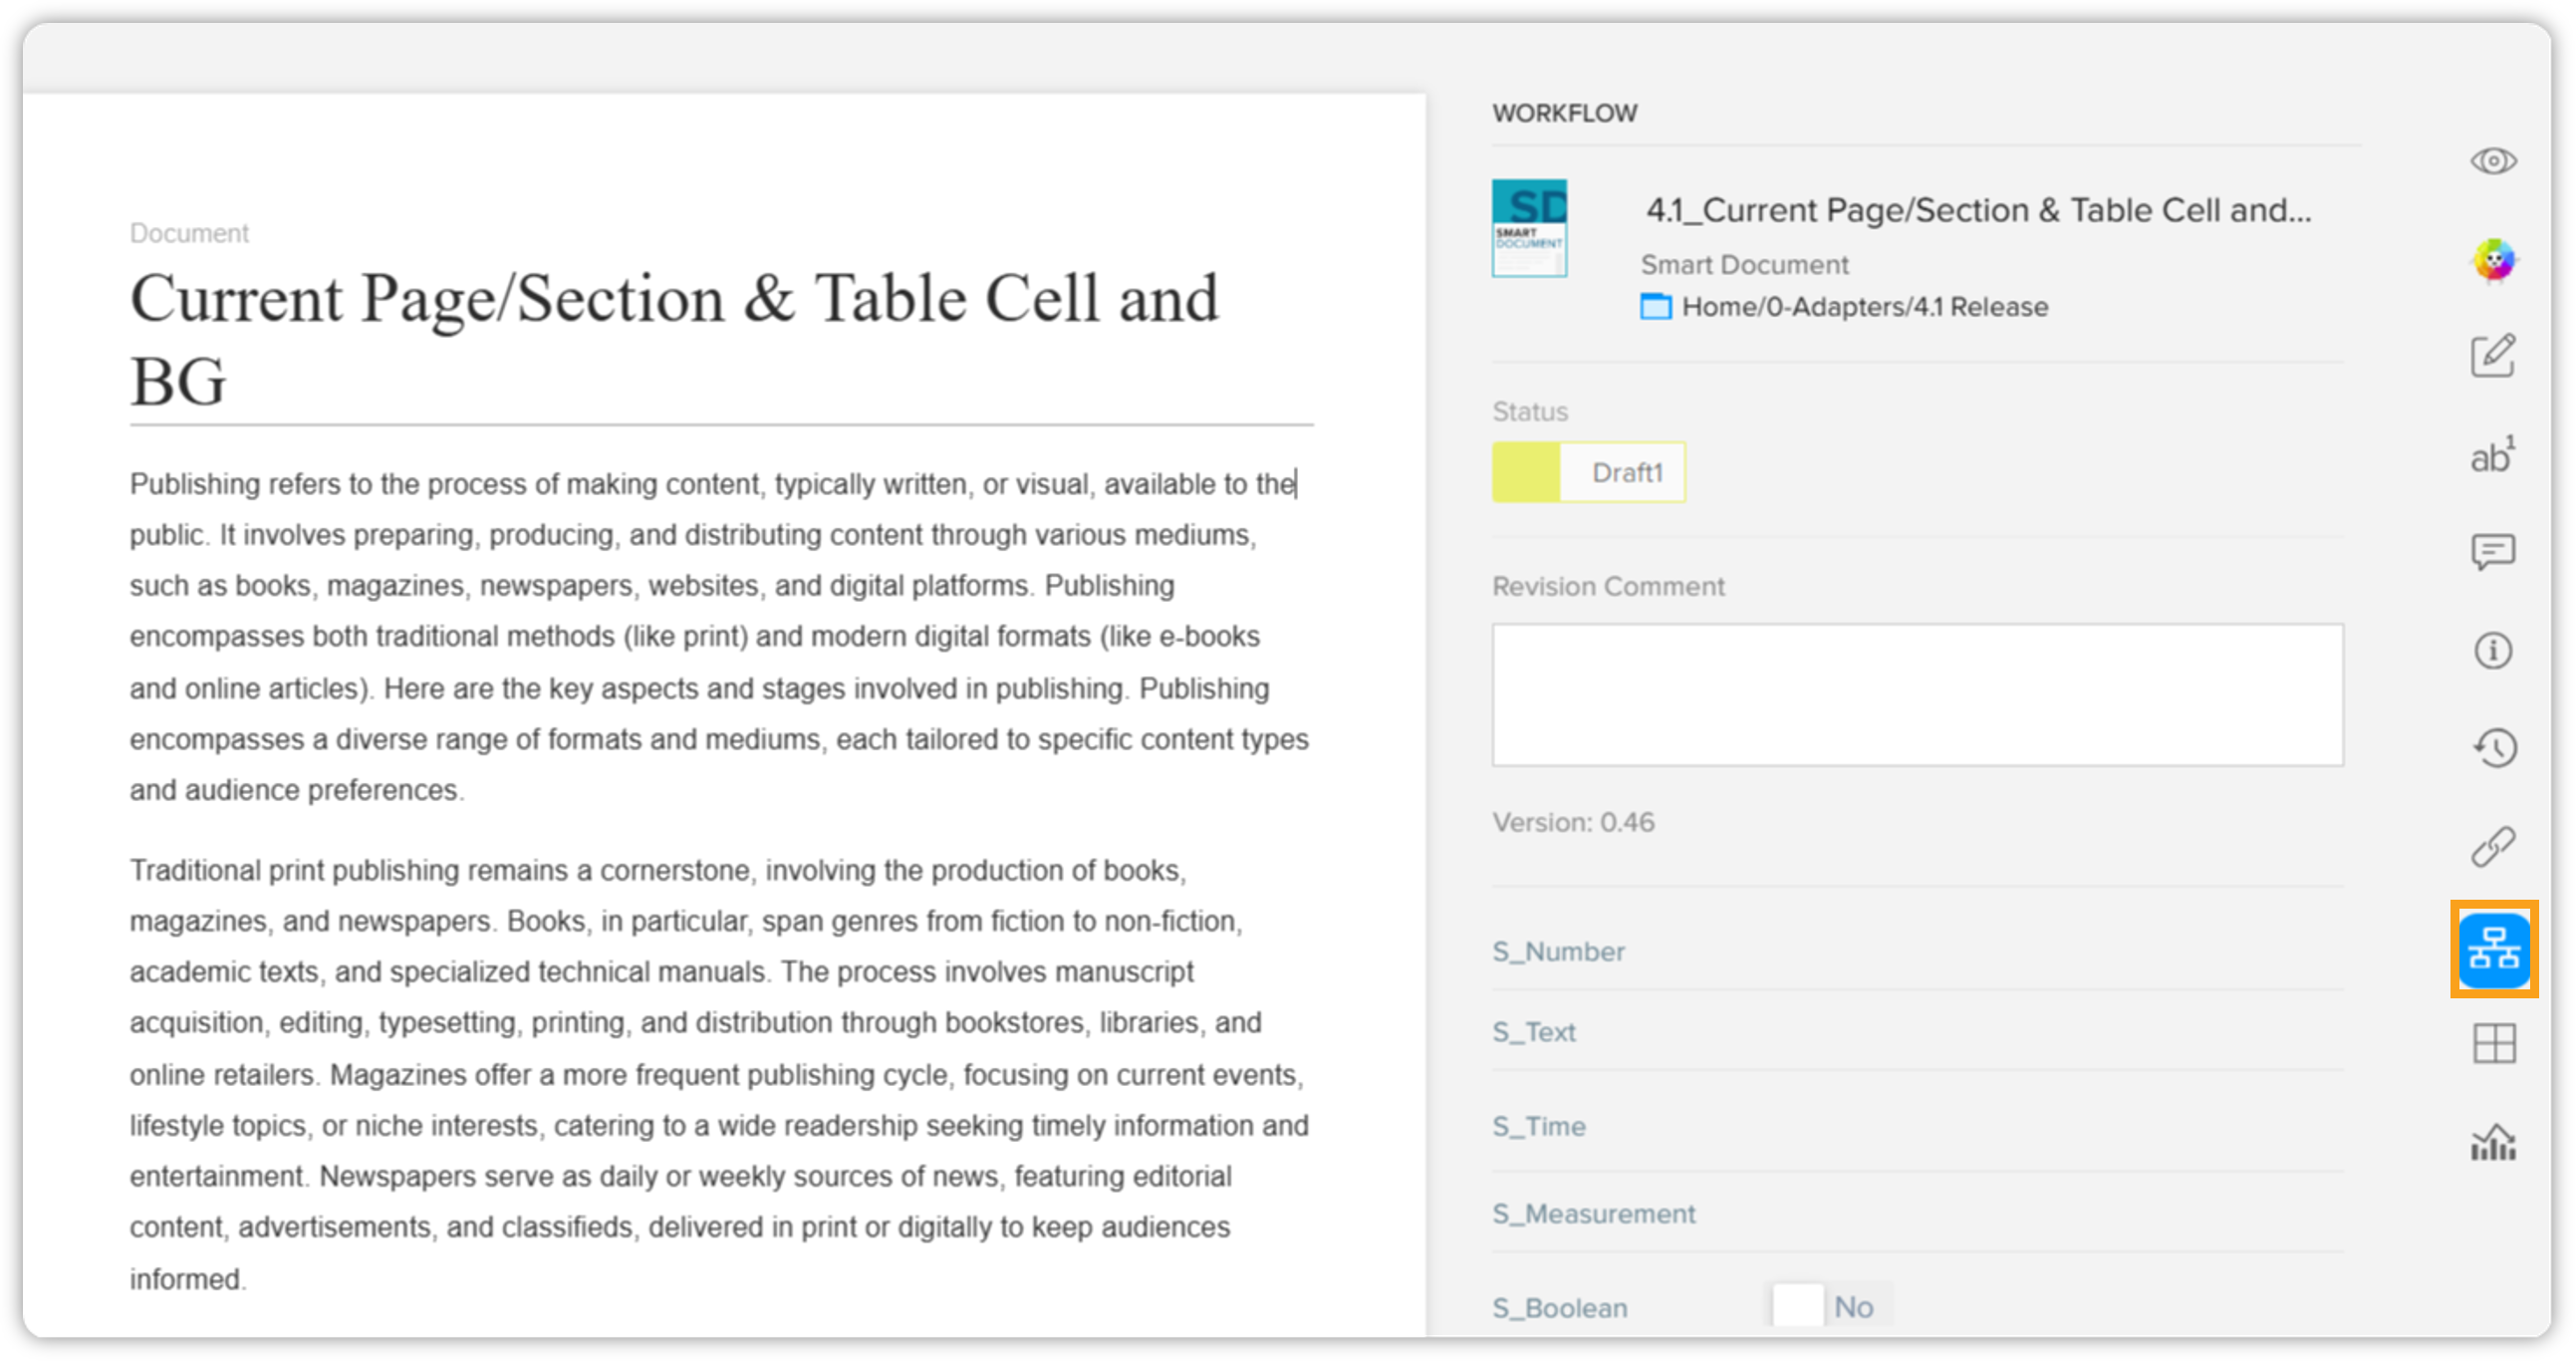
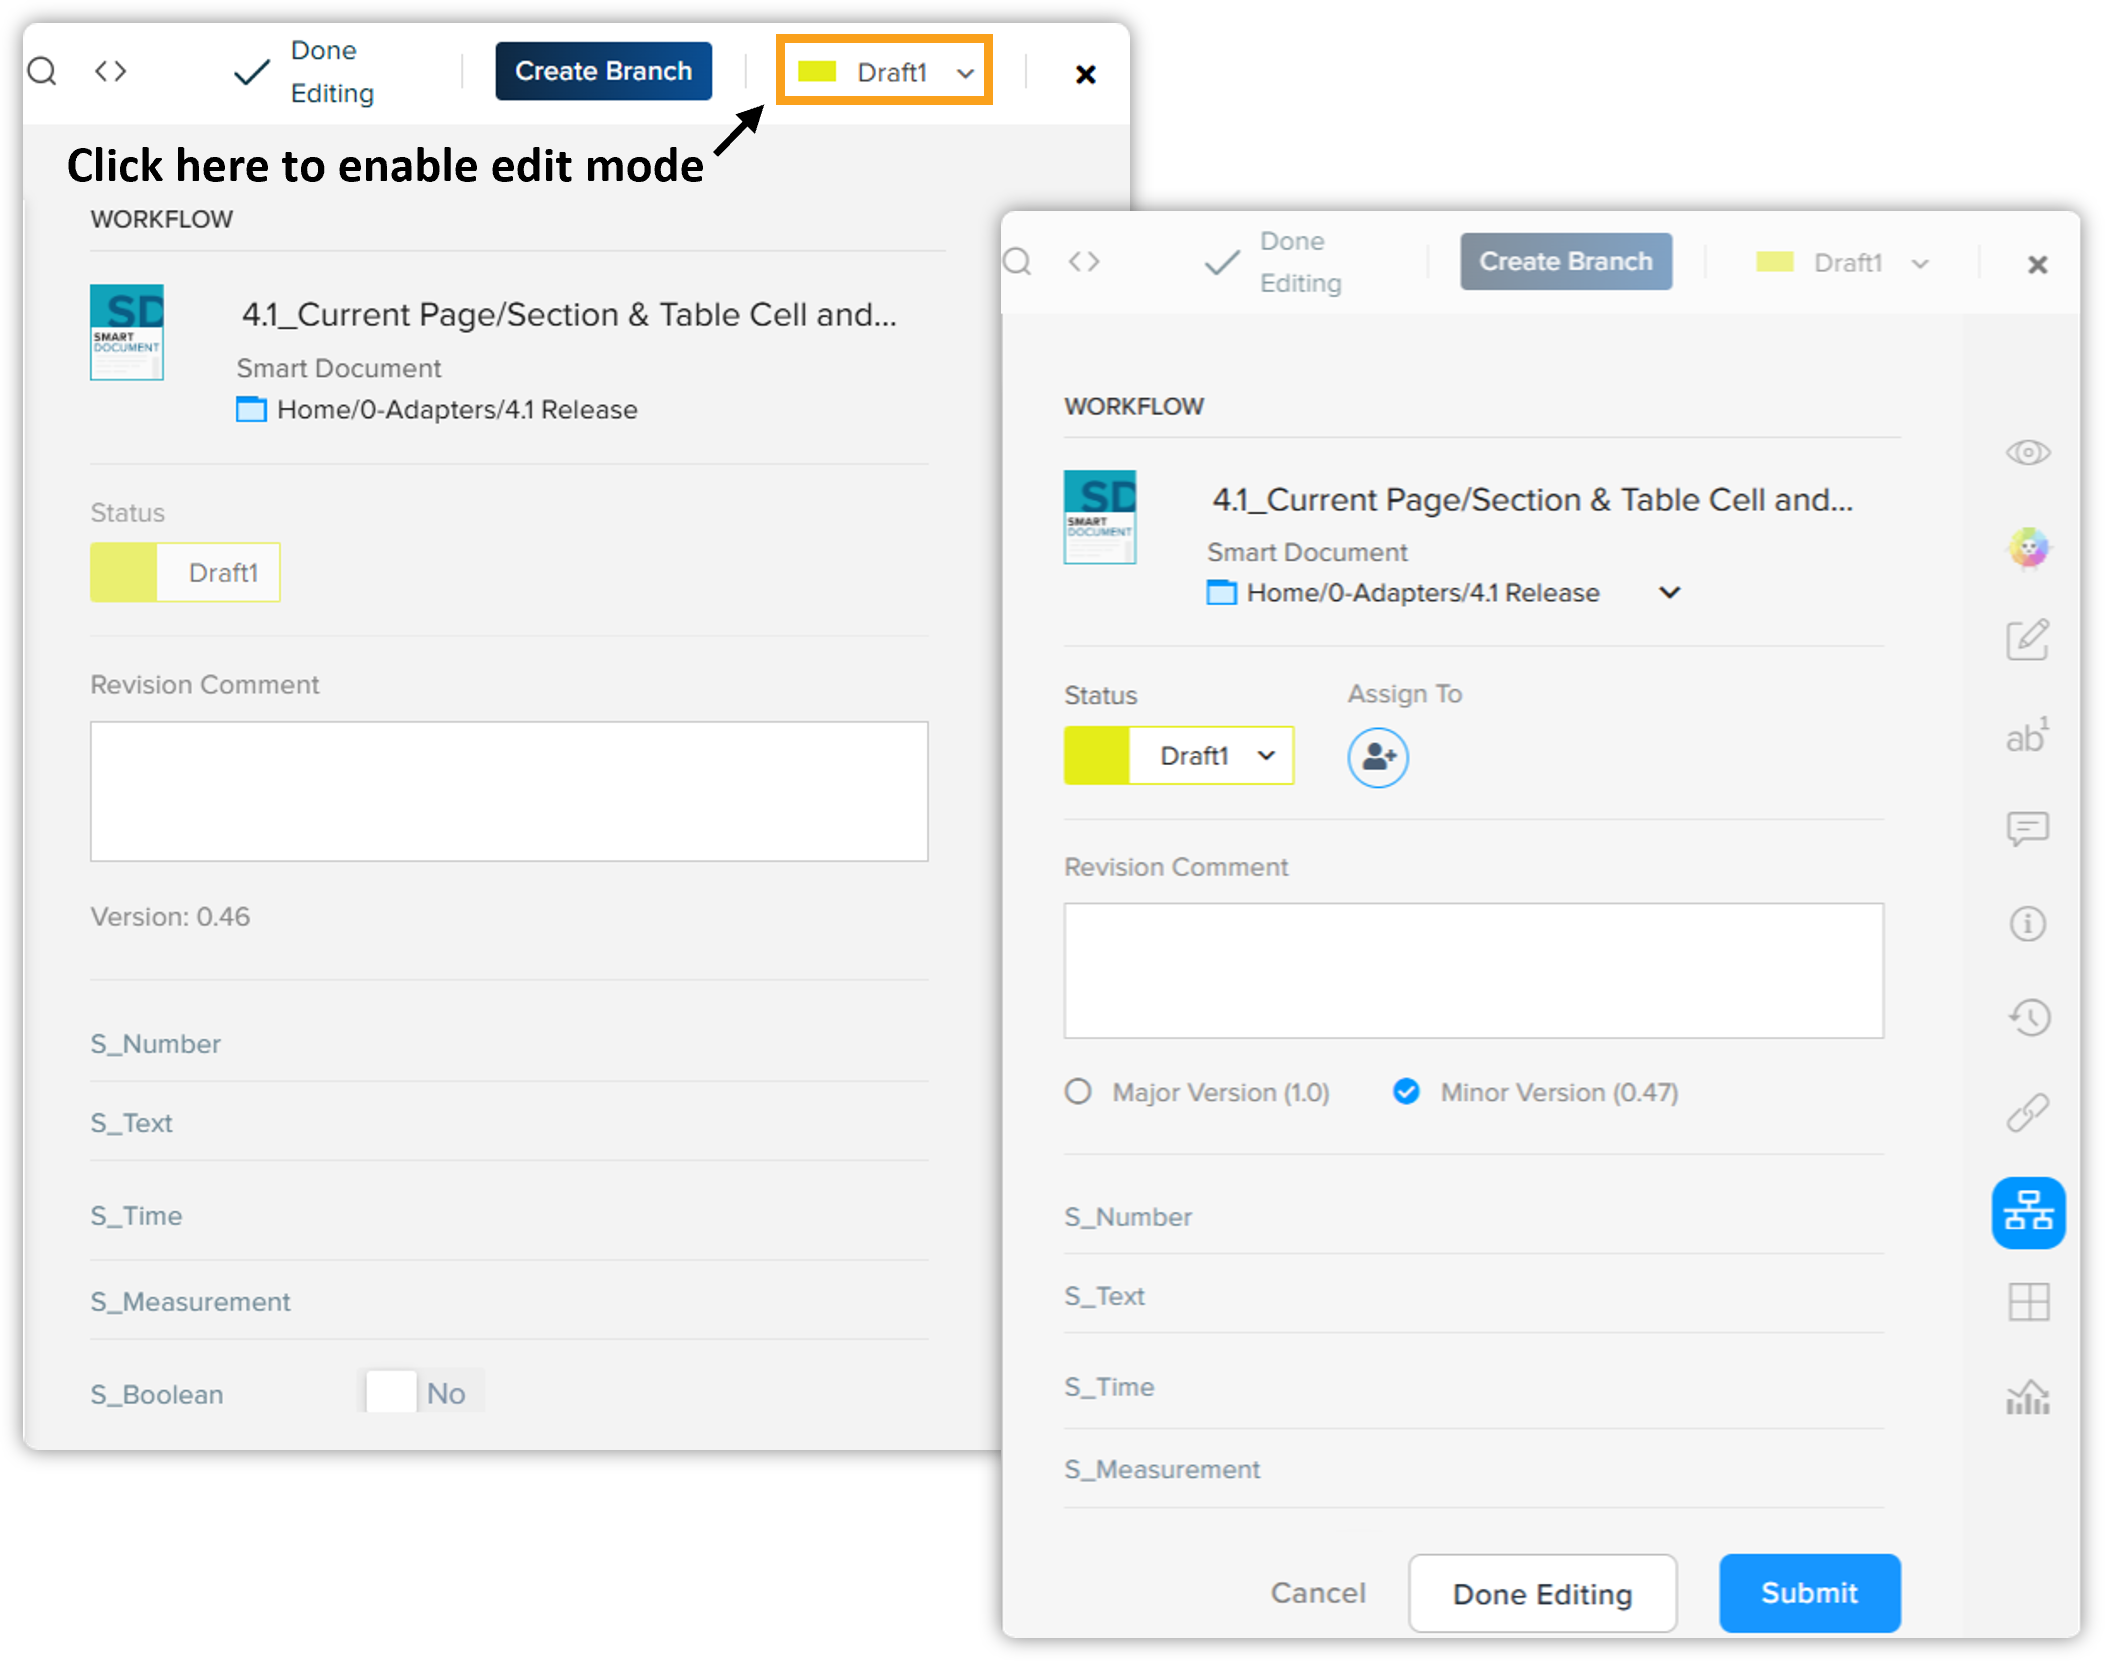
The Workflow pane displays the workflow status-related information of a document. The Workflow pane also displays additional information, such as the location of the asset on the server, version, revision comments, and other attributes.
By default, QPP opens the Workflow pane in read-only mode. However, you can make the Workflow pane editable through the tab Workflow on the header toolbar and then update any of the information listed within the Workflow pane.
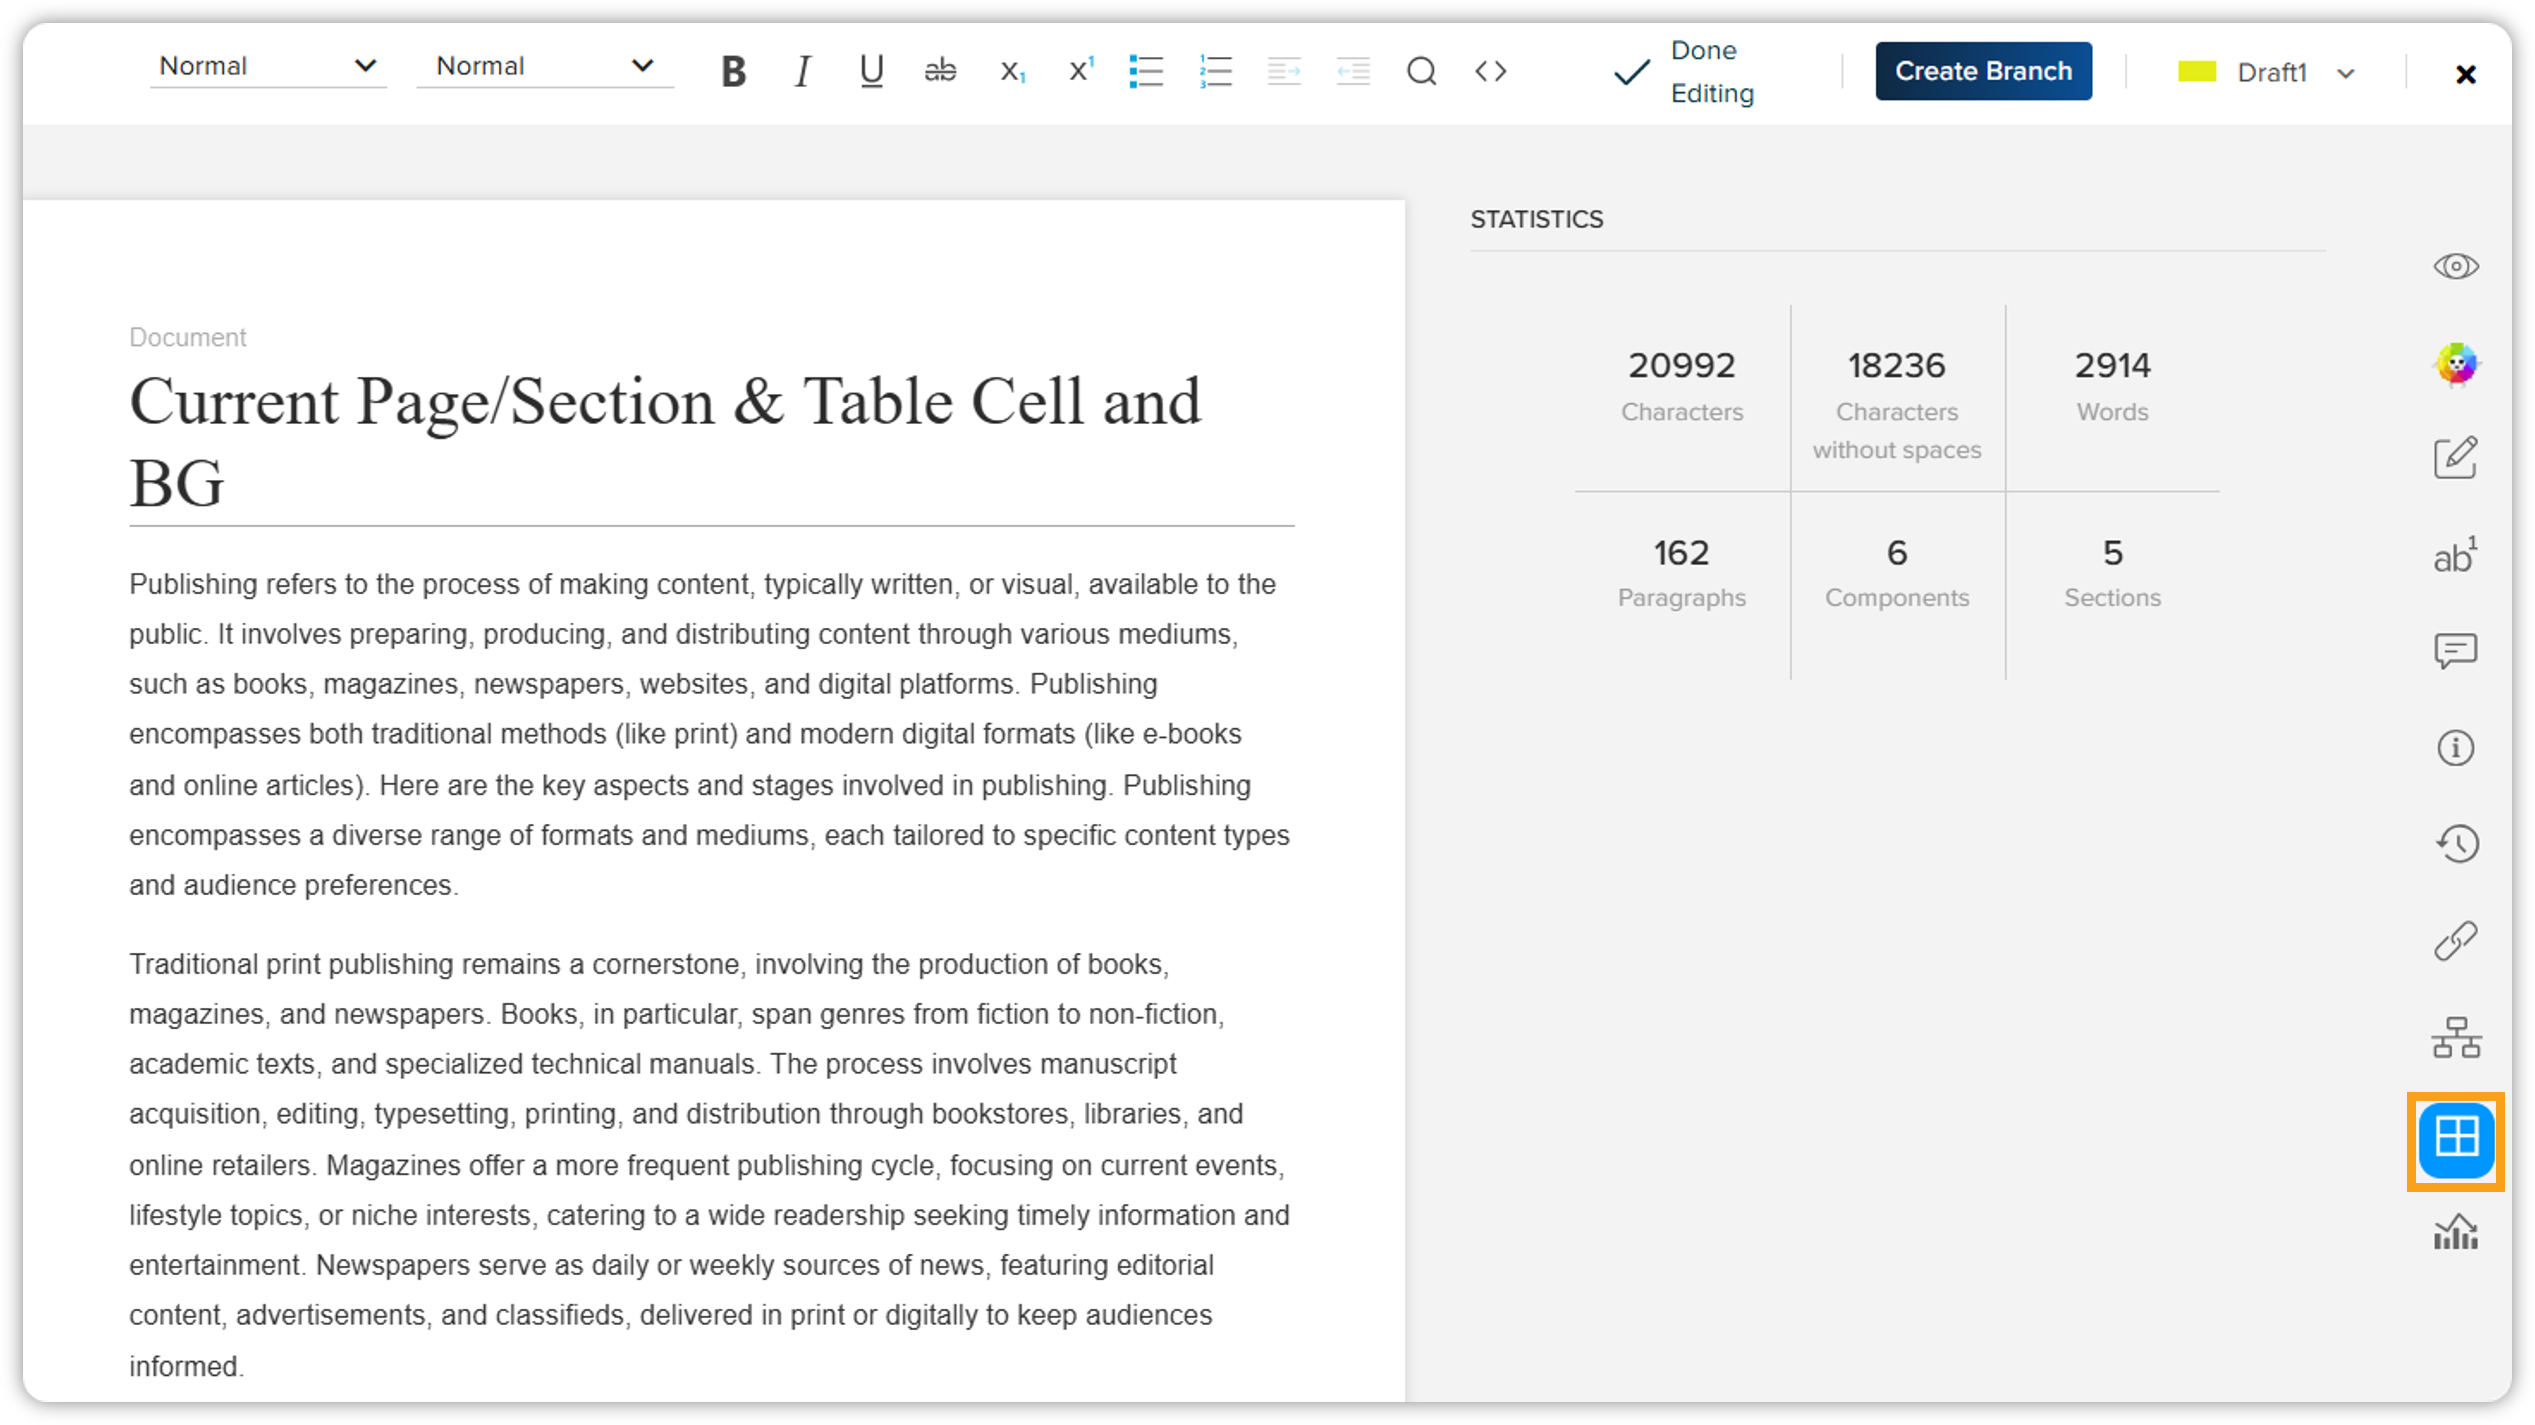
Statistics
The Statistics pane displays the count of the following elements in a document:
-
Characters
-
Characters without spaces
-
Words
-
Paragraphs
-
Components
-
Sections
Trends
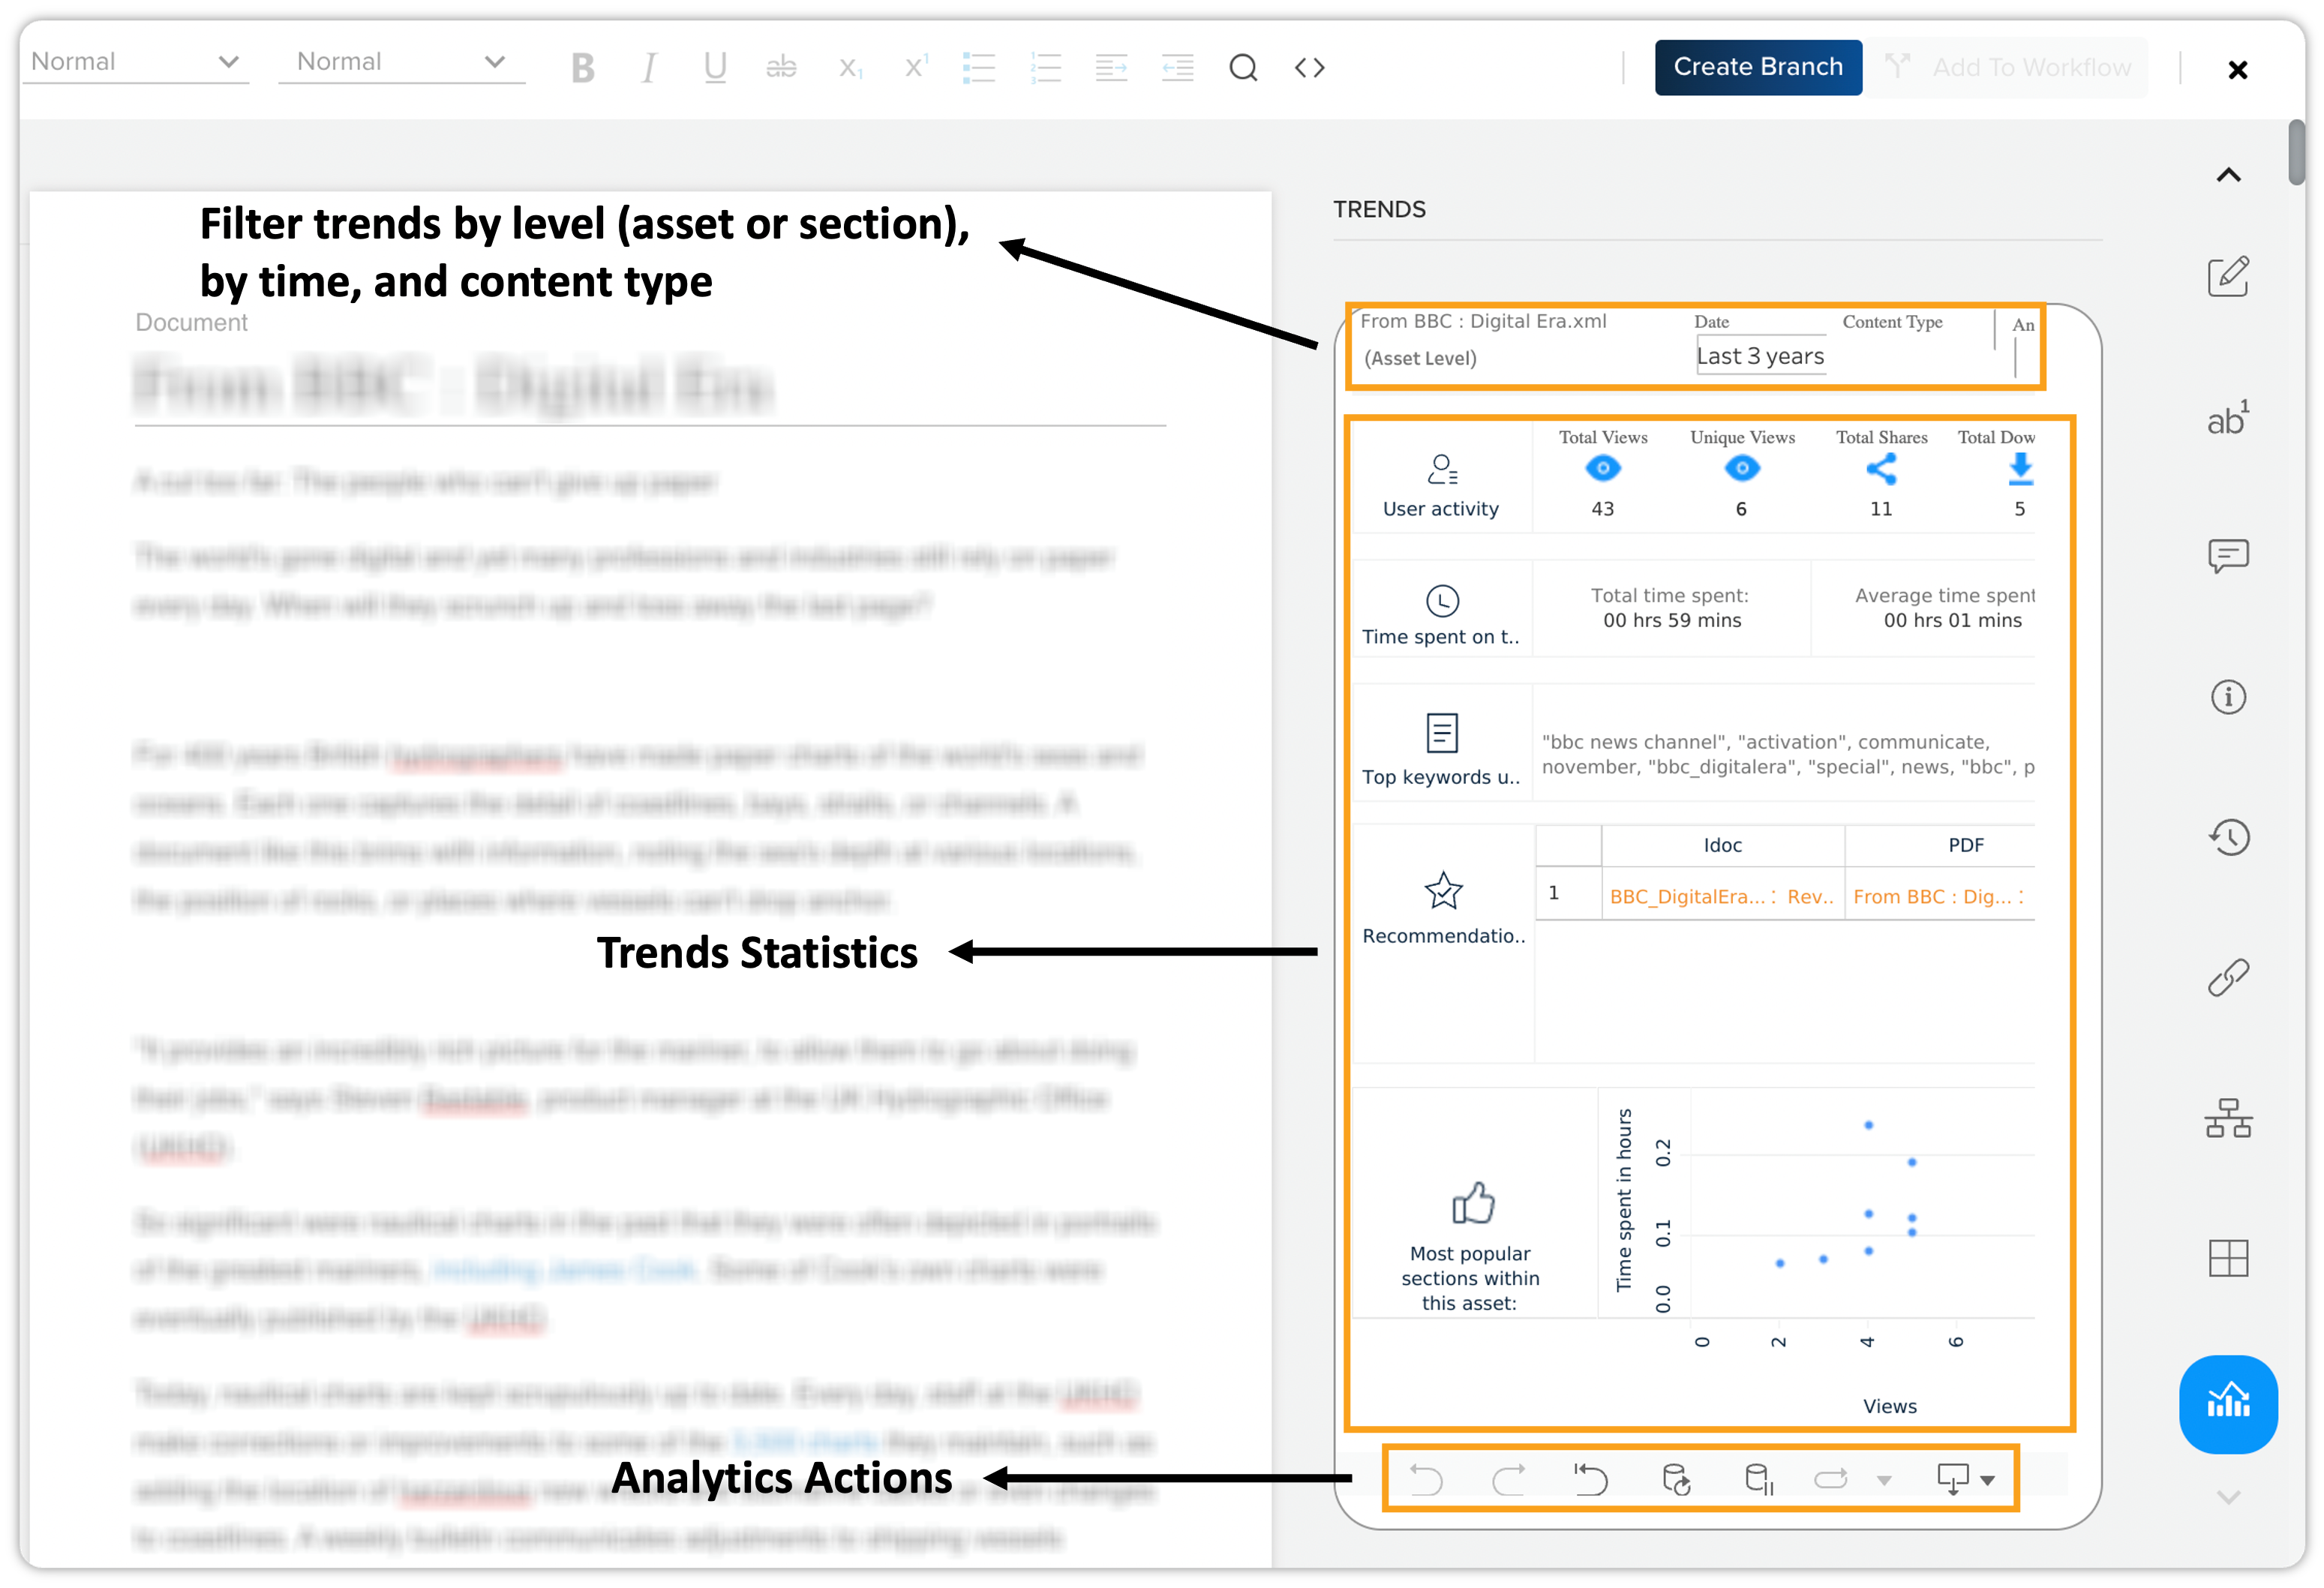
The Trends pane displays the following section and document-level engagement statistics:
-
User Activity: Displays the engagement counts such as the number of views, unique views, shares, and downloads.
-
Time spent on this asset: Total and average time spent on an asset (in hours and minutes).
-
Top keywords used to access this asset: The list of most popular keywords used in the searches to access the current asset.
-
Most popular sections within the asset: Number of views by sections.
Additionally, the Trends pane also you to filter the statistics by level (asset or section), time, and content type. You can also perform a list of analytics actions such as undo, revert, pause, share, and so on the displayed statistics. For more information on analytics actions, see the section Content Strategy > Engagement Trends.
Offline Editing
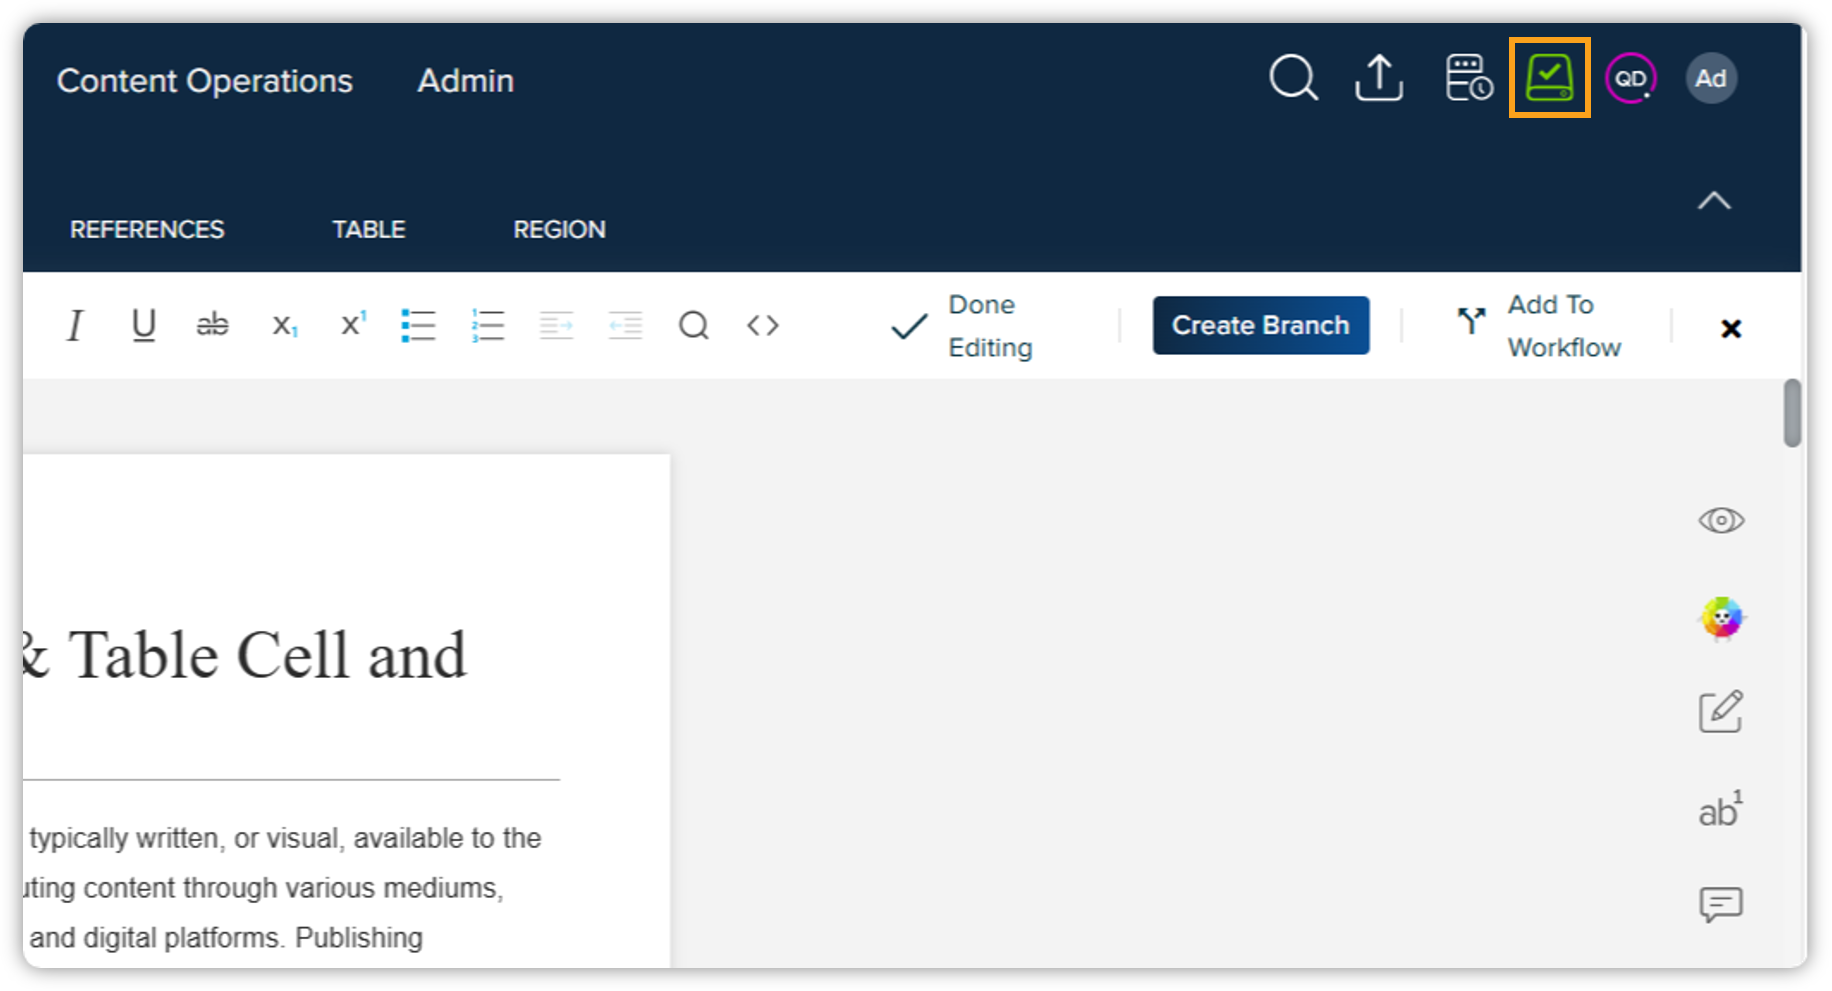
Offline editing allows you to edit documents locally when the connection with the server is lost. You can enable or disable the offline editing capability through the icon (highlighted in the screenshot) at the upper right corner of the top navigation bar.
When the connection with the server is lost, QPP displays a notification above the authoring canvas. QPP retains the changes made while offline. You can see these changes through the link View Edits next to the notification for connection lost, which displays the version created by offline edits under the History pane in the App panes.
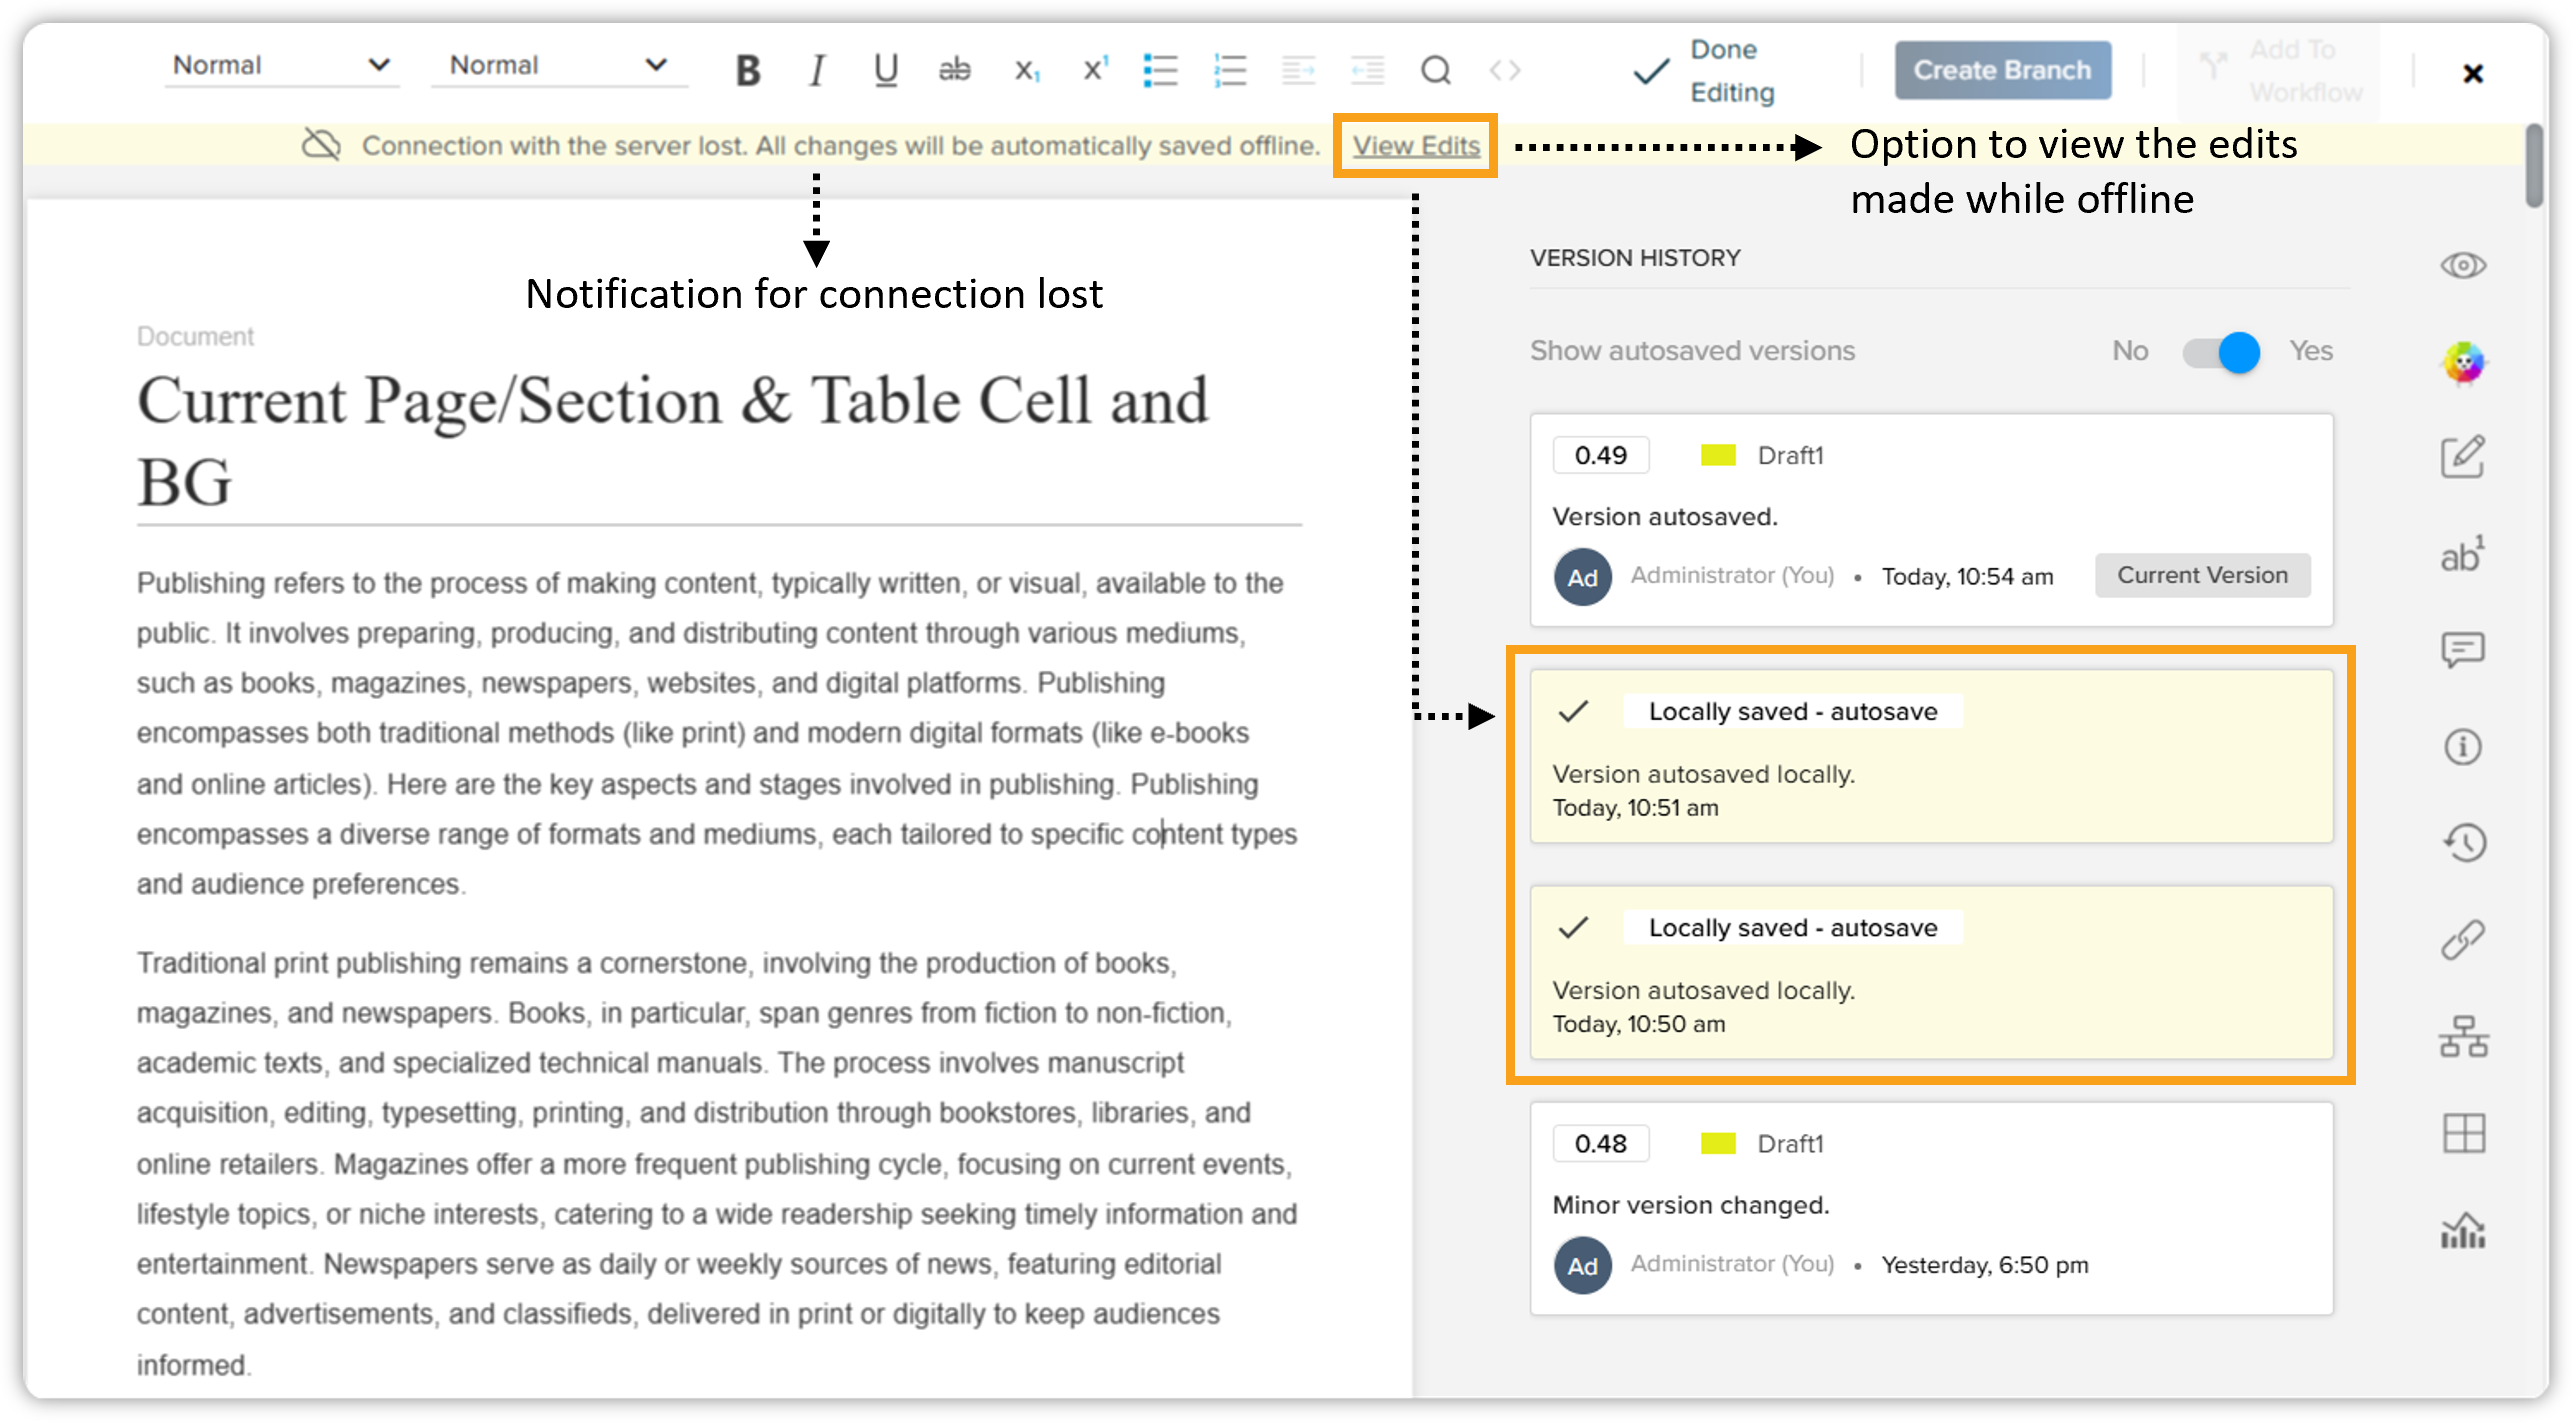
Once the connection is reestablished, QPP syncs the offline version with the online version.
Branching
QPP allows you to create several versions of an asset for different audience segments or geographical regions through branching. Branching allows better asset and version management because unlike duplicating an asset, branching doesn't create separate copies of an asset.
When you create a branch of a document and make any changes to that branch, QPP doesn't impact the original document (the origin branch) or any other branch of the document.
Create a Branch
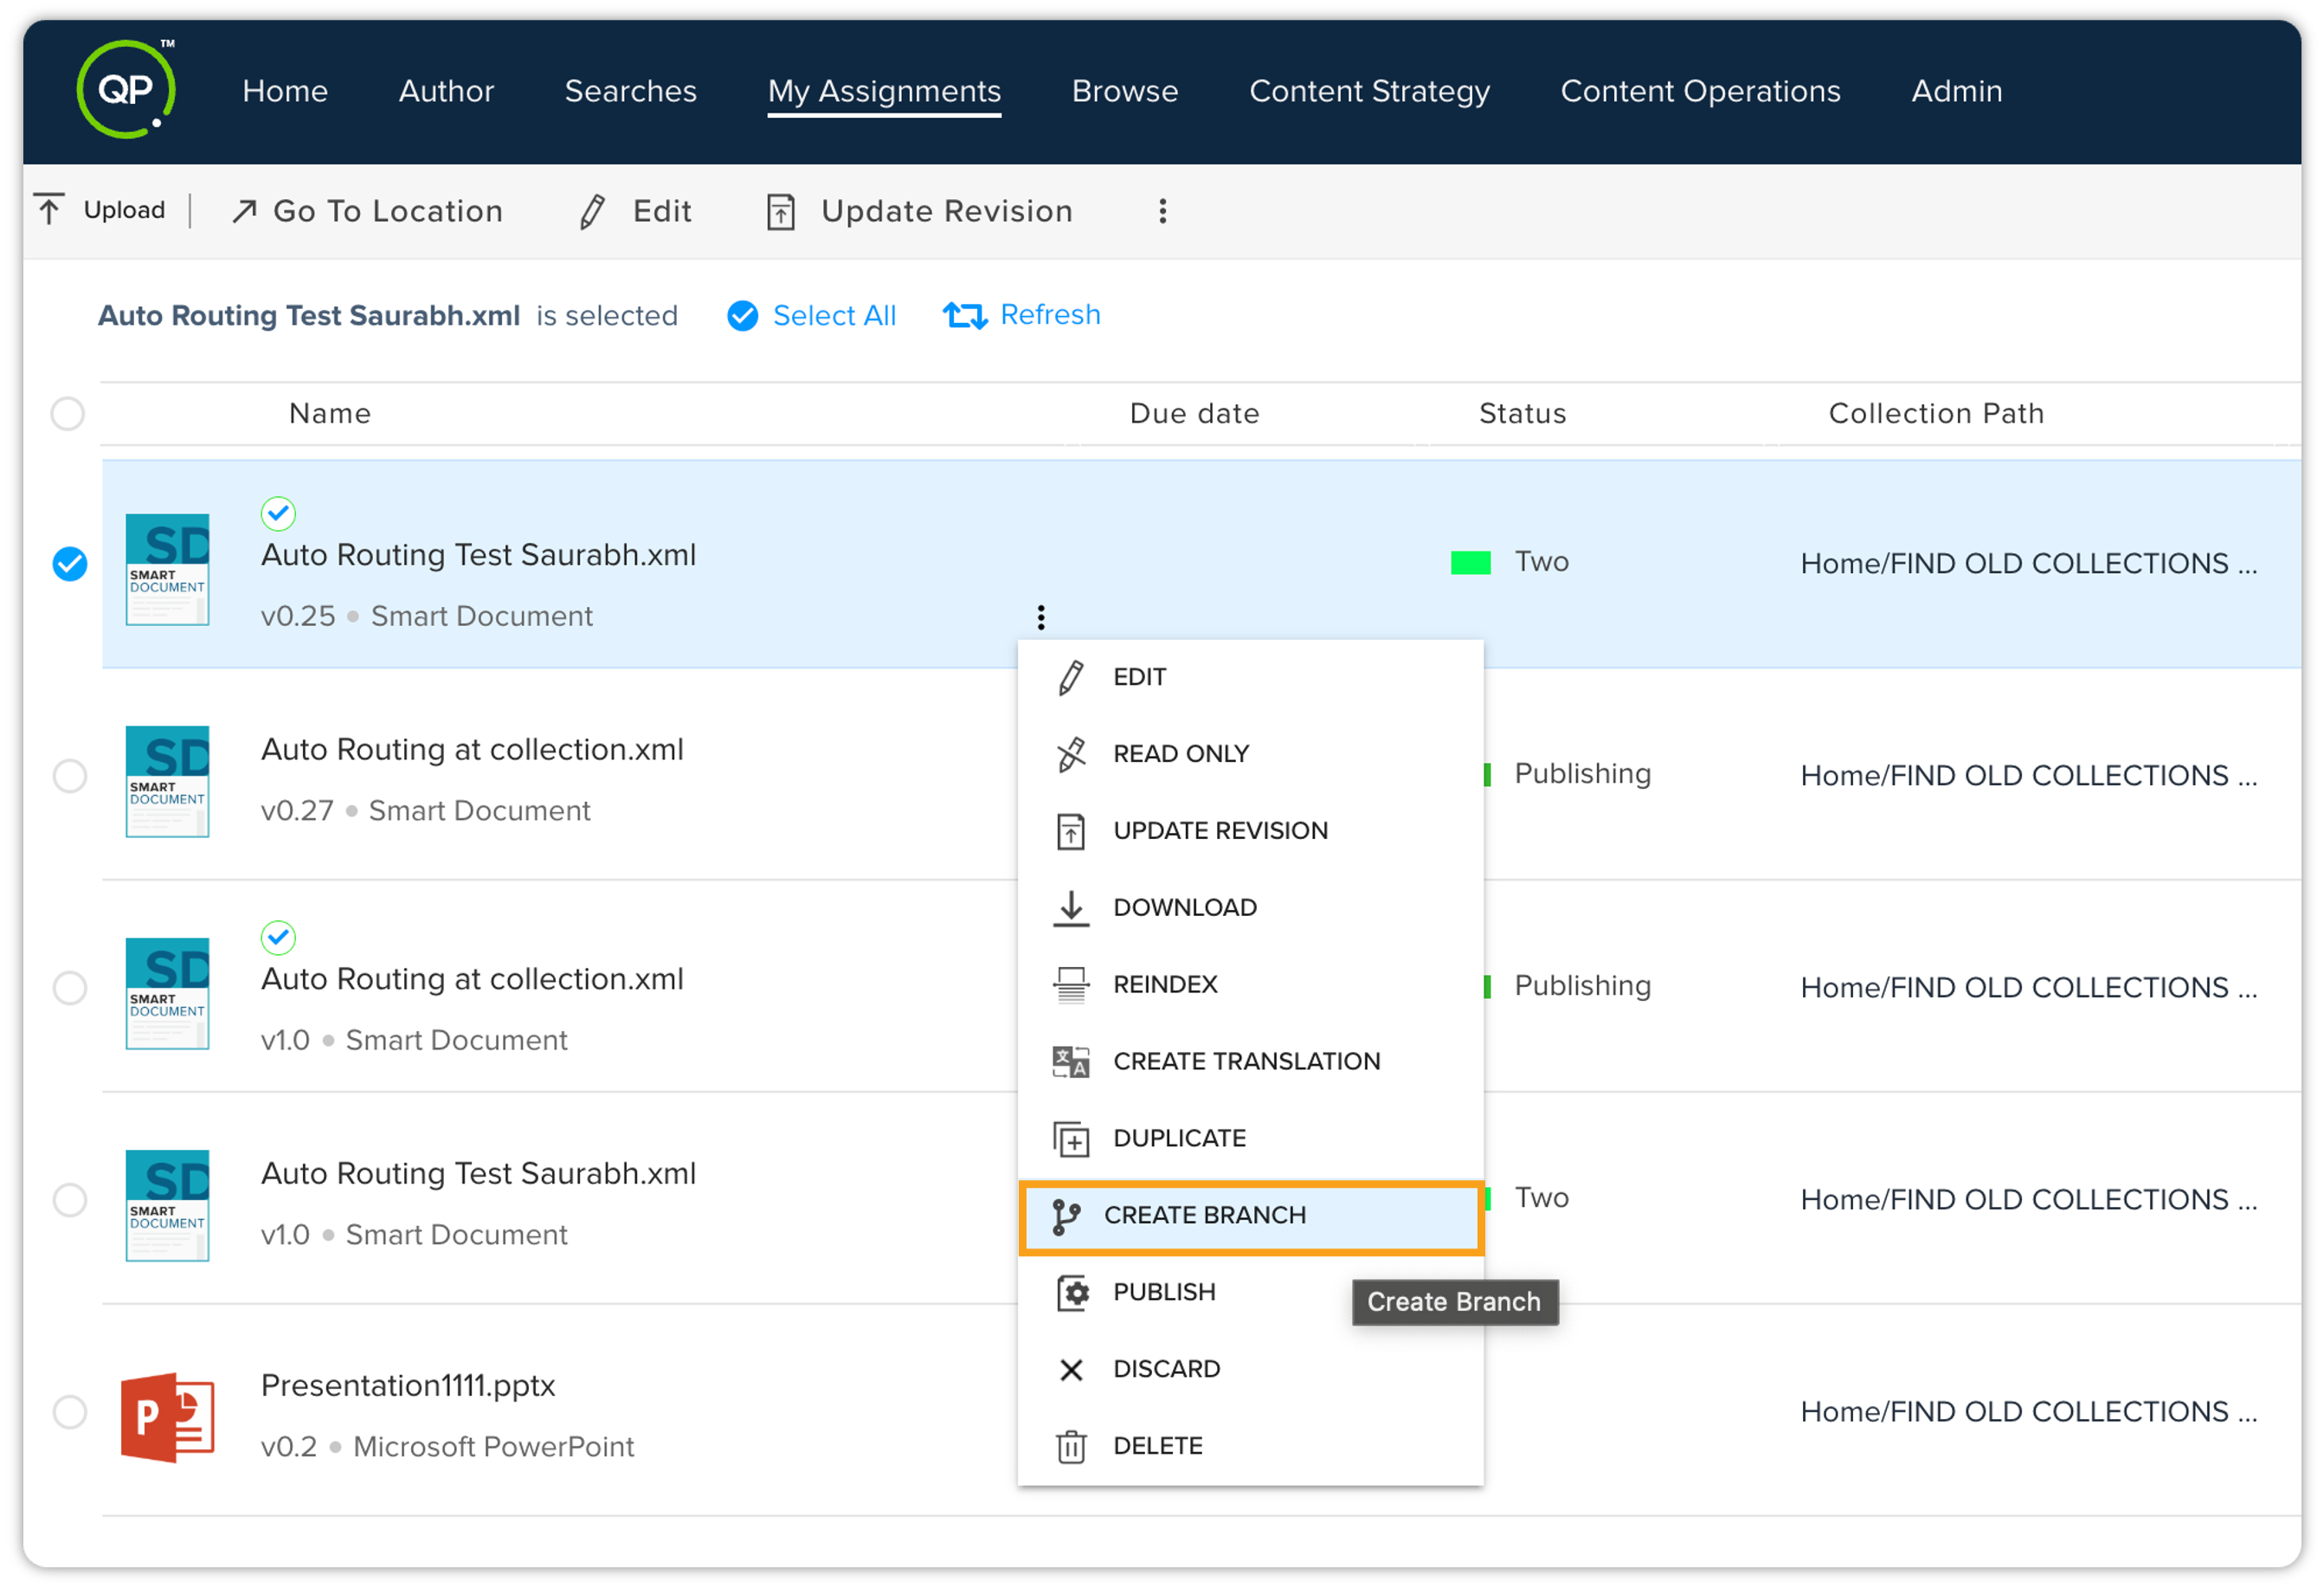
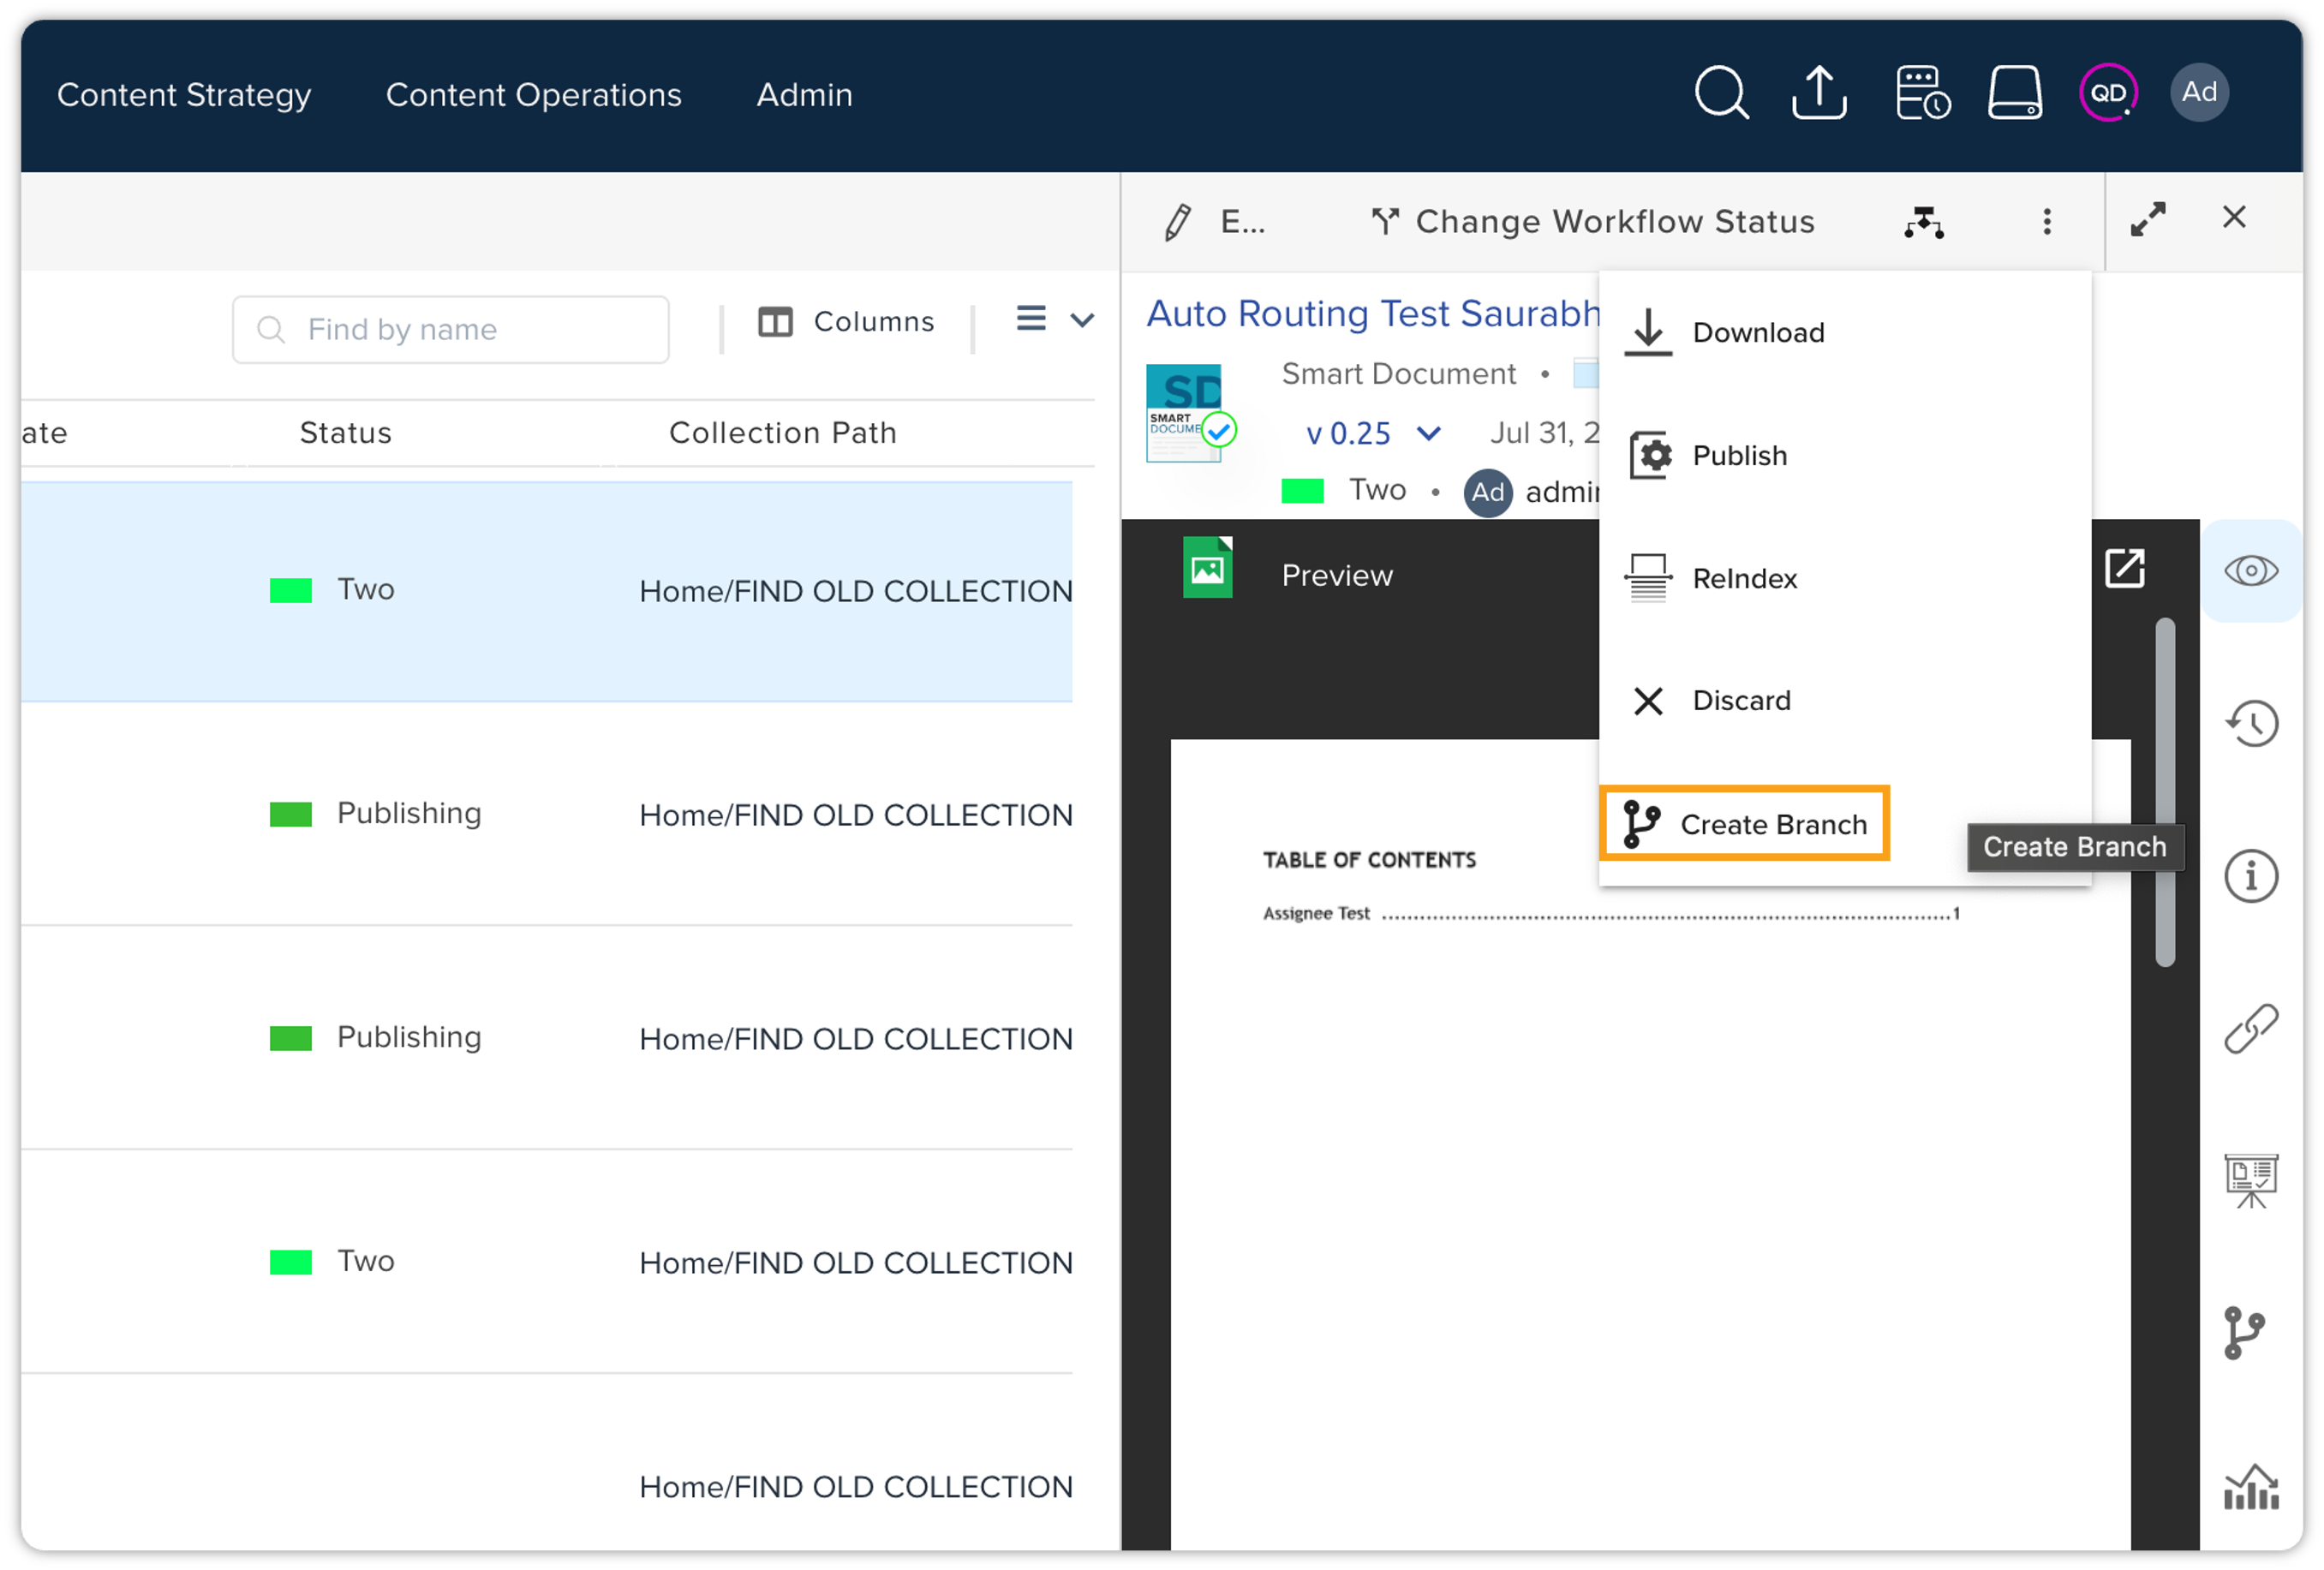
QPP allows you to create a branch of a document from the following places on the user interface:
-
Kebab menu of an asset on any of the asset listing pages.
-
Kebab menu at the top of the Asset Details pane.
-
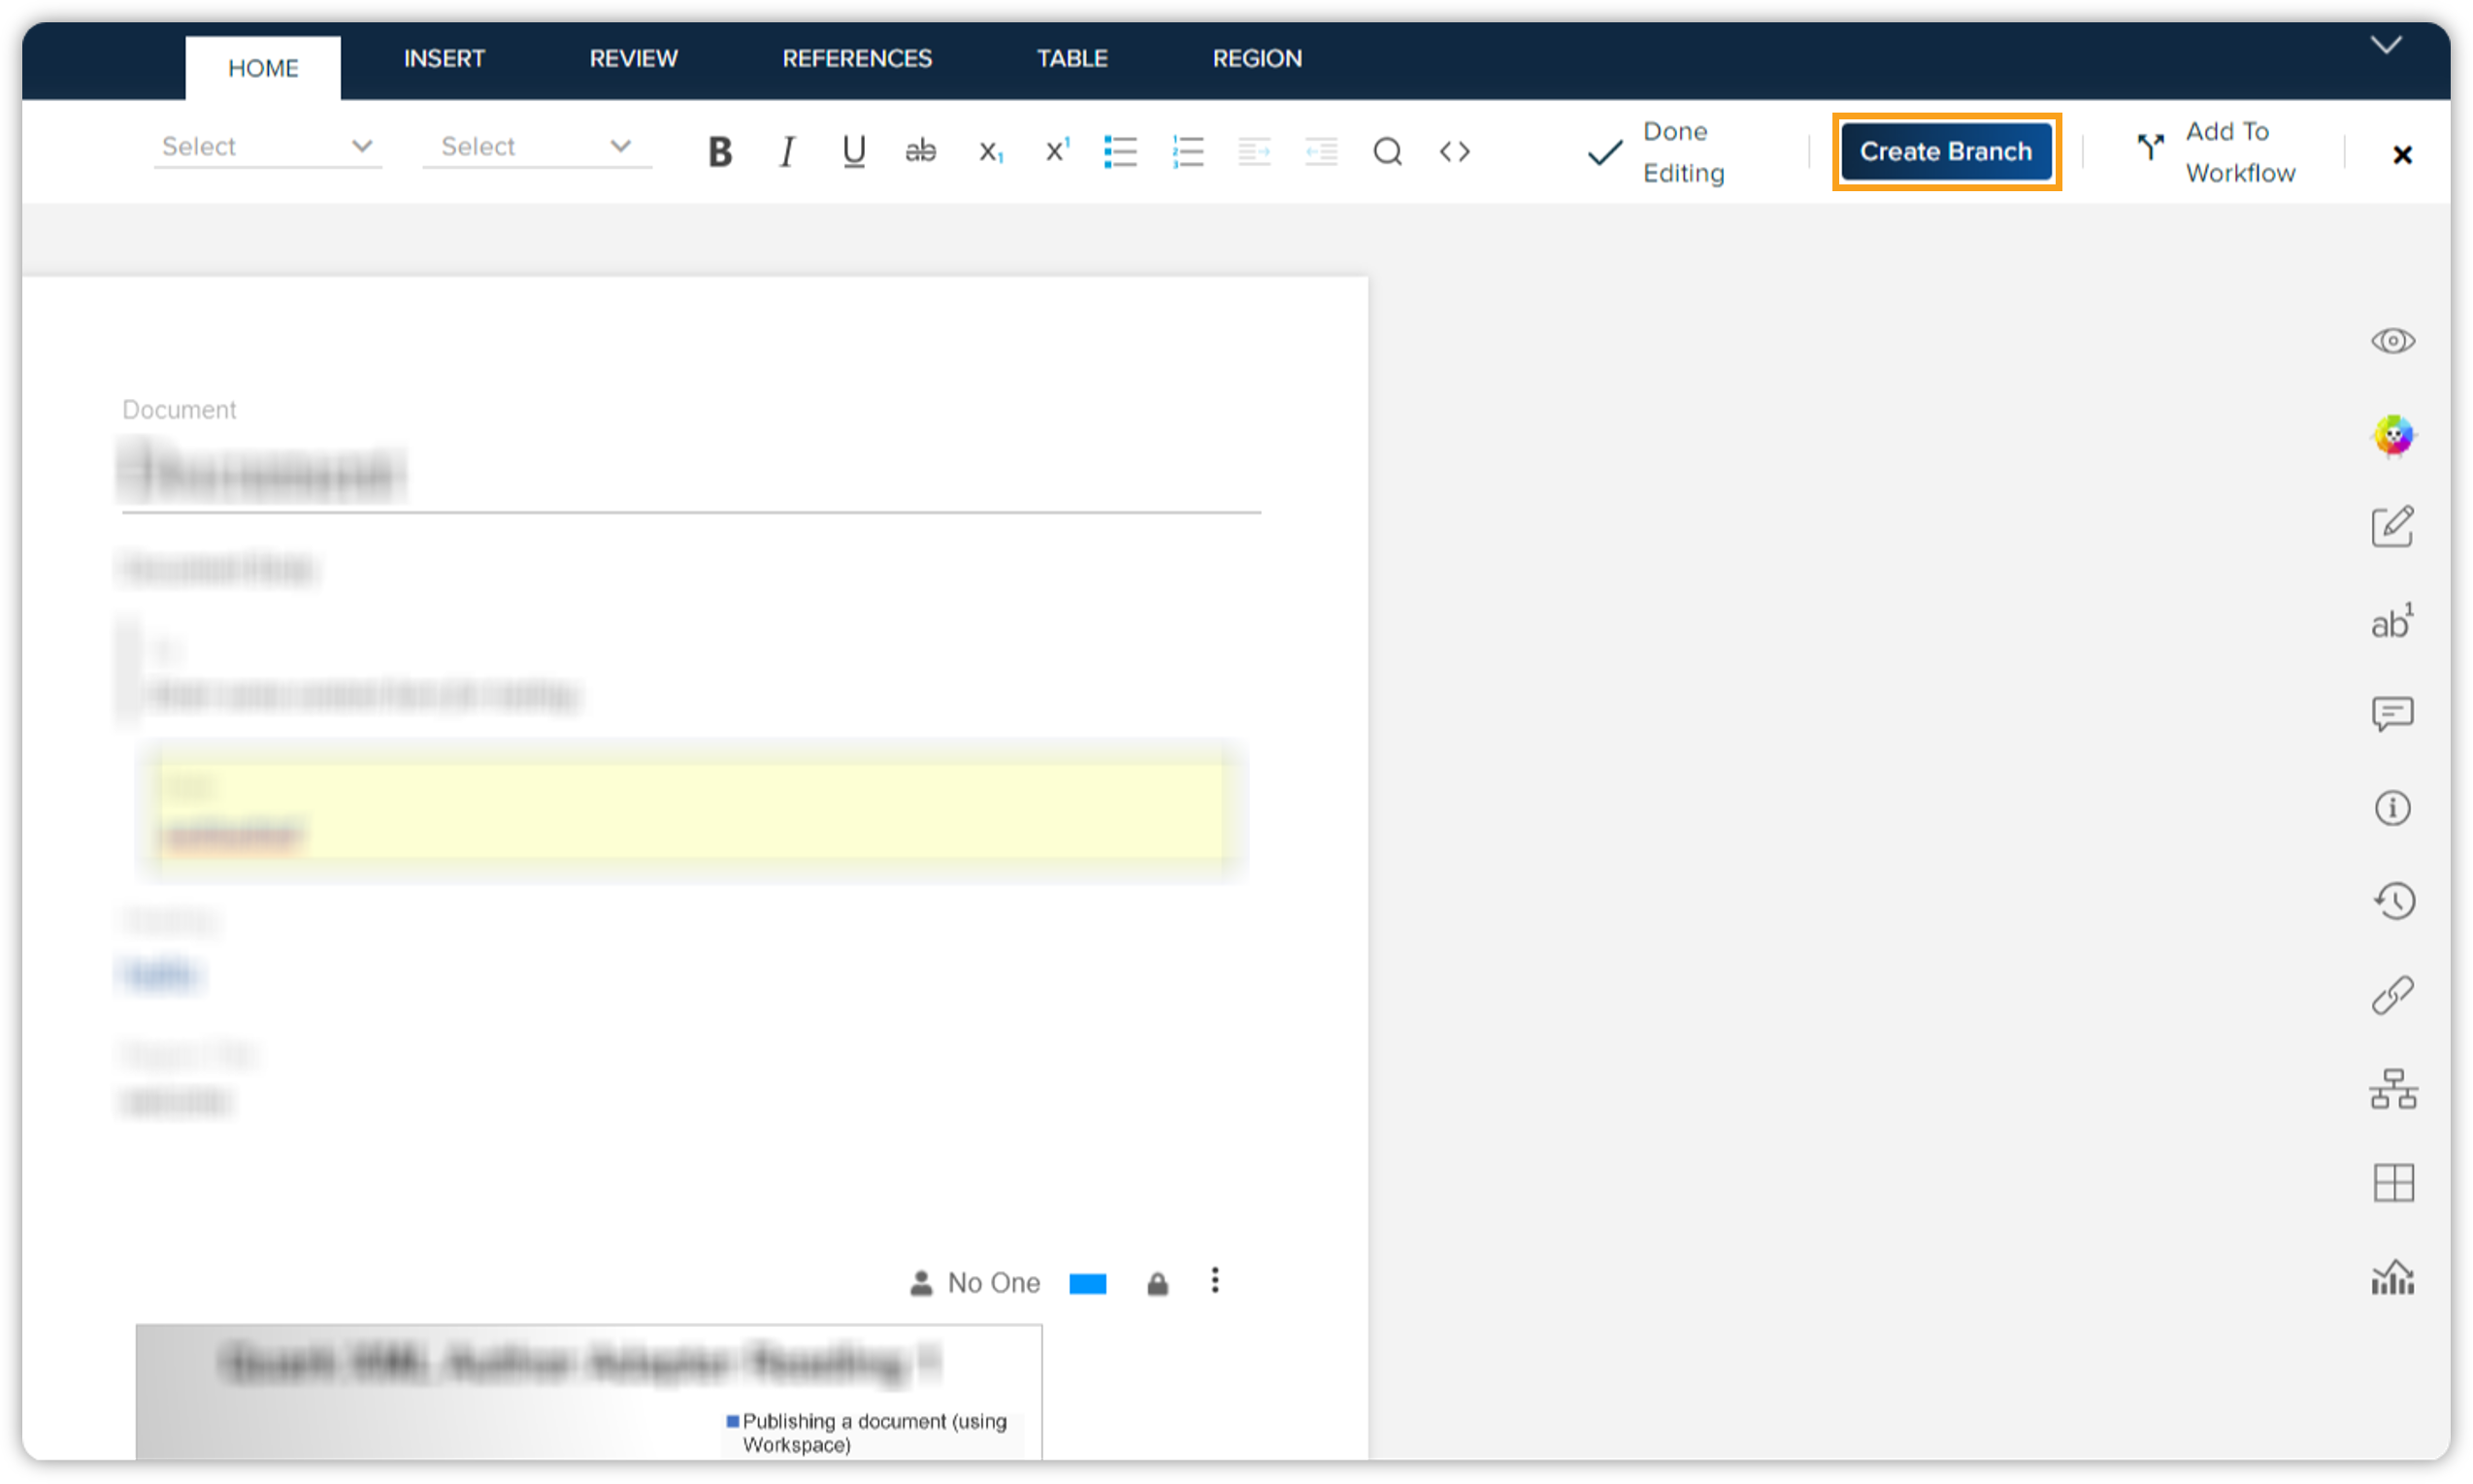
Under the header ribbon of the authoring canvas
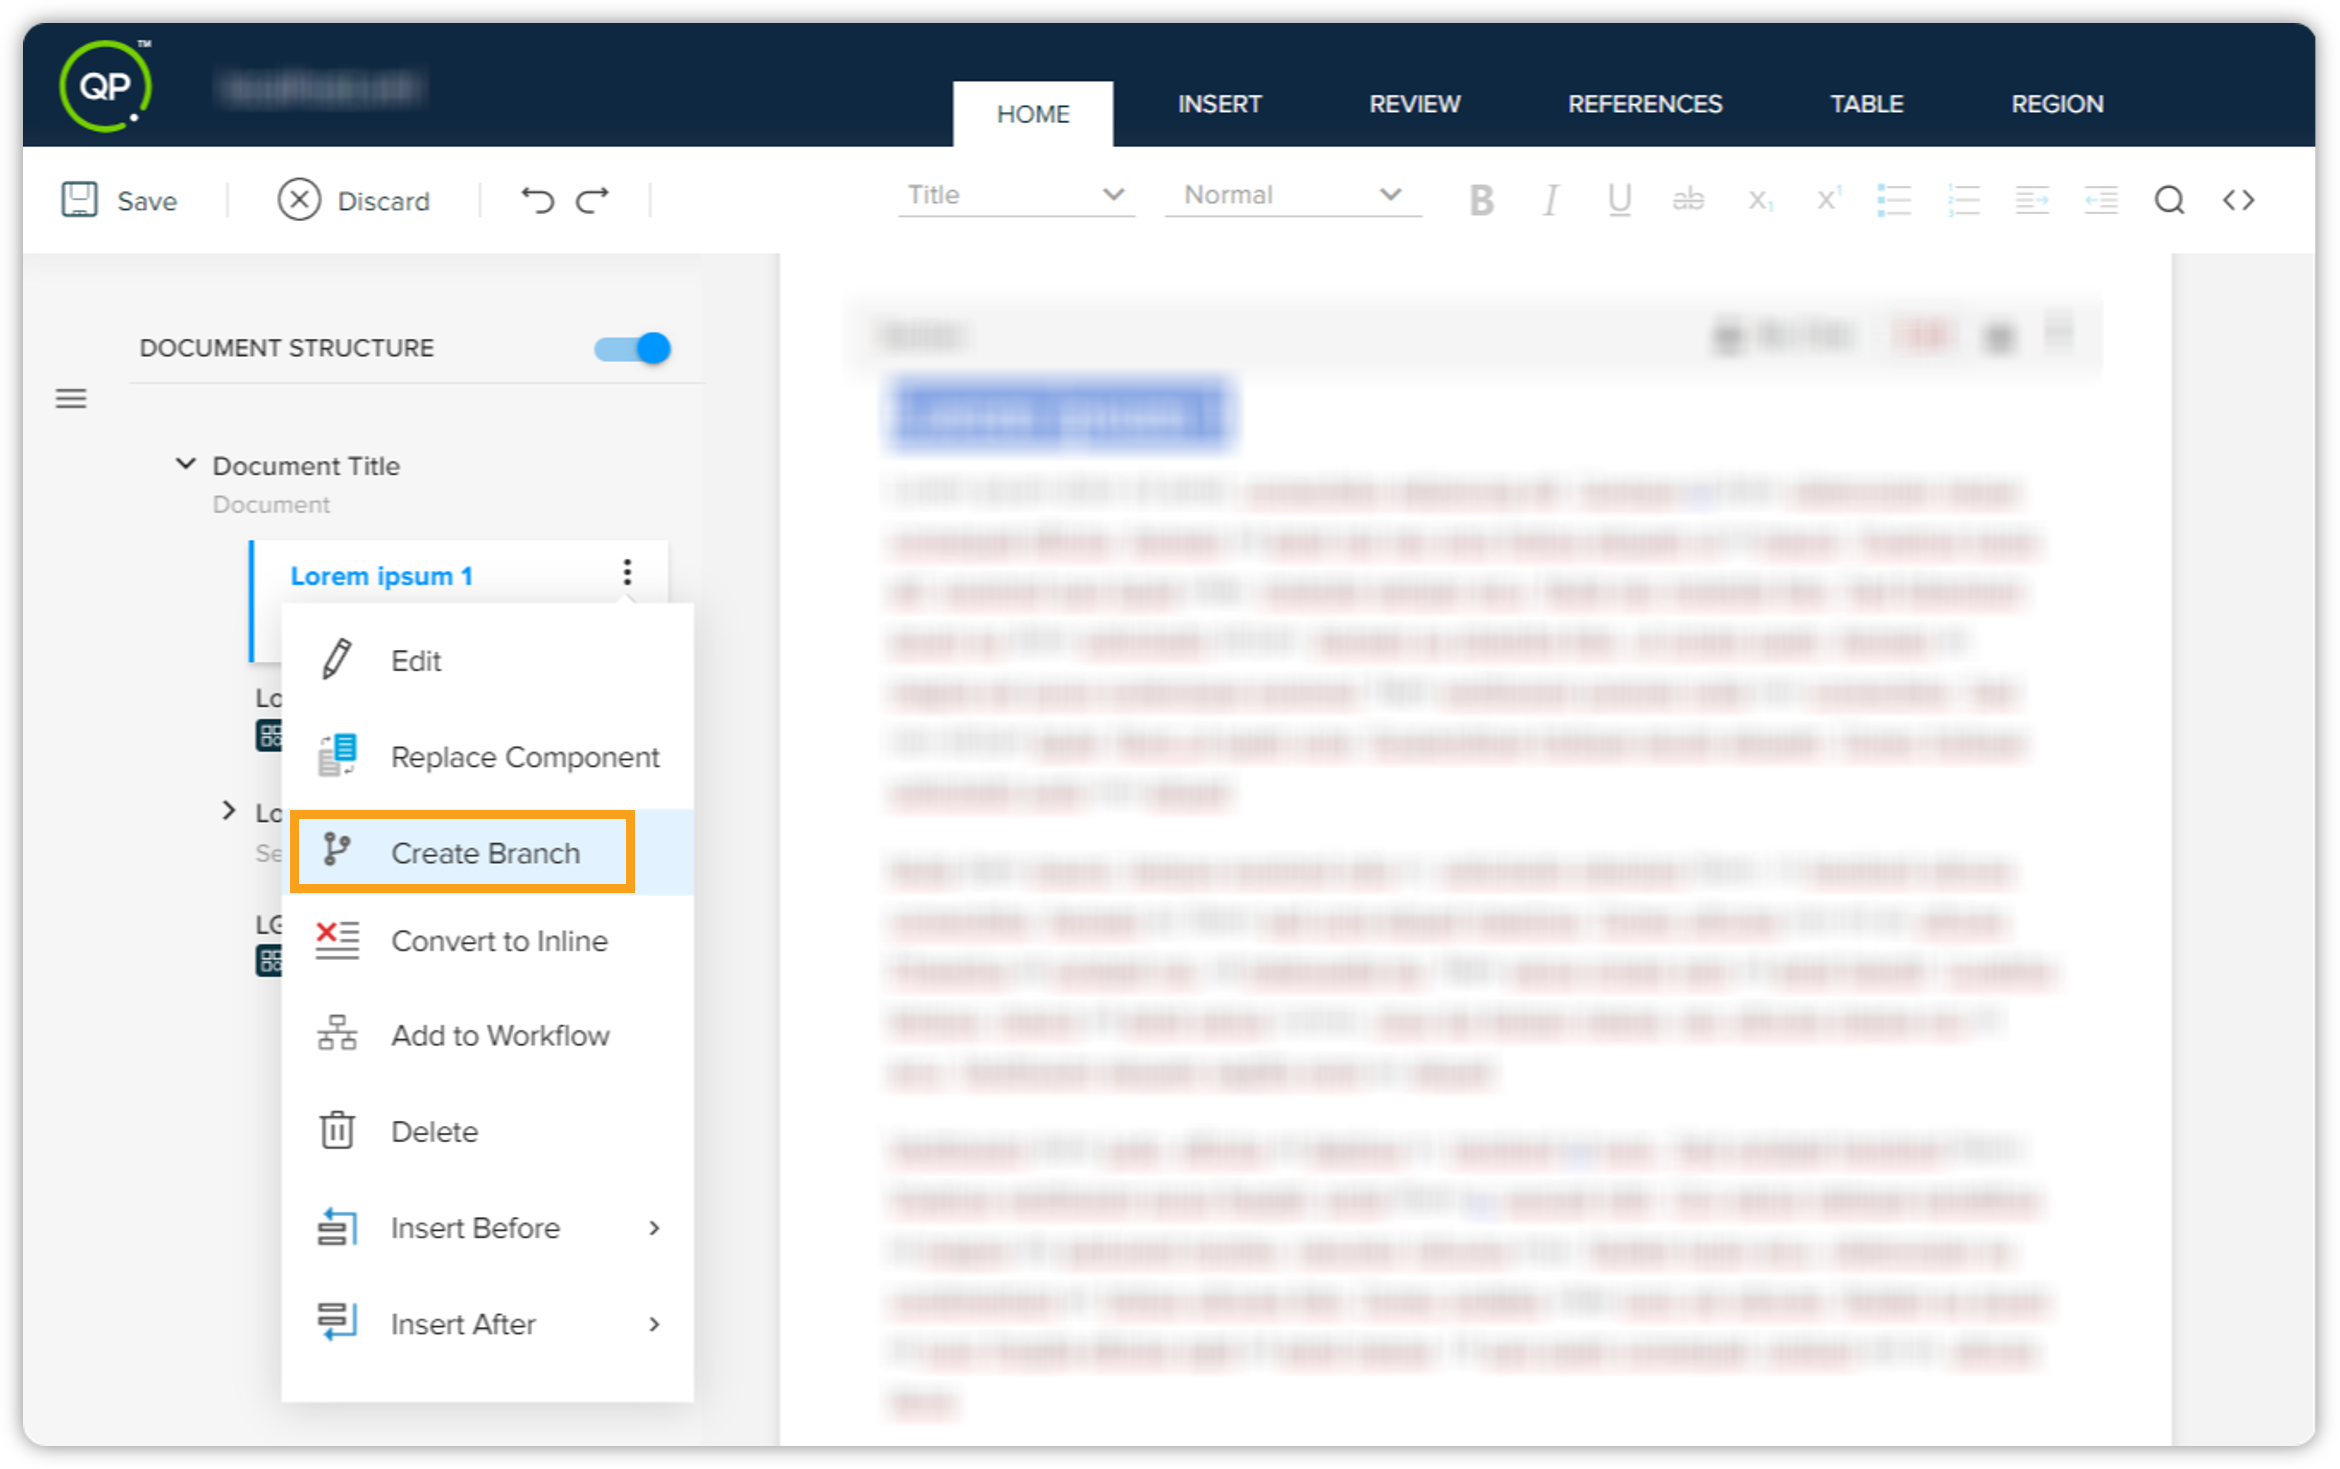
Additionally, QPP also allows you to create a branch of a section from within the navigation menu (through the section context menu) if the section is already available on the server as a component.
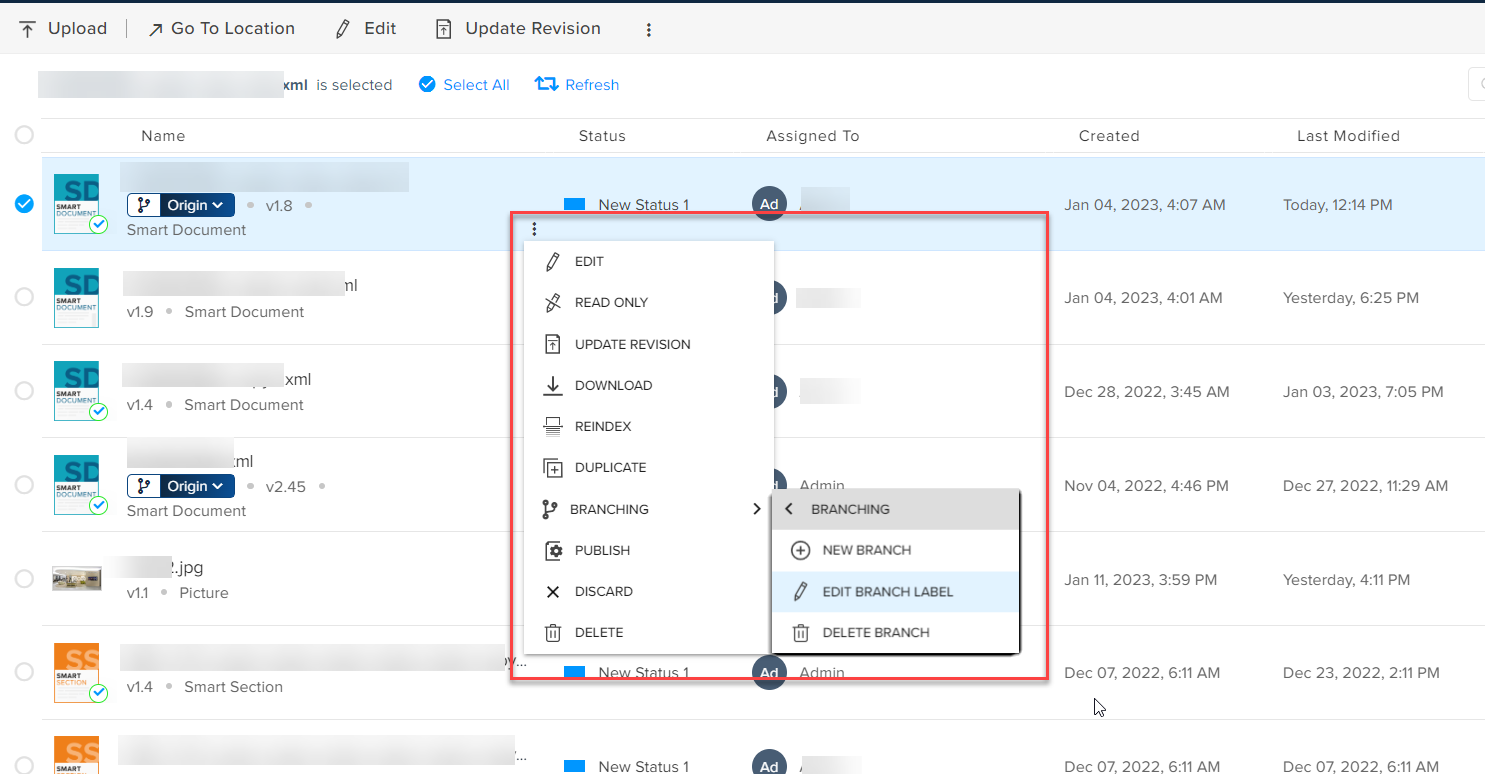
To create a branch:
-
Select the button or context menu option Create Branch (based on where you are on the UI) to open the dialog Create Branch.
-
In the dialog Create Branch, provide a name for the branch in the field Branch Label.
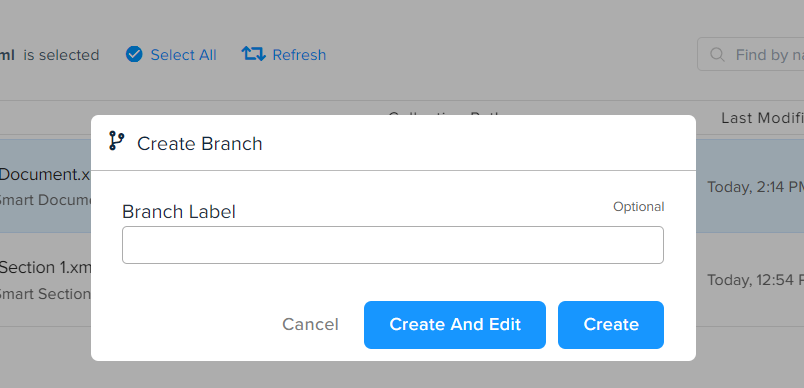 The field Branch Label is optional. When you don't provide a name for the branch, QPP automatically assigns a number to the branch. For more information, see the section Branch Notation.
-
Click Create to save the new branch on the server or click Create and Edit if you want to start working on it right away in the authoring canvas.
Version Number and Branch Notation
QPP increases the version number of an asset by v0.1 every time you edit and check it back into the repository. For example, if you have opened v0.5 of a document to edit, and then when you check in the document, QPP creates v0.6 of the document.
When you create a branch of an asset, QPP creates the branch from the version of the asset you are currently on, which also becomes the parent node of the sub-branch that you have just created.
QPP also automatically assigns a branch number to a branch you create. When you don't assign a custom branch label, QPP sets the automatically assigned branch number as the branch name.
The branch number contains the version/branch number of the parent node, the sequence order of the branch originated from that node, and the version number of the branch. For example, when you create a branch from version 0.5 of the default or the origin branch of the document, QPP assigns branch number 0.5.1.0 to the new branch, where:
-
The last value represents the version number of the branch
-
The second last value represents the sequence order of the branch originated from the same parent node
-
And, the remaining value represents the version/branch number of the parent node
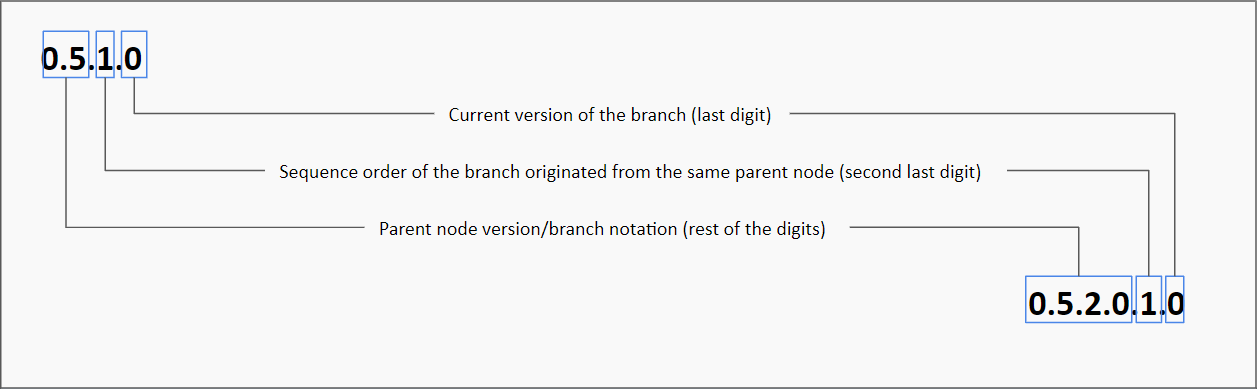
If you create a second branch from version 0.5, the branch number of the second branch would be 0.5.2.0. And if you create a sub-branch from the second branch the branch number would be 0.5.2.0.1.0.
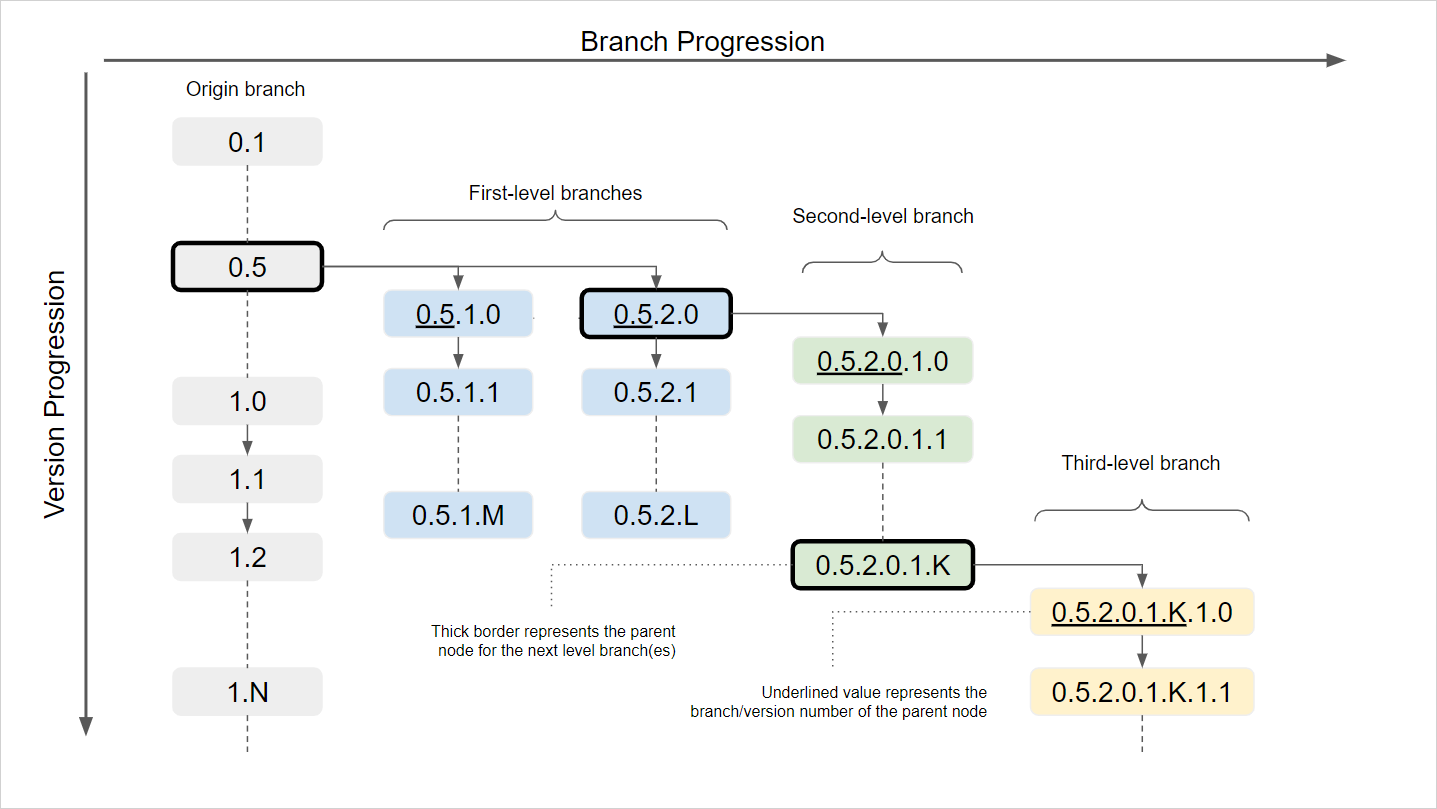
Branch Representation
QPP displays the branching information of an asset (along with the branching icon
 ) at the following places on the user interface:
-
On the listing pages or listing cards, the branch information appears in a pill element right before the version number. For the origin branch, the pill element has a darker color fill.
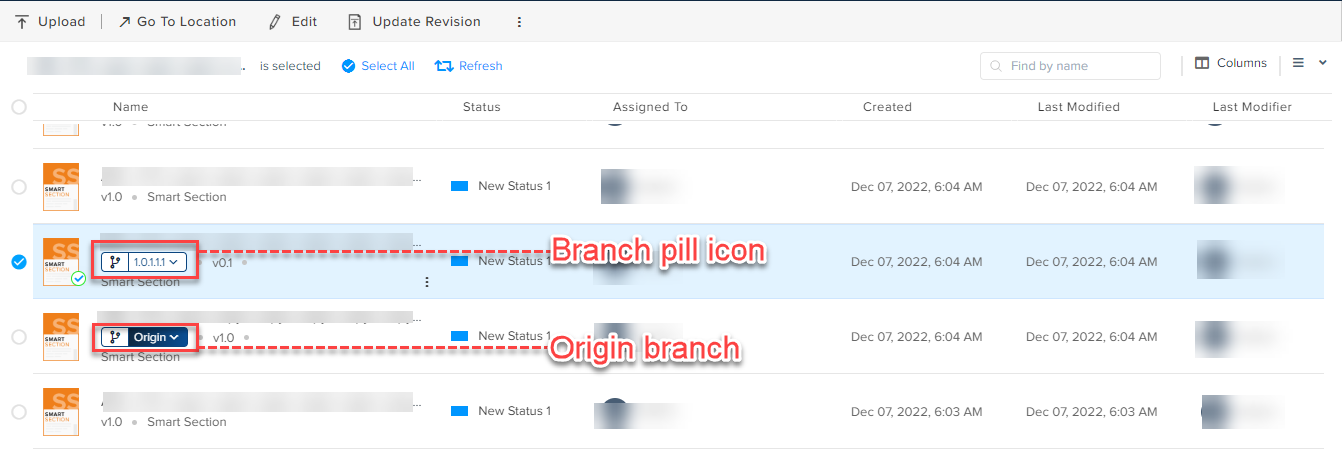
-
On the Asset Details Pane, the branch information appears right below the file name.
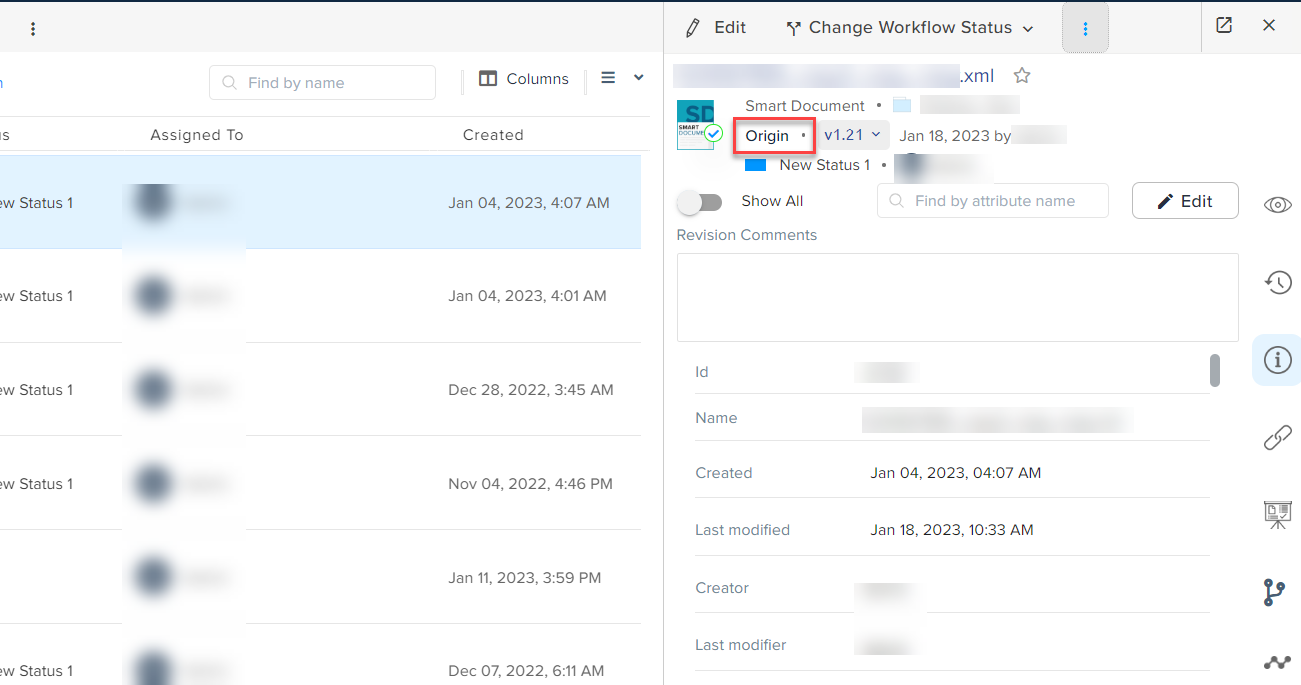
-
On the authoring canvas, the branch information appears in a pill element at the right-hand side of the toolbar ribbon.
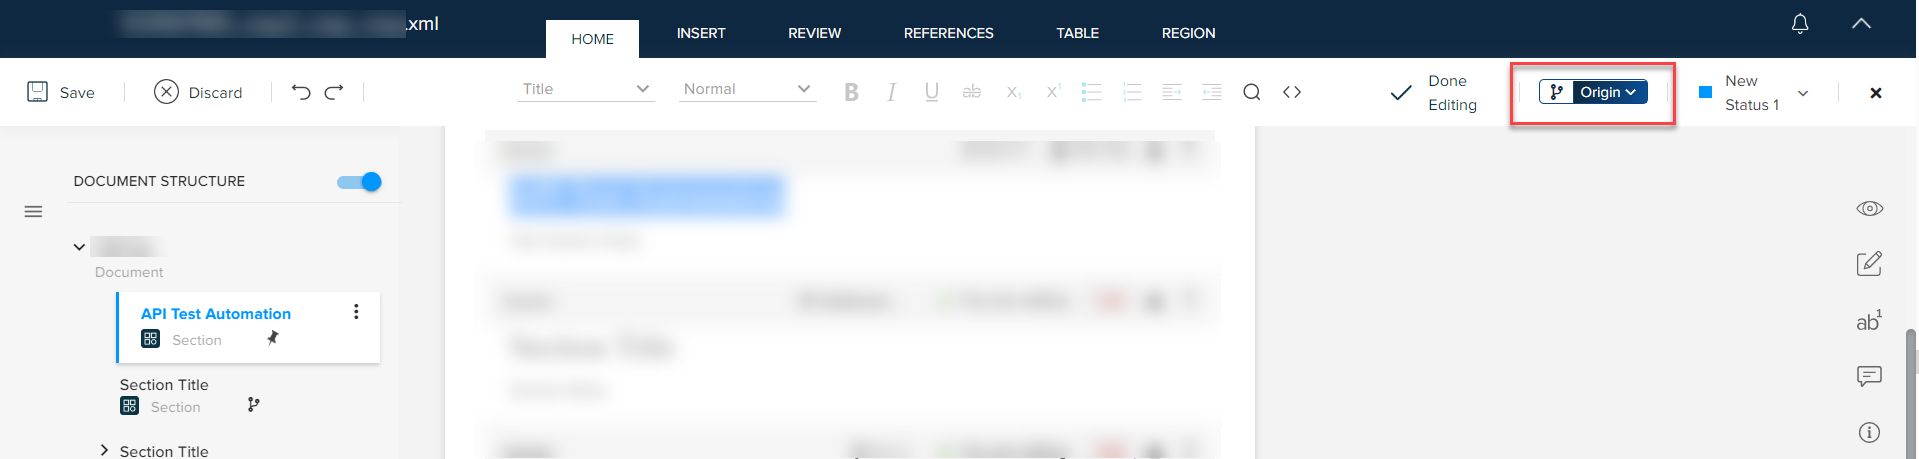
-
On the authoring canvas, QPP also indicates whether a section (component added as a section) has branches by displaying the branching icon
next to it.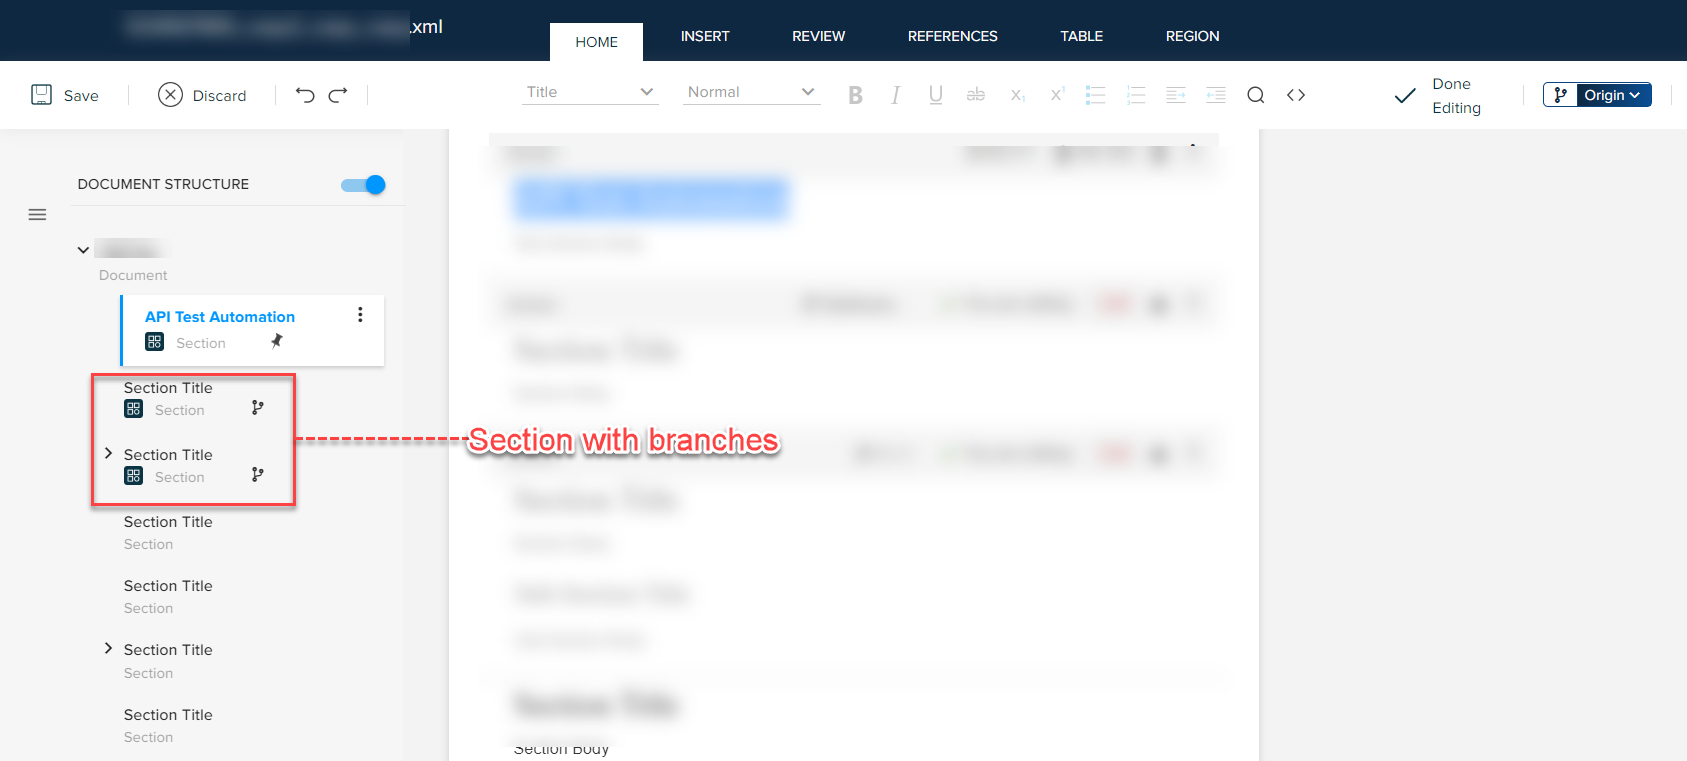
-
Additionally, QPP also displays the branching information along with the listing of assets within the Asset Picker, Replace from Server, and other dialog boxes to insert components in a document.
On all the asset listing pages and dialogs, QPP displays the origin branch selected, by default.
Switch or Select Branch
You can switch or select the branch of an asset from the branch information pill element, which appears at the following locations on the user interface:
-
On all the asset listing pages
-
On the right-hand side of the toolbar ribbon on the authoring canvas
-
On the Asset Picker, Replace from Server, Insert from Server and other dialog boxes insert components in a document
To switch or select the branch of an asset:
-
Select the dropdown menu icon on the branch information pill element to expand the list of branches available for the asset.
-
Select the branch you want to switch to.
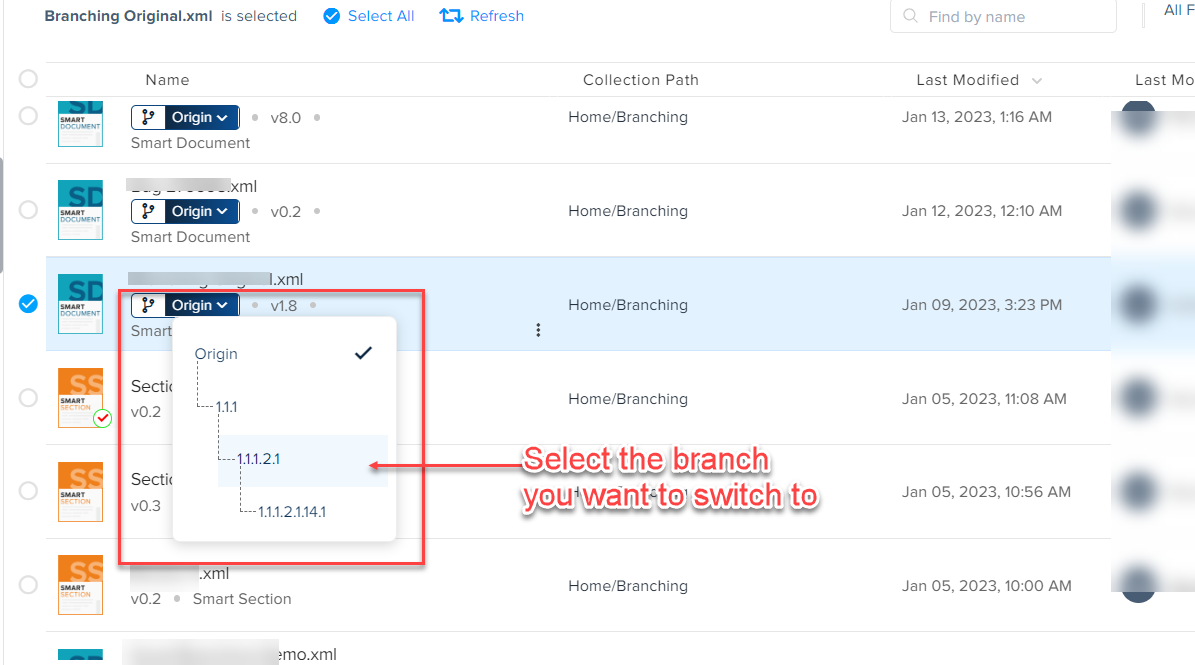
Additionally, you can also switch/select the branch of a component of your document from within the navigation menu of the authoring canvas.
To switch or select the branch of a component in your document:
-
In the navigation menu of the authoring canvas, select the kebab menu icon against the section (for which branches are available) to expand the context menu.
-
In the context menu, select the option Branching > Switch Branch to open the Switch Branch dialog.
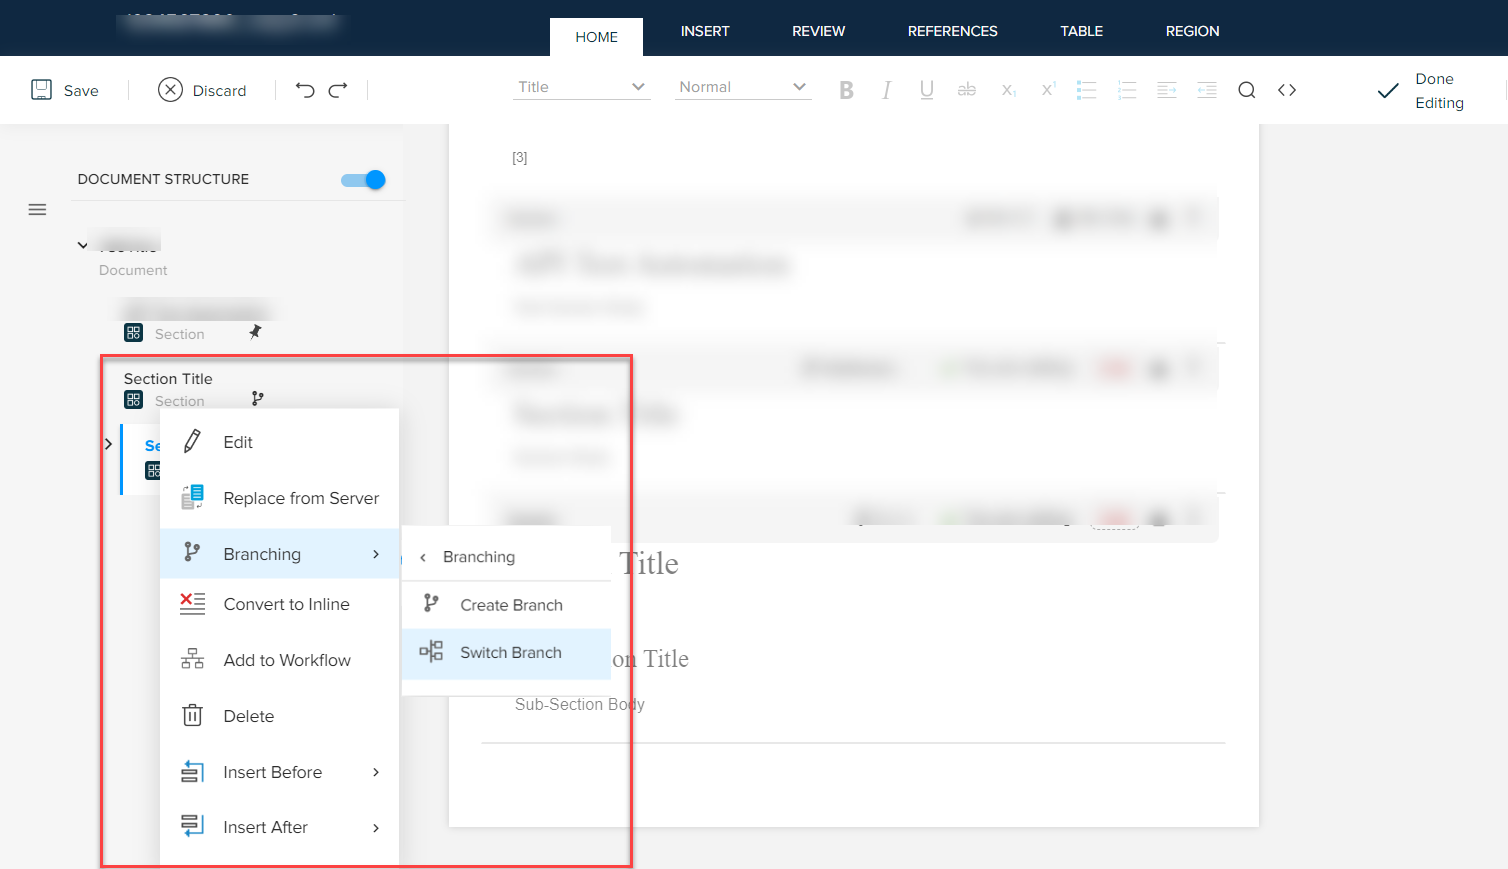
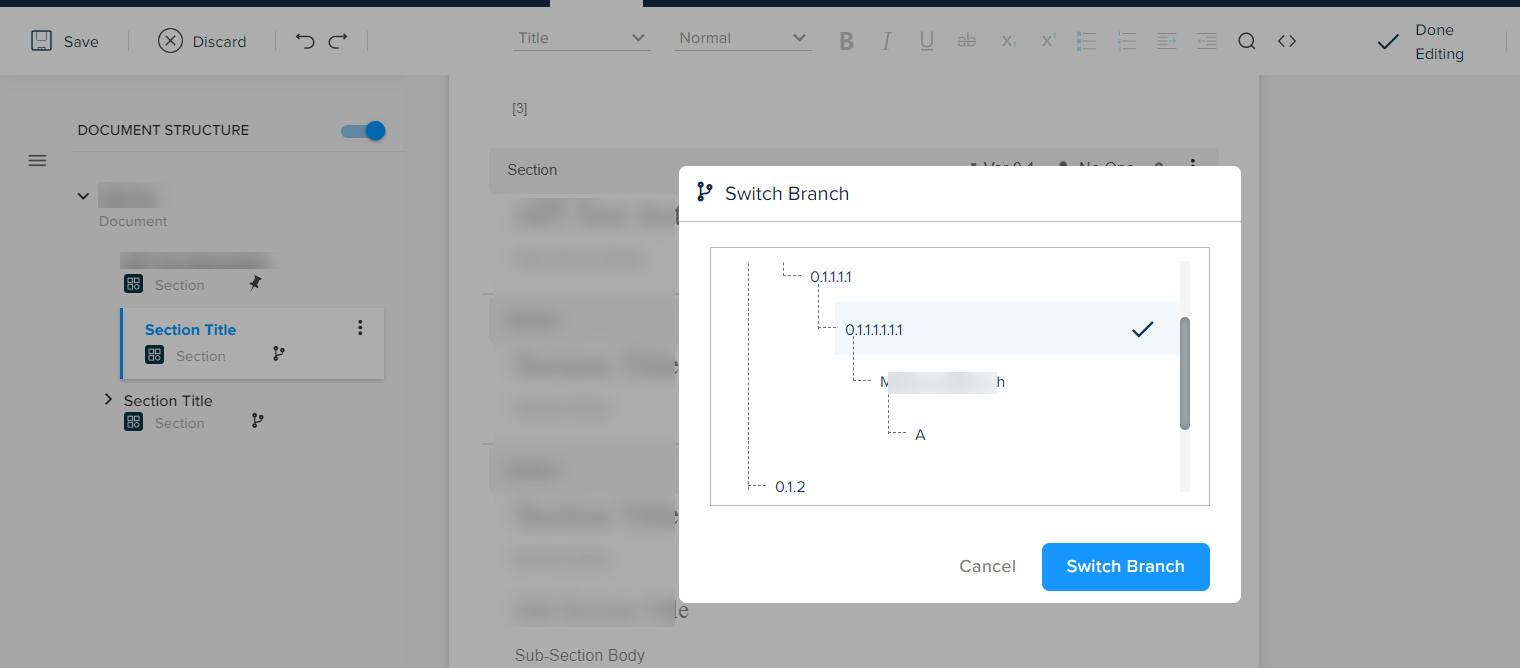
-
In the Switch Branch dialog, select the branch you want to switch to and then select the button Switch Branch.